linux 知识点补充
2018-08-02 20:36
337 查看
1 mkdir -p参数
-p 参数用于创建多级目录是时。 比如我们要创建 a 目录和a目录下的b目录:mkdir -p a/b
还可以在多个文件夹下创建,比如在A,B,C 三个目录下穿件test 目录:
mdkir -p {a,b,c}/test创建a目录并在在 a 目录下创建 b,c 两个目录:
mkdir -p a/{b,c}2 tar 参数 原文档 http://tech.mclarian.com/a/137#viewSource
-c :建立一个压缩文件的参数指令(create 的意思)。-x :解开一个压缩文件的参数指令。
-t :查看 tarfile 里面的文件。特别注意,在参数的下达中,c/x/t 仅能存在一个,不可同时存在, 因为不可能同时压缩与解压缩。
-z :使用gzip进行压缩打包文档。
-j :使用bzip2进行压缩打包文档。
-v :压缩的过程中显示文件。这个常用,但不建议用在背景执行过程。
-f :使用档名。请留意,在 f 之后要立即接档名,不要再加参数。例如使用“tar -zcvfP tfile sfile”就是错误的写法,要写成“tar -zcvPf tfile sfile”才对。(关于这点我保留意见,因为平时我解压,都是-xvfz….没见有神马不对的….也许是改进了?)
-p :使用原文件的原来属性(属性不会依据使用者而变)。
-P :可以使用绝对路径来压缩。
-N() :比后面接的日期(yyyy/mm/dd)还要新的才会被打包进新建的文件中。
–exclude FILE:在压缩的过程中,不要将 FILE 打包。
问题: 1 tar: Removing leading `/’ from member names”的错误
| 其原因是tar默认为相对路径,使用绝对路径的话就回报这个错,可以使 用-P参数(注意大写)解决这个问题
[root@iZryxshkbkz2x2Z a]# tar -jPcf shell.tar /root/shell
3 grep命令
3-1 定义
定义: 在文件中搜素符合条件的字符串,如果需要匹配,使用正则表达式进行匹配。
[root@iZryxshkbkz2x2Z ~]#  grep savepath ./backups.sh
savepath=/root/tar/$(date +%F_%H%M)
if [ ! -d  $savepath ]
mkdir -p $savepath
tar -jPcf $savepath/96.tar /www/wwwroot/default/96weixin.ewm
3-2 grep 中的 或:
grep -E 'bin|sacepath' ./backups.sh # 重点一定要加E参数。将范本样式为延伸的普通表示法来使用,意味着使用能使用扩展正则表达式
3-3 grep 中的 与
grep pattern1 files | grep pattern2 //显示既匹配 pattern1 又匹配 pattern2 的行。[root@iZryxshkbkz2x2Z ~]# grep 'mkdir' backups.sh | grep 'savepath' mkdir -p $savepath
4 find 命令
4-1 定义

[root@iZryxshkbkz2x2Z find]# ls
testABC.txt  testA.txt  testB.txt  test.txt
[root@iZryxshkbkz2x2Z find]# find . -name test
[root@iZryxshkbkz2x2Z find]# find . -name test.txt  # 所以find完全匹配
./test.txt
4-2 使用 通配符

***** :
[root@iZryxshkbkz2x2Z find]# ls
test  testA  testABC
[root@iZryxshkbkz2x2Z find]# find ./ -name 'test*'
./testABC
./test
./testA
? :
[root@iZryxshkbkz2x2Z find]# ls
test  testA  testABC
[root@iZryxshkbkz2x2Z find]# find . -name 'test?'
./testA
[] :
find . -name 'test[AB]' 碰到tes后跟 A 或 B 就返回,注意只返回一个
[root@iZryxshkbkz2x2Z find]# ls
test  testA  testABC  testBc
[root@iZryxshkbkz2x2Z find]# find . -name 'test[AB]'
./testA
4-3 find命令按照时间查找
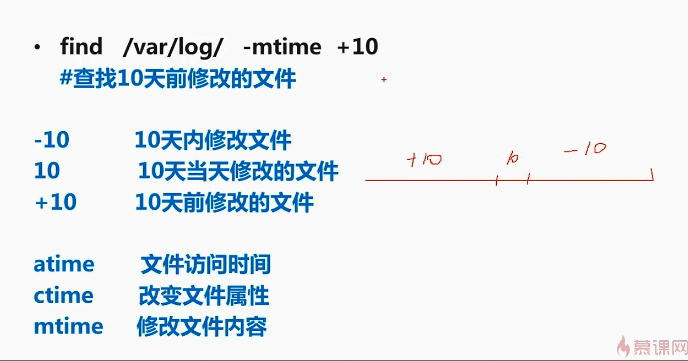
[root@iZryxshkbkz2x2Z ~]# find ./  -mtime 2
./shell/if.sh
./shell/a.txt
./shell/for.sh
./shell/while.sh
./shell/.until.swp
4-4 find 按照文件大小查找
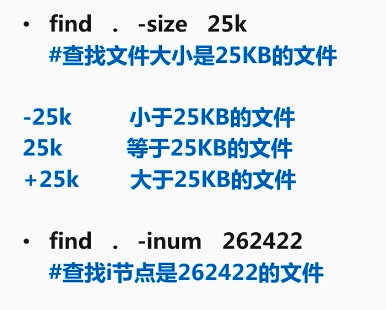

[root@iZryxshkbkz2x2Z ~]# find . -size +20k -a -size -10M; # 注意,k小写,M大写。
./.acme.sh/acme.sh
5 查看系统内存
5-1 free -m
https://blog.csdn.net/makang456/article/details/78694120[root@iZryxshkbkz2x2Z default]# free -m total used free shared buffers cached Mem: 996 883 112 103 62 456 -/+ buffers/cache: 365 630 Swap: 1024 57 967
总内存: total 996M
系统使用内存: userd - free - buffers - cached (-buffer/cached)
系统剩余内存: free + buffers + cached (+buffer/cached)
5-2 proc/meminfo
[root@iZryxshkbkz2x2Z ~]# cat /proc//meminfo
MemTotal:        1019988 kB
MemFree:          347060 kB
Buffers:           24876 kB
Cached:           305160 kB
SwapCached:         8828 kB
Active:           242408 kB
Inactive:         356236 kB
Active(anon):     158404 kB
Inactive(anon):   216016 kB
Active(file):      84004 kB
Inactive(file):   140220 kB
Unevictable:           0 kB
Mlocked:               0 kB
6 获取系统信息
6-1 获取系统: uname -o[root@iZryxshkbkz2x2Z ~]# uname -o GNU/Linux
6-2 获取系统版本: [b]cat /etc/issue[/b]
[root@iZryxshkbkz2x2Z ~]# cat /etc/issue
CentOS release 6.10 (Final)
Kernel \r on an \m
6-3 获取系统操作位数: uname - m
[root@iZryxshkbkz2x2Z ~]# uname -m
x86_64
6-4 获取系统发行版本
[root@iZryxshkbkz2x2Z ~]# uname -r
2.6.32-696.10.1.el6.x86_64
6-5 可使用 [b]uname -a 获取以上信息[/b]
[root@iZryxshkbkz2x2Z ~]# uname -a
Linux iZryxshkbkz2x2Z 2.6.32-696.10.1.el6.x86_64 #1 SMP Tue Aug 22 18:51:35 UTC 2017 x86_64 x86_64 x86_64 GNU/Linux
6-6 获取主机名 hostname
[root@iZryxshkbkz2x2Z ~]# hostname
iZryxshkbkz2x2Z
6-7 获取公网ip hostname -I
[root@iZryxshkbkz2x2Z ~]# hostname -I
172.17.0.1
6-8 获取内网 ip
6-9 获取DNS ca /etc/resolv.conf
[root@iZryxshkbkz2x2Z ~]#  cat /etc/resolv.conf
nameserver 100.100.2.136
nameserver 100.100.2.138
options timeout:2 attempts:3 rotate single-request-reopen
6-10 获取当前正在登陆的用户 who
[root@iZryxshkbkz2x2Z ~]# who
root     pts/5        2018-08-16 08:13 (222.173.241.202)
未完待续。。。
7 linux 查看文件或文件夹大小 du
7-1 [b]-s : 仅显示总计,只列出最后加总的值[/b][root@iZryxshkbkz2x2Z ~]# du -s 51000 .
7-2 [b]-h : 以M 统计[/b]
[root@iZryxshkbkz2x2Z ~]# du -sh
50M .
7-3 [b]-a : 递归显示所有文件大小[/b]
[root@iZryxshkbkz2x2Z ~]# du -ah
4.0K    ./b.docx
4.0K    ./backups.sh
4.0K    ./.ssh/known_hosts
4.0K    ./.ssh/id_rsa
4.0K    ./.ssh/id_rsa.pub
4.0K    ./.ssh/authorized_keys
20K ./.ssh
4.0K    ./firewall.sh
20K ./.cache/pip/http/b/b/8/7/6/bb876b2e6a22c2739002e9ef3388ae978b7a6192a19fe67d8b0030f2
24K ./.cache/pip/http/b/b/8/7/6
28K ./.cache/pip/http/b/b/8/7
32K ./.cache/pip/http/b/b/8
36K ./.cache/pip/http/b/b
40K ./.cache/pip/http/b
4.0K    ./.cache/pip/http/f/e/d/0/e/fed0ed508030b766d5b0c2792132c8bf197804464765b46b361f93a4
8.0K    ./.cache/pip/http/f/e/d/0/e
12K ./.cache/pip/http/f/e/d/0
7-4 --max-depth=1 : 显示一级目录大小,重点: [b]不显示文件,只显示目录。[/b]
[root@iZryxshkbkz2x2Z ~]# du -h --max-depth=1  # 重点
20K ./.ssh
80K ./.cache
4.0K    ./.gconf
46M ./tar
8.0K    ./.pip
12K ./a
1.7M    ./.openoffice
4.0K    ./find
600K    ./html
56K ./.subversion
184K    ./.acme.sh
124K    ./shell
1.8M    ./.config
8.0K    ./.pki
50M .
7-5 [b]显示单个文件大小[/b]
[root@iZryxshkbkz2x2Z ~]# du  -h test.txt
4.0K    test.txt
8 ipatables 添加端口
vim /etc/sysconfig/iptables-A INPUT -p tcp -m state --state NEW -m tcp --dport 3306 -j ACCEPT # 添加3306 端口
service iptables restart # 重启iptables
9 linux 关机与重启
1 shutdowf

如立即重启:
shutdown -r now
在5:30 重启服务器:
[root@iZryxshkbkz2x2Z ~]# shutdown -r 05:30

Broadcast message from root@iZryxshkbkz2x2Z
(/dev/pts/5) at 11:12 ...

The system is going down for reboot in 1098 minutes!
取消上一个关机命令:
[root@iZryxshkbkz2x2Z ~]# shutdown -c
shutdown: Shutdown cancelled
[1]+  Done                    shutdown -r 05:30
[root@iZryxshkbkz2x2Z ~]# shutdown -c
shutdown: Cannot find pid of running shutdown
2 其他关机命令
# halt
# poweroff
# init 0
# reboot
# init 6
并不建议使用以上命令,建议使用shutdown。
3 关于linux init
init命令是Linux下的进程初始化工具,init进程是所有Linux进程的父进程,它的进程号为1。init命令是Linux操作系统中不可缺少的程序之一,init进程是Linux内核引导运行的,是系统中的第一个进程
可以在 在/etc/inittab中查看 # 0 - halt (Do NOT set initdefault to this) # 1 - Single user mode # 2 - Multiuser, without NFS (The same as 3, if you do not have networking) # 3 - Full multiuser mode # 4 - unused # 5 - X11 # 6 - reboot (Do NOT set initdefault to this) # id:3:initdefault: 中文: #0 停机(千万不能把initdefault 设置为0) #1 单用户模式 #2 多用户,没有 NFS(和级别3相似,会停止部分服务) #3 完全多用户模式 #4 没有用到 #5 x11(Xwindow) #6 重新启动(千万不要把initdefault 设置为6)
怎么排查linux 宕机原因?
未完待续 。。。
相关文章推荐
- linux知识点随时补充
- Linux知识点补充(一)
- linux学习笔记之三 第六章 知识点补充之目录树结构图
- (补充)linux下编写动态链接库步骤与知识点详解
- linux命令小结 (待补充)
- 【个人】string知识点补充
- 170826 逆向-段寄存器和调用约定的补充知识点
- Linux 知识点
- ios开发知识点补充
- Linux集群服务知识点总结及通过案例介绍如何实现高性能web服务
- linux基本知识点
- Linux下套接字详解(补充)--OSI七层与TCP/IP五层网络架构详解
- Linux_CentOS-服务器搭建 <五> 补充
- Linux小知识点
- Linux下知识点整理(二)
- linux系统下用到的小知识点积累
- Linux新手要了解的十个知识点
- Linux学习到的一些小知识点(vim 的使用)
- (框架)新手了解的一部分知识点--慢慢补充
- Linux新手要了解的十个知识点