微信小程序 - 实现微信支付
2018-07-14 00:02
603 查看
微信小程序在微信的生态内,接入微信付一定是小程序开发中必须实现的一个功能,这里分享下小程序实现微信支付功能开发流程和思路。
参考文档:[微信支付开发文档]
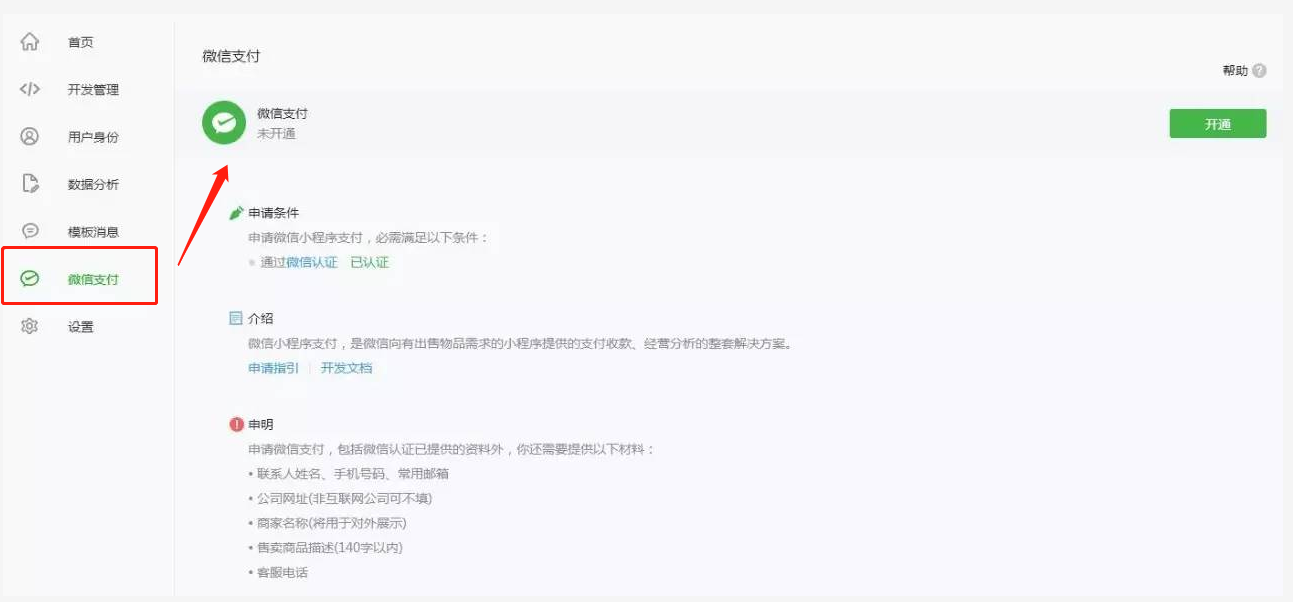
1、准备工作:开通微信支付和微信商户号
没有开通微信支付的小程序,将不能实现使用微信支付。当然也没啥,可以按照步骤来申请,但是申请成功后发给你的邮件一定要保存,此邮件包含开发时需要使用的支付账户信息 。
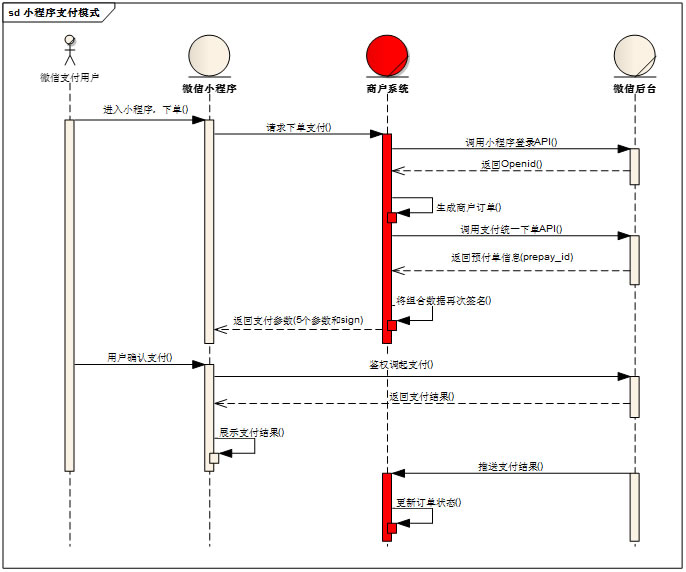
2、弄清楚开发流程
业务流程时序图如下:
3.用户请求下单支付
前台代码:小程序调起支付
4、后台生成订单,之后调用微信统一下单API,数据签名后返回前台支付参数
代码很 low 但是这样简单几步,小程序的微信支付功能就简单实现了,文章仅仅提供了一个思路,具体实现根据自己项目而定。
水平有限,若有问题请留言交流!
互相学习,共同进步 :) 转载请注明出处谢谢!
参考文档:[微信支付开发文档]
1、准备工作:开通微信支付和微信商户号
没有开通微信支付的小程序,将不能实现使用微信支付。当然也没啥,可以按照步骤来申请,但是申请成功后发给你的邮件一定要保存,此邮件包含开发时需要使用的支付账户信息 。
2、弄清楚开发流程
业务流程时序图如下:
3.用户请求下单支付
前台代码:小程序调起支付
formSubmit: function (e) {
var that = this
wx.request({
url: url + "pay/buyGoods",
method: 'POST', // OPTIONS, GET, HEAD, POST, PUT, DELETE, TRACE, CONNECT
header: { 'Content-Type': 'application/json' },
data: {
token: app.globalData.token, // 用户标识
goodsId: that.data.goodsId, //商品id
phone: e.detail.value.phone, //付款用户电话
},
success: function (res) {
if (res.data.data != null) {
//调起微信支付
wx.requestPayment({
timeStamp: res.data.data.timeStamp,
nonceStr: res.data.data.nonceStr,
package: res.data.data.packages,
signType: 'MD5',
paySign: res.data.data.paySign,
success: function (ress) {
wx.showToast({
title: '支付成功',
icon: 'success',
duration: 3000,
success: function () {
},
fail: function (res) {
wx.showToast({
title: '支付失败',
icon: 'success',
duration: 3000,
success: function () {
},
})
}
})
}
})
}
}
})
}
4、后台生成订单,之后调用微信统一下单API,数据签名后返回前台支付参数
@Controller
@RequestMapping("/pay")
public class TransferController {

private static final Logger LOG = Logger.getLogger(TransferController.class);

// 调用该接口在微信支付服务后台生成预支付交易单,返回正确的预支付交易
private static final String USER_PAY = "https://api.mch.weixin.qq.com/pay/unifiedorder";

// 小程序ID
private static final String APP_ID = ConfigUtil.getProperty("wx.appid");

// 商户号
private static final String MCH_ID = ConfigUtil.getProperty("wx.mchid");

// API密钥
private static final String API_SECRET = ConfigUtil.getProperty("wx.api.secret");

@Autowired
private TransferService transferService;

@Autowired
private WedoWxpayService wedoWxpayService;

@RequestMapping(value = "/buyGoods")
public @ResponseBody Map<String, String> buyGoods(HttpServletRequest req, HttpServletResponse resp)
throws Exception {
req.setCharacterEncoding("utf-8");
resp.setCharacterEncoding("utf-8");
resp.setContentType("text/html;charset=UTF-8");

String sum= req.getParameter("phone"); // 电话
String goodsId= req.getParameter("goodsId");// 商品id

// 发起预付款
Map<String, String> map = new HashMap<String, String>();
Map<String, String> restmap = null;
String payId = "";
try {
Map<String, String> parm = new HashMap<String, String>();
parm.put("appid", APP_ID); // 公众账号appid
parm.put("mch_id", MCH_ID); // 商户号
parm.put("nonce_str", PayUtil.getNonceStr()); // 随机字符串
parm.put("out_trade_no", PayUtil.getTransferNo()); // 商户订单号
parm.put("total_fee", sum); // 付款金额sum
parm.put("body", "xxx支付"); // 付款描述信息
parm.put("spbill_create_ip", PayUtil.getLocalIp(req)); // Ip地址
parm.put("trade_type", "JSAPI"); // 交易类型
// 支付成功后的一个通知地址(接收微信支付异步通知回调地址)
parm.put("notify_url", "http://xxx/xxx/transfer/Notify");
parm.put("sign", PayUtil.getSign(parm, API_SECRET)); // 签名

// 预支付请求
String restxml = HttpUtils.posts(USER_PAY, XmlUtil.xmlFormat(parm, false));
// 预支付返回解析
restmap = XmlUtil.xmlParse(restxml);
String prepay_id = "prepay_id=" + restmap.get("prepay_id").toString();

// 返回给小程序前端的信息
Map<String, String> result = new HashMap<String, String>();
Map<String, String> resultMap = new HashMap<String, String>();
result.put("appId", APP_ID); // 公众账号appid
result.put("nonceStr", PayUtil.getNonceStr()); // 随机字符串
result.put("package", prepay_id);
result.put("timeStamp", new Date().getTime() / 1000 + "");
result.put("signType", "MD5");

resultMap.put("nonce_str", result.get("nonceStr"));
resultMap.put("package", prepay_id);
resultMap.put("timeStamp", result.get("timeStamp"));
resultMap.put("signType", "MD5");
resultMap.put("paySign", PayUtil.getSign(result, API_SECRET)); // 再次签名
map = resultMap;

payId = transferService.insert(parm.get("total_fee"),openid.replaceAll("\"", ""), parm.get("out_trade_no"),parm.get("body"), parm.get("spbill_create_ip"), prepay_id, result.get("timeStamp"), sum,goodsId);
} catch (Exception e) {
LOG.error(e.getMessage(), e);
}
map.put("payId", payId);
return map;
}

/**
* 支付结果通知
*
* @param req
* @param resp
* @return
* @throws Exception
*/
@RequestMapping(value = "/Notify")
public @ResponseBody String Notify(HttpServletRequest req, HttpServletResponse resp) throws Exception {
// 1.获取微信通知的参数
String inputLine;
String notityXml = "";
try {
while ((inputLine = req.getReader().readLine()) != null) {
notityXml += inputLine;
}
req.getReader().close();
} catch (Exception e) {
e.printStackTrace();
return null;
}
Map<String, String> resultMap = XmlUtil.xmlParse(notityXml);
String resultCode = resultMap.get("result_code");
System.out.println(resultMap);
if (resultCode == "SUCCESS" || "SUCCESS".equals(resultCode)) {
System.out.println(resultCode);
// 2.更新订单的相关状态
String outtradeno = resultMap.get("out_trade_no");
transferService.updateByOutNo(outtradeno);
} else {
return null;
}
// 3.返回一个xml格式的结果给微信服务器
Map<String, String> parm = new HashMap<String, String>();
parm.put("return_code", "SUCCESS");
parm.put("return_msg", "OK");
return XmlUtil.xmlFormat(parm, false);
}

}
代码很 low 但是这样简单几步,小程序的微信支付功能就简单实现了,文章仅仅提供了一个思路,具体实现根据自己项目而定。
水平有限,若有问题请留言交流!
互相学习,共同进步 :) 转载请注明出处谢谢!

相关文章推荐
- webview实现支付后的业务逻辑处理,小程序webview完成微信支付后的处理方法——微信web-view高级用法12
- 微信小程序与php 实现微信支付的简单实例
- 微信小程序实现微信支付功能
- 微信小程序中实现微信支付
- 微信小程序中实现微信支付
- 微信小程序 ecshop地址三级联动实现实例代码
- 微信小程序分页效果实现
- 微信小程序利用canvas实现蜘蛛网图
- 微信小程序canvas 实现信用图表
- 详细介绍微信小程序使用WEB-VIEW控件进行微信支付
- 微信小程序-详解微信登陆、微信支付、模板消息 超级详细
- 微信小程序下拉刷新上拉加载的两种实现方法
- 微信小程序使用template标签实现五星评分功能
- 微信小程序实现动态添加标签(1)
- 微信小程序实现点击按钮移动view标签的位置功能示例【附demo源码下载】
- 微信小程序下拉刷新界面的实现
- 微信小程序获取用户openId的实现方法
- 微信小程序 --- CSS实现仿网易云音乐播放界面效果(黑胶唱片与唱针纯CSS实现)
- 小程序与php 实现微信支付