Eureka2.0集群 高可用的认证服务实现与搭建
2018-05-28 15:28
931 查看
Springboot-2.0.2.RELEASE Eureka认证后,服务注册失败问题。
随着近几年微服务架构和Docker容器概念的火爆,也会让Spring Cloud在未来越来越“云”化的软件开发风格中立有一席之地,尤其是在目前五花八门的分布式解决方案中提供了标准化的、全站式的技术方案,意义可能会堪比当年Servlet规范的诞生,有效推进服务端软件系统技术水平的进步。
SpringCloud Eureka是SpringCloud Netflix服务套件中的一部分,它基于Netflix Eureka做了二次封装,主要负责完成微服务架构中的服务治理功能。今天就来讲讲Eureka的高可用实现与搭建
从上面的配置可以看出我们配置了3个Euerka服务,端口号分别是8001和8002与8003。
验证的用户名和密码是:admin:123123
到这代码就基本完了,本地已经可以运行了。
启动前先在hosts文件添加内容如下:
127.0.0.1 eureka1
127.0.0.1 eureka2
127.0.0.1 eureka3
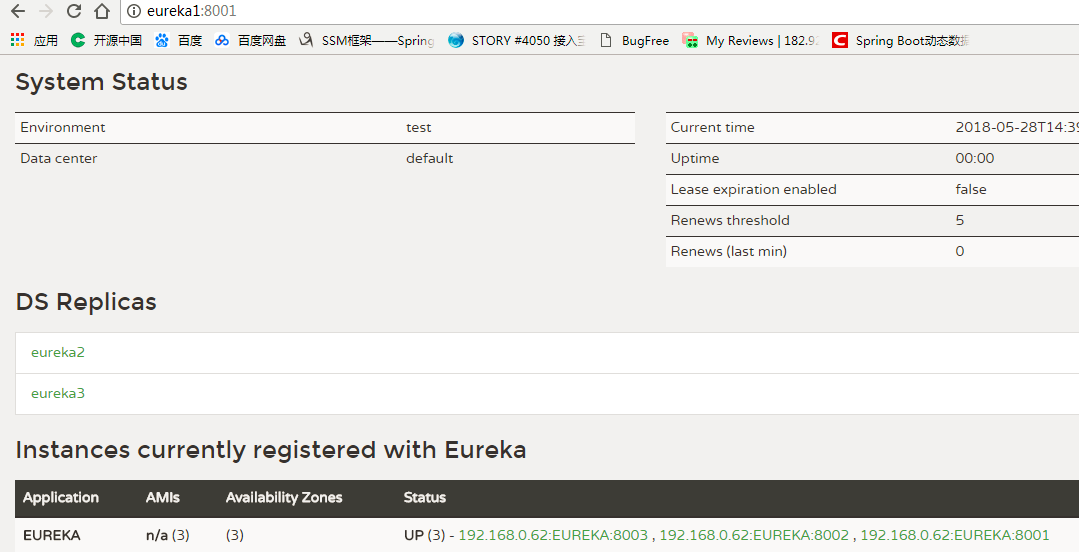
分别启动3个配置eureka1,eureka2,eureka3,启动后到浏览器输入:http://eureka1:8001/ 输入你的用户名和密码。
敲黑板: 页面中Instances currently registered with Eureka下面并没得注入的别的服务,各种搜索引擎各种收,没得个所以然,去掉Spring Security后问题解决,可以知道问题是Spring Security引起的,查看源码发现CSRF保护默认是开启的,可以禁用掉即可。
停止脚本:
后面的脚本我自己没验证,我也不怎么会写脚本,如果那个大神提供更好的脚本,小编感激不尽
随着近几年微服务架构和Docker容器概念的火爆,也会让Spring Cloud在未来越来越“云”化的软件开发风格中立有一席之地,尤其是在目前五花八门的分布式解决方案中提供了标准化的、全站式的技术方案,意义可能会堪比当年Servlet规范的诞生,有效推进服务端软件系统技术水平的进步。
SpringCloud Eureka是SpringCloud Netflix服务套件中的一部分,它基于Netflix Eureka做了二次封装,主要负责完成微服务架构中的服务治理功能。今天就来讲讲Eureka的高可用实现与搭建
MAVEN相关配置
<parent>
<groupId>org.springframework.boot</groupId>
<artifactId>spring-boot-starter-parent</artifactId>
<version>2.0.2.RELEASE</version>
<relativePath/> <!-- lookup parent from repository -->
</parent>

<properties>
<project.build.sourceEncoding>UTF-8</project.build.sourceEncoding>
<project.reporting.outputEncoding>UTF-8</project.reporting.outputEncoding>
<java.version>1.8</java.version>
<spring-cloud.version>Finchley.BUILD-SNAPSHOT</spring-cloud.version>
</properties>

<dependencies>
<dependency>
<groupId>org.springframework.cloud</groupId>
<artifactId>spring-cloud-starter-netflix-eureka-server</artifactId>
</dependency>
<!-- 用于服务注入验证 -->
<dependency>
<groupId>org.springframework.boot</groupId>
<artifactId>spring-boot-starter-security</artifactId>
</dependency>
</dependencies>
如果找不到包版本配置文件中加
<dependencyManagement>
<dependencies>
<dependency>
<groupId>org.springframework.cloud</groupId>
<artifactId>spring-cloud-dependencies</artifactId>
<version>${spring-cloud.version}</version>
<type>pom</type>
<scope>import</scope>
</dependency>
</dependencies>
</dependencyManagement>
application.yml 相关配置
spring:
application:
name: EUREKA
--- #注意这里是三个"减号"
spring:
profiles: eureka1
security:
user:
name: admin
password: 123123
server:
port: 8001
eureka:
instance:
hostname: eureka1
client:
serviceUrl:
defaultZone: http://admin:123123@eureka2:8002/eureka/,http://admin:123123@eureka3:8003/eureka/ fetch-registry: true
register-with-eureka: true
---
spring:
profiles: eureka2
security:
user:
name: admin
password: 123123
server:
port: 8002
eureka:
instance:
hostname: eureka2
client:
serviceUrl:
defaultZone: http://admin:123123@eureka1:8001/eureka/,http://admin:123123@eureka3:8003/eureka/ fetch-registry: true
register-with-eureka: true
---
spring:
profiles: eureka3
security:
user:
name: admin
password: 123123
server:
port: 8003
eureka:
instance:
hostname: eureka3
client:
serviceUrl:
defaultZone: http://admin:123123@eureka1:8001/eureka/,http://admin:123123@eureka2:8002/eureka/ fetch-registry: true
register-with-eureka: true
从上面的配置可以看出我们配置了3个Euerka服务,端口号分别是8001和8002与8003。
验证的用户名和密码是:admin:123123
启动类代码
import org.springframework.boot.SpringApplication;
import org.springframework.boot.autoconfigure.SpringBootApplication;
import org.springframework.cloud.netflix.eureka.server.EnableEurekaServer;

@SpringBootApplication
@EnableEurekaServer
public class EurekaApplication {

public static void main(String[] args) {
SpringApplication.run(EurekaApplication.class, args);
}
}
到这代码就基本完了,本地已经可以运行了。
启动前先在hosts文件添加内容如下:
127.0.0.1 eureka1
127.0.0.1 eureka2
127.0.0.1 eureka3
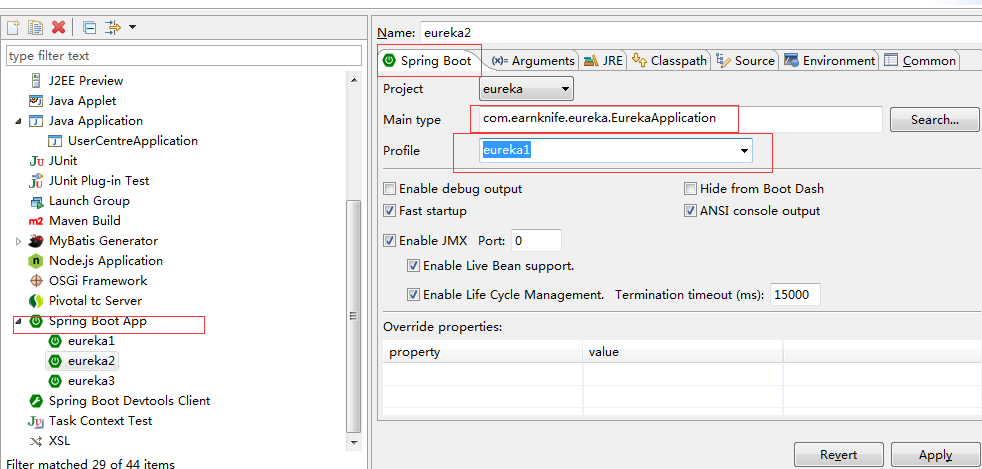
先本地运行一下:run configurations
分别启动3个配置eureka1,eureka2,eureka3,启动后到浏览器输入:http://eureka1:8001/ 输入你的用户名和密码。
敲黑板: 页面中Instances currently registered with Eureka下面并没得注入的别的服务,各种搜索引擎各种收,没得个所以然,去掉Spring Security后问题解决,可以知道问题是Spring Security引起的,查看源码发现CSRF保护默认是开启的,可以禁用掉即可。
老版本代码
security:
basic:
enabled: true
user:
name: admin
password: 123123
新版本解决方案
添加一个配置类禁用csrf如下:(但是你会发现,注入服务确不需要密码了,说明失去了验证。)import org.springframework.security.config.annotation.web.builders.HttpSecurity;
import org.springframework.security.config.annotation.web.configuration.EnableWebSecurity;
import org.springframework.security.config.annotation.web.configuration.WebSecurityConfigurerAdapter;
@EnableWebSecurity
public class WebSecurityConfig extends WebSecurityConfigurerAdapter {
@Override
protected void configure(HttpSecurity http) throws Exception {
http.csrf().disable();
}
}完整的代码如下:
@EnableWebSecurity
public class WebSecurityConfig extends WebSecurityConfigurerAdapter {
@Override
protected void configure(HttpSecurity http) throws Exception {
http.csrf().disable().authorizeRequests().anyRequest().authenticated().and().httpBasic();
}
}
完美的结果
再次启动三个eureka服务,如果一切都正确的话,结果入图下:在Centos上运行的脚本
启动脚本:#!/bin/sh #启动服务 APP_NAME=eureka-0.0.1-SNAPSHOT rm -f tpid nohup java -jar /data/apps/eureka/$APP_NAME --spring.profiles.active=eureka1> /data/apps/eureka/eureka1.log nohup java -jar /data/apps/eureka/$APP_NAME --spring.profiles.active=eureka2> /data/apps/eureka/eureka2.log nohup java -jar /data/apps/eureka/$APP_NAME --spring.profiles.active=eureka3> /data/apps/eureka/eureka3.log echo $! > tpid echo Start Success!
停止脚本:
#!/bin/sh
#停止服务
APP_NAME=eureka-0.0.1-SNAPSHOT
tpid=`ps -ef|grep $APP_NAME|grep -v grep|grep -v kill|awk '{print $2}'`
if [ ${tpid} ]; then
echo 'Stop Process...'
kill -15 $tpid
fi
sleep 5
tpid=`ps -ef|grep $APP_NAME|grep -v grep|grep -v kill|awk '{print $2}'`
if [ ${tpid} ]; then
echo 'Kill Process!'
kill -9 $tpid
else
echo 'Stop Success!'
fi
后面的脚本我自己没验证,我也不怎么会写脚本,如果那个大神提供更好的脚本,小编感激不尽
源码地址:https://gitee.com/bianxin.com/earn_knife/tree/master/eureka

相关文章推荐
- 集群:corosync+pacemaker实现mysql服务高可用
- 搭建LVS实现负载均衡集群服务
- 使用Docker搭建consul集群+registrator实现服务自动注册。
- 跨集群服务——如何利用Kubernetes 1.3实现跨区高可用
- lvs DR模式+keepalived 实现directory高可用、httpd服务负载均衡集群
- Corosync/openais+pacemaker+DRBD实现DRBD服务高可用集群
- 集群:DRBD+corosync+pacemaker实现mysql服务高可用
- 轻松实现基于Heartbeat的高可用web服务集群
- lvs DR模式 +keepalived 实现directory 高可用、httpd服务负载均衡集群
- 【微信群分享预告】Kubernetes结合LVS实现高可用负载均衡与集群外服务访问
- linux企业常用服务---haproxy+nginx搭建web高可用集群
- HA高可用集群服务搭建
- Keepalived实现高可用架构集群的搭建
- springcloud-eureka搭建高可用服务注册集群
- 基于lvs的DR模型搭建高可用的web服务,并部署wordpress,(附有脚本实现健康状态检测的代码) 推荐
- 第一次自己搭建activeMQ实现高可用负载均衡集群心得
- 基于Sentinel(哨兵)搭建实现Redis高可用集群
- linux学习之使用heartbeat搭建高可用lvs集群服务
- 搭建mysql集群实现高可用
- keepalived实现WEB服务集群的高可用负载均衡