Centos 7 上 Nginx + ELK Stack +Kafka + Filebeat 实战指南-elk 前端安装
2018-03-27 19:06
537 查看
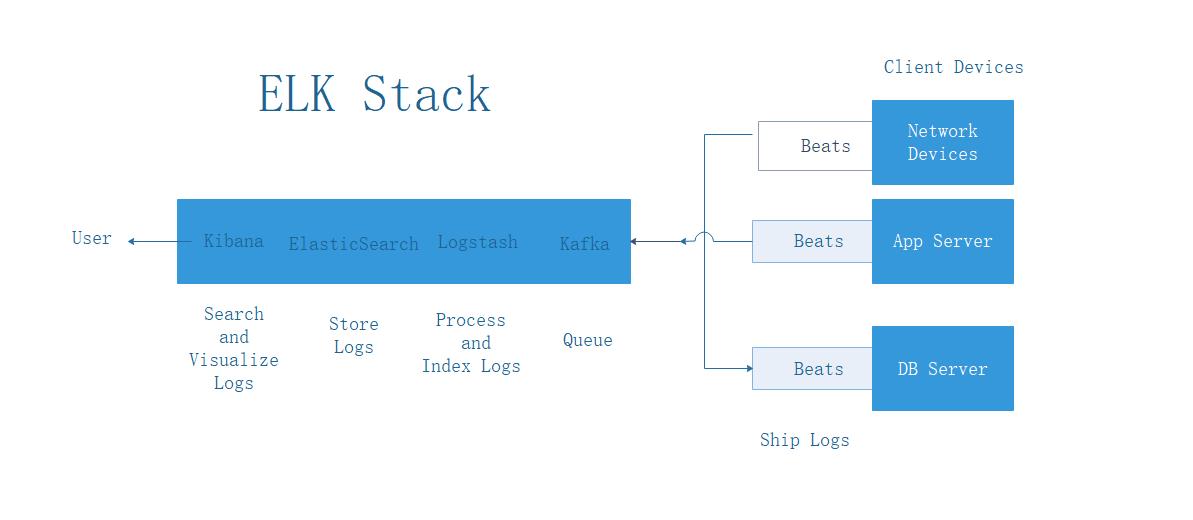
之前有导读部分内容,介绍了elk的及kafka的前世今生及优点,各位客官可以点击这里访问,欢迎大家批评指正交流学习共同进步;OS:Centos 7 ELK Stack : 6.2.2 安装方式:源码安装我的日志收集系统是基于这样的架构来做,前端代理使用Nginx,然后是ELK 的全家桶,文件收集使用filebeat来搞定;
一,系统优化,在安装ES 的主机上需要作如下系统级别的优化工作,不然启动ElasticSearch 的时候会出现报错,同时给未来的运维工作也埋下隐患,所以一开始做好优化之后,以后就不会被各种怪异问题缠绕了!#最大文件打开数参数优化:max file open file-max的含义。man proc,可得到file-max的描述:This file defines a system-wide limit on the number of open files for all processes. (Seealso setrlimit(2), which can be used by a process to set the per-process limit,RLIMIT_NOFILE, on the number of files it may open.) If you get lots of error messagesabout running out of file handles, try increasing this value:
#修改方法:vi /etc/security/limits.conf#在最下边添加如下两行* soft nofile 65538* hard nofile 65538#修改完成之后,重新连接server,通过如下命令确认是否修改完成;[root@localhost ~]# ulimit -a |grep open open files (-n) 65538
#vm.max_map_count 虚拟内存(Virtual memory)es默认使用 hybrid mmapfs / niofs 目录来存储索引。 默认操作系统对mmap计数的限制太低,可能引发内存不足的异常。在Linux中,可以通过root运行下面的命令来放开限制:#临时设置的方法,sysctl –w vm.max_map_count=262144更新系统文件/etc/sysctl.conf的vm.max_map_count字段使得这个设置永久生效。如果不优化会出现启动es的时候会出现如下提示:max virtual memory areas vm.max_map_count [65535] is too low, increase to at least [262144]#编辑/etc/sysctl.conf 添加如下内容:vm.max_map_count=262150
加载到系统中:sysctl -p --load /etc/sysctl.conf
查看是否成功:[root@localhost ~]# sysctl -a |grep vm.maxvm.max_map_count = 262150
二,环境及软件包准备#安装openjdkyum -y install java#验证,需要安装java 1.8 版本java -version

#因为elasticsearch 不允许root 用户启动,同时为了系统的安全考虑,最好还是用非root 用户来run这些程序,所以创建一个elk 用户给elasticsearch,kibana,logstash 等用。#创建用户的时候通过 -d 指定home 目录放到指定位置,我放到/opt/home 目录下useradd elk -d /opt/elk
Tips:存放elasticsearch 的分区一定要有足够的空间,因为elasticsearch 需要存放收集过来的数据,所以一开始就规划好存放位置我选择把安装包我统一放到 elk 的home目录 /opt/elk/ 下,#通过官网下载tar.gz 最新版的安装包wget https://artifacts.elastic.co/downloads/beats/filebeat/filebeat-6.2.2-linux-x86_64.tar.gzwget https://artifacts.elastic.co/downloads/elasticsearch/elasticsearch-6.2.2.tar.gzwget https://artifacts.elastic.co/downloads/kibana/kibana-6.2.2-linux-x86_64.tar.gzwget https://artifacts.elastic.co/downloads/beats/filebeat/filebeat-5.6.8-linux-x86_64.tar.gzwget https://artifacts.elastic.co/downloads/logstash/logstash-6.2.2.tar.gz
#解压所有tar.gz 包,进入当前下载目录,由于安装包比较多,一个个解压比较费劲,使用for 循环一次性解决这个问题,解放双手提高效率。。。! for i in `ls *.tar.gz`;do tar -zxvf $i;done
三,安装ES,Kibana,Nginx,Logstash#安装配置elasticsearch-6.2.2修改elasticsearch 目录拥有者:chown -R elk.elk elasticsearch-6.2.2cd elasticsearch vi config/elasticsearch.yml#配置选项:# Elasticsearch 集群名称。使用集群可将单独 Process Federation Server 绑定到单个分布式系统中。参与集群的所有服务器都必须具有相同的集群名称。cluster.name: my-es# Elasticsearch 节点名。集群中的每个 Process Federation Server 都必须具有唯一节点名。#node.name: node-1 # 数据存储目录(多个路径用逗号分隔) path.data: /opt/elk/elasticsearch-6.2.2/data# 日志目录 path.logs: /opt/elk/elasticsearch-6.2.2/logs#本机的ip地址network.host: 0.0.0.0#ES 集群使用,提供其他 Elasticsearch 服务节点的单点广播发现功能。配置集群中基于主机 TCP 端口的其他 Elasticsearch 服务的逗号分隔列表。例如:#discovery.zen.ping.unicast.hosts="localhost:9300,localhost:9301,localhost:9302"# 设置节点间交互的tcp端口(集群),(默认9300) #transport.tcp.port: 9300 # 监听端口(默认) http.port: 9200 # 增加参数,使head插件可以访问es #如果启用了 HTTP 端口,那么此属性会指定是否允许跨源 REST 请求。 http.cors.enabled: true #如果 http.cors.enabled 的值为 true,那么该属性会指定允许 REST 请求来自何处。http.cors.allow-origin: "*"#准许head 插件通过header 认证方式访问http.cors.allow-headers: Authorization
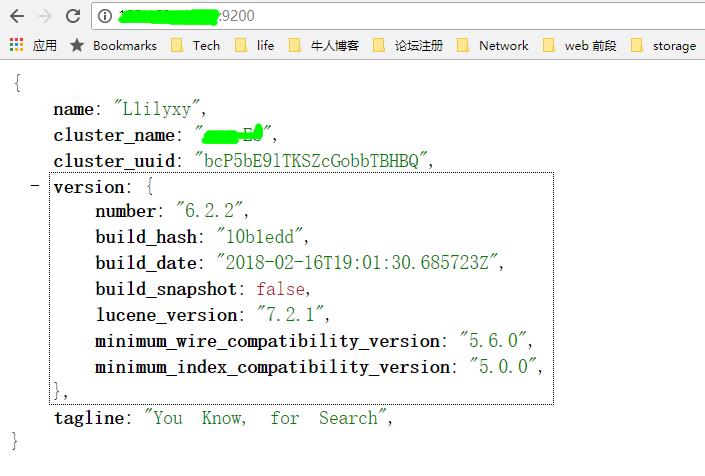
#启动elasticsearch用后台启动nohup su - elk -c /opt/elk/elasticsearch-6.2.2/bin/elasticsearch >> /dev/null 2>&1 &#访问web 记得 iptables 开放该端口http://xxx:9200
#可视化插件 elasticsearch-head 安装介绍: elasticsearch-head是一个界面化的集群操作和管理工具,是集群管理、数据可视化、增删改查、查询语句可视化工具,可以对集群进行傻瓜式操作。官方 GitHub 地址:https://github.com/mobz/elasticsearch-head。安装也很简单,安装 README 步骤走就好了。#下载包elasticsearch-head 如果没有git 请使用 yum -y install git git clone https://github.com/mobz/elasticsearch-head.gitcd /opt/elk/elasticsearch-head
#修改elasticsearch-head 中的ES连接地址,如果你的elasticsearch 中配置的访问地址,这个地址就需要修改,如果不修改,通过web 界面访问elasticsearch-head的时候无法连接到elasticsearch

#编辑配置文件,填写elasticsearch server的地址vi _site/app.jsinit: function(parent) { this._super(); this.prefs = services.Preferences.instance(); this.base_uri = this.config.base_uri || this.prefs.get("app-base_uri") || "http://es_ip:9200"; if( this.base_uri.charAt( this.base_uri.length - 1 ) !== "/" ) { // XHR request fails if the URL is not ending with a "/" this.base_uri += "/"; }
#安装node.js和 npmyum -y install nodejs npm#启动程序nohup npm run start >> /dev/null 2>&1 &
#访问web,记得 iptables 开放该端口;http://xxx:9100
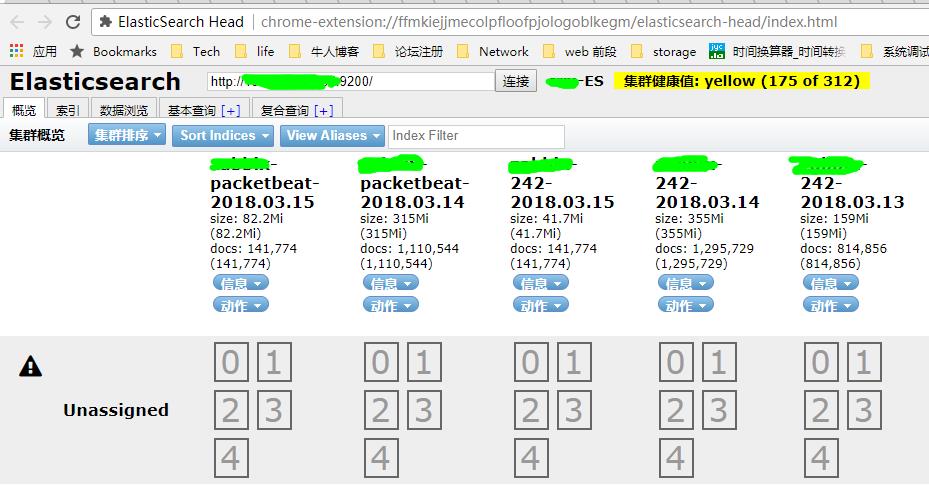
Tips: ElasticSearch-head 有chrome 浏览器的插件可以安装一个非常方便,省着每次还需要输入地址访问;
#安装kibana#修改目录属性chown -R elk.elk kibana-6.2.2-linux-x86_64cd kibana-6.2.2-linux-x86_64#修改配置文件vi config/kibana.ymlserver.host: "server-ip"elasticsearch.url: "http://ES-IP:9200"#启动kibananohup su - elk -c /opt/elk/kibana-6.2.2-linux-x86_64/bin/kibana >>/dev/null 2>&1 &
#出现如下提示证明启动成功su - elk -c /opt/elk/kibana-6.2.2-linux-x86_64/bin/kibana log [10:14:23.157] [info][status][plugin:kibana@6.2.2] Status changed from uninitialized to green - Ready log [10:14:23.203] [info][status][plugin:elasticsearch@6.2.2] Status changed from uninitialized to yellow - Waiting for Elasticsearch log [10:14:23.346] [info][status][plugin:timelion@6.2.2] Status changed from uninitialized to green - Ready log [10:14:23.353] [info][status][plugin:console@6.2.2] Status changed from uninitialized to green - Ready log [10:14:23.357] [info][status][plugin:metrics@6.2.2] Status changed from uninitialized to green - Ready log [10:14:23.376] [info][listening] Server running at http://server-ip:5601 log [10:14:23.421] [info][status][plugin:elasticsearch@6.2.2] Status changed from yellow to green - Ready#访问web,记得 iptables 开放该端口;http://xxx:5601
Tips:Kibana 的前端代理还是要配置一下的,不然每次都访问都要写端口号,不是一般的麻烦,同时因为Kibana 没有认证,可以通过nginx 给它个简单的认证;前端nginx 安装选择使用openresty为openresty 运行创建用户useradd nginx -s /sbin/nologin #安装依赖包yum install pcre-devel openssl-devel gcc curl#安装openresty下载包:wget https://openresty.org/download/openresty-1.13.6.1.tar.gz#解压并进入安装包tar -zxvf openresty-1.13.6.1.tar.gz && cd openresty-1.13.6.1安装openresty./configure --user=nginx --group=nginx && gmake && gmake install#修改nginx 配置文件,指定nginx 执行用户为nginxuser nginx;#在nginx 目录下创建conf.d 目录 cd /usr/local/openresty/nginx/ mkdir conf.d#创建kibana 代理配置cd conf.dvi kibana#把如下内容贴入server { listen 80; server_name xxx.xxx.xxx.xxx; #当前主机名 auth_basic "Restricted Access"; auth_basic_user_file /usr/local/openresty/nginx/conf/htpasswd.users; #登录验证 location / { proxy_pass http://kibana-host:5601; #转发到kibana proxy_http_version 1.1; proxy_set_header Upgrade $http_upgrade; proxy_set_header Connection 'upgrade'; proxy_set_header Host $host; proxy_cache_bypass $http_upgrade; }}#安装httpd-tools介绍:什么是 htpasswd ?htpasswd 是开源 http 服务器 apache httpd 的一个命令工具,用于生成 http 基本认证的密码文件。加密方式有什么区别?MD5:使用MD5加密密码。在Windows, Netware 和TPF上,这是默认的加密方式。crypt:使用crypt()加密密码。在除了Windows, Netware和TPF的平台上,这是默认的。 虽然它在所有平台上可以为htpasswd所支持, 但是在Windows, Netware和TPF上不能为httpd服务器所支持。SHA:使用SHA加密密码。 它是为了方便转入或移植到使用LDAP Directory Interchange Format (ldif)的Netscape而设计的。plain:不加密,使用纯文本的密码。虽然在所有平台上 htpasswd 都可以建立这样的密码, 但是httpd后台只在Windows, Netware和TPF上支持纯文本的密码。
yum -y install httpd-tools生成秘钥文件: htpasswd -bc /usr/local/openresty/nginx/conf/htpasswd.users 用户名 密码 #修改nginx主配置文件导入配置,在文件最下} 符号上边# vim /usr/local/openresty/nginx/conf/nginx.conf include /usr/local/nginx/conf/conf.d/*.conf;
#检查配置并启动启动openresty /usr/local/openresty/nginx/sbin/nginx -t
#出现如下提示证明没有问题:nginx: the configuration file /usr/local/openresty/nginx/conf/nginx.conf syntax is oknginx: configuration file /usr/local/openresty/nginx/conf/nginx.conf test is successful
#启动nginx/usr/local/openresty/nginx/sbin/nginx
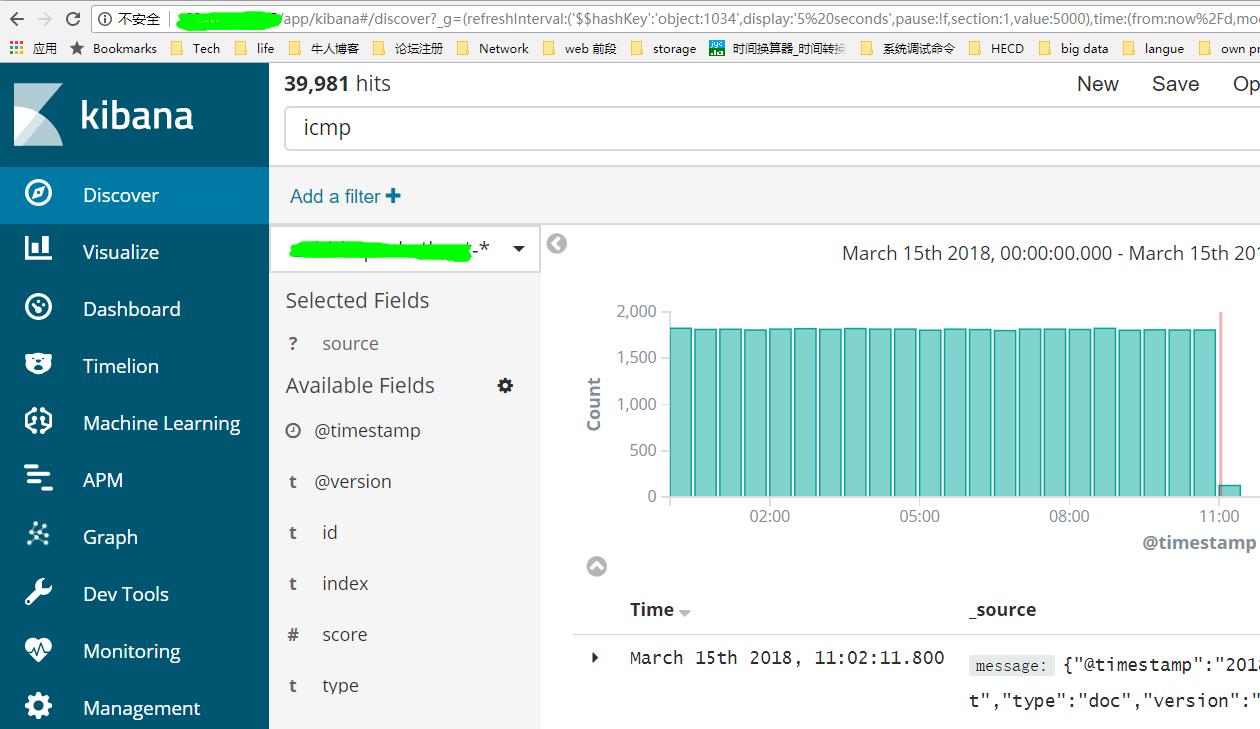
#用浏览器直接访问80端口http://IP地址
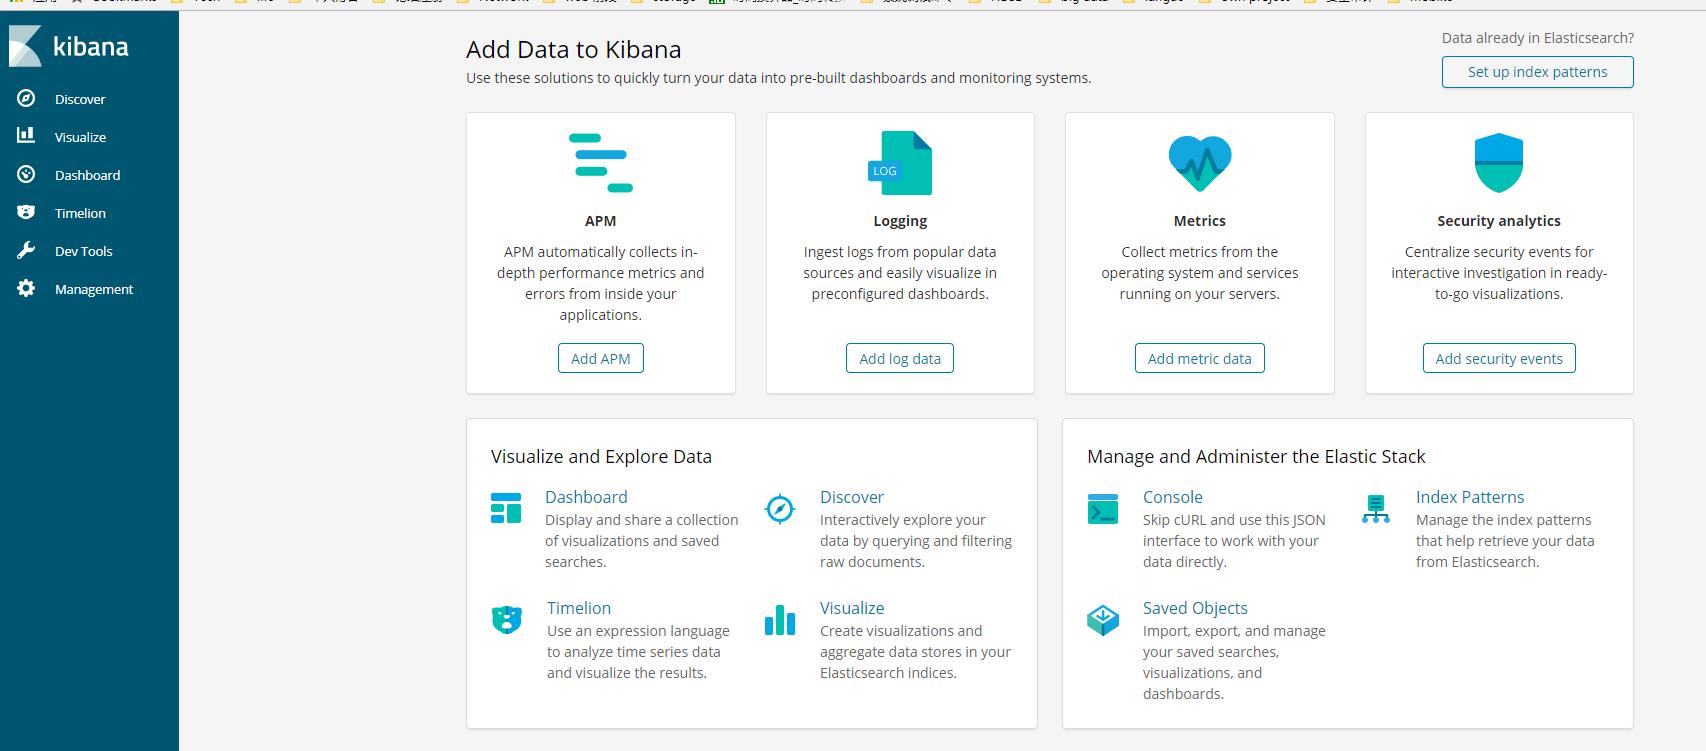
左侧菜单栏介绍如下:discover:浏览数据visualize:可视化报表dashboard:仪表盘dev tools:开发者工具management: 设置和管理
一,系统优化,在安装ES 的主机上需要作如下系统级别的优化工作,不然启动ElasticSearch 的时候会出现报错,同时给未来的运维工作也埋下隐患,所以一开始做好优化之后,以后就不会被各种怪异问题缠绕了!#最大文件打开数参数优化:max file open file-max的含义。man proc,可得到file-max的描述:This file defines a system-wide limit on the number of open files for all processes. (Seealso setrlimit(2), which can be used by a process to set the per-process limit,RLIMIT_NOFILE, on the number of files it may open.) If you get lots of error messagesabout running out of file handles, try increasing this value:
#修改方法:vi /etc/security/limits.conf#在最下边添加如下两行* soft nofile 65538* hard nofile 65538#修改完成之后,重新连接server,通过如下命令确认是否修改完成;[root@localhost ~]# ulimit -a |grep open open files (-n) 65538
#vm.max_map_count 虚拟内存(Virtual memory)es默认使用 hybrid mmapfs / niofs 目录来存储索引。 默认操作系统对mmap计数的限制太低,可能引发内存不足的异常。在Linux中,可以通过root运行下面的命令来放开限制:#临时设置的方法,sysctl –w vm.max_map_count=262144更新系统文件/etc/sysctl.conf的vm.max_map_count字段使得这个设置永久生效。如果不优化会出现启动es的时候会出现如下提示:max virtual memory areas vm.max_map_count [65535] is too low, increase to at least [262144]#编辑/etc/sysctl.conf 添加如下内容:vm.max_map_count=262150
加载到系统中:sysctl -p --load /etc/sysctl.conf
查看是否成功:[root@localhost ~]# sysctl -a |grep vm.maxvm.max_map_count = 262150
二,环境及软件包准备#安装openjdkyum -y install java#验证,需要安装java 1.8 版本java -version
#因为elasticsearch 不允许root 用户启动,同时为了系统的安全考虑,最好还是用非root 用户来run这些程序,所以创建一个elk 用户给elasticsearch,kibana,logstash 等用。#创建用户的时候通过 -d 指定home 目录放到指定位置,我放到/opt/home 目录下useradd elk -d /opt/elk
Tips:存放elasticsearch 的分区一定要有足够的空间,因为elasticsearch 需要存放收集过来的数据,所以一开始就规划好存放位置我选择把安装包我统一放到 elk 的home目录 /opt/elk/ 下,#通过官网下载tar.gz 最新版的安装包wget https://artifacts.elastic.co/downloads/beats/filebeat/filebeat-6.2.2-linux-x86_64.tar.gzwget https://artifacts.elastic.co/downloads/elasticsearch/elasticsearch-6.2.2.tar.gzwget https://artifacts.elastic.co/downloads/kibana/kibana-6.2.2-linux-x86_64.tar.gzwget https://artifacts.elastic.co/downloads/beats/filebeat/filebeat-5.6.8-linux-x86_64.tar.gzwget https://artifacts.elastic.co/downloads/logstash/logstash-6.2.2.tar.gz
#解压所有tar.gz 包,进入当前下载目录,由于安装包比较多,一个个解压比较费劲,使用for 循环一次性解决这个问题,解放双手提高效率。。。! for i in `ls *.tar.gz`;do tar -zxvf $i;done
三,安装ES,Kibana,Nginx,Logstash#安装配置elasticsearch-6.2.2修改elasticsearch 目录拥有者:chown -R elk.elk elasticsearch-6.2.2cd elasticsearch vi config/elasticsearch.yml#配置选项:# Elasticsearch 集群名称。使用集群可将单独 Process Federation Server 绑定到单个分布式系统中。参与集群的所有服务器都必须具有相同的集群名称。cluster.name: my-es# Elasticsearch 节点名。集群中的每个 Process Federation Server 都必须具有唯一节点名。#node.name: node-1 # 数据存储目录(多个路径用逗号分隔) path.data: /opt/elk/elasticsearch-6.2.2/data# 日志目录 path.logs: /opt/elk/elasticsearch-6.2.2/logs#本机的ip地址network.host: 0.0.0.0#ES 集群使用,提供其他 Elasticsearch 服务节点的单点广播发现功能。配置集群中基于主机 TCP 端口的其他 Elasticsearch 服务的逗号分隔列表。例如:#discovery.zen.ping.unicast.hosts="localhost:9300,localhost:9301,localhost:9302"# 设置节点间交互的tcp端口(集群),(默认9300) #transport.tcp.port: 9300 # 监听端口(默认) http.port: 9200 # 增加参数,使head插件可以访问es #如果启用了 HTTP 端口,那么此属性会指定是否允许跨源 REST 请求。 http.cors.enabled: true #如果 http.cors.enabled 的值为 true,那么该属性会指定允许 REST 请求来自何处。http.cors.allow-origin: "*"#准许head 插件通过header 认证方式访问http.cors.allow-headers: Authorization
| http.cors.enabled | true | 如果启用了 HTTP 端口,那么此属性会指定是否允许跨源 REST 请求。 |
| http.cors.allowed.origin | localhost | 如果 http.cors.enabled 的值为 true,那么该属性会指定允许 REST 请求来自何处。 |
#可视化插件 elasticsearch-head 安装介绍: elasticsearch-head是一个界面化的集群操作和管理工具,是集群管理、数据可视化、增删改查、查询语句可视化工具,可以对集群进行傻瓜式操作。官方 GitHub 地址:https://github.com/mobz/elasticsearch-head。安装也很简单,安装 README 步骤走就好了。#下载包elasticsearch-head 如果没有git 请使用 yum -y install git git clone https://github.com/mobz/elasticsearch-head.gitcd /opt/elk/elasticsearch-head
#修改elasticsearch-head 中的ES连接地址,如果你的elasticsearch 中配置的访问地址,这个地址就需要修改,如果不修改,通过web 界面访问elasticsearch-head的时候无法连接到elasticsearch
#编辑配置文件,填写elasticsearch server的地址vi _site/app.jsinit: function(parent) { this._super(); this.prefs = services.Preferences.instance(); this.base_uri = this.config.base_uri || this.prefs.get("app-base_uri") || "http://es_ip:9200"; if( this.base_uri.charAt( this.base_uri.length - 1 ) !== "/" ) { // XHR request fails if the URL is not ending with a "/" this.base_uri += "/"; }
#安装node.js和 npmyum -y install nodejs npm#启动程序nohup npm run start >> /dev/null 2>&1 &
#访问web,记得 iptables 开放该端口;http://xxx:9100
Tips: ElasticSearch-head 有chrome 浏览器的插件可以安装一个非常方便,省着每次还需要输入地址访问;
#安装kibana#修改目录属性chown -R elk.elk kibana-6.2.2-linux-x86_64cd kibana-6.2.2-linux-x86_64#修改配置文件vi config/kibana.ymlserver.host: "server-ip"elasticsearch.url: "http://ES-IP:9200"#启动kibananohup su - elk -c /opt/elk/kibana-6.2.2-linux-x86_64/bin/kibana >>/dev/null 2>&1 &
#出现如下提示证明启动成功su - elk -c /opt/elk/kibana-6.2.2-linux-x86_64/bin/kibana log [10:14:23.157] [info][status][plugin:kibana@6.2.2] Status changed from uninitialized to green - Ready log [10:14:23.203] [info][status][plugin:elasticsearch@6.2.2] Status changed from uninitialized to yellow - Waiting for Elasticsearch log [10:14:23.346] [info][status][plugin:timelion@6.2.2] Status changed from uninitialized to green - Ready log [10:14:23.353] [info][status][plugin:console@6.2.2] Status changed from uninitialized to green - Ready log [10:14:23.357] [info][status][plugin:metrics@6.2.2] Status changed from uninitialized to green - Ready log [10:14:23.376] [info][listening] Server running at http://server-ip:5601 log [10:14:23.421] [info][status][plugin:elasticsearch@6.2.2] Status changed from yellow to green - Ready#访问web,记得 iptables 开放该端口;http://xxx:5601
Tips:Kibana 的前端代理还是要配置一下的,不然每次都访问都要写端口号,不是一般的麻烦,同时因为Kibana 没有认证,可以通过nginx 给它个简单的认证;前端nginx 安装选择使用openresty为openresty 运行创建用户useradd nginx -s /sbin/nologin #安装依赖包yum install pcre-devel openssl-devel gcc curl#安装openresty下载包:wget https://openresty.org/download/openresty-1.13.6.1.tar.gz#解压并进入安装包tar -zxvf openresty-1.13.6.1.tar.gz && cd openresty-1.13.6.1安装openresty./configure --user=nginx --group=nginx && gmake && gmake install#修改nginx 配置文件,指定nginx 执行用户为nginxuser nginx;#在nginx 目录下创建conf.d 目录 cd /usr/local/openresty/nginx/ mkdir conf.d#创建kibana 代理配置cd conf.dvi kibana#把如下内容贴入server { listen 80; server_name xxx.xxx.xxx.xxx; #当前主机名 auth_basic "Restricted Access"; auth_basic_user_file /usr/local/openresty/nginx/conf/htpasswd.users; #登录验证 location / { proxy_pass http://kibana-host:5601; #转发到kibana proxy_http_version 1.1; proxy_set_header Upgrade $http_upgrade; proxy_set_header Connection 'upgrade'; proxy_set_header Host $host; proxy_cache_bypass $http_upgrade; }}#安装httpd-tools介绍:什么是 htpasswd ?htpasswd 是开源 http 服务器 apache httpd 的一个命令工具,用于生成 http 基本认证的密码文件。加密方式有什么区别?MD5:使用MD5加密密码。在Windows, Netware 和TPF上,这是默认的加密方式。crypt:使用crypt()加密密码。在除了Windows, Netware和TPF的平台上,这是默认的。 虽然它在所有平台上可以为htpasswd所支持, 但是在Windows, Netware和TPF上不能为httpd服务器所支持。SHA:使用SHA加密密码。 它是为了方便转入或移植到使用LDAP Directory Interchange Format (ldif)的Netscape而设计的。plain:不加密,使用纯文本的密码。虽然在所有平台上 htpasswd 都可以建立这样的密码, 但是httpd后台只在Windows, Netware和TPF上支持纯文本的密码。
yum -y install httpd-tools生成秘钥文件: htpasswd -bc /usr/local/openresty/nginx/conf/htpasswd.users 用户名 密码 #修改nginx主配置文件导入配置,在文件最下} 符号上边# vim /usr/local/openresty/nginx/conf/nginx.conf include /usr/local/nginx/conf/conf.d/*.conf;
#检查配置并启动启动openresty /usr/local/openresty/nginx/sbin/nginx -t
#出现如下提示证明没有问题:nginx: the configuration file /usr/local/openresty/nginx/conf/nginx.conf syntax is oknginx: configuration file /usr/local/openresty/nginx/conf/nginx.conf test is successful
#启动nginx/usr/local/openresty/nginx/sbin/nginx
#用浏览器直接访问80端口http://IP地址
左侧菜单栏介绍如下:discover:浏览数据visualize:可视化报表dashboard:仪表盘dev tools:开发者工具management: 设置和管理

相关文章推荐
- CentOS上mysql-server的安装指南(Linux安装mysql实战指南)[张振华-Jack]
- docker实战之centos6.5上安装、镜像、容器相关操作
- CentOS 7.3 安装指南
- 原创:centos7.1下 ZooKeeper 集群安装配置+Python实战范例
- centos6.6-zabbix2.4.5安装实战
- Redis学习(一):CentOS 6.8下Redis数据库安装配置指南、常用命令、主从同步集群
- CentOS 64位系统JDK1.6、tomcat 6.0、MySQL 5.5安装指南
- centos 7安装jdk和elk
- 实战3:CentOS 7,编译安装amp(php-fpm) + xcache(分别单独部署)
- Centos7.2安装tomcat+Myeclipse(遇到的一些问题与总结)+web项目实战
- Facebook WDT (Folly) 安装指南 -- CentOS 7
- centos 7 安装配置ELK
- Docker实战(十一):Docker安装ELK环境(二)
- 在CentOS 7上快速安装配置WebSphere MQ 7.5快速指南
- CentOS6.4配置Hadoop-2.6.0集群配置安装指南
- CentOS memcached安装指南
- Kafka Centos安装指南
- rabbitmq 在centos下的安装(实战)
- 实战:ROSE HA双机热备系统安装指南