ContextLoaderListener---WebApplicationContext创建过程
2018-03-07 00:00
507 查看
摘要: 文章来自:http://blog.csdn.net/snowy_way/article/details/50164159#contextloader
Servlet容器会实例化一个ContextLoaderListener
该类继承ContextLoader,实现了ServletContextListener接口,使之具有listener功能
ContextLoaderListener 实现了ServletContextListener接口
ServletContextListener扩展了ContextLoader,使之有Listener功能
在
在
流程图描述该过程
Servlet容器加载实例化ContextLoaderListener调用contextInitialized(ServletContextEvent sce)End
contextInitialized方法内部实现
关键代码:
得到信息:
1. 主要初始化任务在initWebApplicationContext中实现.
ContextLoader
1. 初始化ApplicationContext — initWebApplicationContext
关键代码:
1.
2.
3.
得到信息:
1. 该代码创建了WebApplicationContext
2. 这个源代码很长(- -)
3. 关键代码在
4.
代码
2. 创建ApplicationContext — createWebApplicationContext
关键代码:
1.
2.
得到信息:
1. 根据传入的sevletContext,返回使用WebApplicationContext接口的哪一个实现类,默认是XmlWebApplicationContext
2. 使用BeanUtils实例化该类
源代码
3. 决定使用哪个WebApplicationContext?—determineContextClass
关键代码:
1.
2.
3.
得到信息:
1. 从Servlet InitParam中获取的contextClassName,决定到底使用WebApplicationContext接口的哪一个实现类。
2. 如果你的web.xml中定义了如下片段,会使用你自己的WebApplicationContext (默认”contextClass”),否则就使用XmlWebApplicationContext
3. 利用反射得到Class
web.xml
代码
总结
配置web.xml
Servlet容器实例化ContextLoaderListener,并通知其调用
ContextLoaderListener调用
调用configureAndRefreshWebApplicationContext进行接下来的操作
彻底晕了,后面的还是画个图吧
注意:
1.分析框架代码时,要常使用类继承、调用关系等快捷键,可以更高效的学习,快捷键可以设置成你习惯的按键;
2.本文重在怎么自我分析框架代码,所以对其中解析需自己实际跟踪代码实践方可;
3.spring源代码版本 spring-framework-3.2.1.RELEASE。
预览
javax.servlet.ServletContext,Servlet容器接口。
javax.servlet.ServletContextListener,Servlet容器生命周期监听接口。
org.springframework.web.context.ContextLoaderListener,Spring IOC容器生命周期监听类。
org.springframework.web.context.ContextLoader,Spring IOC容器启动和销毁。
[html] view plain copy
print?
<listener>
<listener-class>
org.springframework.web.context.ContextLoaderListener
</listener-class>
</listener>
public void contextInitialized ( ServletContextEvent sce ); // ServletContext启动时触发
public void contextDestroyed ( ServletContextEvent sce ); // ServletContext销毁时触发
org.springframework.web.context.ContextLoaderListener
public void contextInitialized(ServletContextEvent event) {
this.contextLoader = createContextLoader();
if (this.contextLoader == null) {
this.contextLoader = this;
}
// 对spring ioc容器进行初始化
this.contextLoader.initWebApplicationContext(event.getServletContext());
}
IOC容器的初始化是由ContextLoader类执行:
org.springframework.web.context.ContextLoader
public WebApplicationContext initWebApplicationContext(ServletContext servletContext) {
// 是否已经加载IOC容器
if (servletContext.getAttribute(WebApplicationContext.ROOT_WEB_APPLICATION_CONTEXT_ATTRIBUTE) != null) {
throw new IllegalStateException(
"Cannot initialize context because there is already a root application context present - " +
"check whether you have multiple ContextLoader* definitions in your web.xml!");
}
Log logger = LogFactory.getLog(ContextLoader.class);
servletContext.log("Initializing Spring root WebApplicationContext");
if (logger.isInfoEnabled()) {
logger.info("Root WebApplicationContext: initialization started");
}
long startTime = System.currentTimeMillis();
try {
// Store context in local instance variable, to guarantee that
// it is available on ServletContext shutdown.
if (this.context == null) {
this.context = createWebApplicationContext(servletContext);
}
if (this.context instanceof ConfigurableWebApplicationContext) {
ConfigurableWebApplicationContext cwac = (ConfigurableWebApplicationContext) this.context;
if (!cwac.isActive()) {
// The context has not yet been refreshed -> provide services such as
// setting the parent context, setting the application context id, etc
if (cwac.getParent() == null) {
// The context instance was injected without an explicit parent ->
// determine parent for root web application context, if any.
ApplicationContext parent = loadParentContext(servletContext);
cwac.setParent(parent);
}
// 此方法是刷新初始化IOC容器的地方
configureAndRefreshWebApplicationContext(cwac, servletContext);
}
}
// IOC容器加载后,将IOC容器保存于ServletContext容器中
servletContext.setAttribute(WebApplicationContext.ROOT_WEB_APPLICATION_CONTEXT_ATTRIBUTE, this.context);
...
}
熟悉的refresh()方法的调用:
org.springframework.web.context.ContextLoader
protected void configureAndRefreshWebApplicationContext(ConfigurableWebApplicationContext wac, ServletContext sc) {
if (ObjectUtils.identityToString(wac).equals(wac.getId())) {
// The application context id is still set to its original default value
// -> assign a more useful id based on available information
String idParam = sc.getInitParameter(CONTEXT_ID_PARAM);
if (idParam != null) {
wac.setId(idParam);
}
else {
// Generate default id...
if (sc.getMajorVersion() == 2 && sc.getMinorVersion() < 5) {
// Servlet <= 2.4: resort to name specified in web.xml, if any.
wac.setId(ConfigurableWebApplicationContext.APPLICATION_CONTEXT_ID_PREFIX +
ObjectUtils.getDisplayString(sc.getServletContextName()));
}
else {
wac.setId(ConfigurableWebApplicationContext.APPLICATION_CONTEXT_ID_PREFIX +
ObjectUtils.getDisplayString(sc.getContextPath()));
}
}
}
wac.setServletContext(sc);
String initParameter = sc.getInitParameter(CONFIG_LOCATION_PARAM);
if (initParameter != null) {
wac.setConfigLocation(initParameter);
}
customizeContext(sc, wac);
// 熟悉的refresh()对Spring IOC容器进行加载,接下来的步骤就是 "自我分析-Spring IOC"文脏中的内容
wac.refresh();
}
org.springframework.web.context.ContextLoaderListener
public void contextDestroyed(ServletContextEvent event) {
if (this.contextLoader != null) {
this.contextLoader.closeWebApplicationContext(event.getServletContext());
}
ContextCleanupListener.cleanupAttributes(event.getServletContext());
}
具体清理销毁了spring的什么东西,自己再跟踪下代码即可。
其次,在web.xml中会提供有contextLoaderListener。在web容器启动时,会触发容器初始化事件,此时contextLoaderListener会监听到这个事件,其contextInitialized方法会被调用,在这个方法中,spring会初始化一个启动上下文,这个上下文被称为根上下文,即WebApplicationContext,这是一个接口类,确切的说,其实际的实现类是XmlWebApplicationContext。这个就是spring的IoC容器,其对应的Bean定义的配置由web.xml中的context-param标签指定。在这个IoC容器初始化完毕后,spring以WebApplicationContext.ROOTWEBAPPLICATIONCONTEXTATTRIBUTE为属性Key,将其存储到ServletContext中,便于获取;
再次,contextLoaderListener监听器初始化完毕后,开始初始化web.xml中配置的Servlet,这个servlet可以配置多个,以最常见的DispatcherServlet为例,这个servlet实际上是一个标准的前端控制器,用以转发、匹配、处理每个servlet请求。DispatcherServlet上下文在初始化的时候会建立自己的IoC上下文,用以持有spring mvc相关的bean。在建立DispatcherServlet自己的IoC上下文时,会利用WebApplicationContext.ROOTWEBAPPLICATIONCONTEXTATTRIBUTE先从ServletContext中获取之前的根上下文(即WebApplicationContext)作为自己上下文的parent上下文。有了这个parent上下文之后,再初始化自己持有的上下文。这个DispatcherServlet初始化自己上下文的工作在其initStrategies方法中可以看到,大概的工作就是初始化处理器映射、视图解析等。这个servlet自己持有的上下文默认实现类也是mlWebApplicationContext。初始化完毕后,spring以与servlet的名字相关(此处不是简单的以servlet名为Key,而是通过一些转换,具体可自行查看源码)的属性为属性Key,也将其存到ServletContext中,以便后续使用。这样每个servlet就持有自己的上下文,即拥有自己独立的bean空间,同时各个servlet共享相同的bean,即根上下文(第2步中初始化的上下文)定义的那些bean。
说完了spring上下文的初始化过程,这三个上下文的关系应该就了解了。如还是不太清楚,我就爱莫能助了,只能自行看代码去了。
ContextLoaderListener
Servlet容器实例化ContextLoaderListenerServlet容器会实例化一个ContextLoaderListener
<listener>
<listener-class>org.springframework.web.context.ContextLoaderListener</listener-class>
</listener>
该类继承ContextLoader,实现了ServletContextListener接口,使之具有listener功能
public class ContextLoaderListener extends ContextLoader implements ServletContextListener
ContextLoaderListener 实现了ServletContextListener接口
public interface ServletContextListener extends EventListener {

/**
* web应用初始化开始的时候,收到通知, 所有的ServletContextListeners都会
* 收到通知,在任何filter或者servlet之前
*/
public void contextInitialized(ServletContextEvent sce);

/**
* ServletContext准备关闭的时候,会调用该方法;
* 在contextDestroyed调用前,所有的servlet和filter都已经销毁了
*/
public void contextDestroyed(ServletContextEvent sce);
}
/**
* Initialize the root web application context.
*/
public void contextInitialized(ServletContextEvent event) {
this.contextLoader = createContextLoader();
if (this.contextLoader == null) {
this.contextLoader = this;
}
this.contextLoader.initWebApplicationContext(event.getServletContext());
}
...
/**
* Close the root web application context.
*/
public void contextDestroyed(ServletContextEvent event) {
if (this.contextLoader != null) {
this.contextLoader.closeWebApplicationContext(event.getServletContext());
}
ContextCleanupListener.cleanupAttributes(event.getServletContext());
}ServletContextListener扩展了ContextLoader,使之有Listener功能
在
public void contextInitialized(ServletContextEvent sce);方法中,获取ServletContext
在
public void contextDestroyed(ServletContextEvent event);方法中,释放资源。
流程图描述该过程
Servlet容器加载实例化ContextLoaderListener调用contextInitialized(ServletContextEvent sce)End
contextInitialized方法内部实现
/**
* Initialize the root web application context.
*/
public void contextInitialized(ServletContextEvent event) {
//createContextLoader方法已经弃用,返回永远是null
this.contextLoader = createContextLoader();
if (this.contextLoader == null) {
this.contextLoader = this;
}
//调用父类initWebApplicationContext方法,传入ServletContext
this.contextLoader.initWebApplicationContext(event.getServletContext());
}
/**
* Create the ContextLoader to use. Can be overridden in subclasses.
* @return the new ContextLoader
* @deprecated in favor of simply subclassing ContextLoaderListener itself
* (which extends ContextLoader, as of Spring 3.0)
*/
@Deprecated
protected ContextLoader createContextLoader() {
return null;
}
关键代码:
this.contextLoader.initWebApplicationContext(event.getServletContext());
得到信息:
1. 主要初始化任务在initWebApplicationContext中实现.
ContextLoader
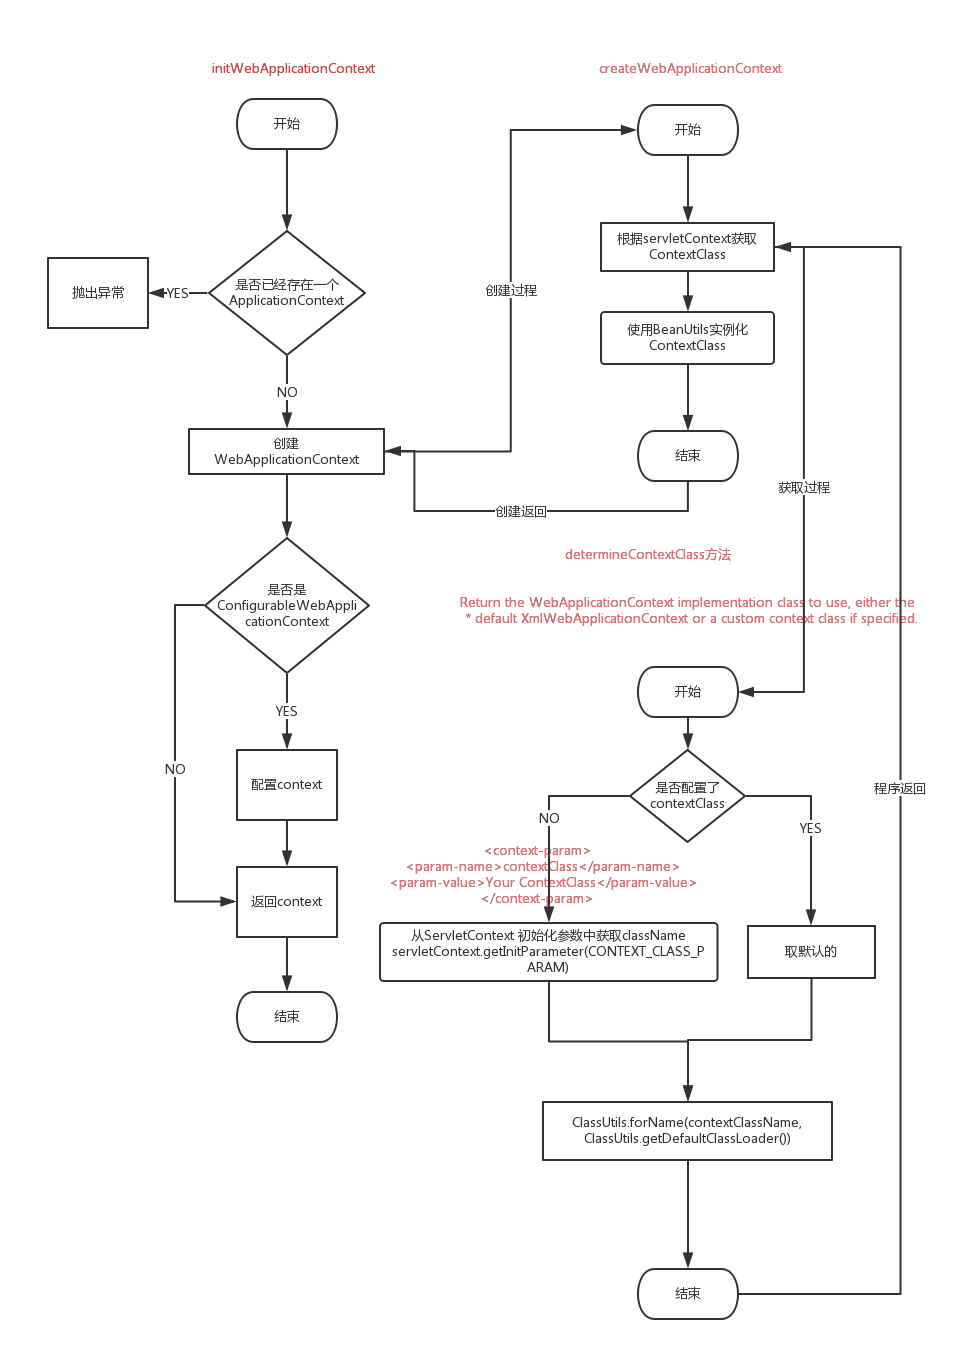
1. 初始化ApplicationContext — initWebApplicationContext
关键代码:
1.
this.context = createWebApplicationContext(servletContext);
2.
servletContext.getAttribute(WebApplicationContext.ROOT_WEB_APPLICATION_CONTEXT_ATTRIBUTE
3.
configureAndRefreshWebApplicationContext(cwac, servletContext);
得到信息:
1. 该代码创建了WebApplicationContext
2. 这个源代码很长(- -)
3. 关键代码在
createWebApplicationContext(servletContext);里面
4.
configureAndRefreshWebApplicationContext(cwac, servletContext);创建之后的配置工作,这个也很重要,以后再说,这里直说创建Context过程。
代码
public WebApplicationContext initWebApplicationContext(ServletContext servletContext) {
if (servletContext.getAttribute(WebApplicationContext.ROOT_WEB_APPLICATION_CONTEXT_ATTRIBUTE) != null) {
throw new IllegalStateException(
"Cannot initialize context because there is already a root application context present - " +
"check whether you have multiple ContextLoader* definitions in your web.xml!");
}

Log logger = LogFactory.getLog(ContextLoader.class);
servletContext.log("Initializing Spring root WebApplicationContext");
if (logger.isInfoEnabled()) {
logger.info("Root WebApplicationContext: initialization started");
}
long startTime = System.currentTimeMillis();

try {
// Store context in local instance variable, to guarantee that
// it is available on ServletContext shutdown.
if (this.context == null) {
this.context = createWebApplicationContext(servletContext);
}
if (this.context instanceof ConfigurableWebApplicationContext) {
ConfigurableWebApplicationContext cwac = (ConfigurableWebApplicationContext) this.context;
if (!cwac.isActive()) {
// The context has not yet been refreshed -> provide services such as
// setting the parent context, setting the application context id, etc
if (cwac.getParent() == null) {
// The context instance was injected without an explicit parent ->
// determine parent for root web application context, if any.
ApplicationContext parent = loadParentContext(servletContext);
cwac.setParent(parent);
}
//此处也很重要
configureAndRefreshWebApplicationContext(cwac, servletContext);
}
}
servletContext.setAttribute(WebApplicationContext.ROOT_WEB_APPLICATION_CONTEXT_ATTRIBUTE, this.context);

ClassLoader ccl = Thread.currentThread().getContextClassLoader();
if (ccl == ContextLoader.class.getClassLoader()) {
currentContext = this.context;
}
else if (ccl != null) {
currentContextPerThread.put(ccl, this.context);
}

if (logger.isDebugEnabled()) {
logger.debug("Published root WebApplicationContext as ServletContext attribute with name [" +
WebApplicationContext.ROOT_WEB_APPLICATION_CONTEXT_ATTRIBUTE + "]");
}
if (logger.isInfoEnabled()) {
long elapsedTime = System.currentTimeMillis() - startTime;
logger.info("Root WebApplicationContext: initialization completed in " + elapsedTime + " ms");
}

return this.context;
}
catch (RuntimeException ex) {
logger.error("Context initialization failed", ex);
servletContext.setAttribute(WebApplicationContext.ROOT_WEB_APPLICATION_CONTEXT_ATTRIBUTE, ex);
throw ex;
}
catch (Error err) {
logger.error("Context initialization failed", err);
servletContext.setAttribute(WebApplicationContext.ROOT_WEB_APPLICATION_CONTEXT_ATTRIBUTE, err);
throw err;
}
}
2. 创建ApplicationContext — createWebApplicationContext
关键代码:
1.
Class<?> contextClass = determineContextClass(sc);
2.
return (ConfigurableWebApplicationContext) BeanUtils.instantiateClass(contextClass);
得到信息:
1. 根据传入的sevletContext,返回使用WebApplicationContext接口的哪一个实现类,默认是XmlWebApplicationContext
2. 使用BeanUtils实例化该类
源代码
protected WebApplicationContext createWebApplicationContext(ServletContext sc) {
Class<?> contextClass = determineContextClass(sc);
if (!ConfigurableWebApplicationContext.class.isAssignableFrom(contextClass)) {
throw new ApplicationContextException("Custom context class [" + contextClass.getName() +
"] is not of type [" + ConfigurableWebApplicationContext.class.getName() + "]");
}
return (ConfigurableWebApplicationContext) BeanUtils.instantiateClass(contextClass);
}
3. 决定使用哪个WebApplicationContext?—determineContextClass
关键代码:
1.
String contextClassName = servletContext.getInitParameter(CONTEXT_CLASS_PARAM);
2.
public static final String CONTEXT_CLASS_PARAM = "contextClass";
3.
return ClassUtils.forName(contextClassName, ContextLoader.class.getClassLoader());
得到信息:
1. 从Servlet InitParam中获取的contextClassName,决定到底使用WebApplicationContext接口的哪一个实现类。
2. 如果你的web.xml中定义了如下片段,会使用你自己的WebApplicationContext (默认”contextClass”),否则就使用XmlWebApplicationContext
3. 利用反射得到Class
web.xml
<context-param>
<param-name>contextClass</param-name>
<param-value>Your ContextClass</param-value>
</context-param>
代码
protected Class<?> determineContextClass(ServletContext servletContext) {
String contextClassName = servletContext.getInitParameter(CONTEXT_CLASS_PARAM);
if (contextClassName != null) {
try {
return ClassUtils.forName(contextClassName, ClassUtils.getDefaultClassLoader());
}
catch (ClassNotFoundException ex) {
throw new ApplicationContextException(
"Failed to load custom context class [" + contextClassName + "]", ex);
}
}
else {
contextClassName = defaultStrategies.getProperty(WebApplicationContext.class.getName());
try {
return ClassUtils.forName(contextClassName, ContextLoader.class.getClassLoader());
}
catch (ClassNotFoundException ex) {
throw new ApplicationContextException(
"Failed to load default context class [" + contextClassName + "]", ex);
}
}
}
总结
配置web.xml
<listener>
<listener-class>org.springframework.web.context.ContextLoaderListener</listener-class>
</listener>
Servlet容器实例化ContextLoaderListener,并通知其调用
initWebApplicationContext
ContextLoaderListener调用
createWebApplicationContext根据ServletContext创建出WebApplicationContext
调用configureAndRefreshWebApplicationContext进行接下来的操作
彻底晕了,后面的还是画个图吧
2:自我分析-Spring IOC在Web应用的启动和销毁
Spring IOC容器通过ServletContextListener对servlet容器的生命周期监听,从而实现了IOC的启动和销毁。注意:
1.分析框架代码时,要常使用类继承、调用关系等快捷键,可以更高效的学习,快捷键可以设置成你习惯的按键;
2.本文重在怎么自我分析框架代码,所以对其中解析需自己实际跟踪代码实践方可;
3.spring源代码版本 spring-framework-3.2.1.RELEASE。
预览
javax.servlet.ServletContext,Servlet容器接口。
javax.servlet.ServletContextListener,Servlet容器生命周期监听接口。
org.springframework.web.context.ContextLoaderListener,Spring IOC容器生命周期监听类。
org.springframework.web.context.ContextLoader,Spring IOC容器启动和销毁。
配置-监听ServletContext生命周期
在web.xml中spring配置了对ServletContext生命周期的监听,当Web容器启动和销毁时,触发Spring定义的IOC容器的启动和销毁,具体配置如下:[html] view plain copy
print?
<listener>
<listener-class>
org.springframework.web.context.ContextLoaderListener
</listener-class>
</listener>
入口-ContextLoaderListener对Spring IOC初始化和销毁
当web容器启动时会触发contextInitialized方法对spring ioc容器进行初始化,销毁时会触发contextDestroyed方法对spring ioc容器进行销毁,ServletContextListener接口如下:public void contextInitialized ( ServletContextEvent sce ); // ServletContext启动时触发
public void contextDestroyed ( ServletContextEvent sce ); // ServletContext销毁时触发
Spring IOC启动
spring ioc容器初始化具体代码如下:org.springframework.web.context.ContextLoaderListener
public void contextInitialized(ServletContextEvent event) {
this.contextLoader = createContextLoader();
if (this.contextLoader == null) {
this.contextLoader = this;
}
// 对spring ioc容器进行初始化
this.contextLoader.initWebApplicationContext(event.getServletContext());
}
IOC容器的初始化是由ContextLoader类执行:
org.springframework.web.context.ContextLoader
public WebApplicationContext initWebApplicationContext(ServletContext servletContext) {
// 是否已经加载IOC容器
if (servletContext.getAttribute(WebApplicationContext.ROOT_WEB_APPLICATION_CONTEXT_ATTRIBUTE) != null) {
throw new IllegalStateException(
"Cannot initialize context because there is already a root application context present - " +
"check whether you have multiple ContextLoader* definitions in your web.xml!");
}
Log logger = LogFactory.getLog(ContextLoader.class);
servletContext.log("Initializing Spring root WebApplicationContext");
if (logger.isInfoEnabled()) {
logger.info("Root WebApplicationContext: initialization started");
}
long startTime = System.currentTimeMillis();
try {
// Store context in local instance variable, to guarantee that
// it is available on ServletContext shutdown.
if (this.context == null) {
this.context = createWebApplicationContext(servletContext);
}
if (this.context instanceof ConfigurableWebApplicationContext) {
ConfigurableWebApplicationContext cwac = (ConfigurableWebApplicationContext) this.context;
if (!cwac.isActive()) {
// The context has not yet been refreshed -> provide services such as
// setting the parent context, setting the application context id, etc
if (cwac.getParent() == null) {
// The context instance was injected without an explicit parent ->
// determine parent for root web application context, if any.
ApplicationContext parent = loadParentContext(servletContext);
cwac.setParent(parent);
}
// 此方法是刷新初始化IOC容器的地方
configureAndRefreshWebApplicationContext(cwac, servletContext);
}
}
// IOC容器加载后,将IOC容器保存于ServletContext容器中
servletContext.setAttribute(WebApplicationContext.ROOT_WEB_APPLICATION_CONTEXT_ATTRIBUTE, this.context);
...
}
熟悉的refresh()方法的调用:
org.springframework.web.context.ContextLoader
protected void configureAndRefreshWebApplicationContext(ConfigurableWebApplicationContext wac, ServletContext sc) {
if (ObjectUtils.identityToString(wac).equals(wac.getId())) {
// The application context id is still set to its original default value
// -> assign a more useful id based on available information
String idParam = sc.getInitParameter(CONTEXT_ID_PARAM);
if (idParam != null) {
wac.setId(idParam);
}
else {
// Generate default id...
if (sc.getMajorVersion() == 2 && sc.getMinorVersion() < 5) {
// Servlet <= 2.4: resort to name specified in web.xml, if any.
wac.setId(ConfigurableWebApplicationContext.APPLICATION_CONTEXT_ID_PREFIX +
ObjectUtils.getDisplayString(sc.getServletContextName()));
}
else {
wac.setId(ConfigurableWebApplicationContext.APPLICATION_CONTEXT_ID_PREFIX +
ObjectUtils.getDisplayString(sc.getContextPath()));
}
}
}
wac.setServletContext(sc);
String initParameter = sc.getInitParameter(CONFIG_LOCATION_PARAM);
if (initParameter != null) {
wac.setConfigLocation(initParameter);
}
customizeContext(sc, wac);
// 熟悉的refresh()对Spring IOC容器进行加载,接下来的步骤就是 "自我分析-Spring IOC"文脏中的内容
wac.refresh();
}
Spring IOC销毁
对Spring IOC容器和其他Spring环境信息进行销毁:org.springframework.web.context.ContextLoaderListener
public void contextDestroyed(ServletContextEvent event) {
if (this.contextLoader != null) {
this.contextLoader.closeWebApplicationContext(event.getServletContext());
}
ContextCleanupListener.cleanupAttributes(event.getServletContext());
}
具体清理销毁了spring的什么东西,自己再跟踪下代码即可。
spring的启动过程:
首先,对于一个web应用,其部署在web容器中,web容器提供其一个全局的上下文环境,这个上下文就是ServletContext,其为后面的spring IoC容器提供宿主环境;其次,在web.xml中会提供有contextLoaderListener。在web容器启动时,会触发容器初始化事件,此时contextLoaderListener会监听到这个事件,其contextInitialized方法会被调用,在这个方法中,spring会初始化一个启动上下文,这个上下文被称为根上下文,即WebApplicationContext,这是一个接口类,确切的说,其实际的实现类是XmlWebApplicationContext。这个就是spring的IoC容器,其对应的Bean定义的配置由web.xml中的context-param标签指定。在这个IoC容器初始化完毕后,spring以WebApplicationContext.ROOTWEBAPPLICATIONCONTEXTATTRIBUTE为属性Key,将其存储到ServletContext中,便于获取;
再次,contextLoaderListener监听器初始化完毕后,开始初始化web.xml中配置的Servlet,这个servlet可以配置多个,以最常见的DispatcherServlet为例,这个servlet实际上是一个标准的前端控制器,用以转发、匹配、处理每个servlet请求。DispatcherServlet上下文在初始化的时候会建立自己的IoC上下文,用以持有spring mvc相关的bean。在建立DispatcherServlet自己的IoC上下文时,会利用WebApplicationContext.ROOTWEBAPPLICATIONCONTEXTATTRIBUTE先从ServletContext中获取之前的根上下文(即WebApplicationContext)作为自己上下文的parent上下文。有了这个parent上下文之后,再初始化自己持有的上下文。这个DispatcherServlet初始化自己上下文的工作在其initStrategies方法中可以看到,大概的工作就是初始化处理器映射、视图解析等。这个servlet自己持有的上下文默认实现类也是mlWebApplicationContext。初始化完毕后,spring以与servlet的名字相关(此处不是简单的以servlet名为Key,而是通过一些转换,具体可自行查看源码)的属性为属性Key,也将其存到ServletContext中,以便后续使用。这样每个servlet就持有自己的上下文,即拥有自己独立的bean空间,同时各个servlet共享相同的bean,即根上下文(第2步中初始化的上下文)定义的那些bean。
说完了spring上下文的初始化过程,这三个上下文的关系应该就了解了。如还是不太清楚,我就爱莫能助了,只能自行看代码去了。

相关文章推荐
- ContextLoaderListener(1)---WebApplicationContext创建过程
- ContextLoaderListener---WebApplicationContext创建过程
- SpringWeb ContextLoaderListener 初始化过程
- eclipse中创建maven项目, maven无法加载org.springframework.web.context.ContextLoaderListener
- maven项目报 ClassNotFoundException: org.springframework.web.context.ContextLoaderListener
- 严重: Error configuring application listener of class org.springframework.web.context.ContextLoaderLis
- Spring: DispacherServlet和ContextLoaderListener中的WebApplicationContext的关系
- org.springframework.web.context.ContextLoaderListener的作用
- java.lang.ClassNotFoundException: org.springframework.web.context.ContextLoaderListener
- Error configuring application listener of class org.springframework.web.context.ContextLoaderListene
- java.lang.ClassNotFoundException: org.springframework.web.context.ContextLoaderListener
- java.lang.ClassNotFoundException: org.springframework.web.context.ContextLoaderListener问题解决
- java.lang.ClassNotFoundException: org.springframework.web.context.ContextLoaderListener
- 问题解决-java.lang.ClassNotFoundException: org.springframework.web.context.ContextLoaderListener
- Error configuring application listener of class org.springframework.web.context.ContextLoaderListene
- No WebApplicationContext found: no ContextLoaderListener registered 错误解决
- ClassNotFoundException: org.springframework.web.context.ContextLoaderListener解决办法
- 严重: Exception sending context initialized event to listener instance of class org.springframework.web.context.ContextLoaderListe
- web.xml文件中配置spring的ContextLoaderListener后报错
- 读Spring的源代码三:ContextLoaderListener和DispatcherServlet的加载过程