Android开发丶一个仿IOS的底部弹窗
2018-02-22 15:04
423 查看
在项目开发过程中,需要在个人中心模块点击用户头像使底部弹出弹窗,显示相机获取、相册获取等选项,这里本来想使用Android Material Design风格的界面,然而UI小姐姐不管三七二十一,要求界面风格和IOS保持一致,我擦。。。这是歧视我们Android吗,我们Android现在界面也很风骚炫酷的好吗?但是吐槽归吐槽,既然这方案也得到BOSS首肯了,那么就乖乖按照人家要求来吧,然而因为Android和IOS的界面风格差异略大,因此我们这里要自定义手动写一个,话说真羡慕IOS各种原生控件拿来即用,不过DIY才好玩,才有挑战性。
我们先看下效果:
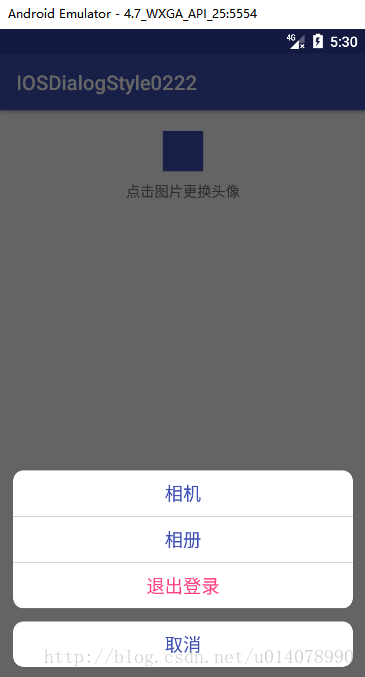
虽然细节上有些小出入,但是基本已经完美实现了。
下面是实现步骤:
1.首先写好弹窗布局的XML文件
此处可以把整体布局分为两部分,分别是上面的三文字和下面的一文字,三个文字可以放在oriention为vertical的线性布局中,然后给它们background都设置填充色为白色,四角弧度的的XML文件,剩下就是简单的文字大小,颜色,内外间距等参数,可以根据实际开发需求去更改。<?xml version="1.0" encoding="utf-8"?>
<LinearLayout xmlns:android="http://schemas.android.com/apk/res/android"
android:layout_width="match_parent"
android:layout_height="match_parent"
android:orientation="vertical">
在自定义的DialogFragment方法里onCreateView生命周期里进行如下的设置:
1)首先去掉弹窗的顶部title。
getDialog().requestWindowFeature(Window.FEATURE_NO_TITLE); 2)设置Dialog的背景透明,这点很重要,这样我们设置的background的xml布局才可以正常显示(填充色,弧度等) getDialog().getWindow().setBackgroundDrawable(new ColorDrawable(Color.TRANSPARENT)); 在onStart()生命周期里主要设置布局充满空间和弹出位置。
1)首先获取屏幕宽度DisplayMetrics dm= new DisplayMetrics();
getActivity().getDialog().getDefaultDisplay().getMetrics(dm);
int width= dm.widthPixels; 2)给dialogFragment设置显示宽高。getDialog().getWindow().setLayout(width, getDialog().getWindow().getAttributes().height); 3)给dialogFragment设置弹窗位置。WindowManager.LayoutParams params= getDialog().getWindow().getAttributes();
params.gravity= Gravity.BOTTOM;
getDialog().getWindow().setAttributes(params);3.在宿主的弹窗入口设置点击事件,显示DialogFragment
源码下载:点击打开链接
我们先看下效果:
虽然细节上有些小出入,但是基本已经完美实现了。
下面是实现步骤:
1.首先写好弹窗布局的XML文件
此处可以把整体布局分为两部分,分别是上面的三文字和下面的一文字,三个文字可以放在oriention为vertical的线性布局中,然后给它们background都设置填充色为白色,四角弧度的的XML文件,剩下就是简单的文字大小,颜色,内外间距等参数,可以根据实际开发需求去更改。<?xml version="1.0" encoding="utf-8"?>
<LinearLayout xmlns:android="http://schemas.android.com/apk/res/android"
android:layout_width="match_parent"
android:layout_height="match_parent"
android:orientation="vertical">
<LinearLayout
android:layout_width="wrap_content"
android:layout_height="wrap_content"
android:layout_marginLeft="13dp"
android:layout_marginRight="13dp"
android:background="@drawable/bottom_menu"
android:orientation="vertical">

<TextView
android:id="@+id/menu_camera"
android:layout_width="match_parent"
android:layout_height="wrap_content"
android:gravity="center"
android:text="相机"
android:textSize="18sp"
android:padding="10dp"
android:textColor="@color/colorPrimary" />

<View
android:layout_width="match_parent"
android:layout_height="1dp"
android:background="#D3D3D3" />

<TextView
android:id="@+id/menu_photo"
android:layout_width="match_parent"
android:layout_height="wrap_content"
android:gravity="center"
android:textSize="18sp"
android:padding="10dp"
android:text="相册"
android:textColor="@color/colorPrimary" />

<View
android:layout_width="match_parent"
android:layout_height="1dp"
android:background="#D3D3D3" />

<TextView
android:id="@+id/menu_logout"
android:layout_width="match_parent"
android:layout_height="wrap_content"
android:gravity="center"
android:textSize="18sp"
android:text="退出登录"
android:padding="10dp"
android:textColor="@color/colorAccent" />
</LinearLayout>
<TextView
android:id="@+id/menu_cancel"
android:layout_width="match_parent"
android:layout_height="wrap_content"
android:textSize="18sp"
android:textColor="@color/colorPrimary"
android:text="取消"
android:background="@drawable/bottom_menu"
android:padding="10dp"
android:layout_margin="13dp"
android:gravity="center"/>
</LinearLayout>
2.画好了弹窗布局,我们这里使用DialogFragment来实现功能。
在自定义的DialogFragment方法里onCreateView生命周期里进行如下的设置:
1)首先去掉弹窗的顶部title。
getDialog().requestWindowFeature(Window.FEATURE_NO_TITLE); 2)设置Dialog的背景透明,这点很重要,这样我们设置的background的xml布局才可以正常显示(填充色,弧度等) getDialog().getWindow().setBackgroundDrawable(new ColorDrawable(Color.TRANSPARENT)); 在onStart()生命周期里主要设置布局充满空间和弹出位置。
1)首先获取屏幕宽度DisplayMetrics dm= new DisplayMetrics();
getActivity().getDialog().getDefaultDisplay().getMetrics(dm);
int width= dm.widthPixels; 2)给dialogFragment设置显示宽高。getDialog().getWindow().setLayout(width, getDialog().getWindow().getAttributes().height); 3)给dialogFragment设置弹窗位置。WindowManager.LayoutParams params= getDialog().getWindow().getAttributes();
params.gravity= Gravity.BOTTOM;
getDialog().getWindow().setAttributes(params);3.在宿主的弹窗入口设置点击事件,显示DialogFragment
MenuDialogFragment fragment= new MenuDialogFragment();
fragment.show(getFragmentManager(), "");
至此就全部完成了,然后我们可以按照自己的开发需求给每个按钮相应的点击事件,我这里只简单写了个Toast以供参考。
源码下载:点击打开链接

相关文章推荐
- Android控件PopupWindow模仿ios底部弹窗
- 用.Net打造一个移动客户端(Android/IOS)的服务端框架NHM(三)——搭建Android开发环境,用Hibernate生成Android项目的Model层
- 输出Bag中的所有记录为一个json数组---精通android、IOS App应用服务程序开发
- 一个专为移动端开发的原创即时通讯框架,超轻量级、高度提炼,完全基于UDP协议,支持iOS、Android、标准Java平台。
- iOS开发 封装一个可以复用的弹窗父类(TSActionAlertView)
- Android开发dialog的底部弹窗
- 从 iOS,Objective-C, IPhone, iPad, Android, Java, Node.js 或其他平台,或通过其他开发语言,使用WS-Trust请求一个ADFS的令牌
- Android模拟IOS风格的自定义Dialog底部弹窗案例
- Android开发中实现IOS风格底部选择器(支持时间 日期 自定义)
- 如何在iOS和Android上选择一个JavaScript 引擎进行应用开发
- 用Xamarin 开发一个微信(ios和android)(1) 准备篇
- 输出Bag中的所有记录为一个只有值的json数组---精通android、IOS App应用服务程序开发
- Android基础控件——PopupWindow模仿ios底部弹窗
- 如何开发一个适配Android和iOS双平台的React Native应用
- Android初级开发(八)——手机多媒体—底部弹窗+选择照片或拍照的实现
- 用Xamarin 开发一个微信(ios和android)(1) 架构篇
- 【Android游戏开发十六】Android Gesture之【触摸屏手势识别】操作!利用触摸屏手势实现一个简单切换图片的功能!
- Symbian/Android/iOS/WM应用程序开发感受对比
- Android版WPS放弃免费策略 IOS版亦在开发中
- 16—【Android游戏开发十六】Android Gesture之【触摸屏手势识别】操作!利用触摸屏手势实现一个简单切换图片的功能