IDEA 通过Maven创建Spring MVC项目搭建
2018-02-21 20:56
567 查看
概述
本篇随笔主要记录内容如下:
1、通过Maven创建基于Spring Framework类库的MVC项目,免去了繁琐的XML配置;
2、在Idea里面配置Tomcat的测试启动项;
Maven创建MVC项目
2.1、新建Maven项目:New Project-->Maven

2.2、修改配置
配置pom.xml
在src/main/resources新建logback.xml来配置日志
在src/main/resources新建views文件夹,在src/main/resources/views新建index.jsp文件
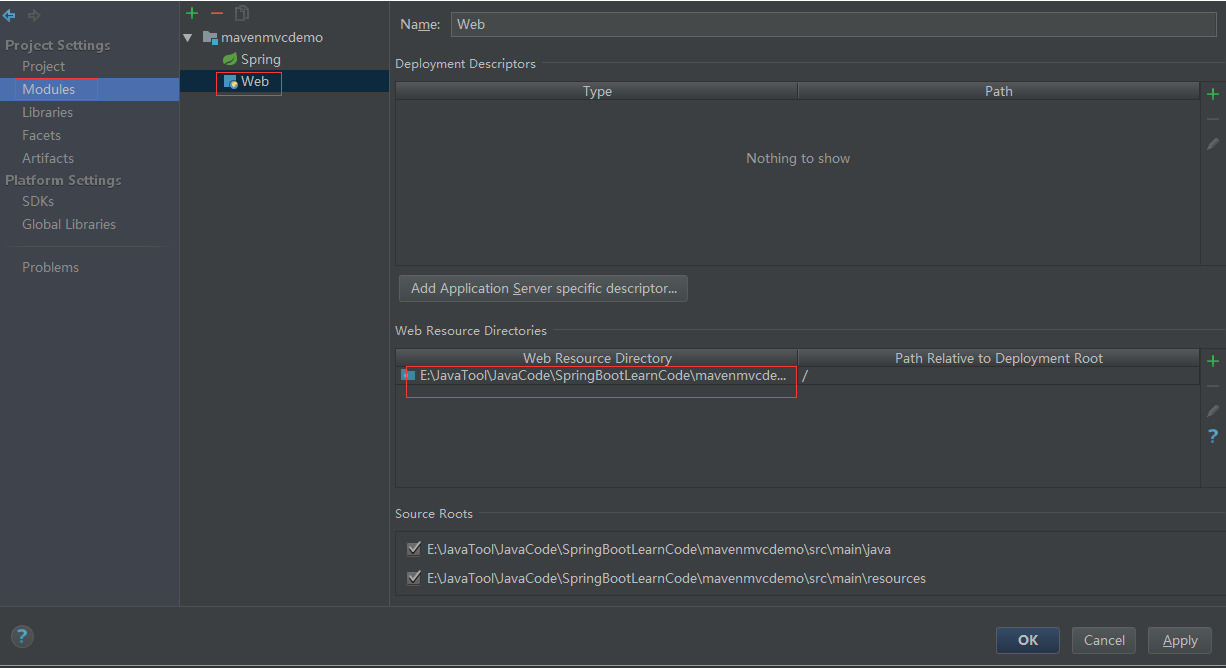
PS(右键views新建的时候并没有jsp类型,需要将views设置为web路径。Project Structure-->Modules-->选择web,设置Web Resource Directory)
2.3、新建代码块
新建MvcConfig文件,用于配置MVC的映射规则,主要使用的InternalResourceViewResolver 类;PS:通过Package,查找新建的类的路径
新建WebInitializer继承WebApplicationInitializer,重写里面OnStartUp方法。在WEB中,我们使用AnnotationConfigWebApplicationContext,代码如下
新建HelloController
Idea里面配置Tomcat
3.1、选择Edit Configration,设置Tomcat

3.2、设置Deployment,选择"+"之后,选择Artifacts
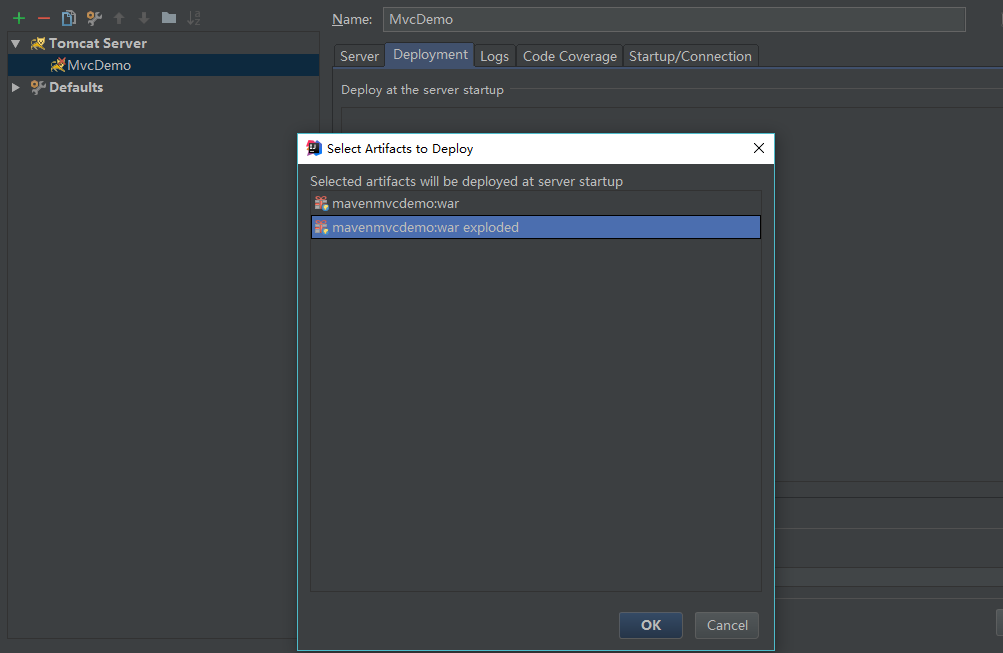
PS:war模式—-将WEB工程以包的形式上传到服务器 ;war exploded模式—-将WEB工程以当前文件夹的位置关系上传到服务器
3.3、设置Server内容项

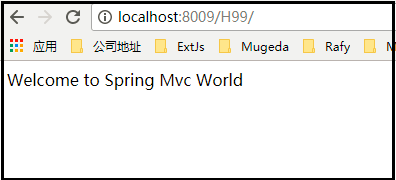
启动项目RunTomcat即可,输入 http://localhost:8009/H99/即可访问页面信息
get中文乱码
项目中遇到在前台用get方法传递中文到后台拿到的是乱码问题,花了好长时间解决,
下面是解决办法:
1、在IDEA编辑器里的编码格式都改成utf-8。
2、Get方式的乱码问题,由于参数是通过URL传递的,需要在服务器端配置URL编码格式。
注意,IDEA是没法编辑server.xml文件的,需要我们手动编辑文件。
在D:\tolls\apache-tomcat-7.0.64\conf下,修改tomcat的配置文件server.xml:
<Connector port="8080" protocol="HTTP/1.1"
connectionTimeout="20000"
redirectPort="8443" URIEncoding="UTF-8" />
只需增加 URIEncoding="UTF-8" 这一句,然后重启tomcat即可。
Post中文乱码
下载Demo
本篇随笔主要记录内容如下:
1、通过Maven创建基于Spring Framework类库的MVC项目,免去了繁琐的XML配置;
2、在Idea里面配置Tomcat的测试启动项;
Maven创建MVC项目
2.1、新建Maven项目:New Project-->Maven
2.2、修改配置
配置pom.xml
<?xml version="1.0" encoding="UTF-8"?>
<project xmlns="http://maven.apache.org/POM/4.0.0"
xmlns:xsi="http://www.w3.org/2001/XMLSchema-instance"
xsi:schemaLocation="http://maven.apache.org/POM/4.0.0 http://maven.apache.org/xsd/maven-4.0.0.xsd"> <modelVersion>4.0.0</modelVersion>

<groupId>com.wisely</groupId>
<artifactId>hightlight_springmvc4</artifactId>
<version>1.0-SNAPSHOT</version>
<packaging>war</packaging>
<properties>
<java.version>1.7</java.version>
<project.build.sourceEncoding>UTF-8</project.build.sourceEncoding>
<project.reporting.outputEncoding>UTF-8</project.reporting.outputEncoding>
<!--web-->
<jsp.version>2.2</jsp.version>
<jstl.version>1.2</jstl.version>
<servlet.version>3.1.0</servlet.version>
<!--spring-->
<spring-framwork.version>4.1.5.RELEASE</spring-framwork.version>
<!--Logging-->
<logback.version>1.0.13</logback.version>
<slf4j.version>1.7.5</slf4j.version>
</properties>
<dependencies>
<dependency>
<groupId>javax</groupId>
<artifactId>javaee-web-api</artifactId>
<version>7.0</version>
<scope>provided</scope>
</dependency>
<!--Spring MVC-->
<dependency>
<groupId>org.springframework</groupId>
<artifactId>spring-webmvc</artifactId>
<version>${spring-framwork.version}</version>
</dependency>
<!--WEB依赖-->
<dependency>
<groupId>javax.servlet</groupId>
<artifactId>jstl</artifactId>
<version>${jstl.version}</version>
</dependency>
<dependency>
<groupId>javax.servlet</groupId>
<artifactId>javax.servlet-api</artifactId>
<version>${servlet.version}</version>
<scope>provided</scope>
</dependency>
<dependency>
<groupId>javax.servlet.jsp</groupId>
<artifactId>jsp-api</artifactId>
<version>${jsp.version}</version>
<scope>provided</scope>
</dependency>
<!--Spring and Transactions-->
<dependency>
<groupId>org.springframework</groupId>
<artifactId>spring-tx</artifactId>
<version>${spring-framwork.version}</version>
</dependency>
<!--使用SLF4J和LogBack作为日志-->
<dependency>
<groupId>org.slf4j</groupId>
<artifactId>slf4j-api</artifactId>
<version>${slf4j.version}</version>
</dependency>
<dependency>
<groupId>log4j</groupId>
<artifactId>log4j</artifactId>
<version>1.2.16</version>
</dependency>
<dependency>
<groupId>org.slf4j</groupId>
<artifactId>jcl-over-slf4j</artifactId>
<version>${slf4j.version}</version>
</dependency>
<dependency>
<groupId>ch.qos.logback</groupId>
<artifactId>logback-classic</artifactId>
<version>${logback.version}</version>
</dependency>
<dependency>
<groupId>ch.qos.logback</groupId>
<artifactId>logback-core</artifactId>
<version>${logback.version}</version>
</dependency>
<dependency>
<groupId>ch.qos.logback</groupId>
<artifactId>logback-access</artifactId>
<version>${logback.version}</version>
</dependency>
</dependencies>
<build>
<plugins>
<plugin>
<groupId>org.apache.maven.plugins</groupId>
<artifactId>maven-compiler-plugin</artifactId>
<version>2.3.2</version>
<configuration>
<source>${java.version}</source>
<target>${java.version}</target>
</configuration>
</plugin>
<plugin>
<groupId>org.apache.maven.plugins</groupId>
<artifactId>maven-war-plugin</artifactId>
<version>2.3</version>
<configuration>
<failOnMissingWebXml>false</failOnMissingWebXml>
</configuration>
</plugin>
</plugins>
</build>
</project>
在src/main/resources新建logback.xml来配置日志
<?xml version="1.0" encoding="UTF-8"?>
<configuration scan="true" scanPeriod="1 seconds">

<contextListener class="ch.qos.logback.classic.jul.LevelChangePropagator">
<resetJUL>true</resetJUL>
</contextListener>

<jmxConfigurator/>

<appender name="console" class="ch.qos.logback.core.ConsoleAppender">
<encoder>
<pattern>logbak: %d{HH:mm:ss.SSS} %logger{36} - %msg%n</pattern>
</encoder>
</appender>

<logger name="org.springframework.web" level="DEBUG"/> <!-- 1 -->
<root level="info">
<appender-ref ref="console"/>
</root>
</configuration>
在src/main/resources新建views文件夹,在src/main/resources/views新建index.jsp文件
<%@ page contentType="text/html;charset=UTF-8" language="java" %>
<html>
<head>
<title>首页</title>
</head>
<body>
<pr>
Welcome to Spring Mvc World
</pr>
</body>
</html>
PS(右键views新建的时候并没有jsp类型,需要将views设置为web路径。Project Structure-->Modules-->选择web,设置Web Resource Directory)
2.3、新建代码块
新建MvcConfig文件,用于配置MVC的映射规则,主要使用的InternalResourceViewResolver 类;PS:通过Package,查找新建的类的路径
package com.wisely.highlight_springmvc4;

import org.springframework.context.annotation.Bean;
import org.springframework.context.annotation.ComponentScan;
import org.springframework.context.annotation.Configuration;
import org.springframework.web.servlet.config.annotation.EnableWebMvc;
import org.springframework.web.servlet.view.InternalResourceViewResolver;
import org.springframework.web.servlet.view.JstlView;

@Configuration
@EnableWebMvc
@ComponentScan("com.wisely.highlight_springmvc4")
public class MyMVCConfig {

@Bean
public InternalResourceViewResolver viewResolver(){
InternalResourceViewResolver viewResolver=new InternalResourceViewResolver();
viewResolver.setPrefix("/WEB-INF/classes/views/");
viewResolver.setSuffix(".jsp");
viewResolver.setViewClass(JstlView.class);
return  viewResolver;
}
}
新建WebInitializer继承WebApplicationInitializer,重写里面OnStartUp方法。在WEB中,我们使用AnnotationConfigWebApplicationContext,代码如下
package com.wisely.highlight_springmvc4;

import org.springframework.web.WebApplicationInitializer;
import org.springframework.web.context.support.AnnotationConfigWebApplicationContext;
import org.springframework.web.servlet.DispatcherServlet;

import javax.servlet.ServletContext;
import javax.servlet.ServletException;
import javax.servlet.ServletRegistration.Dynamic;

public class WebInitializer implements WebApplicationInitializer {

@Override
public void onStartup(ServletContext servletContext) throws ServletException {
AnnotationConfigWebApplicationContext context=new AnnotationConfigWebApplicationContext();
context.register(MyMVCConfig.class);
context.setServletContext(servletContext);

Dynamic servlet=servletContext.addServlet("dispatcher",new DispatcherServlet(context));
servlet.addMapping("/");
servlet.setLoadOnStartup(1);

}
}
新建HelloController
package com.wisely.highlight_springmvc4.web;

import org.springframework.stereotype.Controller;
import org.springframework.web.bind.annotation.RequestMapping;

@Controller
public class HelloController {

@RequestMapping("/index")
public String hello(){
return "index";
}
}
Idea里面配置Tomcat
3.1、选择Edit Configration,设置Tomcat
3.2、设置Deployment,选择"+"之后,选择Artifacts
PS:war模式—-将WEB工程以包的形式上传到服务器 ;war exploded模式—-将WEB工程以当前文件夹的位置关系上传到服务器
3.3、设置Server内容项
启动项目RunTomcat即可,输入 http://localhost:8009/H99/即可访问页面信息
get中文乱码
项目中遇到在前台用get方法传递中文到后台拿到的是乱码问题,花了好长时间解决,
下面是解决办法:
1、在IDEA编辑器里的编码格式都改成utf-8。
2、Get方式的乱码问题,由于参数是通过URL传递的,需要在服务器端配置URL编码格式。
注意,IDEA是没法编辑server.xml文件的,需要我们手动编辑文件。
在D:\tolls\apache-tomcat-7.0.64\conf下,修改tomcat的配置文件server.xml:
<Connector port="8080" protocol="HTTP/1.1"
connectionTimeout="20000"
redirectPort="8443" URIEncoding="UTF-8" />
只需增加 URIEncoding="UTF-8" 这一句,然后重启tomcat即可。
Post中文乱码
package com.wisely.highlight_springmvc4;

import org.springframework.web.WebApplicationInitializer;
import org.springframework.web.context.support.AnnotationConfigWebApplicationContext;
import org.springframework.web.filter.CharacterEncodingFilter;
import org.springframework.web.servlet.DispatcherServlet;

import javax.servlet.*;
import java.util.EnumSet;

public class WebInitializer implements WebApplicationInitializer {

@Override
public void onStartup(ServletContext servletContext) throws ServletException {
AnnotationConfigWebApplicationContext context=new AnnotationConfigWebApplicationContext();
context.register(MyMVCConfig.class);
context.setServletContext(servletContext);

//Post中文编码乱码
CharacterEncodingFilter characterEncodingFilter=new CharacterEncodingFilter();
characterEncodingFilter.setEncoding("UTF-8");
characterEncodingFilter.setForceEncoding(true);
FilterRegistration.Dynamic filter=servletContext.addFilter("characterEncodingFilter",characterEncodingFilter);
filter.addMappingForUrlPatterns(EnumSet.of(DispatcherType.REQUEST), true, "/*"); //映射Filter
//数据启动
ServletRegistration.Dynamic servlet=servletContext.addServlet("dispatcher",new DispatcherServlet(context));
servlet.addMapping("/");
servlet.setLoadOnStartup(1);
//开启异步方法处理
servlet.setAsyncSupported(true);

}
}
下载Demo

相关文章推荐
- Spring MVC(一)----eclipse通过Maven创建一个Spring MVC项目
- 通过maven创建javaweb项目的搭建工作
- idea Maven项目的搭建 无法创建java类的解决方案
- IDEA创建Maven的Spring MVC项目Demo
- 使用idea搭建一个简单的SSM框架:(1)使用idea创建maven项目
- IDEA下创建Maven项目,并整合使用Spring、Spring MVC、Mybatis框架
- IDEA使用maven创建Spring MVC WEB项目
- ubuntu16.04安装及配置tomcat,IDEA集成tomcat及部署web项目,IDEA通过阿里云镜像加速maven项目创建
- maven 搭建 ---- 以及 IDEA 创建 maven 项目
- Idea 下创建 maven管理的spring mvc项目,并上传到github
- MAVEN环境搭建和IDEA创建MAVEN项目
- IDEA 创建Spring MVC项目搭建
- 使用idea14.1.4创建maven多项目工程搭建jfinal框架报错
- idea使用maven创建WebApp项目+项目搭建
- Intellij IDEA 15.0.2创建Spring MVC Maven项目
- 【IDEA】无法创建Maven项目
- IntelliJ IDEA-ssm使用IDEA创建一个Maven风格的ssm项目
- IDEA maven项目创建Web时 JSP如何使用标签
- idea创建maven-archetype-webapp项目无java目录
- intellij idea Maven 创建项目时出现的一些问题