OpenCV基本数据结构及绘图功能
2018-02-13 21:14
288 查看
开发环境:Ubuntu+OpenCV3.2+Clion
用法:Vec<double,8> vec1;
可以使用[]访问Vec向量成员,可以使用以下预定义的类型typedef Vec<uchar, 2> Vec2b;
typedef Vec<uchar, 3> Vec3b;
typedef Vec<uchar, 4> Vec4b;
typedef Vec<short, 2> Vec2s;
typedef Vec<short, 3> Vec3s;
typedef Vec<short, 4> Vec4s;
typedef Vec<int, 2> Vec2i;
typedef Vec<int, 3> Vec3i;
typedef Vec<int, 4> Vec4i;
typedef Vec<float, 2> Vec2f;
typedef Vec<float, 3> Vec3f;
typedef Vec<float, 4> Vec4f;
typedef Vec<float, 6> Vec6f;
typedef Vec<double, 2> Vec2d;
typedef Vec<double, 3> Vec3d;
typedef Vec<double, 4> Vec4d;
typedef Vec<double, 6> Vec6d;示例: Vec3b vec1; // Vec<uchar,3> vec1;
vec1[0] = 1;
vec1[1] = 2;
vec1[2] = 3;
cout << "Vec3b: vec1 = " << vec1 << endl;
cout << "Vec3b: vec1[1] = " << vec1.val[1] << endl;
cout << "Vec3b: vec1[1] = " << vec1[1] << endl;
输出:Vec3b:vec1 = [1, 2, 3]
Vec3b:vec1[1] =?
Vec3b:vec1[1] =?
后两句不知为何输出的不对,请高手指教!
示例: Scalar scalar1(0, 255, 0);
cout << "scalar1 = " << scalar1 << endl;
scalar1[0] = 255;
scalar1[1] = 0;
scalar1[2] = 0;
scalar1[3] = 10;
cout << "scalar1 = " << scalar1 << endl;
cout << "scalar1[3] = " << scalar1.val[3] << endl;
输出:scalar1= [0, 255, 0, 0]
scalar1= [255, 0, 0, 10]
scalar1[3]= 10
cv::Pointp1;
p1.x=1;
p1.y=2;
或者
cv::Pointp1=Point(1,2);
或者使用如下预定义:
typedefPoint_<int> Point2i;
typedefPoint2i Point;
typedefPoint_<float> Point2f;
typedefPoint_<double> Point2d;
示例: Point pt(10, 20);
Point pt2(255, 255);
cout << "pt = " << pt << endl;
pt.x = 5;
pt.y = 6;
cout << "pt.x = " << pt.x << endl;
cout << "pt = " << pt << endl;
输出:pt= [10, 20]
pt.x= 5
pt= [5, 6]
示例: Size size1(10, 20);
cout << "size1 = " << size1 << endl;
cout << "size1.area = " << size1.area() << endl;
size1.width = 6;
cout << "size1 = " << size1 << endl;
输出:size1= [10 x 20]
size1.area= 200
size1= [6 x 20]
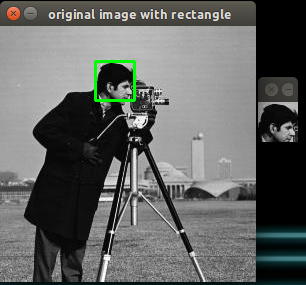
用法:cv::Rectrect(x,y,width,height)。
示例: Mat img1 = imread("../test.jpg");
Rect rect(95,35,40,40); //(x,y)=(180,200),w=200,height=200
Mat roi = cv::Mat(img1, rect);
Mat pImgRect = img1.clone();
rectangle(pImgRect,rect,cv::Scalar(0,255,0),2);
imshow("original image with rectangle",pImgRect);
imshow("roi",roi);
waitKey();
效果:
InputOutputArray img, //图像
Point pt1, //线的起点
Point pt2, //线的终点
const Scalar & color, //线的颜色
int thickness = 1, //线的粗细
int lineType = LINE_8, //线的类型
int shift = 0 //点坐标中小数位数
)
示例:
InputOutputArray img, //图像
Point pt1, //矩形的一个顶点
Point pt2, //和上一个顶点相对的顶点
const Scalar & color, //线的颜色
int thickness = 1, //线的粗细
int lineType = LINE_8, //线的类型
int shift = 0 //点坐标中小数位数
)示例: // 画矩形
img1 = imread("../test.jpg");
pt.x = 105;
pt.y = 45;
pt2.x = 135;
pt2.y = 75;
rectangle(img1, pt, pt2, Scalar(0, 200, 0), 2);
imshow("rectangle", img1);
waitKey(0);
效果:
InputOutputArray img, //图像
Point center, //圆心
int radius, //半径
const Scalar & color, //线的颜色
int thickness = 1, //如果是正数,则为线的粗细,如果为负数则填充圆的内部
int lineType = LINE_8, //线的类型
int shift = 0 ////点坐标中小数位数
)
示例:
InputOutputArray img, //图像
Point center, //椭圆中心
Size axes, //椭圆长半轴和短半轴
double angle, //椭圆的旋转角度
double startAngle, //椭圆弧的起始角
double endAngle, //椭圆弧的结束角
const Scalar & color, //线的颜色
int thickness = 1, //如果是正数,则为线的粗细,如果为负数则填充椭圆的内部
int lineType = LINE_8, //线的类型
int shift = 0 //中心坐标和半轴的小数位数
)
示例:
InputOutputArray img, //图像
InputArrayOfArrays pts, //点集
bool isClosed, //true为闭合,最后一个点和第一个点连起来
const Scalar & color, //线的颜色
int thickness = 1, //线的粗细
int lineType = LINE_8, //线的类型
int shift = 0 //点的坐标精度
)
示例:
1、 基本数据结构
这里梳理一些在工程中经常用到的几种基本数据类型,包括Vec、Scalar、Point、Size等。1.1.Vec类
Vec是一个模板类,主要用于存储数值向量,可以存储任意类型向量。支持+、-、*、==、!=运算。用法:Vec<double,8> vec1;
可以使用[]访问Vec向量成员,可以使用以下预定义的类型typedef Vec<uchar, 2> Vec2b;
typedef Vec<uchar, 3> Vec3b;
typedef Vec<uchar, 4> Vec4b;
typedef Vec<short, 2> Vec2s;
typedef Vec<short, 3> Vec3s;
typedef Vec<short, 4> Vec4s;
typedef Vec<int, 2> Vec2i;
typedef Vec<int, 3> Vec3i;
typedef Vec<int, 4> Vec4i;
typedef Vec<float, 2> Vec2f;
typedef Vec<float, 3> Vec3f;
typedef Vec<float, 4> Vec4f;
typedef Vec<float, 6> Vec6f;
typedef Vec<double, 2> Vec2d;
typedef Vec<double, 3> Vec3d;
typedef Vec<double, 4> Vec4d;
typedef Vec<double, 6> Vec6d;示例: Vec3b vec1; // Vec<uchar,3> vec1;
vec1[0] = 1;
vec1[1] = 2;
vec1[2] = 3;
cout << "Vec3b: vec1 = " << vec1 << endl;
cout << "Vec3b: vec1[1] = " << vec1.val[1] << endl;
cout << "Vec3b: vec1[1] = " << vec1[1] << endl;
输出:Vec3b:vec1 = [1, 2, 3]
Vec3b:vec1[1] =?
Vec3b:vec1[1] =?
后两句不知为何输出的不对,请高手指教!
1.2.Scalar类
Scalar类是一个从Vec类引出的模板类,是一个可存放4个元素的向量,广泛用于传递和读取图像中的像素值。同样可使用[]访问其中的元素值。示例: Scalar scalar1(0, 255, 0);
cout << "scalar1 = " << scalar1 << endl;
scalar1[0] = 255;
scalar1[1] = 0;
scalar1[2] = 0;
scalar1[3] = 10;
cout << "scalar1 = " << scalar1 << endl;
cout << "scalar1[3] = " << scalar1.val[3] << endl;
输出:scalar1= [0, 255, 0, 0]
scalar1= [255, 0, 0, 10]
scalar1[3]= 10
1.3.Point类
Point类常用语表示2维坐标,主要是图像中的像素点的坐标值,支持同Vec类的运算。可以使用如下方法定义:cv::Pointp1;
p1.x=1;
p1.y=2;
或者
cv::Pointp1=Point(1,2);
或者使用如下预定义:
typedefPoint_<int> Point2i;
typedefPoint2i Point;
typedefPoint_<float> Point2f;
typedefPoint_<double> Point2d;
示例: Point pt(10, 20);
Point pt2(255, 255);
cout << "pt = " << pt << endl;
pt.x = 5;
pt.y = 6;
cout << "pt.x = " << pt.x << endl;
cout << "pt = " << pt << endl;
输出:pt= [10, 20]
pt.x= 5
pt= [5, 6]
1.4.Size类
模板类Size可表示一副图像或一个矩形的大小。包含宽、高两个成员:width、height还有一个面积函数area()。示例: Size size1(10, 20);
cout << "size1 = " << size1 << endl;
cout << "size1.area = " << size1.area() << endl;
size1.width = 6;
cout << "size1 = " << size1 << endl;
输出:size1= [10 x 20]
size1.area= 200
size1= [6 x 20]
1.5.Rect类
Rect类是另一个用于定义2维矩形的模板类。它由两组参数定义:矩形的左上角标(x,y),矩形的宽和高(width,height)。Rect可以用来定义图像的ROI区域。用法:cv::Rectrect(x,y,width,height)。
示例: Mat img1 = imread("../test.jpg");
Rect rect(95,35,40,40); //(x,y)=(180,200),w=200,height=200
Mat roi = cv::Mat(img1, rect);
Mat pImgRect = img1.clone();
rectangle(pImgRect,rect,cv::Scalar(0,255,0),2);
imshow("original image with rectangle",pImgRect);
imshow("roi",roi);
waitKey();
效果:
2.基本绘图功能
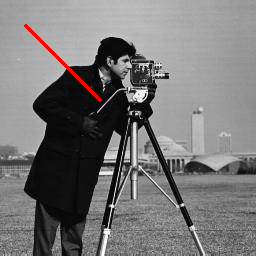
OpenCV的基本绘图功能用于在图像中绘制基本图像如线段、矩阵等。可用于标注图像,如在图像中标志角点的位置等信息。2.1.直线line
函数原型:void cv::line (InputOutputArray img, //图像
Point pt1, //线的起点
Point pt2, //线的终点
const Scalar & color, //线的颜色
int thickness = 1, //线的粗细
int lineType = LINE_8, //线的类型
int shift = 0 //点坐标中小数位数
)
示例:
// 画线段
Mat img1 = imread("../test.jpg");
pt.y = 25;
pt.x = 25;
pt2.y = 100;
pt2.x = 100;
line(img1, pt, pt2, Scalar(0, 0, 255), 2);
imshow("line", img1);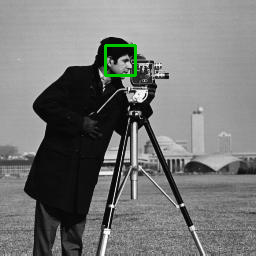
waitKey(0);效果:2.2.矩形Rectangle
函数原型:void cv::rectangle (InputOutputArray img, //图像
Point pt1, //矩形的一个顶点
Point pt2, //和上一个顶点相对的顶点
const Scalar & color, //线的颜色
int thickness = 1, //线的粗细
int lineType = LINE_8, //线的类型
int shift = 0 //点坐标中小数位数
)示例: // 画矩形
img1 = imread("../test.jpg");
pt.x = 105;
pt.y = 45;
pt2.x = 135;
pt2.y = 75;
rectangle(img1, pt, pt2, Scalar(0, 200, 0), 2);
imshow("rectangle", img1);
waitKey(0);
效果:
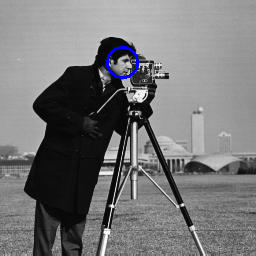
2.3.圆形Circle
函数原型:void cv::circle (InputOutputArray img, //图像
Point center, //圆心
int radius, //半径
const Scalar & color, //线的颜色
int thickness = 1, //如果是正数,则为线的粗细,如果为负数则填充圆的内部
int lineType = LINE_8, //线的类型
int shift = 0 ////点坐标中小数位数
)
示例:
// 画圆
img1 = imread("../test.jpg");
Point circle_center = Point(122, 62);
int circle_radius = 15;
circle(img1, circle_center, circle_radius, Scalar(255, 0, 0), 2);
imshow("circle", img1);
waitKey();效果:2.4.椭圆Ellipse
函数原型:void cv::ellipse (InputOutputArray img, //图像
Point center, //椭圆中心
Size axes, //椭圆长半轴和短半轴
double angle, //椭圆的旋转角度
double startAngle, //椭圆弧的起始角
double endAngle, //椭圆弧的结束角
const Scalar & color, //线的颜色
int thickness = 1, //如果是正数,则为线的粗细,如果为负数则填充椭圆的内部
int lineType = LINE_8, //线的类型
int shift = 0 //中心坐标和半轴的小数位数
)
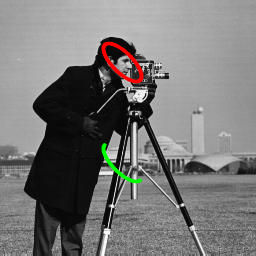
示例:
// 画椭圆
img1 = imread("../test.jpg");
Point center = Point(122, 62);
Size axes = Size(25, 10);
double  angle = 45;
//绘制0~360度,完整的椭圆
ellipse(img1, center, axes, angle, 0,360,Scalar(0, 0, 255), 2, LINE_AA);
//绘制0~180度,椭圆的一部分
center = Point(122, 162);
ellipse(img1, center, axes, angle, 0,180,Scalar(0, 255, 0), 2, LINE_AA);
imshow("ellipse", img1);
waitKey();效果:2.5.多边形Polygon
函数原型:void cv::polylines (InputOutputArray img, //图像
InputArrayOfArrays pts, //点集
bool isClosed, //true为闭合,最后一个点和第一个点连起来
const Scalar & color, //线的颜色
int thickness = 1, //线的粗细
int lineType = LINE_8, //线的类型
int shift = 0 //点的坐标精度
)
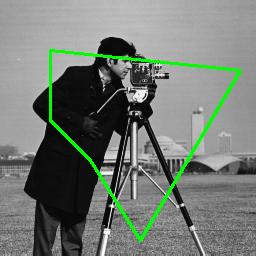
示例:
// 画多边形
img1 = imread("../test.jpg");
vector<Point> pt3;
pt3.push_back ( Point(50, 50) );
pt3.push_back ( Point(50, 120) );
pt3.push_back ( Point(90, 160) );
pt3.push_back ( Point(140, 240) );
pt3.push_back ( Point(240, 70) );
polylines(img1 ,pt3 ,1, CV_RGB(0, 255, 0), 2);
imshow("polylines", img1);
waitKey();
效果:

相关文章推荐
- OpenCV之core 模块. 核心功能(2)基本绘图 随机数发生器&绘制文字 离散傅立叶变换 输入输出XML和YAML文件 与 OpenCV 1 同时使用
- opencv学习(1)之基本数据结构
- OpenCV之core 模块. 核心功能(1)Mat - 基本图像容器 OpenCV如何扫描图像、利用查找表和计时 矩阵的掩码操作 使用OpenCV对两幅图像求和(求混合(blending))
- OpenCv基本绘图操作
- OpenCV学习:基本绘图
- opencv 基本数据结构
- opencv 绘图功能
- OpenCv学习笔记(七)---OpenCv中的基本绘图函数,圆,椭圆,线段,矩形,多边形的绘制(2)--提高篇
- opencv-OpenCV中的绘图功能
- opencv 基本数据结构
- 数据结构之栈的基本功能实现
- opencv 基本绘图函数总结
- OpenCV学习笔记(17)OpenCV之基本绘图
- C# 实现完整功能的截图控件(1)-实现绘图工具栏控件 控件实现了截图、绘制矩形、圆形、箭头、线条、文字,还需要可以撤销绘制步骤、保存图形等功能,基本实现了跟QQ2008截图一样的功能,还可以更
- 图像识别与处理之Opencv——基本数据结构及示例
- Android OpenCV中的几种基本数据结构
- opencv基本数据结构
- opencv基本绘图函数--点,线,矩形,圆等
- openCV 绘图基本函数
- OpenCV—基本数据结构与示例