QT下进程之间通讯——QtDBus(2)
2018-02-04 22:22
316 查看
一、简介
DBus的出现,使得Linux进程间通信更加便捷,不仅可以和用户空间应用程序进行通信,而且还可以和内核的程序进行通信,DBus使得Linux变得更加智能,更加具有交互性。DBus分为两种类型:system bus(系统总线),用于系统(Linux)和用户程序之间进行通信和消息的传递;session bus(回话总线),用于桌面(GNOME, KDE等)用户程序之间进行通信。
二、详解之Qt代码
1、代码一
(1)test.h[html] view
plain copy


#ifndef TEST_H
#define TEST_H
#include&nb
1f493
sp; <QtCore>
#include <QTimer>
class Test : public QObject
{
Q_OBJECT
public:
Test();
public slots:
QString testStart();
void changeTest();
signals:
void stateChange(QString str);
private:
QTimer *timer;
};
#endif /*TEST_H*/
(2)test.cpp
[html] view
plain copy
#include "test.h"
Test::Test()
{
qDebug() << "===========test init===========";
timer = new QTimer;
connect(timer, SIGNAL(timeout()), this, SLOT(changeTest()));
}
QString Test::testStart()
{
qDebug() << "+++++++QtDBus test++++++++++";
QString tmp;
tmp = QString("OFF");
qDebug() << tmp;
if (timer->isActive()) {
timer->stop();
}
timer->start(2000);
return tmp;
}
void Test::changeTest()
{
QString tmp;
tmp = QString("ON");
qDebug() << "+++++++++++++++++++" << tmp;
emit stateChange(tmp);
}
(3)test_adaptor.h
[html] view
plain copy
#include "test_adaptor.h"
#include <QtCore>
TestInterfaceAdaptor::TestInterfaceAdaptor(QObject *parent)
:QDBusAbstractAdaptor(parent)
{
qDebug() << "***************TestInterfaceAdaptor::TestInterfaceAdaptor**************";
setAutoRelaySignals(true); //connection of the signals on the parent
}
TestInterfaceAdaptor::~TestInterfaceAdaptor()
{
}
QString TestInterfaceAdaptor::test()
{
QString out;
QMetaObject::invokeMethod(parent(), "testStart",Q_RETURN_ARG(QString, out));
qDebug() << "==========" << out;
return out;
}
(4)test_adaptor.cpp
[html] view
plain copy
#ifndef TEST_ADAPTOR_H
#define TEST_ADAPTOR_H
#include <QtCore/QObject>
#include <QtDBus/QtDBus>
/****
**dbus-send --session --print-reply --dest=com.asianux.btagent / com.asianux.btagent.adaptor.test
**dbus-monitor --session \ "type='signal',interface='com.asianux.btagent.adaptor',member='stateChange'"
*****/
class TestInterfaceAdaptor : public QDBusAbstractAdaptor
{
Q_OBJECT
Q_CLASSINFO("D-Bus Interface", "com.asianux.btagent.adaptor")
Q_CLASSINFO("D-Bus Introspection", ""
" <interface name=\"com.asianux.btagent.adaptor\">\n"
" <method name=\"test\">\n"
" <arg name=\"state\" type=\"s\" direction=\"out\"/>\n"
" </method> \n"
" <signal name=\"stateChange\"> \n"
" <arg type=\"s\" direction=\"out\"/>\n"
" </signal> \n"
" </interface>\n"
"")
public:
TestInterfaceAdaptor(QObject *parent);
virtual ~TestInterfaceAdaptor();
public:
public slots:
QString test();
signals:
void stateChange(QString str);
};
#endif /*TEST_ADAPTOR_H*/
(5)main.cpp
[html] view
plain copy
#include <QApplication>
#include <QtDBus>
#include <QDebug>
#include "test_adaptor.h"
#include "test.h"
int main(int argc,char *argv[])
{
QApplication app(argc,argv);
Test *test = new Test();
new TestInterfaceAdaptor(test);
QDBusConnection conn = QDBusConnection::sessionBus();
conn.registerObject("/",test);
conn.registerService("com.asianux.btagent");
return app.exec();
}
(6)运行
可以在linux终端发送(dbus-send)和监控dbus(dbus-monitor)的信息。 dbus-send调用远程方法的一般形式是:$ dbus-send [--system | --session] --type=method_call --print-reply --dest=连接名 对象路径 接口名.方法名 参数类型:参数值 参数类型:参数值,dbus-send支持的参数类型包括:string,
int32, uint32, double, byte, boolean。
启动程序后,先执行:dbus-send --session --print-reply --dest=com.asianux.btagent / com.asianux.btagent.adaptor.test,发送dbus信号,得到输出结果:

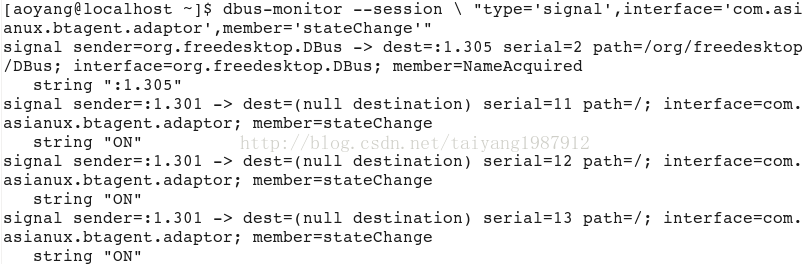
然后输入:dbus-monitor --session \ "type='signal',interface='com.asianux.btagent.adaptor',member='stateChange'",监控,从应用程序发出的DBus信号:
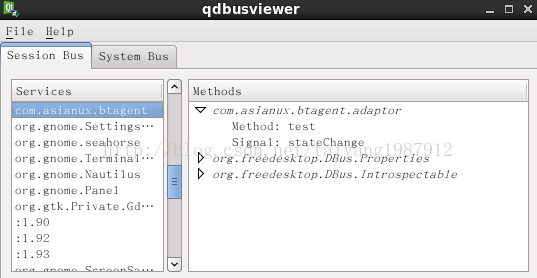
也可以通过qt自带的工具qdbusviewer查看和操作相应的DBus信号:
(7)除了上述方法,也可以使用glib的程序进行DBus通信。
main.c:
[html] view
plain copy
#include <stdio.h>
#include <stdlib.h>
#include <glib.h>
#include <dbus/dbus-glib.h>
#include <dbus/dbus.h>
static void bt_manager_changed_cb (DBusGProxy *proxy,
const gchar *state,
gpointer user_data)
{
printf("state = %s\n",state);
}
int main(int argc,char *argv[])
{
GMainLoop *loop = g_main_loop_new(NULL,TRUE);
g_type_init();
GError * error = NULL;
DBusGConnection *gconn = dbus_g_bus_get(DBUS_BUS_SESSION, NULL);
DBusGProxy *m_proxy = dbus_g_proxy_new_for_name(gconn, "com.asianux.btagent","/","com.asianux.btagent.adaptor");
char *str = NULL;
dbus_g_proxy_call(m_proxy, "test", &error,
G_TYPE_INVALID,
G_TYPE_STRING,&str,
G_TYPE_INVALID);
dbus_g_proxy_add_signal (m_proxy,
"stateChange",
G_TYPE_STRING,
G_TYPE_INVALID);
dbus_g_proxy_connect_signal (m_proxy,
"stateChange",
G_CALLBACK (bt_manager_changed_cb),
NULL,
NULL);
printf("str = %s\n",str);
g_main_loop_run(loop);
}
makefile:
[html] view
plain copy
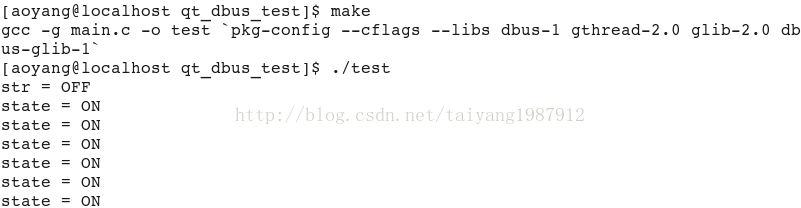
all:
gcc -g main.c -o test `pkg-config --cflags --libs dbus-1 gthread-2.0 glib-2.0 dbus-glib-1`
clean:
rm -rf *.o test
运行结果(先启动最上的服务器qt程序):
2、代码二
(1)qdbus.h[html] view
plain copy
#ifndef QDBUS
#define QDBUS
#include <QtCore>
/*dbus-send --session --print-reply --dest=com.asianux.btagent2 / com.asianux.btagent2.interface.slotInterface string:"helloworld"*/
class DeviceManager : public QObject
{
Q_OBJECT
Q_CLASSINFO("D-Bus Interface", "com.asianux.btagent2.interface")
public:
// DeviceManager(){}
// ~DeviceManager(){}
public slots:
void slotInterface(QString);
};
#endif // QDBUS
(2)main.cpp
[html] view
plain copy
#include <QCoreApplication>
#include <QObject>
#include <QtDBus>
#include "qdbus.h"
void DeviceManager::slotInterface(QString str)
{
qDebug() << "D-Bus Interface(com.asianux.btagent2.interface):" << str;
}
int main(int argc, char *argv[])
{
QCoreApplication a(argc, argv);
QDBusConnection bus = QDBusConnection::sessionBus();
if(!bus.registerService("com.asianux.btagent2")){
qDebug() << bus.lastError().message();
exit(1);
}
DeviceManager *deviceManager = new DeviceManager();
bus.registerObject("/", deviceManager, QDBusConnection::ExportAllSlots);
return a.exec();
}
运行结果:

3、其他网上代码
D-Bus的QT4绑定下面,我们通过一个实例来介绍D-Bus的QT4绑定。(参见hotel.pro)
在Session bus上创建一个"com.test.hotel" service,通过这个service可以执行check in,check out和query三个动作。
创建Service并且注册Object:
| // 用于建立到session bus的连接 QDBusConnection bus = QDBusConnection::sessionBus(); // 在session bus上注册名为"com.test.hotel"的service if (!bus.registerService("com.test.hotel")){ qDebug()<< bus.lastError().message(); exit(1); } Hotel my_hotel; // 注册名为"/hotel/registry"的object。 // "QDBusConnection::ExportAllSlots" // 表示把类Hotel的所有Slot都导出为这个Object的method bus.registerObject("/hotel/registry",&my_hotel, QDBusConnection::ExportAllSlots); return a.exec(); } |
| class Hotel:public QObject { Q_OBJECT // 定义Interface名称为"com.test.hotel.registry" Q_CLASSINFO("D-Bus Interface","com.test.hotel.registry") public: Hotel() { m_rooms = MAX_ROOMS;} public slots: // Check in,参数为房间数,返回成功拿到的房间数 int checkIn(int num_room); // Check out,参数为房间数,返回成功退回的房间数 int checkOut(int num_room); // Query,用于查询目前还剩下的房间数 int query(); private: int m_rooms; QReadWriteLock m_lock; }; |
通过QDBusMessage访问Service
在QT4中,用QDBusMessage表示在D-Bus上发送和接收的Message。(参见checkin.pro)
| // 用来构造一个在D-Bus上传递的Message QDBusMessage m = QDBusMessage::createMethodCall("com.test.hotel", "/hotel/registry", "com.test.hotel.registry", "checkIn"); if (argc== 2){ // 给QDBusMessage增加一个参数; // 这是一种比较友好的写法,也可以用setArguments来实现 m << QString(argv[1]).toInt(); } // 发送Message QDBusMessage response = QDBusConnection::sessionBus().call(m); // 判断Method是否被正确返回 if (response.type()== QDBusMessage::ReplyMessage){ // QDBusMessage的arguments不仅可以用来存储发送的参数,也用来存储返回值; // 这里取得checkIn的返回值 int num_room = response.arguments().takeFirst().toInt(); printf("Got %d %s\n", num_room,(num_room> 1)?"rooms": "room"); } else { fprintf(stderr,"Check In fail!\n"); } |
在QT4中,QDBusInterface可以更加方便的访问Service。(参见checkin2.pro)
| // 创建QDBusInterface QDBusInterface iface( "com.test.hotel", "/hotel/registry", "com.test.hotel.registry", QDBusConnection::sessionBus()); if (!iface.isValid()){ qDebug()<< qPrintable(QDBusConnection::sessionBus(). lastError().message()); exit(1); } // 呼叫远程的checkIn,参数为num_room QDBusReply<int> reply= iface.call("checkIn", num_room); if (reply.isValid()){ num_room = reply.value(); printf("Got %d %s\n", num_room,(num_room> 1)?"rooms": "room"); } else { fprintf(stderr,"Check In fail!\n"); } |
从D-Bus XML自动生成Proxy类
用QDB usInterface访问Service已经非常方便了,但还不够直观。还有没有更直观的方法,就像访问本地类成员变量的方式访问远程的method?答案是Proxy。
Proxy Object提供了一种更加直观的方式来访问Service,就好像调用本地对象的方法一样。
概括的说,达成上述目标需要分三步走:
(1)使用工具qdbuscpp2xml从hotel.h生成XML文件;
qdbuscpp2xml -M hotel.h -o com.test.hotel.xml
(2)使用工具qdbusxml2cpp从XML文件生成继承自QDBusInterface的类;
qdbusxml2cpp com.test.hotel.xml -i hotel.h -p hotelInterface
这条命令会生成两个文件:hotelInterface.cpp和hotelInterface.h
(3)调用(2)生成的类来访问Service。
下面是举例(参见checkin3.pro ):
| // 初始化自动生成的Proxy类com::test::hotel::registry com::test::hotel::registry myHotel("com.test.hotel", "/hotel/registry", QDBusConnection::sessionBus()); // 调用checkIn QDBusPendingReply<int> reply= myHotel.checkIn(num_room); // qdbusxml2cpp生成的Proxy类是采用异步的方式来传递Message, // 所以在此需要调用waitForFinished来等到Message执行完成 reply.waitForFinished(); if (reply.isValid()){ num_room = reply.value(); printf("Got %d %s\n", num_room,(num_room> 1)?"rooms": "room"); } else { fprintf(stderr,"Check In fail!\n"); }; |
如前文所述,我们可以直接把class Hotel注册为Message Bus上的一个Object,但这种方式并不是QT4所推荐的。QT4推荐使用Adapter来注册Object。
很多情况下,我们可能只需要把我们定义的类里的方法有选择的发布到Message Bus上,使用Adapter可以很方便的实现这种意图。
以前文中的Hotel为例,假设我们只需要把checkIn和checkOut发布到Message Bus上,应该怎么办?
(1)使用工具 qdbuscpp2xml从hotel.h生成XML文件;
qdbuscpp2xml -M hotel.h -o com.test.hotel.xml
(2)编辑com.test.hotel.xml,把其中的query部分去掉;
即去掉以下三条语句:
<method name="query">
1fff8
; <arg type="i" direction="out"/>
</method>
(3)使用工具qdbusxml2cpp从XML文件生成继承自QDBusInterface的类;
qdbusxml2cpp com.test.hotel.xml -i hotel.h -a hotelAdaptor
这条命令会生成两个文件:hotelAdaptor.cpp和hotelAdaptor.h
(4)调用(3)生成的类来注册Object。(参见hotel2.pro)
| int main(int argc,char*argv[]) { QCoreApplication a(argc, argv); QDBusConnection bus = QDBusConnection::sessionBus(); Hotel myHotel; // RegistryAdaptor是qdbusxml2cpp生成的Adaptor类 RegistryAdaptor myAdaptor(&myHotel); if (!bus.registerService("com.test.hotel")){ qDebug()<< bus.lastError().message(); exit(1); } bus.registerObject("/hotel/registry",&myHotel); return a.exec(); } |
自动启动Service
D-Bus系统提供了一种机制可以在访问某个service时,自动把该程序运行起来。
我们需要在/usr/share/dbus-1/services下面建立com.test.hotel.service文件,文件的内容如下:
[D-BUS Service]
Name=com.test.hotel
Exec=/path/to/your/hotel
这样,我们在访问Hotel的method之前,就不必手动运行该应用程序了。
4、其他细节
(1)如果想使用system bus(自启动服务参考上述),需要在/etc/dbus-1/system.d/目录下创建一个配置文件my.conf:
[html] view
plain copy
<!DOCTYPE busconfig PUBLIC
"-//freedesktop//DTD D-BUS Bus Configuration 1.0//EN"
"http://www.freedesktop.org/standards/dbus/1.0/busconfig.dtd">
<busconfig>
<policy context="default">
<allow own="com.asianux.btagent2"/>
<allow send_destination="com.asianux.btagent2"/>
<allow receive_sender="com.asianux.btagent2"/>
</policy>
</busconfig>
(2)可以参考通过QDbus实现的Qt检测U盘的例子:http://download.csdn.net/detail/taiyang1987912/8686677
(3)除了DBus,也可使用SIGHUP信号用于进程间通信,比如重写了配置文件,又不想重启程序就让配置生效,可以往该程序的进程发送一个SIGHUP信号:killall -HUP <进程名称>或kill -HUP <进程号>,可能因以前的系统没有提供用户自定义信号 SIGUSR1 和 SIGUSR1 ,而对于一个没有终端的守护进程来说是不可能收到 SIGHUP 信号的,所以就把 SIGHUP 当用户自定义信号使用。
[html] view
plain copy
#include<stdio.h>
#include <stdlib.h>
#include<signal.h>
char**args;
void exithandle(int sig)
{
printf("%s:(%d)sighup received\n", args[0], sig);
exit(0);
}
int main(int argc,char **argv)
{
args = argv;
signal(SIGHUP,exithandle);
while(1) sleep(1);
return 0;
}
运行程序,打开另终端发送killall -HUP ./sighupcode,则会处理SIGHUP信号:

三、详解之C代码
1、代码
使用C语言调用dbus的底层函数编写一个远程调用的示例代码,代码很简单,没使用GObject等一些复杂的库。(1)method_send.c
[html] view
plain copy
#include <stdio.h>
#include <stdlib.h>
#include <string.h>
#include <dbus/dbus-glib.h>
#include <dbus/dbus.h>
#include <unistd.h>
/*gcc -o method_send method_send.c -I/usr/include/glib-2.0 -I/usr/include/dbus-1.0 -I/usr/lib64/glib-2.0/include -I/usr/lib64/dbus-1.0/include -lglib-2.0 -ldbus-glib-1*/
void reply_to_method_call(DBusMessage * msg, DBusConnection * conn)
{
DBusMessage * reply;
DBusMessageIter arg;
char * param = NULL;
dbus_bool_t stat = TRUE;
dbus_uint32_t level = 2010;
dbus_uint32_t serial = 0;
//从msg中读取参数,这个在上一次学习中学过
if(!dbus_message_iter_init(msg,&arg))
printf("Message has noargs\n");
else if(dbus_message_iter_get_arg_type(&arg)!= DBUS_TYPE_STRING)
printf("Arg is notstring!\n");
else
dbus_message_iter_get_basic(&arg,& param);
if(param == NULL) return;
//创建返回消息reply
reply = dbus_message_new_method_return(msg);
//在返回消息中填入两个参数,和信号加入参数的方式是一样的。这次我们将加入两个参数。
dbus_message_iter_init_append(reply,&arg);
if(!dbus_message_iter_append_basic(&arg,DBUS_TYPE_BOOLEAN,&stat)){
printf("Out ofMemory!\n");
exit(1);
}
if(!dbus_message_iter_append_basic(&arg,DBUS_TYPE_UINT32,&level)){
printf("Out ofMemory!\n");
exit(1);
}
//发送返回消息
if( !dbus_connection_send(conn, reply,&serial)){
printf("Out of Memory\n");
exit(1);
}
dbus_connection_flush (conn);
dbus_message_unref (reply);
}
void listen_dbus()
{
DBusMessage * msg;
DBusMessageIter arg;
DBusConnection * connection;
DBusError err;
int ret;
char * sigvalue;
dbus_error_init(&err);
//创建于session D-Bus的连接
connection =dbus_bus_get(DBUS_BUS_SESSION, &err);
if(dbus_error_is_set(&err)){
fprintf(stderr,"ConnectionError %s\n",err.message);
dbus_error_free(&err);
}
if(connection == NULL)
return;
//设置一个BUS name:test.wei.dest
ret =dbus_bus_request_name(connection,"test.wei.dest",DBUS_NAME_FLAG_REPLACE_EXISTING,&err);
if(dbus_error_is_set(&err)){
fprintf(stderr,"Name Error%s\n",err.message);
dbus_error_free(&err);
}
if(ret !=DBUS_REQUEST_NAME_REPLY_PRIMARY_OWNER)
return;
//要求监听某个singal:来自接口test.signal.Type的信号
dbus_bus_add_match(connection,"type='signal',interface='test.signal.Type'",&err);
dbus_connection_flush(connection);
if(dbus_error_is_set(&err)){
fprintf(stderr,"Match Error%s\n",err.message);
dbus_error_free(&err);
}
while(1){
dbus_connection_read_write(connection,0);
msg =dbus_connection_pop_message (connection);
if(msg == NULL){
sleep(1);
continue;
}
if(dbus_message_is_signal(msg,"test.signal.Type","Test")){
if(!dbus_message_iter_init(msg,&arg))
fprintf(stderr,"Message Has no Param");
else if(dbus_message_iter_get_arg_type(&arg) != DBUS_TYPE_STRING)
g_printerr("Param isnot string");
else
dbus_message_iter_get_basic(&arg,&sigvalue);
}else if(dbus_message_is_method_call(msg,"test.method.Type","Method")){
//我们这里面先比较了接口名字和方法名字,实际上应当现比较路径
if(strcmp(dbus_message_get_path(msg),"/test/method/Object") == 0)
reply_to_method_call(msg,connection);
}
dbus_message_unref(msg);
}
}
int main( int argc , char ** argv)
{
listen_dbus();
return 0;
}
(2)method_recv.c
[html] view
plain copy
#include <stdio.h>
#include <stdlib.h>
#include <string.h>
#include <dbus/dbus-glib.h>
#include <dbus/dbus.h>
#include <unistd.h>
/*gcc -o method_recv method_recv.c -I/usr/include/glib-2.0 -I/usr/include/dbus-1.0 -I/usr/lib64/glib-2.0/include -I/usr/lib64/dbus-1.0/include -lglib-2.0 -ldbus-glib-1*/
//建立与session D-Bus daemo的连接,并设定连接的名字,相关的代码已经多次使用过了
DBusConnection * connect_dbus()
{
DBusError err;
DBusConnection * connection;
int ret;
//Step 1: connecting session bus
dbus_error_init(&err);
connection =dbus_bus_get(DBUS_BUS_SESSION, &err);
if(dbus_error_is_set(&err)){
fprintf(stderr,"ConnectionErr : %s\n",err.message);
dbus_error_free(&err);
}
if(connection == NULL)
return NULL;
//step 2: 设置BUS name,也即连接的名字。
ret =dbus_bus_request_name(connection,"test.wei.source",DBUS_NAME_FLAG_REPLACE_EXISTING,&err);
if(dbus_error_is_set(&err)){
fprintf(stderr,"Name Err :%s\n",err.message);
dbus_error_free(&err);
}
if(ret !=DBUS_REQUEST_NAME_REPLY_PRIMARY_OWNER)
return NULL;
return connection;
}
void send_a_method_call(DBusConnection * connection,char * param)
{
DBusError err;
DBusMessage * msg;
DBusMessageIter arg;
DBusPendingCall * pending;
dbus_bool_t * stat;
dbus_uint32_t * level;
dbus_error_init(&err);
//针对目的地地址,请参考图,创建一个method call消息。Constructs a new message to invoke a method on a remote object.
msg =dbus_message_new_method_call ("test.wei.dest","/test/method/Object","test.method.Type","Method");
if(msg == NULL){
g_printerr("MessageNULL");
return;
}
//为消息添加参数。Appendarguments
dbus_message_iter_init_append(msg, &arg);
if(!dbus_message_iter_append_basic(&arg, DBUS_TYPE_STRING,&stat)){
g_printerr("Out of Memory!");
exit(1);
}
//发送消息并获得reply的handle。Queues amessage to send, as withdbus_connection_send() , but also returns aDBusPendingCall used to receive a reply to the message.
if(!dbus_connection_send_with_reply (connection, msg,&pending, -1)){
g_printerr("Out of Memory!");
exit(1);
}
if(pending == NULL){
g_printerr("Pending CallNULL: connection is disconnected ");
dbus_message_unref(msg);
return;
}
dbus_connection_flush(connection);
dbus_message_unref(msg);
//waiting a reply,在发送的时候,已经获取了methodreply的handle,类型为DBusPendingCall。
// block until we recieve a reply, Block until the pendingcall is completed.
dbus_pending_call_block (pending);
//get the reply message,Gets thereply, or returns NULL if none has been received yet.
msg =dbus_pending_call_steal_reply (pending);
if (msg == NULL) {
fprintf(stderr, "ReplyNull\n");
exit(1);
}
// free the pendingmessage handle
dbus_pending_call_unref(pending);
// read the parameters
if(!dbus_message_iter_init(msg, &arg))
fprintf(stderr, "Message hasno arguments!\n");
else if (dbus_message_iter_get_arg_type(&arg) != DBUS_TYPE_BOOLEAN)
fprintf(stderr, "Argument isnot boolean!\n");
else
dbus_message_iter_get_basic(&arg, &stat);
if (!dbus_message_iter_next(&arg))
fprintf(stderr, "Message hastoo few arguments!\n");
else if (dbus_message_iter_get_arg_type(&arg) != DBUS_TYPE_UINT32 )
fprintf(stderr, "Argument isnot int!\n");
else
dbus_message_iter_get_basic(&arg, &level);
printf("Got Reply: %d,%d\n", stat, level);
dbus_message_unref(msg);
}
int main( int argc , char ** argv)
{
DBusConnection * connection;
connection = connect_dbus();
if(connection == NULL)
return -1;
send_a_method_call(connection,"Hello, D-Bus");
return 0;
}
(3)编译运行(先运行method_send)
编译method_send.c:

编译method_recv.c(得到运行结果):

四、总结
(1)本文仅提供代码的测试,其他的具体函数的意义请查阅相应的帮助文档。(2)源码已经打包上传到csdn上,可登录下载(http://download.csdn.net/detail/taiyang1987912/8687183)。
(3)若有建议,请留言,在此先感谢! http://blog.csdn.net/taiyang1987912/article/details/45642079

相关文章推荐
- 实例解析C++/CLI程序进程之间的通讯
- Android面试篇之IPC机制[进程之间的通讯]
- 线程共享的环境包括:进程代码段、进程的公有数据(利用这些共享的数据,线程很容易的实现相互之间的通讯)、进程打开的文件描述符、信号的处理器、进程的当前目录和进程用户ID与进程组ID。 进程拥有这
- 进程之间的通讯之管道
- 利用管道技术在两个进程之间通讯.
- c# 进程间同步实现 进程之间通讯的几种方法
- 进程之间通讯的几种方法
- 进程之间及跨进程的Appdomain之间通讯方式
- Windows 进程之间通讯的几种方法
- eVC编程遇到的各种问题之——进程之间的通讯
- 进程之间的四种通讯方式
- 进程之间通讯问题
- windows进程之间的通讯
- 进程之间通讯:M_COPYDATA消息来实现两个进程之间传递数据.
- 进程之间通讯方法
- AIDL实现不同应用之间跨进程通讯及传递与返回各种数据类型和远程接口回调
- messenger进程之间的通讯
- c# 进程间同步实现 进程之间通讯的几种方法
- 进程之间通讯的代码:
- C++/CLI程序进程之间的通讯