Full Stack Hello World Voting Ethereum Dapp Tutorial — Part 3
2018-02-02 07:05
615 查看
[Tutorial was last updated in January 2018]
In Part
1, we built a simple voting dapp and got it working on our local machine. In Part
2, we moved our app to use truffle framework and deployed it to the public Ropsten testnet and interacted with it through the truffle console and through a webpage. In this tutorial, we will add few more features to our voting dapp in order to learn a
few key concepts. Here is what you will learn in this tutorial:
Learn to use new data types like struct to organize and store data on the blockchain.
Learn the concept of tokens and its usage.
Learn to make payments using Ether, the currency of the Ethereum blockchain platform.
You can find all the code in chapter3 directory in this repository:https://github.com/maheshmurthy/ethereum_voting_dapp
As you may know, in a general election, every citizen gets to cast one vote for their favorite candidate. However there are elections like electing a board of directors of a company where
you are a shareholder, you get to vote based on the number of shares you own in that company. So, the more shares you own, the more votes you get.
Let’s enhance our voting dapp to support this type of election. We will add functionality for anyone to purchase shares in the company. They can then use those shares to vote for the candidates.
We will also add a feature to lookup voter information. In the Ethereum blockchain world, these shares are more commonly referred to as tokens. We will refer to these shares as tokens in the rest of this tutorial.
If you want to skip all the explanation and want to just see the contract file, you can find it here:https://github.com/maheshmurthy/ethereum_voting_dapp/blob/master/chapter3/contracts/Voting.sol.
The first step is to declare the variables we need to store all the information we are interested in. Below are the contract variables with explanation.
In tutorial
1 and tutorial 2, we initialized the list of candidates
contesting in a constructor. Remember that the constructor is invoked just once when the contract is deployed on the blockchain. Here, we also have to initialize the contract with total number of tokens available for sale and the cost of each token. So, we
update our contract constructor like below:
In truffle, you deploy your code on to the blockchain using migrations. You can take a peek at a migration file here.
An example deploy call in truffle migration file looks like this:
Now that we have initialized the tokens and set the price, let’s see how someone could purchase these tokens by paying ether. Here is the function to buy tokens.
An example purchase call looks like this:
The
Ether = 10 tokens.
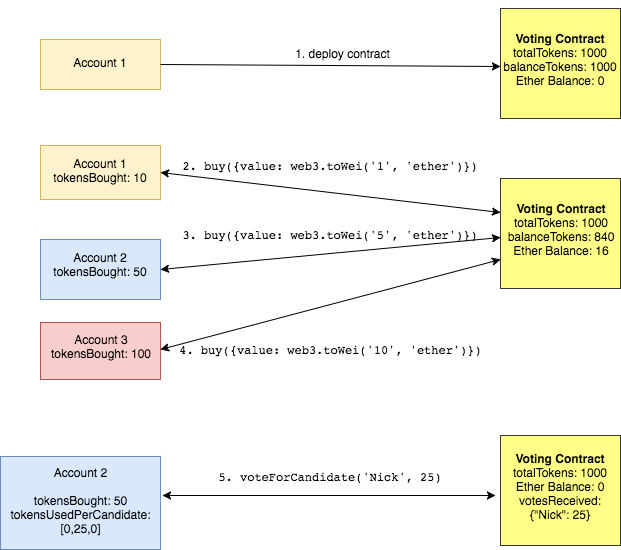
Let’s take a break from looking at the code for a moment and visualize the interaction between accounts (voters) and the contract.
As you can see in the contract
file on github, the rest of the new methods in the contract are mostly getters and should be easy to follow along.
The index.html file
has some new updates:
To vote for a candidate, you now have to specify the no. of tokens you want to vote with.
There is a new section where you can purchase tokens.
You can now look up voter information — how many tokens they own and no. of votes they have cast to each candidate.
The candidates are not hardcoded anymore. We fetch the candidates from the blockchain and populate it.
The app.js file
has the updates to support all the UI functionality above.
Update the deployment file 2_deploy_contracts.js to pass in total tokens and token price along with candidate names.
To summarize, the four files we have updated in this tutorial are Voting.sol, index.html, app.js and 2_deploy_contracts.js. Once you have updated your truffle repository with these files,
we can deploy the contract to the blockchain. The deploy process is exactly the same as the previous tutorial.
You just have to compile and migrate using truffle command.
If you are able to successfully deploy the contract and start your web server, your page will look like below:

As you can see in the screenshot above, you will be able to purchase tokens, vote for candidates using the tokens and lookup voter information by their address. If you are able to get
all these features working, congratulations!
I hope this series of tutorials has given you an idea of what Ethereum is, its capabilities, and how to build decentralized applications. If you run into issues getting the application working
(github repo), feel free to DM me on twitter @zastrinlab.
You now know just enough Ethereum to be dangerous :)
If you want an even more challenging project, I created a course to build a decentralized
eBay on Ethereum & IPFS.
If you would like to get notified when I write more tutorials, you can subscribe here.
原文地址: https://medium.com/@mvmurthy/full-stack-hello-world-voting-ethereum-dapp-tutorial-part-3-331c2712c9df
In Part
1, we built a simple voting dapp and got it working on our local machine. In Part
2, we moved our app to use truffle framework and deployed it to the public Ropsten testnet and interacted with it through the truffle console and through a webpage. In this tutorial, we will add few more features to our voting dapp in order to learn a
few key concepts. Here is what you will learn in this tutorial:
Learn to use new data types like struct to organize and store data on the blockchain.
Learn the concept of tokens and its usage.
Learn to make payments using Ether, the currency of the Ethereum blockchain platform.
You can find all the code in chapter3 directory in this repository:https://github.com/maheshmurthy/ethereum_voting_dapp
As you may know, in a general election, every citizen gets to cast one vote for their favorite candidate. However there are elections like electing a board of directors of a company where
you are a shareholder, you get to vote based on the number of shares you own in that company. So, the more shares you own, the more votes you get.
Let’s enhance our voting dapp to support this type of election. We will add functionality for anyone to purchase shares in the company. They can then use those shares to vote for the candidates.
We will also add a feature to lookup voter information. In the Ethereum blockchain world, these shares are more commonly referred to as tokens. We will refer to these shares as tokens in the rest of this tutorial.
If you want to skip all the explanation and want to just see the contract file, you can find it here:https://github.com/maheshmurthy/ethereum_voting_dapp/blob/master/chapter3/contracts/Voting.sol.
The first step is to declare the variables we need to store all the information we are interested in. Below are the contract variables with explanation.
In tutorial
1 and tutorial 2, we initialized the list of candidates
contesting in a constructor. Remember that the constructor is invoked just once when the contract is deployed on the blockchain. Here, we also have to initialize the contract with total number of tokens available for sale and the cost of each token. So, we
update our contract constructor like below:
/* When the contract is deployed on the blockchain, we will
initialize the total number of tokens for sale, cost per token and
all the candidates
*/
function Voting(uint tokens, uint pricePerToken, bytes32[] candidateNames) public {
candidateList = candidateNames;
totalTokens = tokens;
balanceTokens = tokens;
tokenPrice = pricePerToken;
}
In truffle, you deploy your code on to the blockchain using migrations. You can take a peek at a migration file here.
An example deploy call in truffle migration file looks like this:
deployer.deploy(Voting, 1000, web3.toWei('0.1', 'ether'), ['Rama', 'Nick', 'Jose']);// 1000 is the total number of tokens for sale and the price of each token is set to 0.1 ether. // We will revisit this section again later in this tutorial.
Now that we have initialized the tokens and set the price, let’s see how someone could purchase these tokens by paying ether. Here is the function to buy tokens.
/* This function is used to purchase the tokens. Note the keyword
'payable' below. By just adding that one keyword to a function,
your contract can now accept Ether from anyone who calls this
function. Accepting money can not get any easier than this!
*/
function buy() payable public returns (uint) {
uint tokensToBuy = msg.value / tokenPrice;
if (tokensToBuy > balanceTokens) throw;
voterInfo[msg.sender].voterAddress = msg.sender;
voterInfo[msg.sender].tokensBought += tokensToBuy;
balanceTokens -= tokensToBuy;
return tokensToBuy;
}
An example purchase call looks like this:
truffle(development)> Voting.deployed().then(function(contract) {contract.buy({value: web3.toWei('1', 'ether'), from: web3.eth.accounts[1]})})The
value:
web3.toWei(‘1’, ‘ether’)
argument is accessed in the buy() function using msg.value and msg.sender gives us the account address of web3.eth.accounts[1]. Assuming the value of each token to be 0.1 Ether, the web3.eth.accounts[1] will receive 1 Ether/0.1
Ether = 10 tokens.
Let’s take a break from looking at the code for a moment and visualize the interaction between accounts (voters) and the contract.
As you can see in the contract
file on github, the rest of the new methods in the contract are mostly getters and should be easy to follow along.
The index.html file
has some new updates:
To vote for a candidate, you now have to specify the no. of tokens you want to vote with.
There is a new section where you can purchase tokens.
You can now look up voter information — how many tokens they own and no. of votes they have cast to each candidate.
The candidates are not hardcoded anymore. We fetch the candidates from the blockchain and populate it.
The app.js file
has the updates to support all the UI functionality above.
Update the deployment file 2_deploy_contracts.js to pass in total tokens and token price along with candidate names.
var Voting = artifacts.require("./Voting.sol");
module.exports = function(deployer) {
deployer.deploy(Voting, 1000, web3.toWei('0.1', 'ether'), ['Rama', 'Nick', 'Jose']);
};
To summarize, the four files we have updated in this tutorial are Voting.sol, index.html, app.js and 2_deploy_contracts.js. Once you have updated your truffle repository with these files,
we can deploy the contract to the blockchain. The deploy process is exactly the same as the previous tutorial.
You just have to compile and migrate using truffle command.
maheshmurthy|~/dev/ethereum_voting_dapp/chapter3$ truffle migrate
Using network 'development'.
Compiling Migrations.sol...
Compiling Voting.sol...
Writing artifacts to ./build/contracts
Running migration: 1_initial_migration.js
Deploying Migrations...
Migrations: 0xc9249947010675b8a3b1defb12334148f7f59010
Saving successful migration to network...
Saving artifacts...
Running migration: 2_deploy_contracts.js
Deploying Voting...
Voting: 0x795d6d1f7cf467f27e48181da5f1ebd5bbd0a8df
Saving successful migration to network...
Saving artifacts...
If you are able to successfully deploy the contract and start your web server, your page will look like below:
As you can see in the screenshot above, you will be able to purchase tokens, vote for candidates using the tokens and lookup voter information by their address. If you are able to get
all these features working, congratulations!
I hope this series of tutorials has given you an idea of what Ethereum is, its capabilities, and how to build decentralized applications. If you run into issues getting the application working
(github repo), feel free to DM me on twitter @zastrinlab.
You now know just enough Ethereum to be dangerous :)
If you want an even more challenging project, I created a course to build a decentralized
eBay on Ethereum & IPFS.
If you would like to get notified when I write more tutorials, you can subscribe here.
原文地址: https://medium.com/@mvmurthy/full-stack-hello-world-voting-ethereum-dapp-tutorial-part-3-331c2712c9df

相关文章推荐
- Full Stack Hello World Voting Ethereum Dapp Tutorial — Part 2
- Full Stack Hello World Voting Ethereum Dapp Tutorial — Part 1
- 实现Spring 4 MVC HelloWorld Tutorial – Full XML Example
- Ethereum Dapp Tutorial — Part 1
- Spring 4 MVC HelloWorld Tutorial – Full XML Example
- Tutorial: Hello World with Apache Ant
- The ultimate end-to-end tutorial to create and deploy a fully decentralized Dapp in ethereum
- Qt tutorial 1 -- hello,world
- Hello from a libc-free world! (Part 1)
- 谷歌浏览器插件开发----Tutorial: Getting Started (Hello, World!) 教程:准备开始(你好,世界!)
- The Java IDL Development Process and the Hello World Tutorial
- Rolling with Rails 2.0 - The First Full Tutorial - Part 1
- Exploit writing tutorial part 2 : Stack Based Overflows – jumping to shellcode
- python-gtk-3-tutorial(2)--"Print hello world"
- Rolling with Rails 2.0 - The First Full Tutorial - Part 2
- FreeMarker (FTL) Hello World Tutorial With Example
- Hello from a libc-free world! (Part 1)
- Linux Assembly "Hello World" Tutorial, CS 200
- Spring MVC 快速教程:Hello World Spring MVC Fast Tutorial: Hello World
- Dapp开发教程一 Asch Dapp Hello World