微信小程序左右滑动切换图片酷炫效果(附效果)
2018-01-31 13:33
1021 查看
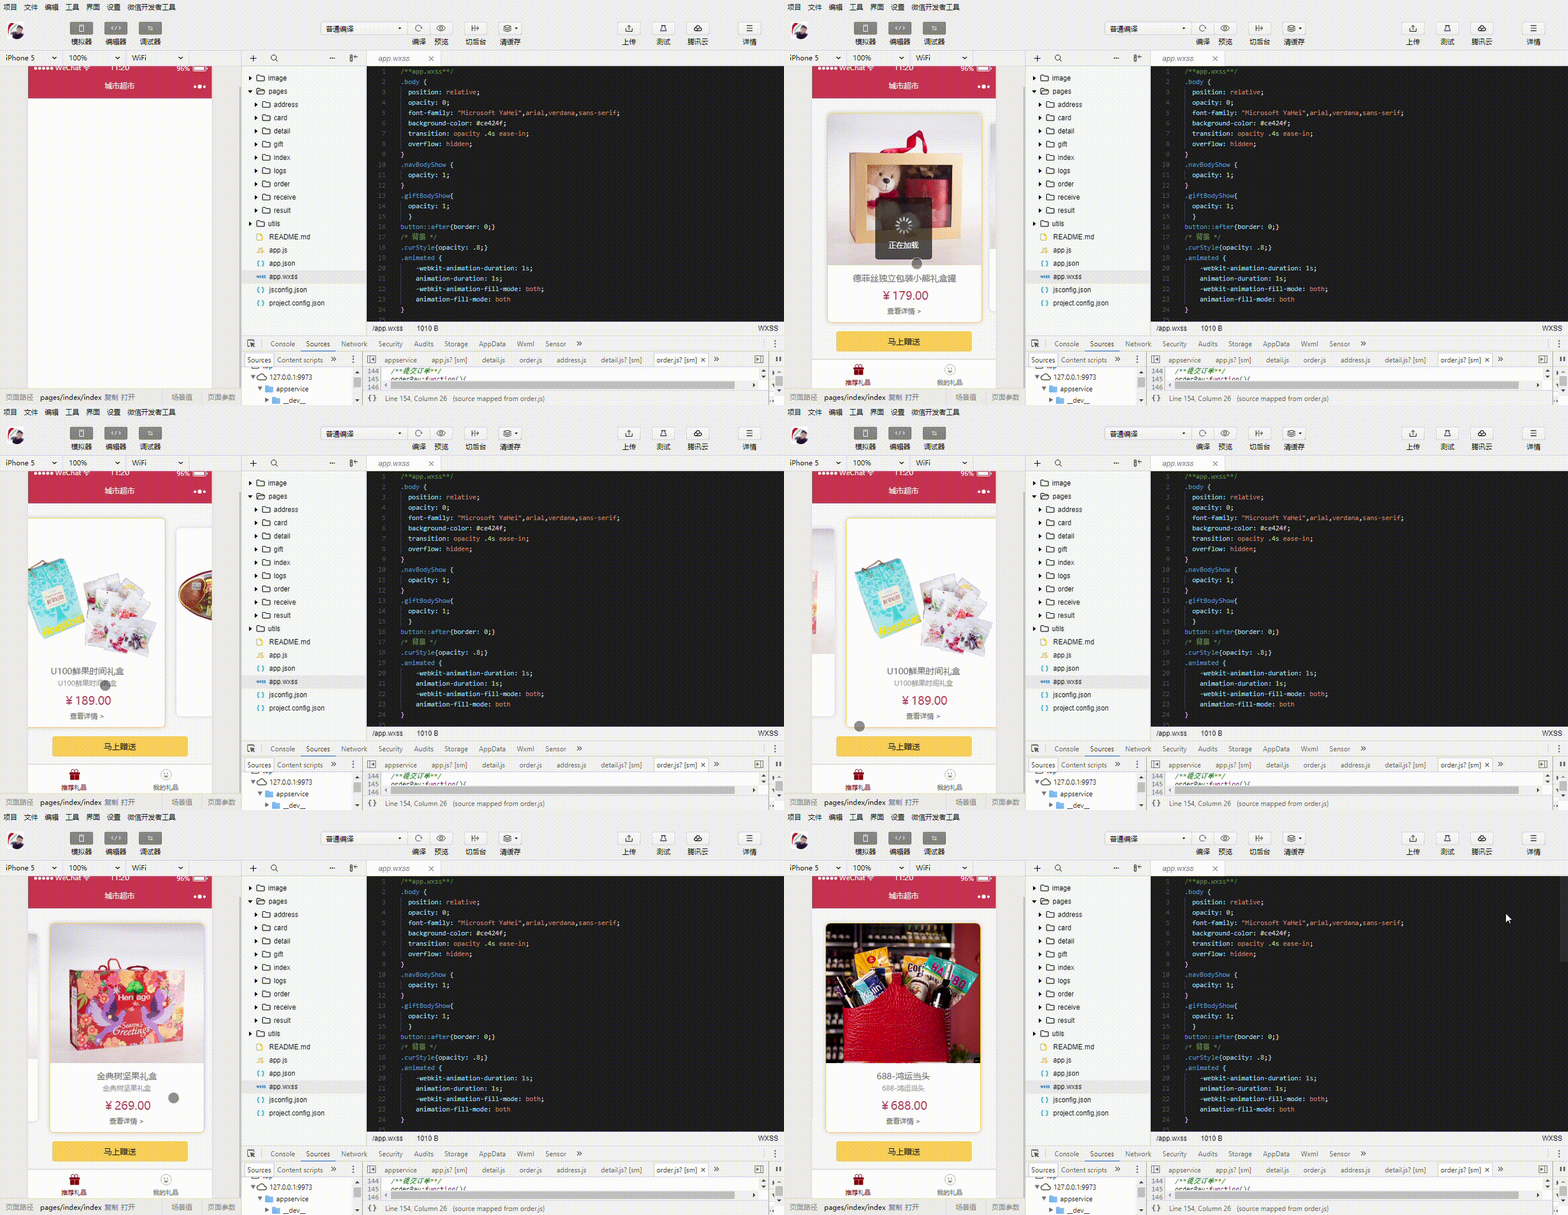
开门见山,先上效果吧!感觉可以的用的上的再往下看。

心动吗?那就继续往下看!
先上页面结构吧,也就是wxml文件,其实可以理解成微信自己封装过的html,这个不多说了,不懂也没必要往下看了。
做该效果样式就不多说了,一个默认状态样式,一个当前选中样式。(开发小程序的时候,注意class的命名,尽量不要使用层级嵌套,所以class取名的时候要注意唯一性)
js部分:该效果基于小程序的组件 scroll-view 开发的,利用bindscroll事件加载回调函数。
回调事件原理:
通过滚动宽度和每个item的宽度从而获取当前滚动的item是第几位,然后给对应的item加上选中class,其他的则去除选中class。
ps:有时候一些酷炫的效果其实实现起来非常简单,建议开发前先理清实现思路,虽然整个文章言简意赅,能看懂就自然懂,乐在分享。

心动吗?那就继续往下看!
先上页面结构吧,也就是wxml文件,其实可以理解成微信自己封装过的html,这个不多说了,不懂也没必要往下看了。
1  <scroll-view class="scroll-view_H" scroll-x scroll-with-animation style="width: 100%;height:{{windowHeight}}px" bindscroll="getSelectItem">
2     <block wx:for="{{proList}}"  wx:key="unique" wx:for-index="id" wx:for-item="item">
3       <view class="scroll_item {{item.selected ? 'selected' : ''}}" data-index='{{item.index}}' bindtap='selectProItem'>
4       <view class='proImg'><image src="{{item.proUrl}}" class="slide-image"  mode="widthFix"/></view>
5         <view class='detailBox'>
6             <view class='proTitle'>{{item.proTitle}}</view>
7             <view class='proDec'>{{item.proDec}}</view>
8             <view class='proPrice'>¥{{item.proPrice}}</view>
9             <navigator class='detailLink'  url="../detail/detail?id={{item.id}}">查看详情 ></navigator>
10         </view>
11       </view>
12     </block>
13   </scroll-view>
做该效果样式就不多说了,一个默认状态样式,一个当前选中样式。(开发小程序的时候,注意class的命名,尽量不要使用层级嵌套,所以class取名的时候要注意唯一性)
.scroll-view_H{
width: 100%;
text-align: center;
white-space: nowrap;
}
.scroll_item {
position: relative;
width: 84%;
margin: 0 1%;
left: -2%;
display: inline-block;
border-radius: 20rpx !important ;
overflow: hidden;
transform: scale(0.9);
box-shadow: 0 0 10px #ccc;
vertical-align: top;
top: 5%;
height: 72%;
background-color: #fff;
}
.scroll_item:first-child{
margin-left: 8%;
left: 0;
}
.scroll_item:last-child{
margin-right: 8%;
left: 0;
}
.scroll_item.selected{
transform: scale(1);
border: solid 1px #ffcd54;
}
.scroll_item .proImg{
border-top-left-radius: 20rpx;
border-top-right-radius: 20rpx;
width: 100%;
max-height: 200rpx;
position: absolute;
top: 0;
left: 0;
z-index: 0;
}
.scroll_item image {
width: 100%;
float: left;
border-top-left-radius: 20rpx;
border-top-right-radius: 20rpx;
}
.detailBox {
padding: 30rpx 5% 30rpx 5%;
float: left;
width: 90%;
border-bottom-left-radius: 20rpx;
border-bottom-right-radius: 20rpx;
position: absolute;
bottom: 0;
left: 0;
z-index: 1;
background: #fff;
}
.proTitle {
font-size: 36rpx;
color: #666;
line-height: 50rpx;
overflow: hidden;
text-overflow: ellipsis;
white-space: nowrap;
}
.proDec {
font-size: 30rpx;
color: #999;
line-height: 50rpx;
}
.proPrice {
font-size: 48rpx;
color: #CA414C;
line-height: 90rpx;
}
.detailLink{
color: #666;
font-size: 30rpx;
}
js部分:该效果基于小程序的组件 scroll-view 开发的,利用bindscroll事件加载回调函数。
回调事件原理:
通过滚动宽度和每个item的宽度从而获取当前滚动的item是第几位,然后给对应的item加上选中class,其他的则去除选中class。
//滑动获取选中商品
getSelectItem:function(e){
var that = this;
var itemWidth = e.detail.scrollWidth / that.data.proList.length;//每个商品的宽度
var scrollLeft = e.detail.scrollLeft;//滚动宽度
var curIndex = Math.round(scrollLeft / itemWidth);//通过Math.round方法对滚动大于一半的位置进行进位
for (var i = 0, len = that.data.proList.length; i < len; ++i) {
that.data.proList[i].selected = false;
}
that.data.proList[curIndex].selected = true;
that.setData({
proList: that.data.proList,
giftNo: this.data.proList[curIndex].id
});
},
ps:有时候一些酷炫的效果其实实现起来非常简单,建议开发前先理清实现思路,虽然整个文章言简意赅,能看懂就自然懂,乐在分享。
相关文章推荐
- 微信小程序左右滑动切换图片酷炫效果(附效果)
- 微信小程序滚动Tab选项卡:左右可滑动切换
- 使用viewpager嵌套实现上下左右滑动切换图片(IOS双向滚动翻页效果相同)
- h5用swiper结合angularjs实现手机浏览器左右滑动切换图片的效果
- 微信小程序滚动Tab实现左右可滑动切换
- 滑动切换图片效果【左右】
- 微信小程序滚动Tab选项卡:左右可滑动切换
- 微信小程序图片横向左右滑动案例
- 微信小程序左右滑动切换页面详解及实例代码
- 微信小程序左右滑动切换页面示例代码--转载
- 模仿优酷Android客户端图片左右滑动(自动切换)效果
- 微信小程序滚动Tab选项卡:左右可滑动切换
- 微信小程序实现tab左右切换效果
- 个人学习JQ插件编写成果:little酷炫的图片滑动切换效果
- 微信小程序开发常用技巧(5)——view左右滑动,切换page页面
- h5手机浏览器左右滑动切换图片效果
- 使用viewpager嵌套实现上下左右滑动切换图片(IOS双向滚动翻页效果相同)
- Android开发之使用ViewPager实现图片左右滑动切换效果
- android viewflipper 左右滑动切换显示图片效果
- android系列微谈一之——仿微信6.0左右滑动渐变切换效果[大陆第一人_求加精]
