HBuilder MUI 使用扩展图标样式问题解决
2018-01-29 11:16
996 查看
MUI工程,默认会提供很多图标,直接使用会是这样的效果:

默认图标的css样式是正常的,为两行,但当导入扩展图标,在index.html界面,导入css,如下:
* 在对应目录引入
使用时只需要在
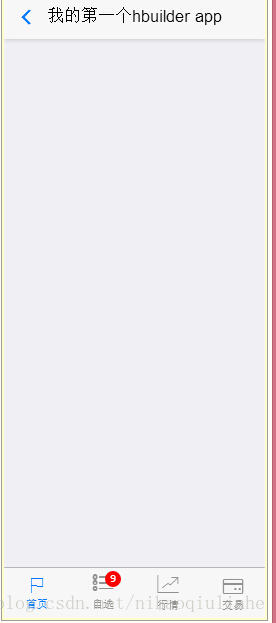
如果你默认导入这个文件,会有这样的问题,图标和文字不在一个方向,为水平了,如下截图:

解决方式:使用浏览器开发者模式看到,默认图标的样式和扩展图标样式有不同,使用默认图标的样式,放在icons-extra.css中,就可以解决,如下icons-extra.css文件修改如下:
@font-face {
font-family: MuiiconSpread;
font-weight: normal;
font-style: normal;
src: url('../fonts/mui-icons-extra.ttf') format('truetype'); /* iOS 4.1- */
}
.mui-icon-extra
{
font-family: MuiiconSpread;
font-size: 24px;
font-weight: normal;
font-style: normal;
line-height: 1;
display: inline-block;
text-decoration: none;
-webkit-font-smoothing: antialiased;
}
.mui-bar-tab .mui-tab-item .mui-icon~.mui-tab-label {
font-size: 11px;
display: block;
overflow: hidden;
text-overflow: ellipsis;
}
.mui-bar-tab .mui-tab-item .mui-icon-extra {
top: 3px;
width: 24px;
height: 24px;
padding-top: 0;
padding-bottom: 0;
}
.mui-bar .mui-icon-extra {
font-size: 24px;
position: relative;
z-index: 20;
padding-top: 10px;
padding-bottom: 10px;
}
.mui-icon-extra-cold:before { content: "\e500"; }
.mui-icon-extra-share:before { content: "\e200"; }
.mui-icon-extra-class:before { content: "\e118"; }
.mui-icon-extra-custom:before { content: "\e117"; }
.mui-icon-extra-new:before { content: "\e103"; }
.mui-icon-extra-card:before { content: "\e104"; }
.mui-icon-extra-grech:before { content: "\e105"; }
.mui-icon-extra-trend:before { content: "\e106"; }
.mui-icon-extra-filter:before { content: "\e207"; }
.mui-icon-extra-holiday:before { content: "\e300"; }
.mui-icon-extra-cart:before { content: "\e107"; }
.mui-icon-extra-heart:before { content: "\e180"; }
.mui-icon-extra-computer:before { content: "\e600"; }
.mui-icon-extra-express:before { content: "\e108"; }
.mui-icon-extra-gift:before { content: "\e109"; }
.mui-icon-extra-gold:before { content: "\e102"; }
.mui-icon-extra-lamp:before { content: "\e601"; }
.mui-icon-extra-rank:before { content: "\e110"; }
.mui-icon-extra-notice:before { content: "\e111"; }
.mui-icon-extra-sweep:before { content: "\e202"; }
.mui-icon-extra-arrowleftcricle:before { content: "\e401"; }
.mui-icon-extra-dictionary:before { content: "\e602"; }
.mui-icon-extra-heart-filled:before { content: "\e119"; }
.mui-icon-extra-xiaoshuo:before { content: "\e607"; }
.mui-icon-extra-top:before { content: "\e403"; }
.mui-icon-extra-people:before { content: "\e203"; }
.mui-icon-extra-topic:before { content: "\e603"; }
.mui-icon-extra-hotel:before { content: "\e301"; }
.mui-icon-extra-like:before { content: "\e206"; }
.mui-icon-extra-regist:before { content: "\e201"; }
.mui-icon-extra-order:before { content: "\e113"; }
.mui-icon-extra-alipay:before { content: "\e114"; }
.mui-icon-extra-find:before { content: "\e400"; }
.mui-icon-extra-arrowrightcricle:before { content: "\e402"; }
.mui-icon-extra-calendar:before { content: "\e115"; }
.mui-icon-extra-prech:before { content: "\e116"; }
.mui-icon-extra-cate:before { content: "\e501"; }
.mui-icon-extra-comment:before { content: "\e209"; }
.mui-icon-extra-at:before { content: "\e208"; }
.mui-icon-extra-addpeople:before { content: "\e204"; }
.mui-icon-extra-peoples:before { content: "\e205"; }
.mui-icon-extra-calc:before { content: "\e101"; }
.mui-icon-extra-classroom:before { content: "\e604"; }
.mui-icon-extra-phone:before { content: "\e404"; }
.mui-icon-extra-university:before { content: "\e605"; }
.mui-icon-extra-outline:before { content: "\e606"; }
运行之后,效果如图:
步入前端的坑,看我如何一步步填坑,哈哈哈哈
默认图标的css样式是正常的,为两行,但当导入扩展图标,在index.html界面,导入css,如下:
使用示例:
* 在对应目录引入css/mui-icon-extra
fonts/mui-icons-extra.ttf
使用时只需要在span
节点上分别增加.mui-icon-extra
、.mui-icon-extra-name
两个类即可(name为图标名称,例如:calc、new等),如下代码即可显示一个计算器图标:
<span class="mui-icon-extra mui-icon-extra-calc"></span>
如果你默认导入这个文件,会有这样的问题,图标和文字不在一个方向,为水平了,如下截图:
解决方式:使用浏览器开发者模式看到,默认图标的样式和扩展图标样式有不同,使用默认图标的样式,放在icons-extra.css中,就可以解决,如下icons-extra.css文件修改如下:
@font-face {
font-family: MuiiconSpread;
font-weight: normal;
font-style: normal;
src: url('../fonts/mui-icons-extra.ttf') format('truetype'); /* iOS 4.1- */
}
.mui-icon-extra
{
font-family: MuiiconSpread;
font-size: 24px;
font-weight: normal;
font-style: normal;
line-height: 1;
display: inline-block;
text-decoration: none;
-webkit-font-smoothing: antialiased;
}
.mui-bar-tab .mui-tab-item .mui-icon~.mui-tab-label {
font-size: 11px;
display: block;
overflow: hidden;
text-overflow: ellipsis;
}
.mui-bar-tab .mui-tab-item .mui-icon-extra {
top: 3px;
width: 24px;
height: 24px;
padding-top: 0;
padding-bottom: 0;
}
.mui-bar .mui-icon-extra {
font-size: 24px;
position: relative;
z-index: 20;
padding-top: 10px;
padding-bottom: 10px;
}
.mui-icon-extra-cold:before { content: "\e500"; }
.mui-icon-extra-share:before { content: "\e200"; }
.mui-icon-extra-class:before { content: "\e118"; }
.mui-icon-extra-custom:before { content: "\e117"; }
.mui-icon-extra-new:before { content: "\e103"; }
.mui-icon-extra-card:before { content: "\e104"; }
.mui-icon-extra-grech:before { content: "\e105"; }
.mui-icon-extra-trend:before { content: "\e106"; }
.mui-icon-extra-filter:before { content: "\e207"; }
.mui-icon-extra-holiday:before { content: "\e300"; }
.mui-icon-extra-cart:before { content: "\e107"; }
.mui-icon-extra-heart:before { content: "\e180"; }
.mui-icon-extra-computer:before { content: "\e600"; }
.mui-icon-extra-express:before { content: "\e108"; }
.mui-icon-extra-gift:before { content: "\e109"; }
.mui-icon-extra-gold:before { content: "\e102"; }
.mui-icon-extra-lamp:before { content: "\e601"; }
.mui-icon-extra-rank:before { content: "\e110"; }
.mui-icon-extra-notice:before { content: "\e111"; }
.mui-icon-extra-sweep:before { content: "\e202"; }
.mui-icon-extra-arrowleftcricle:before { content: "\e401"; }
.mui-icon-extra-dictionary:before { content: "\e602"; }
.mui-icon-extra-heart-filled:before { content: "\e119"; }
.mui-icon-extra-xiaoshuo:before { content: "\e607"; }
.mui-icon-extra-top:before { content: "\e403"; }
.mui-icon-extra-people:before { content: "\e203"; }
.mui-icon-extra-topic:before { content: "\e603"; }
.mui-icon-extra-hotel:before { content: "\e301"; }
.mui-icon-extra-like:before { content: "\e206"; }
.mui-icon-extra-regist:before { content: "\e201"; }
.mui-icon-extra-order:before { content: "\e113"; }
.mui-icon-extra-alipay:before { content: "\e114"; }
.mui-icon-extra-find:before { content: "\e400"; }
.mui-icon-extra-arrowrightcricle:before { content: "\e402"; }
.mui-icon-extra-calendar:before { content: "\e115"; }
.mui-icon-extra-prech:before { content: "\e116"; }
.mui-icon-extra-cate:before { content: "\e501"; }
.mui-icon-extra-comment:before { content: "\e209"; }
.mui-icon-extra-at:before { content: "\e208"; }
.mui-icon-extra-addpeople:before { content: "\e204"; }
.mui-icon-extra-peoples:before { content: "\e205"; }
.mui-icon-extra-calc:before { content: "\e101"; }
.mui-icon-extra-classroom:before { content: "\e604"; }
.mui-icon-extra-phone:before { content: "\e404"; }
.mui-icon-extra-university:before { content: "\e605"; }
.mui-icon-extra-outline:before { content: "\e606"; }
运行之后,效果如图:
步入前端的坑,看我如何一步步填坑,哈哈哈哈

相关文章推荐
- 解决使用 XP 风格样式时图标丢失的问题
- 页面内嵌样式表中使用url(), 出现页面多次载入问题解决
- Puppet扩展篇2-如何使用虚拟资源解决puppet冲突问题
- 使用php缺少加密扩展mcrypt等相关问题的一些解决方法
- Office2007图标变成白框,但是还能使用问题解决办法
- 电脑图标错位解决,一般只有使用第三方样式才可能会出现
- 解决Java程序的托盘图标在Windows任务栏重建后丢失的问题(使用SystemTray类创建托盘图标)
- 使用font-awesome图标,css元素选择器(i)下,部分设置不生效的问题之解决。
- (转)再不用担心DataRow类型转换和空值了(使用扩展方法解决高频问题)
- sencha touch 扩展篇之使用sass自定义主题样式 (下)通过css修改官方组件样式以及自定义图标
- Android Activity使用Dialog样式导致点击空白处自动关闭的问题解决
- 使用PCI-E USB3.0扩展板卡解决OPENCV不能同时打开同品牌摄像头的问题
- 再不用担心DataRow类型转换和空值了(使用扩展方法解决高频问题)
- 关于文本域不能在form表单或table不能使用问题,现在用样式解决
- 【已解决,看后文】使用BlogEngine.net的扩展插件Silverlight Player Extension遇到的问题
- sencha touch 扩展篇之使用sass自定义主题样式 (下)通过css修改官方组件样式以及自定义图标
- MFC使用CEF并实现js与C++交互功能,解决Render进程中OnContextCreated绑定与OnWebKitInitialized的js扩展无法回调问题
- 使用ResolveUrl来解决样式(style)相对路径问题
- 解决 使用高德地图定位 导致DatePicker 样式变为英文问题
- 解决Java程序的托盘图标在Windows任务栏重建后丢失的问题(使用SystemTray类创建托盘图标)