TensorFlow--实现人脸识别实验精讲 (Face Recognition using Tensorflow)
2018-01-29 08:24
603 查看
做一个人脸检测实验。
1.获取数据集(LFW)
Labeled Faces in the Wild Home Menu->Download->All images as gzipped tar file
或者直接点击我是LFW 解压放到datasets
2.下载facenet并配置(facenet
是一个使用tensorflow 进行人脸识别的开源库,我们可以依赖于它,进行人脸识别相关开发,进而降低难度与成本)
1)git clone --recursive https://github.com/davidsandberg/facenet.git
2)cd facenet/
3)pip install -r requirements.txt (这一步会把你的TF修改成1.2.0,我之前的是TensorFlow·1.4.1,执行完此命令变为了TensorFlow1.2.0)
4)export PYTHONPATH=$(pwd)/src
注意文件放置的位置!(facenet 和lfw要放在同一目录下,切记!)
facenet所在路径 /home/cjz/anaconda3/envs/tensorflow/facenet
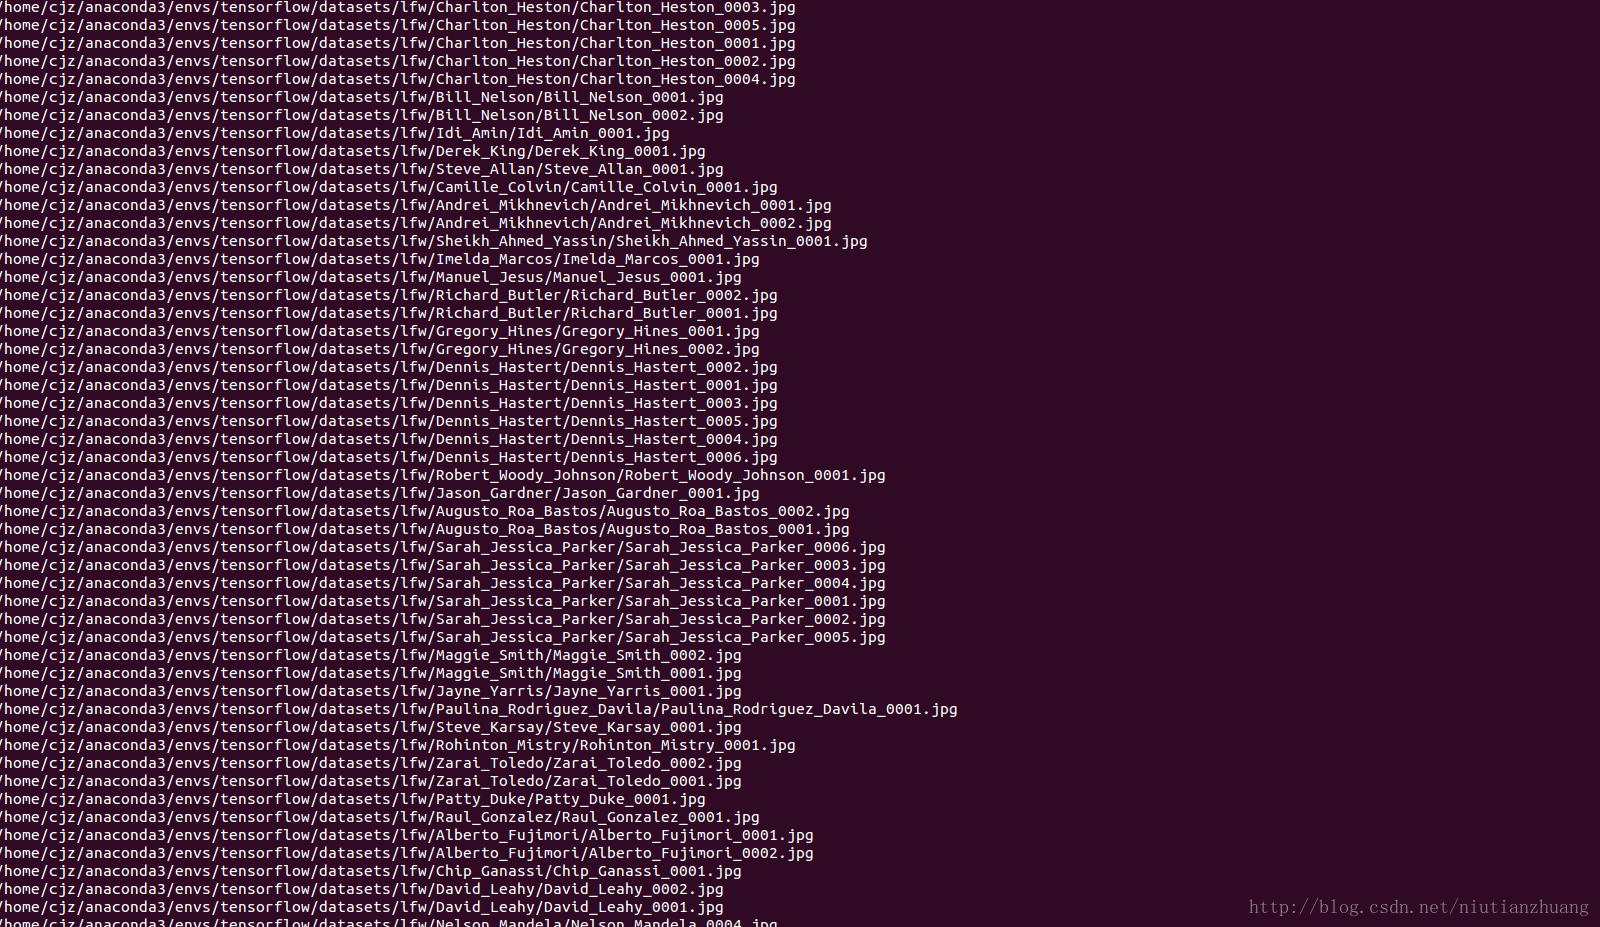
lfw解压后所在路径:/home/cjz/anaconda3/envs/tensorflow/datasets/lfw
3.处理数据集(对齐数据集)
1)cd facenet
2)python src/align/align_dataset_mtcnn.py~/anaconda3/envs/tensorflow/datasets/lfw~/anaconda3/envs/tensorflow/datasets/lfw/lfw_mtcnnpy_160
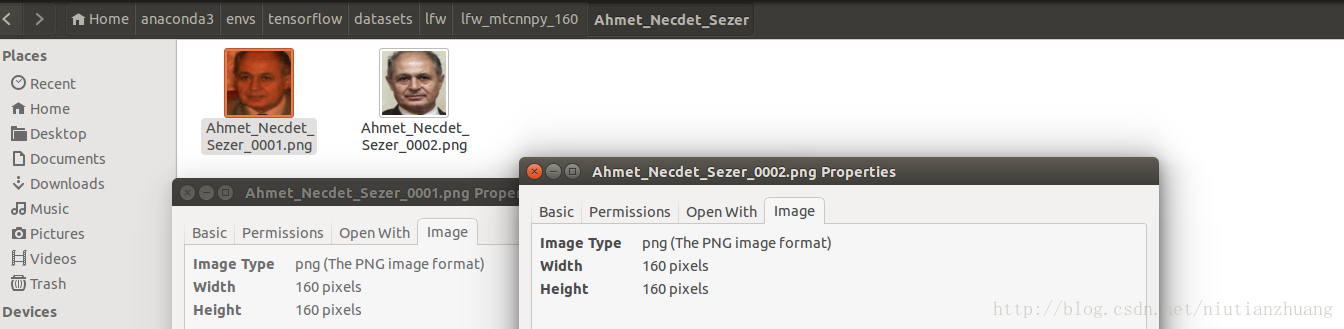
--image_size 160 --margin 32 --random_order --gpu_memory_fraction 0.25 (切记,一定要写对路径 ,这样才能导入全部数据,并导出相同像素160*160的图片)
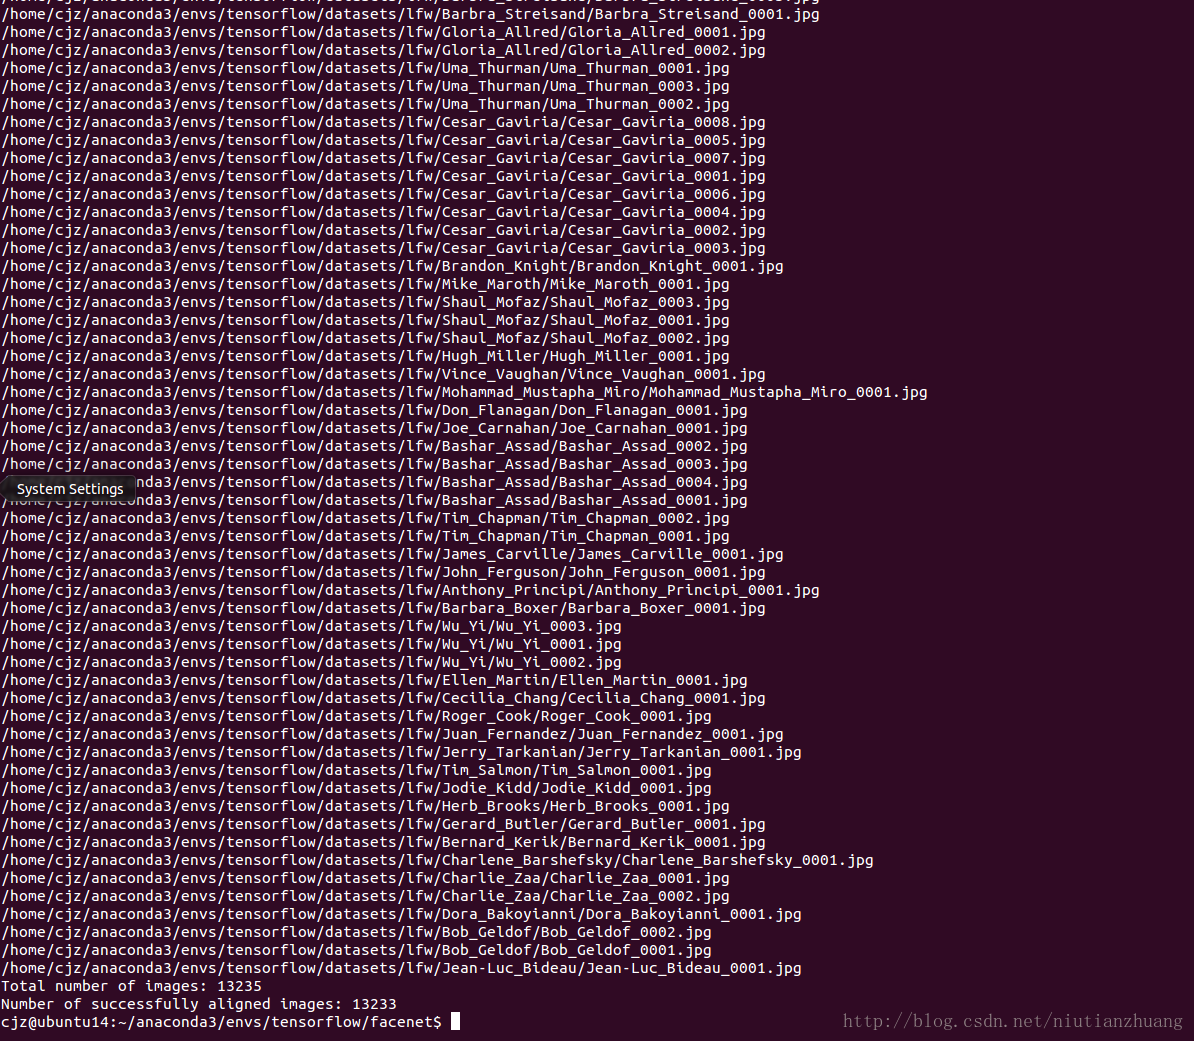
图片较多需要等一段时间(我的CPU跑了40-50分钟,gpu的话应该更快),
然后在这里 /home/cjz/anaconda3/envs/tensorflow/datasets/lfw/lfw_mtcnnpy_160会有对齐之后的图片了(所谓对齐,可以理解为就是同等像素大小,详解https://www.cnblogs.com/bakari/archive/2012/08/27/2658956.html)。
4.下载训练好的模型文件
(1) facenet提供了两个预训练模型,分别是基于CASIA-WebFace和MS-Celeb-1M人脸库训练的
(2) 本人使用的是基于数据集MS-Celeb-1M训练好的模型。模型存储在Google网盘,需要翻墙。
https://github.com/davidsandberg/facenet
选择pre-trained models
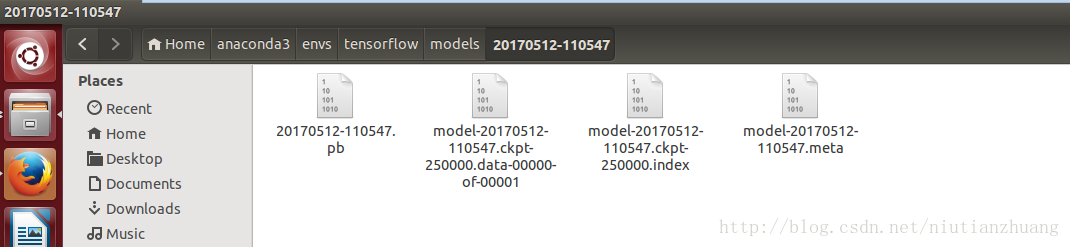
下载20170512-110547(MS-Celeb-1M数据集训练的模型文件,微软人脸识别数据库,名人榜选择前100万名人,搜索引擎采集每个名人100张人脸图片。预训练模型准确率0.993+-0.004)
(注意:我是翻墙才能下载下来,稍后我会上传)
然后解压
然后解压
放在一个文件夹下 mkdir ~/models以便后面路径寻找
也就是说文件放在了/home/cjz/anaconda3/envs/tensorflow/models
5.在lfw数据集上面进行验证,评估预训练模型的准确率
1)cd facenet
2) python src/validate_on_lfw.py ~/anaconda3/envs/tensorflow/datasets/lfw/lfw_mtcnnpy_160 ~/anaconda3/envs/tensorflow/models/20170512-110547/
输出:
(注:
)
为了和基准比较,本实验采用facenet/data/pairs.txt,官方随机生成数据,里面包含匹配和不匹配人名和图片编号。
validate_on_lfw.py文件:
这里采用十折交叉验证的方法来测试算法的准确。十折交叉验证是常用的精度测试方法,具体策略是:数据集分成10份,轮流将其中9份做训练集,1份做测试集,10次结果均值作算法精度估计。一般需要多次10折交叉验证求均值。
************************************************************************************************************************************
基本知识
人脸识别,基于人脸部特征信息识别身份的生物识别技术。摄像机、摄像头采集人脸图像或视频流,自动检测、跟踪图像中人脸,做脸部相关技术处理,人脸检测、人脸关键点检测、人脸验证等。《麻省理工科技评论》(MIT Technology Review),2017年全球十大突破性技术榜单,支付宝“刷脸支付”(Paying with Your Face)入围。
人脸识别优势,非强制性(采集方式不容易被察觉,被识别人脸图像可主动获取)、非接触性(用户不需要与设备接触)、并发性(可同时多人脸检测、跟踪、识别)。深度学习前,人脸识别两步骤:高维人工特征提取、降维。传统人脸识别技术基于可见光图像。深度学习+大数据(海量有标注人脸数据)为人脸识别领域主流技术路线。神经网络人脸识别技术,大量样本图像训练识别模型,无需人工选取特征,样本训练过程自行学习,识别准确率可以达到99%。
人脸识别技术流程。
人脸图像采集、检测。人脸图像采集,摄像头把人脸图像采集下来,静态图像、动态图像、不同位置、不同表情。用户在采集设备拍报范围内,采集设置自动搜索并拍摄。人脸检测属于目标检测(object detection)。对要检测目标对象概率统计,得到待检测对象特征,建立目标检测模型。用模型匹配输入图像,输出匹配区域。人脸检测是人脸识别预处理,准确标定人脸在图像的位置大小。人脸图像模式特征丰富,直方图特征、颜色特征、模板特征、结构特征、哈尔特征(Haar-like feature)。人脸检测挑出有用信息,用特征检测人脸。人脸检测算法,模板匹配模型、Adaboost模型,Adaboost模型速度。精度综合性能最好,训练慢、检测快,可达到视频流实时检测效果。
人脸图像预处理
基于人脸检测结果,处理图像,服务特征提取。系统获取人脸图像受到各种条件限制、随机干扰,需缩放、旋转、拉伸、光线补偿、灰度变换、直方图均衡化、规范化、几何校正、过滤、锐化等图像预处理。
人脸图像特征提取
人脸图像信息数字化,人脸图像转变为一串数字(特征向量)。如,眼睛左边、嘴唇右边、鼻子、下巴位置,特征点间欧氏距离、曲率、角度提取出特征分量,相关特征连接成长特征向量。
人脸图像匹配、识别
提取人脸图像特征数据与数据库存储人脸特征模板搜索匹配,根据相似程度对身份信息进行判断,设定阈值,相似度越过阈值,输出匹配结果。确认,一对一(1:1)图像比较,证明“你就是你”,金融核实身份、信息安全领域。辨认,一对多(1:N)图像匹配,“N人中找你”,视频流,人走进识别范围就完成识别,安防领域。
###########################################
人脸识别分类
*人脸检测
*人脸关键点检测
*人脸验证
*人脸属性检测
人脸检测
检测、定位图片人脸,返回高精度人脸框坐标。对人脸分析、处理的第一步。“滑动窗口”,选择图像矩形区域作滑动窗口,窗口中提取特征对图像区域描述,根据特征描述判断窗口是否人脸。不断遍历需要观察窗口。
人脸关键点检测
定位、返回人脸五官、轮廓关键点坐标位置。人脸轮廓、眼睛、眉毛、嘴唇、鼻子轮廓。Face++提供高达106点关键点。人脸关键点定位技术,级联形回归(cascaded shape regression, CSR)。人脸识别,基于DeepID网络结构。DeepID网络结构类似卷积神经网络结构,倒数第二层,有DeepID层,与卷积层4、最大池化层3相连,卷积神经网络层数越高视野域越大,既考虑局部特征,又考虑全局特征。
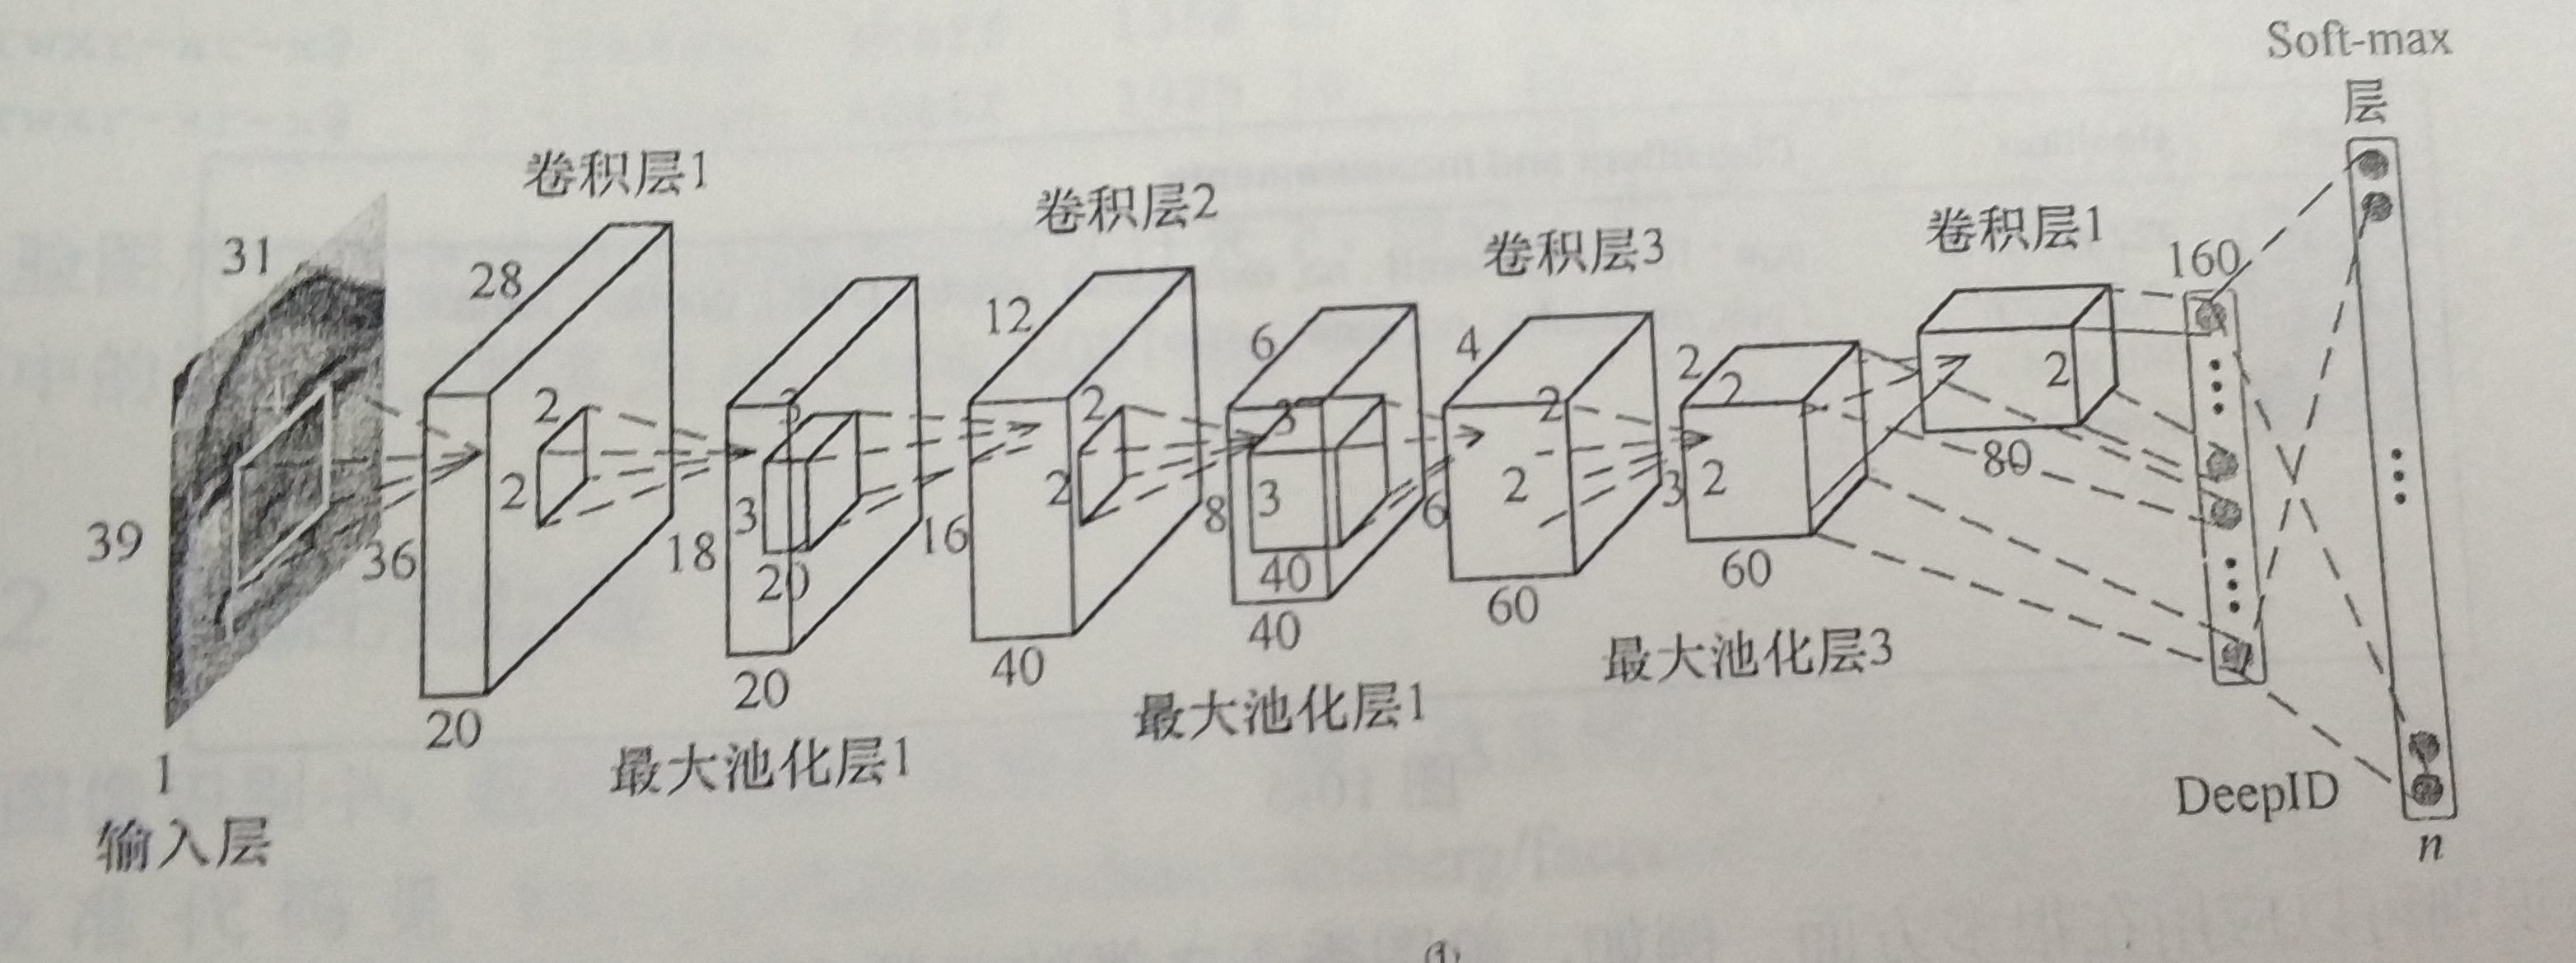
输入层 31x39x1、卷积层1 28x36x20(卷积核4x4x1)、最大池化层1 12x18x20(过滤器2x2)、卷积层2 12x16x20(卷积核3x3x20)、最大池化层2 6x8x40(过滤器2x2)、卷积层3 4x6x60(卷积核3x3x40)、最大池化层2 2x3x60(过滤器2x2)、卷积层42x2x80(卷积核2x2x60)、DeepID层 1x160、全连接层 Softmax。《Deep Learning Face Representation
from Predicting 10000 Classes》 http://mmlab.ie.cuhk.edu.hk/pdf/YiSun_CVPR14.pdf。
人脸验证
分析两张人脸同一人可能性大小。输入两张人脸,得到置信度分类、相应阈值,评估相似度。
人脸属性检测
人脸属性辩识、人脸情绪分析。https://www.betaface.com/wpa/在线人脸识别测试。给出人年龄、是否有胡子、情绪(高兴、正常、生气、愤怒)、性别、是否带眼镜、肤色。
人脸识别应用,美图秀秀美颜应用、世纪佳缘查看潜在配偶“面相”相似度,支付领域“刷脸支付”,安防领域“人脸鉴权”。Face++、商汤科技,提供人脸识别SDK。
************************************************************************************************************************************
1. Facenet可以直接对比2个人脸经过它的网络映射之后的欧式距离;
运行程序为facenet\src\compare.py;
2. 从LFW数据集内随机选取同一人的2人脸图,
在compare.py所在同级目录下放入要对比的人脸图像Abdullah_al-Attiyah_0001.png和Abdullah_al-Attiyah_0002.png(同一个人的2张人脸图);
3. 在终端terminal窗口中使用 命令
find ./ -name compare.py 找到compare.py所在路径,然后cd进到compare.py所在路径;
4. 输入如下命令:
5.在compare.py所在同级目录下放入要对比的人脸图像cheng.JPG和zhuang.JPG(完全不同的2人脸图)
6.输入如下命令:
python compare.py ~/anaconda3/envs/tensorflow/models/20170512-110547/ cheng.JPG zhuang.JPG运行结果如图:

生成的是欧氏距离的二分类代价矩阵(cost matrix),cost(i, j):第i类样本对第j类的代价,cost=0,说明相同,相似度范围[0,1],
cost >= 1说明相似度为0.
compare.py 源码如下"""Performs face alignment and calculates L2 distance between the embeddings of images."""
# MIT License
#
# Copyright (c) 2016 David Sandberg
#
# Permission is hereby granted, free of charge, to any person obtaining a copy
# of this software and associated documentation files (the "Software"), to deal
# in the Software without restriction, including without limitation the rights
# to use, copy, modify, merge, publish, distribute, sublicense, and/or sell
# copies of the Software, and to permit persons to whom the Software is
# furnished to do so, subject to the following conditions:
#
# The above copyright notice and this permission notice shall be included in all
# copies or substantial portions of the Software.
#
# THE SOFTWARE IS PROVIDED "AS IS", WITHOUT WARRANTY OF ANY KIND, EXPRESS OR
# IMPLIED, INCLUDING BUT NOT LIMITED TO THE WARRANTIES OF MERCHANTABILITY,
# FITNESS FOR A PARTICULAR PURPOSE AND NONINFRINGEMENT. IN NO EVENT SHALL THE
# AUTHORS OR COPYRIGHT HOLDERS BE LIABLE FOR ANY CLAIM, DAMAGES OR OTHER
# LIABILITY, WHETHER IN AN ACTION OF CONTRACT, TORT OR OTHERWISE, ARISING FROM,
# OUT OF OR IN CONNECTION WITH THE SOFTWARE OR THE USE OR OTHER DEALINGS IN THE
# SOFTWARE.
from __future__ import absolute_import
from __future__ import division
from __future__ import print_function
from scipy import misc
import tensorflow as tf
import numpy as np
import sys
import os
import argparse
import facenet
import align.detect_face
def main(args):
images = load_and_align_data(args.image_files, args.image_size, args.margin, args.gpu_memory_fraction)
with tf.Graph().as_default():
with tf.Session() as sess:
# Load the model
facenet.load_model(args.model)
# Get input and output tensors
images_placeholder = tf.get_default_graph().get_tensor_by_name("input:0")
embeddings = tf.get_default_graph().get_tensor_by_name("embeddings:0")
phase_train_placeholder = tf.get_default_graph().get_tensor_by_name("phase_train:0")
# Run forward pass to calculate embeddings
feed_dict = { images_placeholder: images, phase_train_placeholder:False }
emb = sess.run(embeddings, feed_dict=feed_dict)
nrof_images = len(args.image_files)
print('Images:')
for i in range(nrof_images):
print('%1d: %s' % (i, args.image_files[i]))
print('')
# Print distance matrix
print('Distance matrix')
print(' ', end='')
for i in range(nrof_images):
print(' %1d ' % i, end='')
print('')
for i in range(nrof_images):
print('%1d ' % i, end='')
for j in range(nrof_images):
dist = np.sqrt(np.sum(np.square(np.subtract(emb[i,:], emb[j,:]))))
print(' %1.4f ' % dist, end='')
print('')
def load_and_align_data(image_paths, image_size, margin, gpu_memory_fraction):
minsize = 20 # minimum size of face
threshold = [ 0.6, 0.7, 0.7 ] # three steps's threshold
factor = 0.709 # scale factor
print('Creating networks and loading parameters')
with tf.Graph().as_default():
gpu_options = tf.GPUOptions(per_process_gpu_memory_fraction=gpu_memory_fraction)
sess = tf.Session(config=tf.ConfigProto(gpu_options=gpu_options, log_device_placement=False))
with sess.as_default():
pnet, rnet, onet = align.detect_face.create_mtcnn(sess, None)
tmp_image_paths = image_paths.copy()
img_list = []
for image in tmp_image_paths:
img = misc.imread(os.path.expanduser(image), mode='RGB')
img_size = np.asarray(img.shape)[0:2]
bounding_boxes, _ = align.detect_face.detect_face(img, minsize, pnet, rnet, onet, threshold, factor)
if len(bounding_boxes) < 1:
image_paths.remove(image)
print("can't detect face, remove ", image)
continue
det = np.squeeze(bounding_boxes[0,0:4])
bb = np.zeros(4, dtype=np.int32)
bb[0] = np.maximum(det[0]-margin/2, 0)
bb[1] = np.maximum(det[1]-margin/2, 0)
bb[2] = np.minimum(det[2]+margin/2, img_size[1])
bb[3] = np.minimum(det[3]+margin/2, img_size[0])
cropped = img[bb[1]:bb[3],bb[0]:bb[2],:]
aligned = misc.imresize(cropped, (image_size, image_size), interp='bilinear')
prewhitened = facenet.prewhiten(aligned)
img_list.append(prewhitened)
images = np.stack(img_list)
return images
def parse_arguments(argv):
parser = argparse.ArgumentParser()
parser.add_argument('model', type=str,
help='Could be either a directory containing the meta_file and ckpt_file or a model protobuf (.pb) file')
parser.add_argument('image_files', type=str, nargs='+', help='Images to compare')
parser.add_argument('--image_size', type=int,
help='Image size (height, width) in pixels.', default=160)
parser.add_argument('--margin', type=int,
help='Margin for the crop around the bounding box (height, width) in pixels.', default=44)
parser.add_argument('--gpu_memory_fraction', type=float,
help='Upper bound on the amount of GPU memory that will be used by the process.', default=1.0)
return parser.parse_args(argv)
if __name__ == '__main__':
main(parse_arguments(sys.argv[1:]))
参考:
1.《TensorFlow技术解析与实战》
2. http://blog.csdn.net/tmosk/article/details/78087122
3. https://www.cnblogs.com/libinggen/p/7786901.html
4.http://blog.csdn.net/HelloZEX/article/details/78551974
5.http://blog.csdn.net/xingwei_09/article/details/79161931
1.获取数据集(LFW)
Labeled Faces in the Wild Home Menu->Download->All images as gzipped tar file
或者直接点击我是LFW 解压放到datasets
2.下载facenet并配置(facenet
是一个使用tensorflow 进行人脸识别的开源库,我们可以依赖于它,进行人脸识别相关开发,进而降低难度与成本)
1)git clone --recursive https://github.com/davidsandberg/facenet.git
2)cd facenet/
3)pip install -r requirements.txt (这一步会把你的TF修改成1.2.0,我之前的是TensorFlow·1.4.1,执行完此命令变为了TensorFlow1.2.0)
4)export PYTHONPATH=$(pwd)/src
注意文件放置的位置!(facenet 和lfw要放在同一目录下,切记!)
facenet所在路径 /home/cjz/anaconda3/envs/tensorflow/facenet
lfw解压后所在路径:/home/cjz/anaconda3/envs/tensorflow/datasets/lfw
3.处理数据集(对齐数据集)
1)cd facenet
2)python src/align/align_dataset_mtcnn.py~/anaconda3/envs/tensorflow/datasets/lfw~/anaconda3/envs/tensorflow/datasets/lfw/lfw_mtcnnpy_160
--image_size 160 --margin 32 --random_order --gpu_memory_fraction 0.25 (切记,一定要写对路径 ,这样才能导入全部数据,并导出相同像素160*160的图片)
图片较多需要等一段时间(我的CPU跑了40-50分钟,gpu的话应该更快),
然后在这里 /home/cjz/anaconda3/envs/tensorflow/datasets/lfw/lfw_mtcnnpy_160会有对齐之后的图片了(所谓对齐,可以理解为就是同等像素大小,详解https://www.cnblogs.com/bakari/archive/2012/08/27/2658956.html)。
4.下载训练好的模型文件
(1) facenet提供了两个预训练模型,分别是基于CASIA-WebFace和MS-Celeb-1M人脸库训练的
(2) 本人使用的是基于数据集MS-Celeb-1M训练好的模型。模型存储在Google网盘,需要翻墙。
https://github.com/davidsandberg/facenet
选择pre-trained models
下载20170512-110547(MS-Celeb-1M数据集训练的模型文件,微软人脸识别数据库,名人榜选择前100万名人,搜索引擎采集每个名人100张人脸图片。预训练模型准确率0.993+-0.004)
(注意:我是翻墙才能下载下来,稍后我会上传)
然后解压
然后解压
放在一个文件夹下 mkdir ~/models以便后面路径寻找
也就是说文件放在了/home/cjz/anaconda3/envs/tensorflow/models
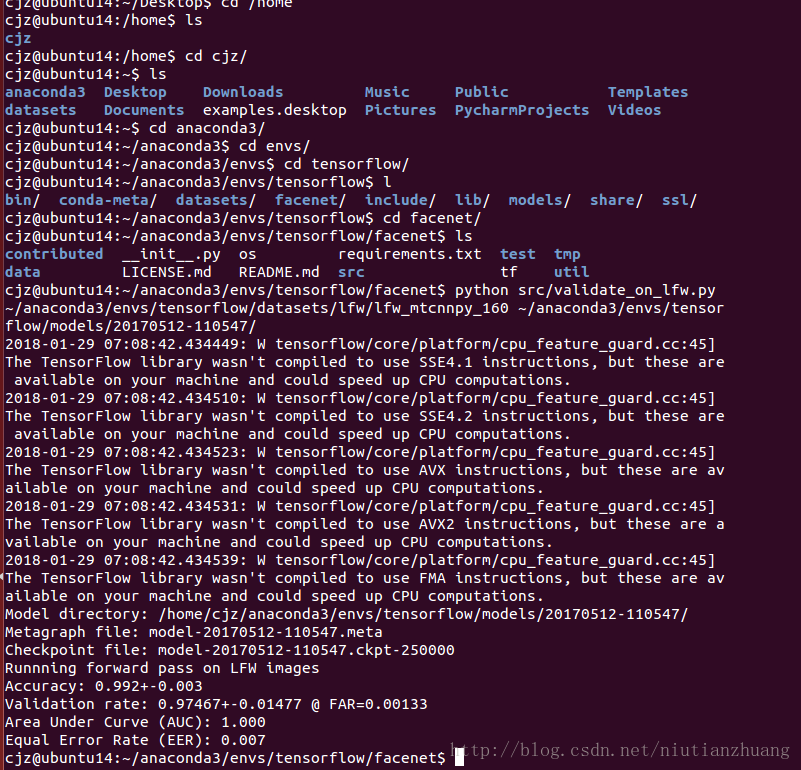
5.在lfw数据集上面进行验证,评估预训练模型的准确率
1)cd facenet
2) python src/validate_on_lfw.py ~/anaconda3/envs/tensorflow/datasets/lfw/lfw_mtcnnpy_160 ~/anaconda3/envs/tensorflow/models/20170512-110547/
输出:
Model directory: /home/cjz/anaconda3/envs/tensorflow/models/20170512-110547/
Metagraph file: model-20170512-110547.meta
Checkpoint file: model-20170512-110547.ckpt-250000
Runnning forward pass on LFW images
Killed
出现killed原因 执行第68-80语句时批处理时由于cpu性能,出现killed或者电脑宕机,面对killed,我的处理办法重启主机电脑后,立马跑程序,结果OK的,
cjz@ubuntu14:~/anaconda3/envs/tensorflow/facenet$ python src/validate_on_lfw.py ~/anaconda3/envs/tensorflow/datasets/lfw/lfw_mtcnnpy_160 ~/anaconda3/envs/tensorflow/models/20170512-110547/
(...)
Model directory: /home/cjz/anaconda3/envs/tensorflow/models/20170512-110547/
Metagraph file: model-20170512-110547.meta
Checkpoint file: model-20170512-110547.ckpt-250000
Runnning forward pass on LFW images
Accuracy: 0.992+-0.003
Validation rate: 0.97467+-0.01477 @ FAR=0.00133
Area Under Curve (AUC): 1.000
Equal Error Rate (EER): 0.007
cjz@ubuntu14:~/anaconda3/envs/tensorflow/facenet$
(注:
(...)中的内容不必在意,只是在提醒你的电脑还可以提高计算能力,具体内容为
2018-01-29 07:08:42.434449: W tensorflow/core/platform/cpu_feature_guard.cc:45] The TensorFlow library wasn't compiled to use SSE4.1 instructions, but these are available on your machine and could speed up CPU computations.
2018-01-29 07:08:42.434510: W tensorflow/core/platform/cpu_feature_guard.cc:45] The TensorFlow library wasn't compiled to use SSE4.2 instructions, but these are available on your machine and could speed up CPU computations.
2018-01-29 07:08:42.434523: W tensorflow/core/platform/cpu_feature_guard.cc:45] The TensorFlow library wasn't compiled to use AVX instructions, but these are available on your machine and could speed up CPU computations.
2018-01-29 07:08:42.434531: W tensorflow/core/platform/cpu_feature_guard.cc:45] The TensorFlow library wasn't compiled to use AVX2 instructions, but these are available on your machine and could speed up CPU computations.
2018-01-29 07:08:42.434539: W tensorflow/core/platform/cpu_feature_guard.cc:45] The TensorFlow library wasn't compiled to use FMA instructions, but these are available on your machine and could speed up CPU computations.
)
为了和基准比较,本实验采用facenet/data/pairs.txt,官方随机生成数据,里面包含匹配和不匹配人名和图片编号。
validate_on_lfw.py文件:
这里采用十折交叉验证的方法来测试算法的准确。十折交叉验证是常用的精度测试方法,具体策略是:数据集分成10份,轮流将其中9份做训练集,1份做测试集,10次结果均值作算法精度估计。一般需要多次10折交叉验证求均值。
"""Validate a face recognizer on the "Labeled Faces in the Wild" dataset (http://vis-www.cs.umass.edu/lfw/).
Embeddings are calculated using the pairs from http://vis-www.cs.umass.edu/lfw/pairs.txt and the ROC curve
is calculated and plotted. Both the model metagraph and the model parameters need to exist
in the same directory, and the metagraph should have the extension '.meta'.
"""
# MIT License
#
# Copyright (c) 2016 David Sandberg
#
# Permission is hereby granted, free of charge, to any person obtaining a copy
# of this software and associated documentation files (the "Software"), to deal
# in the Software without restriction, including without limitation the rights
# to use, copy, modify, merge, publish, distribute, sublicense, and/or sell
# copies of the Software, and to permit persons to whom the Software is
# furnished to do so, subject to the following conditions:
#
# The above copyright notice and this permission notice shall be included in all
# copies or substantial portions of the Software.
#
# THE SOFTWARE IS PROVIDED "AS IS", WITHOUT WARRANTY OF ANY KIND, EXPRESS OR
# IMPLIED, INCLUDING BUT NOT LIMITED TO THE WARRANTIES OF MERCHANTABILITY,
# FITNESS FOR A PARTICULAR PURPOSE AND NONINFRINGEMENT. IN NO EVENT SHALL THE
# AUTHORS OR COPYRIGHT HOLDERS BE LIABLE FOR ANY CLAIM, DAMAGES OR OTHER
# LIABILITY, WHETHER IN AN ACTION OF CONTRACT, TORT OR OTHERWISE, ARISING FROM,
# OUT OF OR IN CONNECTION WITH THE SOFTWARE OR THE USE OR OTHER DEALINGS IN THE
# SOFTWARE.

#author cjz,执行第68-80语句时批处理时由于cpu性能,出现killed或者电脑宕机,面对killed,我的处理办法重启主机电脑后,立马跑程序,结果OK的,'''

from __future__ import absolute_import
from __future__ import division
from __future__ import print_function

import tensorflow as tf
import numpy as np
import argparse
import facenet
import lfw
import os
import sys
import math
from sklearn import metrics
from scipy.optimize import brentq
from scipy import interpolate

def main(args):
with tf.Graph().as_default():
with tf.Session() as sess:
# Read the file containing the pairs used for testing
pairs = lfw.read_pairs(os.path.expanduser(args.lfw_pairs))

# Get the paths for the corresponding images
paths, actual_issame = lfw.get_paths(os.path.expanduser(args.lfw_dir), pairs, args.lfw_file_ext)

# Load the model
facenet.load_model(args.model)

# Get input and output tensors
images_placeholder = tf.get_default_graph().get_tensor_by_name("input:0")
embeddings = tf.get_default_graph().get_tensor_by_name("embeddings:0")
phase_train_placeholder = tf.get_default_graph().get_tensor_by_name("phase_train:0")

# image_size = images_placeholder.get_shape()[1]  # For some reason this doesn't work for frozen graphs
image_size = args.image_size
embedding_size = embeddings.get_shape()[1]

# Run forward pass to calculate embeddings
print('Runnning forward pass on LFW images')
batch_size = args.lfw_batch_size
nrof_images = len(paths)
nrof_batches = int(math.ceil(1.0 * nrof_images / batch_size))
emb_array = np.zeros((nrof_images, embedding_size))
for i in range(nrof_batches):
start_index = i * batch_size
end_index = min((i + 1) * batch_size, nrof_images)
paths_batch = paths[start_index:end_index]
images = facenet.load_data(paths_batch, False, False, image_size)
feed_dict = {images_placeholder: images, phase_train_placeholder: False}
emb_array[start_index:end_index, :] = sess.run(embeddings, feed_dict=feed_dict)

tpr, fpr, accuracy, val, val_std, far = lfw.evaluate(emb_array,
actual_issame, nrof_folds=args.lfw_nrof_folds)

print('Accuracy: %1.3f+-%1.3f' % (np.mean(accuracy), np.std(accuracy)))
print('Validation rate: %2.5f+-%2.5f @ FAR=%2.5f' % (val, val_std, far))

auc = metrics.auc(fpr, tpr)
print('Area Under Curve (AUC): %1.3f' % auc)
eer = brentq(lambda x: 1. - x - interpolate.interp1d(fpr, tpr)(x), 0., 1.)
print('Equal Error Rate (EER): %1.3f' % eer)

def parse_arguments(argv):
parser = argparse.ArgumentParser()

parser.add_argument('lfw_dir', type=str,
help='Path to the data directory containing aligned LFW face patches.')
parser.add_argument('--lfw_batch_size', type=int,
help='Number of images to process in a batch in the LFW test set.', default=100)
parser.add_argument('model', type=str,
help='Could be either a directory containing the meta_file and ckpt_file or a model protobuf (.pb) file')
parser.add_argument('--image_size', type=int,
help='Image size (height, width) in pixels.', default=160)
parser.add_argument('--lfw_pairs', type=str,
help='The file containing the pairs to use for validation.', default='data/pairs.txt')
parser.add_argument('--lfw_file_ext', type=str,
help='The file extension for the LFW dataset.', default='png', choices=['jpg', 'png'])
parser.add_argument('--lfw_nrof_folds', type=int,
help='Number of folds to use for cross validation. Mainly used for testing.', default=10)
return parser.parse_args(argv)

if __name__ == '__main__':
main(parse_arguments(sys.argv[1:]))
************************************************************************************************************************************
基本知识
人脸识别,基于人脸部特征信息识别身份的生物识别技术。摄像机、摄像头采集人脸图像或视频流,自动检测、跟踪图像中人脸,做脸部相关技术处理,人脸检测、人脸关键点检测、人脸验证等。《麻省理工科技评论》(MIT Technology Review),2017年全球十大突破性技术榜单,支付宝“刷脸支付”(Paying with Your Face)入围。
人脸识别优势,非强制性(采集方式不容易被察觉,被识别人脸图像可主动获取)、非接触性(用户不需要与设备接触)、并发性(可同时多人脸检测、跟踪、识别)。深度学习前,人脸识别两步骤:高维人工特征提取、降维。传统人脸识别技术基于可见光图像。深度学习+大数据(海量有标注人脸数据)为人脸识别领域主流技术路线。神经网络人脸识别技术,大量样本图像训练识别模型,无需人工选取特征,样本训练过程自行学习,识别准确率可以达到99%。
人脸识别技术流程。
人脸图像采集、检测。人脸图像采集,摄像头把人脸图像采集下来,静态图像、动态图像、不同位置、不同表情。用户在采集设备拍报范围内,采集设置自动搜索并拍摄。人脸检测属于目标检测(object detection)。对要检测目标对象概率统计,得到待检测对象特征,建立目标检测模型。用模型匹配输入图像,输出匹配区域。人脸检测是人脸识别预处理,准确标定人脸在图像的位置大小。人脸图像模式特征丰富,直方图特征、颜色特征、模板特征、结构特征、哈尔特征(Haar-like feature)。人脸检测挑出有用信息,用特征检测人脸。人脸检测算法,模板匹配模型、Adaboost模型,Adaboost模型速度。精度综合性能最好,训练慢、检测快,可达到视频流实时检测效果。
人脸图像预处理
基于人脸检测结果,处理图像,服务特征提取。系统获取人脸图像受到各种条件限制、随机干扰,需缩放、旋转、拉伸、光线补偿、灰度变换、直方图均衡化、规范化、几何校正、过滤、锐化等图像预处理。
人脸图像特征提取
人脸图像信息数字化,人脸图像转变为一串数字(特征向量)。如,眼睛左边、嘴唇右边、鼻子、下巴位置,特征点间欧氏距离、曲率、角度提取出特征分量,相关特征连接成长特征向量。
人脸图像匹配、识别
提取人脸图像特征数据与数据库存储人脸特征模板搜索匹配,根据相似程度对身份信息进行判断,设定阈值,相似度越过阈值,输出匹配结果。确认,一对一(1:1)图像比较,证明“你就是你”,金融核实身份、信息安全领域。辨认,一对多(1:N)图像匹配,“N人中找你”,视频流,人走进识别范围就完成识别,安防领域。
###########################################
人脸识别分类
*人脸检测
*人脸关键点检测
*人脸验证
*人脸属性检测
人脸检测
检测、定位图片人脸,返回高精度人脸框坐标。对人脸分析、处理的第一步。“滑动窗口”,选择图像矩形区域作滑动窗口,窗口中提取特征对图像区域描述,根据特征描述判断窗口是否人脸。不断遍历需要观察窗口。
人脸关键点检测
定位、返回人脸五官、轮廓关键点坐标位置。人脸轮廓、眼睛、眉毛、嘴唇、鼻子轮廓。Face++提供高达106点关键点。人脸关键点定位技术,级联形回归(cascaded shape regression, CSR)。人脸识别,基于DeepID网络结构。DeepID网络结构类似卷积神经网络结构,倒数第二层,有DeepID层,与卷积层4、最大池化层3相连,卷积神经网络层数越高视野域越大,既考虑局部特征,又考虑全局特征。
输入层 31x39x1、卷积层1 28x36x20(卷积核4x4x1)、最大池化层1 12x18x20(过滤器2x2)、卷积层2 12x16x20(卷积核3x3x20)、最大池化层2 6x8x40(过滤器2x2)、卷积层3 4x6x60(卷积核3x3x40)、最大池化层2 2x3x60(过滤器2x2)、卷积层42x2x80(卷积核2x2x60)、DeepID层 1x160、全连接层 Softmax。《Deep Learning Face Representation
from Predicting 10000 Classes》 http://mmlab.ie.cuhk.edu.hk/pdf/YiSun_CVPR14.pdf。
人脸验证
分析两张人脸同一人可能性大小。输入两张人脸,得到置信度分类、相应阈值,评估相似度。
人脸属性检测
人脸属性辩识、人脸情绪分析。https://www.betaface.com/wpa/在线人脸识别测试。给出人年龄、是否有胡子、情绪(高兴、正常、生气、愤怒)、性别、是否带眼镜、肤色。
人脸识别应用,美图秀秀美颜应用、世纪佳缘查看潜在配偶“面相”相似度,支付领域“刷脸支付”,安防领域“人脸鉴权”。Face++、商汤科技,提供人脸识别SDK。
************************************************************************************************************************************
人脸对比
1. Facenet可以直接对比2个人脸经过它的网络映射之后的欧式距离;运行程序为facenet\src\compare.py;
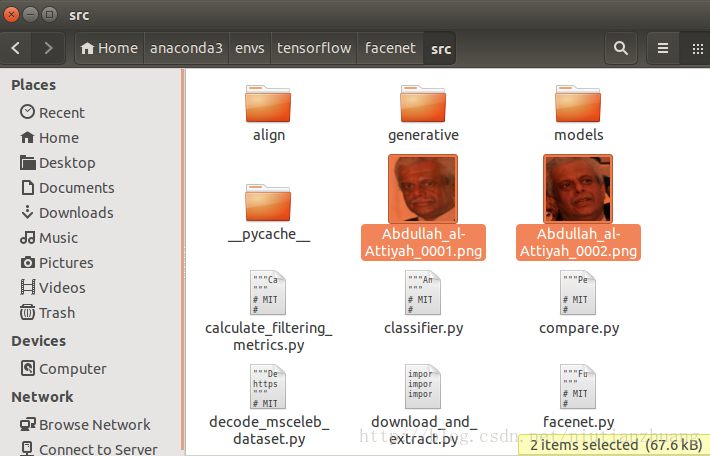
2. 从LFW数据集内随机选取同一人的2人脸图,
在compare.py所在同级目录下放入要对比的人脸图像Abdullah_al-Attiyah_0001.png和Abdullah_al-Attiyah_0002.png(同一个人的2张人脸图);
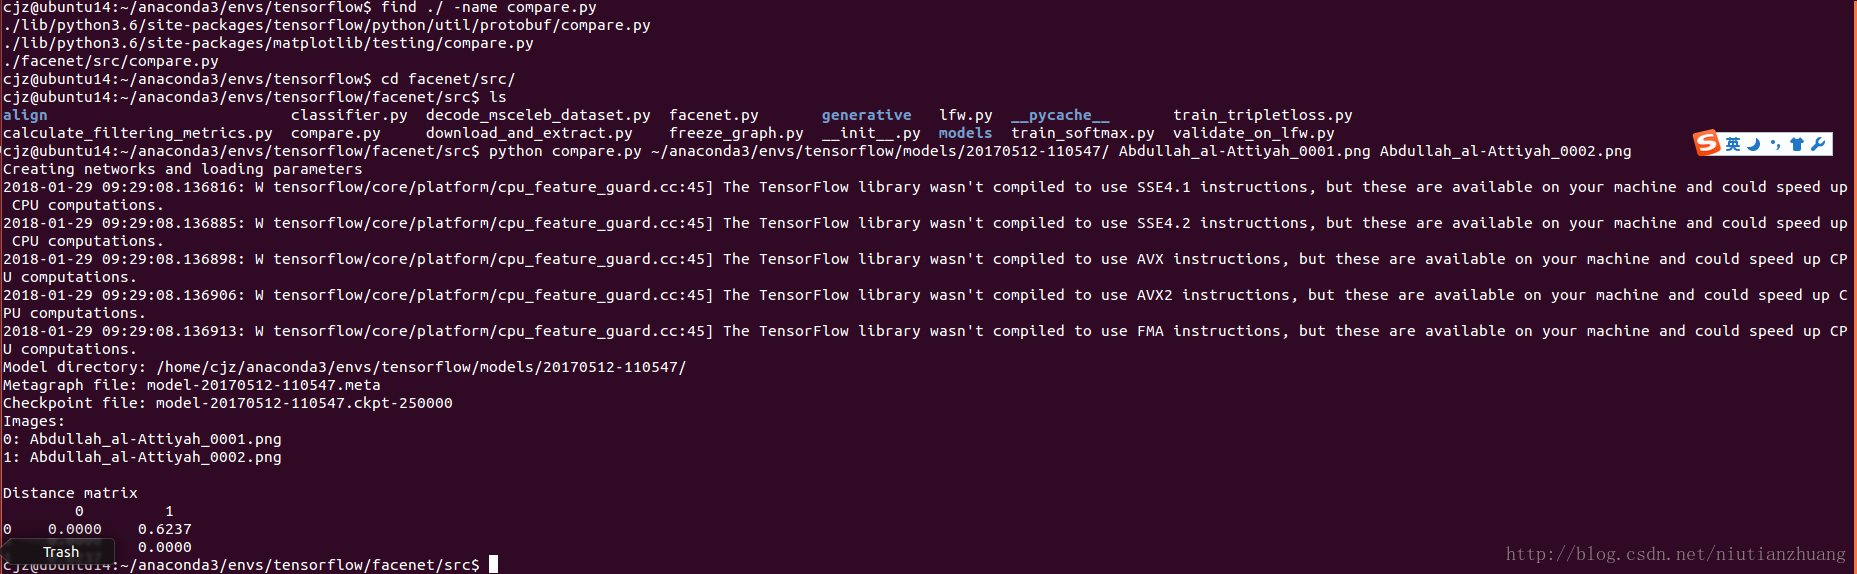
3. 在终端terminal窗口中使用 命令
find ./ -name compare.py 找到compare.py所在路径,然后cd进到compare.py所在路径;
4. 输入如下命令:
python compare.py ~/anaconda3/envs/tensorflow/models/20170512-110547/ Abdullah_al-Attiyah_0001.png Abdullah_al-Attiyah_0002.png运行结果如下:
5.在compare.py所在同级目录下放入要对比的人脸图像cheng.JPG和zhuang.JPG(完全不同的2人脸图)
6.输入如下命令:
python compare.py ~/anaconda3/envs/tensorflow/models/20170512-110547/ cheng.JPG zhuang.JPG运行结果如图:
生成的是欧氏距离的二分类代价矩阵(cost matrix),cost(i, j):第i类样本对第j类的代价,cost=0,说明相同,相似度范围[0,1],
cost >= 1说明相似度为0.
compare.py 源码如下"""Performs face alignment and calculates L2 distance between the embeddings of images."""
# MIT License
#
# Copyright (c) 2016 David Sandberg
#
# Permission is hereby granted, free of charge, to any person obtaining a copy
# of this software and associated documentation files (the "Software"), to deal
# in the Software without restriction, including without limitation the rights
# to use, copy, modify, merge, publish, distribute, sublicense, and/or sell
# copies of the Software, and to permit persons to whom the Software is
# furnished to do so, subject to the following conditions:
#
# The above copyright notice and this permission notice shall be included in all
# copies or substantial portions of the Software.
#
# THE SOFTWARE IS PROVIDED "AS IS", WITHOUT WARRANTY OF ANY KIND, EXPRESS OR
# IMPLIED, INCLUDING BUT NOT LIMITED TO THE WARRANTIES OF MERCHANTABILITY,
# FITNESS FOR A PARTICULAR PURPOSE AND NONINFRINGEMENT. IN NO EVENT SHALL THE
# AUTHORS OR COPYRIGHT HOLDERS BE LIABLE FOR ANY CLAIM, DAMAGES OR OTHER
# LIABILITY, WHETHER IN AN ACTION OF CONTRACT, TORT OR OTHERWISE, ARISING FROM,
# OUT OF OR IN CONNECTION WITH THE SOFTWARE OR THE USE OR OTHER DEALINGS IN THE
# SOFTWARE.
from __future__ import absolute_import
from __future__ import division
from __future__ import print_function
from scipy import misc
import tensorflow as tf
import numpy as np
import sys
import os
import argparse
import facenet
import align.detect_face
def main(args):
images = load_and_align_data(args.image_files, args.image_size, args.margin, args.gpu_memory_fraction)
with tf.Graph().as_default():
with tf.Session() as sess:
# Load the model
facenet.load_model(args.model)
# Get input and output tensors
images_placeholder = tf.get_default_graph().get_tensor_by_name("input:0")
embeddings = tf.get_default_graph().get_tensor_by_name("embeddings:0")
phase_train_placeholder = tf.get_default_graph().get_tensor_by_name("phase_train:0")
# Run forward pass to calculate embeddings
feed_dict = { images_placeholder: images, phase_train_placeholder:False }
emb = sess.run(embeddings, feed_dict=feed_dict)
nrof_images = len(args.image_files)
print('Images:')
for i in range(nrof_images):
print('%1d: %s' % (i, args.image_files[i]))
print('')
# Print distance matrix
print('Distance matrix')
print(' ', end='')
for i in range(nrof_images):
print(' %1d ' % i, end='')
print('')
for i in range(nrof_images):
print('%1d ' % i, end='')
for j in range(nrof_images):
dist = np.sqrt(np.sum(np.square(np.subtract(emb[i,:], emb[j,:]))))
print(' %1.4f ' % dist, end='')
print('')
def load_and_align_data(image_paths, image_size, margin, gpu_memory_fraction):
minsize = 20 # minimum size of face
threshold = [ 0.6, 0.7, 0.7 ] # three steps's threshold
factor = 0.709 # scale factor
print('Creating networks and loading parameters')
with tf.Graph().as_default():
gpu_options = tf.GPUOptions(per_process_gpu_memory_fraction=gpu_memory_fraction)
sess = tf.Session(config=tf.ConfigProto(gpu_options=gpu_options, log_device_placement=False))
with sess.as_default():
pnet, rnet, onet = align.detect_face.create_mtcnn(sess, None)
tmp_image_paths = image_paths.copy()
img_list = []
for image in tmp_image_paths:
img = misc.imread(os.path.expanduser(image), mode='RGB')
img_size = np.asarray(img.shape)[0:2]
bounding_boxes, _ = align.detect_face.detect_face(img, minsize, pnet, rnet, onet, threshold, factor)
if len(bounding_boxes) < 1:
image_paths.remove(image)
print("can't detect face, remove ", image)
continue
det = np.squeeze(bounding_boxes[0,0:4])
bb = np.zeros(4, dtype=np.int32)
bb[0] = np.maximum(det[0]-margin/2, 0)
bb[1] = np.maximum(det[1]-margin/2, 0)
bb[2] = np.minimum(det[2]+margin/2, img_size[1])
bb[3] = np.minimum(det[3]+margin/2, img_size[0])
cropped = img[bb[1]:bb[3],bb[0]:bb[2],:]
aligned = misc.imresize(cropped, (image_size, image_size), interp='bilinear')
prewhitened = facenet.prewhiten(aligned)
img_list.append(prewhitened)
images = np.stack(img_list)
return images
def parse_arguments(argv):
parser = argparse.ArgumentParser()
parser.add_argument('model', type=str,
help='Could be either a directory containing the meta_file and ckpt_file or a model protobuf (.pb) file')
parser.add_argument('image_files', type=str, nargs='+', help='Images to compare')
parser.add_argument('--image_size', type=int,
help='Image size (height, width) in pixels.', default=160)
parser.add_argument('--margin', type=int,
help='Margin for the crop around the bounding box (height, width) in pixels.', default=44)
parser.add_argument('--gpu_memory_fraction', type=float,
help='Upper bound on the amount of GPU memory that will be used by the process.', default=1.0)
return parser.parse_args(argv)
if __name__ == '__main__':
main(parse_arguments(sys.argv[1:]))
参考:
1.《TensorFlow技术解析与实战》
2. http://blog.csdn.net/tmosk/article/details/78087122
3. https://www.cnblogs.com/libinggen/p/7786901.html
4.http://blog.csdn.net/HelloZEX/article/details/78551974
5.http://blog.csdn.net/xingwei_09/article/details/79161931

相关文章推荐
- TensorFlow 实现人脸识别
- 基于Tensorflow的Facenet 人脸识别实现
- TensorFlow实现人脸识别(3)------将得到的训练图片以及测试图片进行处理
- Tensorflow实现卷积神经网络用于人脸关键点识别
- Tensorflow实现卷积神经网络,用于人脸关键点识别
- TensorFlow 人脸识别实验 ImportError: No module named 'sklearn.model_selection'
- Tensorflow实现卷积神经网络,用于人脸关键点识别
- TensorFlow 实现人脸识别
- TensorFlow实践|TensorFlow实现人脸表情识别
- 机器学习实验(四):用tensorflow实现卷积神经网络识别人类活动
- TensorFlow实现人脸识别(2)------利用opencv在视频中识别人脸并且保存
- TensorFlow实现人脸识别(5)-------利用训练好的模型实时进行人脸检测
- TensorFlow实现人脸识别(4)--------对人脸样本进行训练,保存人脸识别模型
- TensorFlow实现人脸识别(1)------Linux下用opencv打开视频
- Tensorflow实现卷积神经网络,用于人脸关键点识别
- TensorFlow学习---实现mnist手写数字识别
- Android使用Face++架构包实现人脸识别
- C#实现人脸识别
- [置顶] Android移动开发-在Android项目里集成face++人脸识别的实现
- 【人脸识别】人脸验证算法Joint Bayesian详解及实现(Python版)