LaTeX论文写作的一些用法记录
2018-01-23 01:56
686 查看
常用宏包汇总
\usepackage{amsmath}
\usepackage{booktabs}
\usepackage{amssymb}
\usepackage{amsbsy}
\usepackage{multirow}
%\usepackage{float}
\usepackage{graphicx}
\usepackage{subfigure}
\usepackage{array}
\usepackage{caption}
\usepackage{url}

%\usepackage{algorithmic}
%\usepackage{algorithm}
%\usepackage{algorithmic}
%\usepackage{algpseudocode}
%\usepackage{pseudocode}
%\usepackage{algorithm}
\usepackage{algorithmic}

\usepackage{array}
\newcolumntype{L}[1]{>{\raggedright\let\newline\\\arraybackslash\hspace{0pt}}m{#1}}
\newcolumntype{C}[1]{>{\centering\let\newline\\\arraybackslash\hspace{0pt}}m{#1}}
\newcolumntype{R}[1]{>{\raggedleft\let\newline\\\arraybackslash\hspace{0pt}}m{#1}}12
3
4
5
6
7
8
9
10
11
12
13
14
15
16
17
18
19
20
21
22
23
24
图片
* 测试图片来源 半次元:巨蜥不是十晰x [手动眨眼]基本用法
\begin{figure}[Htbp]
\centering % 居中对齐
\includegraphics[width=0.7\textwidth]{test.pdf}
\caption{Add caption here.}
\label{Fig:test}
\end{figure}12
3
4
5
6
图片对齐
上例是居中对齐,对应的还有左对齐和右对齐。\begin{figure}[htbp]
\raggedright % 左对齐
\includegraphics[width=0.3\textwidth]{test.jpg}
\caption{align left.}
\label{Fig:tag_left}
\end{figure}
\begin{figure}[htbp]
\raggedleft % 右对齐
\includegraphics[width=0.3\textwidth]{test.jpg}
\caption{align right.}
\label{Fig:tag_
4000
right}
\end{figure}12
3
4
5
6
7
8
9
10
11
12

关于对齐还有其他的实现方式
Syntax similar to \centering for right and left?
一种方式是利用adjustbox 宏包,但是一般CTEX(老版本,新版本不造)并没有安装这个宏包,学不来的,散了散了
\documentclass{article}
\usepackage[export]{adjustbox}

\begin{document}

\begin{figure}
\includegraphics[width=.6\textwidth,center]{example-image}
\caption{centered image}
\end{figure}

\begin{figure}
\includegraphics[width=.6\textwidth,left]{example-image}
\caption{left aligned image}
\end{figure}

\begin{figure}
\includegraphics[width=.6\textwidth,right]{example-image}
\caption{right aligned image}
\end{figure}

\end{document}12
3
4
5
6
7
8
9
10
11
12
13
14
15
16
17
18
19
20
21
还有几种方式一并列下:
\begin{figure}[htbp]
\flushleft % 左对齐,对应\flushright右对齐
\includegraphics[width=0.3\textwidth]{test.jpg}
\caption{flushright.}
\end{figure}

\begin{figure}
\hfill\includegraphics[width=0.3\textwidth]{test.jpg} %暴力右对齐
\caption{\texttt{hfill}}
\end{figure}

\begin{figure}
%这里利用了一个minipage环境,其实区别在于caption上
\hfill\begin{minipage}{.5\textwidth}\centering
\includegraphics{n}
\caption{\texttt{minipage}}
\end{minipage}
\end{figure}12
3
4
5
6
7
8
9
10
11
12
13
14
15
16
17
18

多图片排版
我常用的是subfigure环境,采用宏包graphicx和subfigure下面是一个两个图的例子,当然更多图也是可以滴
\begin{figure}[htbp]
\centering
\subfigure[caption for 1]{
\label{Fig.sub.1}
\includegraphics[width=0.4\textwidth]{test.jpg}}
\subfigure[caption for 2]{
\label{Fig.sub.2}
\includegraphics[width=0.4\textwidth]{test.jpg}}
\caption{Subfigure with two imgs.}
\label{Fig:demo_sub}
\end{figure}12
3
4
5
6
7
8
9
10
11

关于其他用法,下面给出一些参考
Insert multiple figures in Latex
Placing figures/tables side-by-side (\subfig)
How to arrage multiple figures?
***Using the multirow environment
采用multirow和multicolumn能解决大部分的排版问题,这里采用multirow方式的源码和结果如下:
\documentclass[a4paper]{article}
\usepackage[demo]{graphicx}

\usepackage{multirow}
\begin{document}

\begin{figure}[h]
\centering
\begin{tabular}{c@{}c@{}}
\multirow{-6}{*}{\includegraphics[height=1cm,angle=90]{vertical.jpg}}
&
\begin{tabular}{l}
\includegraphics[trim = 0mm 0mm 0mm 0mm, clip, width=0.7\linewidth]{1.jpg} \tabularnewline
\includegraphics[trim = 0mm 0mm 0mm 0mm, clip, width=0.7\linewidth]{1.jpg} \tabularnewline
\includegraphics[trim = 0mm 0mm 0mm 0mm, clip, width=0.7\linewidth]{1.jpg} \tabularnewline
\end{tabular} \tabularnewline
& \multicolumn{1}{c}{\includegraphics[width=0.4\linewidth,height=1cm]{horizontal.jpg}}
\end{tabular}
\caption{Test}
\label{figTest}
\end{figure}

\begin{figure}[h]
\centering
\begin{tabular}{c@{}c@{}}
\multirow{-4}{*}{\rotatebox{90}{\LARGE \bfseries Error (mm)}}
&
\begin{tabular}{l}
\includegraphics[trim = 0mm 0mm 0mm 0mm, clip, width=0.7\linewidth]{1.jpg} \tabularnewline
\includegraphics[trim = 0mm 0mm 0mm 0mm, clip, width=0.7\linewidth]{1.jpg} \tabularnewline
\includegraphics[trim = 0mm 0mm 0mm 0mm, clip, width=0.7\linewidth]{1.jpg} \tabularnewline
\end{tabular} \tabularnewline
& \tabularnewline
& \LARGE \bfseries Time (s)  \tabularnewline
\end{tabular}
\caption{Other Test}
\label{figOtherTest}
\end{figure}

\end{document}12
3
4
5
6
7
8
9
10
11
12
13
14
15
16
17
18
19
20
21
22
23
24
25
26
27
28
29
30
31
32
33
34
35
36
37
38
39
40
41
42


表格
基本用法
最常用的三线表\begin{table}[!htbp]
\caption{A simple table}
\centering
\begin{tabular}{ccc}
\toprule
M1 & M2 & M3 \\
\midrule
T1 & a & b \\
T2 & c & d \\
\bottomrule
\end{tabular}
\end{table12
3
4
5
6
7
8
9
10
11
12

表格对齐与列宽设置
一种粗暴但好用的方法\begin{table}[!htbp]
\caption{A simple table with width}
\centering
%\begin{tabular}{ccc}
\begin{tabular}{p{1cm}<{\flushleft}p{1cm}<{\centering}p{1cm}<{\raggedleft}}
\toprule
M1 & M2 & M3 \\
\midrule
T1 & a & b \\
T2 & c & d \\
\bottomrule
\end{tabular}
\end{table}12
3
4
5
6
7
8
9
10
11
12
13

当列比较多时,这种写法会比较长,看起不太优雅(要优雅~)
后来我发现一种灰常nice的写法
\usepackage{array}
\newcolumntype{L}[1]{>{\raggedright\let\newline\\\arraybackslash\hspace{0pt}}m{#1}}
\newcolumntype{C}[1]{>{\centering\let\newline\\\arraybackslash\hspace{0pt}}m{#1}}
\newcolumntype{R}[1]{>{\raggedleft\let\newline\\\arraybackslash\hspace{0pt}}m{#1}}

\begin{table}[!htbp]
\caption{A simple table with nice width setting.}
\centering
%\begin{tabular}{ccc}
%\begin{tabular}{p{1cm}<{\flushleft}p{1cm}<{\centering}p{1cm}<{\raggedleft}}
\begin{tabular}{L{1cm}C{1cm}R{1cm}}
\toprule
M1 & M2 & M3 \\
\midrule
T1 & a & b \\
T2 & c & d \\
\bottomrule
\end{tabular}
\end{table}12
3
4
5
6
7
8
9
10
11
12
13
14
15
16
17
18
19
20

复杂表格结构
就像之前在图片中提到的,采用multirow和multicolumn能解决大部分的排版问题这里给出一个简单的例子来说明具体的使用
\begin{table}[!htbp]
%\small
\renewcommand{\arraystretch}{1.1}
\caption{A illustration of complex table. }
\label{tab:mypersonality}
\centering
%\begin{tabular}{{c}p{100pt}{l}p{80pt}{l}p{200pt}}
\begin{tabular}{c|ccc|ccc}
%\begin{tabular}{cccccccccc}
%\toprule
\hline
\multirow{2}{*}{Method} &
\multicolumn{3}{c|}{Dataset one} &
\multicolumn{3}{c}{Dataset two} \\
\cline{2-7}
& M1  & M2   & M3   & M1  & M2   & M3  \\
%\midrule
\hline
T1    & 1 & 2 & 3 & 1 & 2 & 3  \\
T2    & 1 & 2 & 3 & 1 & 2 & 3  \\
T3    & 1 & 2 & 3 & 1 & 2 & 3  \\
\hline
%\bottomrule
\end{tabular}
%\vspace{-1.5em}
\end{table}12
3
4
5
6
7
8
9
10
11
12
13
14
15
16
17
18
19
20
21
22
23
24
25
26

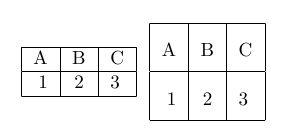
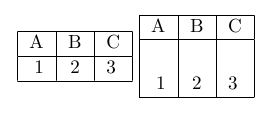
改变表格行高
有两种,一种是全局改变,一种是局部改变某一行的行高给出一篇文章
row height,里面具体给出了两个例子分别说明这两个问题。
\documentclass{article}
\begin{document}
\begin{tabular}{|r|c|l|}
\hline
A & B & C \\
\hline
1 & 2 & 3 \\
\hline
\end{tabular}
\renewcommand{\arraystretch}{2} %改变整个表格环境的行高
\begin{tabular}{|r|c|l|}
\hline
A & B & C \\
\hline
1 & 2 & 3 \\
\hline
\end{tabular}
\renewcommand{\arraystretch}{1}
\end{document}12
3
4
5
6
7
8
9
10
11
12
13
14
15
16
17
18
19
\documentclass{article}
\begin{document}

\begin{tabular}{|r|c|l|}
\hline
A & B & C \\
\hline
1 & 2 & 3 \\
\hline
\end{tabular}
\begin{tabular}{|r|c|l|}
\hline
A & B & C \\
\hline
%use the command \rule with a width of zero and the height you want as parameter
\rule{0pt}{25pt}1 & 2 & 3 \\
\hline
\end{tabular}
\end{document}12
3
4
5
6
7
8
9
10
11
12
13
14
15
16
17
18
19
伪代码
用latex写伪代码的教程有很多,比如How to write algorithm and pseudocode in Latex ?但是最近有些模板,比如IEEE的conference模板,对与algorithm宏包会报错不兼容。
我采用的解决方式是,将algorithmic放在Table或者Figure环境里。
具体给出放在Table里的例子
\begin{table}[!htbp]
%\renewcommand{\arraystretch}{1}
\centering
\begin{tabular}{p{8cm}}
\toprule
%\hline
%\specialrule{1pt}{5pt}{5pt}
\textbf{Algorithm 1} A algorithm\\
\midrule
%\hline
%\specialrule{1pt}{1pt}{1pt}
%\rule{-5pt}{-5pt}
%\setlength{\parskip}{-10pt}
{
\vspace{-8pt}
%\setlength{\abovecaptionskip}{-20pt}
%\setlength{\belowcaptionskip}{-20pt}
\begin{algorithmic}
\STATE  Initialize  11
\WHILE{ not converge}
\STATE 22
\STATE 33
\ENDWHILE
\end{algorithmic}
} \setlength{\parskip}{-10pt}\\
%\specialrule{0em}{-1pt}{-1pt}
\bottomrule
%\hline
%\specialrule{1pt}{1pt}{1pt}
\end{tabular}
\caption{ A algorithm}
\end{table}12
3
4
5
6
7
8
9
10
11
12
13
14
15
16
17
18
19
20
21
22
23
24
25
26
27
28
29
30
31
32
33

一些间距调整
主要是图表与正文的间距、图表之间的间距记录下采用过的方法
\hspace{}
\vspace{-1.5em}
\rule{-5pt}{-5pt}
\setlength{\parskip}{-10pt}
\specialrule{0em}{-1pt}{-1pt}
\renewcommand{\arraystretch}{1}
\setlength{\abovecaptionskip}{-20pt}
\setlength{\belowcaptionskip}{-20pt}12
3
4
5
6
7
8
9
特殊符号
L: \mathcal{L}
Yˆ:
\widehat{Y}
Intel\textsuperscript{\textregistered} Core\texttrademark
: \textsuperscript{\textregistered} , \texttrademark
∂O(θ)∂α:
\frac{\partial \mathcal{O}(\theta)}{\partial \alpha}
给出一个符号的比较好玩的网站:
Detexify
左边手绘,右边给出候选,虽然很多时候不准2333

公式
公式不编号: \nonumber我碰到的一些稍微复杂一点的公式
\begin{eqnarray}
f( m, n) =
\left\{ \begin{array}{l}
\frac{1}{W_1} exp\{\beta_1 \cdot I(m^1, n^1)\}\\
\frac{1}{W_2} exp\{\beta_2 \cdot I(m^2, n^2)\}\\
\cdots \\
\frac{1}{W_k} exp\{\beta_k \cdot I(m^k, n^k)\}
\end{array} \right.
\end{eqnarray}12
3
4
5
6
7
8
9
f(m,n)=⎧⎩⎨⎪⎪⎪⎪⎪⎪⎪⎪⎪⎪⎪⎪⎪⎪⎪⎪⎪⎪⎪⎪1W1exp{β1⋅I(m1,n1)}1W2exp{β2⋅I(m2,n2)}⋯1Wkexp{βk⋅I(mk,nk)}
\begin{equation}
\begin{split}
&\frac{\partial \mathcal{O}(\theta)}{\partial \alpha}  \! =\!  E[ f(\cdot)]
\! - \! E_{P_{\alpha}}[ f(\cdot)) ] \\
&\frac{\partial \mathcal{O}(\theta)}{\partial \beta}  \! =\!  E[ g(\cdot)]
\! - \! E_{P_{\alpha}}[ g(\cdot)) ] \\
\end{split}
\end{equation12
3
4
5
6
7
8
注意公式编号,这里都是用了split环境,多个公式只编一个号


相关文章推荐
- LaTeX论文写作的一些用法记录
- LaTex:实践------论文写作
- Latex排版论文的过程中遇到的一些编译问题及解决方案
- vim 的宏及一些特定用法的记录
- 记录一些Matlab用法
- 系分、项管论文写作的一些技巧(本人系分、项管均为一次性通过)
- 论文写作进度记录 随时更新
- latex论文写作常见问题
- 记录jQuery的一些用法
- 科学论文写作工具TEX/LaTEX/CTEX
- 记录_Mac OS X中brew的一些用法
- 记录一些kotlin的用法
- 工作中的一些小记录(命令用法、函数等)
- linux下一些sh命令用法记录
- electron开发记录(五):调用jquery,bootstrap并对其一些用法的总结
- 关于Vue的一些小用法(记录)
- 英文文献及论文写作中的一些技巧
- LaTeX的一些用法
- Elsevier: 一些国外科技论文写作的网络资源
- 科学论文写作工具TEX/LaTEX/CTEX