FTP服务搭建与配置
2018-01-18 00:00
731 查看
第十五章 FTP服务搭建与配置
FTP服务介绍
FTP(file transfer protocol)文件传输协议,用于在Internet上控制文件的双向传输。FTP主要作用是让用户连接一个远程计算机(这些计算机上运行着FTP服务器程序)查看远程计算机有哪些文件,然后把文件从远程计算机上拷贝到本地计算机,或把本地文件传送到远程计算机。!!!该服务在小公司用的比较多,由于FTP服务的安全性较差,所以大公司不使用该服务。
应用场景
A,B,C三台机器上需要被访问到的文件是一样的,A共享数据出来,B和C分别取挂载A共享的数据目录,从而B和C访问到的数据和A上的一致。15.2 使用vsftpd搭建ftp服务(上)
安装vsftpd工具
centos中默认自带vsftpd安装包。[root@cham002 ~]# yum install -y vsftpd 创建用户: [root@cham002 ~]# useradd -s /sbin/nologin virftp 名字随意,-s指定它的shell
说明: vsftpd可以使用系统级别的用户进行登录,但是这样做不安全,所以需要使用vsftpd创建一个虚拟用户。在此创建一个系统普通用户的作用是使vsftpd的虚拟用户来进行映射,然后完成数据的传输。
编辑虚拟用户密码文件
[root@cham002 ~]# vim /etc/vsftpd/vsftpd_login

testuser1
champinlinux
user1
a123456
~
:wq
[root@cham002 ~]# chmod 600 !$
chmod 600 /etc/vsftpd/vsftpd_login
•内容如下,奇数行为用户名,偶数行为密码,(2-4是密码)多个用户就写多行
文件转换: 将该密码文件转换成计算机能识别的二进制文件。
[root@cham002 ~]# db_load -T -t hash -f /etc/vsftpd/vsftpd_login /etc/vsftpd/vsftpd_login.db
[root@cham002 ~]# ls -l /etc/vsftpd/
总用量 36
-rw------- 1 root root   125 8月   3 14:10 ftpusers
-rw------- 1 root root   361 8月   3 14:10 user_list
-rw------- 1 root root  5030 8月   3 14:10 vsftpd.conf
-rwxr--r-- 1 root root   338 8月   3 14:10 vsftpd_conf_migrate.sh
-rw------- 1 root root    37 1月  18 08:40 vsftpd_login
-rw-r--r-- 1 root root 12288 1月  18 08:42 vsftpd_login.db    #生成此文件
[root@cham002 ~]#
创建虚拟用户配置文件
[root@cham002 ~]# mkdir /etc/vsftpd/vsftpd_user_conf
[root@cham002 ~]# cd !$

[root@cham002 vsftpd_user_conf]# vim testuser1

local_root=/home/virftp/testuser1
#定义虚拟用户家目录
anonymous_enable=NO
#是否允许匿名用户登录
write_enable=YES
#是否可写
local_umask=022
#定义创建新文件时的默认权限
anon_upload_enable=NO
#是否允许匿名用户上传文件
anon_mkdir_write_enable=NO
#是否允许匿名用户创建目录文件
idle_session_timeout=600
#空闲用户保留时间
data_connection_timeout=120
#数据传输超时时间
max_clients=10
#客户端最大连接数量
:wq
注: 在此保持虚拟用户配置文件和虚拟用户名称一致。!!!!!!!!!!!!!
创建虚拟用户家目录
[root@cham002 vsftpd_user_conf]#  mkdir /home/virftp/testuser1
创建一个文件:
[root@cham002 vsftpd_user_conf]# touch /home/virftp/testuser1/cham.txt
[root@cham002 vsftpd_user_conf]# chown -R virftp:virftp /home/virftp  修改权限
虚拟用户密码匹配
[root@cham002 vsftpd_user_conf]# vim /etc/pam.d/vsftpd

#%PAM-1.0
auth sufficient /lib64/security/pam_userdb.so db=/etc/vsftpd/vsftpd_login
account sufficient /lib64/security/pam_userdb.so db=/etc/vsftpd/vsftpd_login
session    optional     pam_keyinit.so    force revoke
auth       required     pam_listfile.so item=user sense=deny file=/etc/vsftpd/ftpusers onerr=succeed
auth       required     pam_shells.so
auth       include      password-auth
account    include      password-auth
session    required     pam_loginuid.so
session    include      password-auth
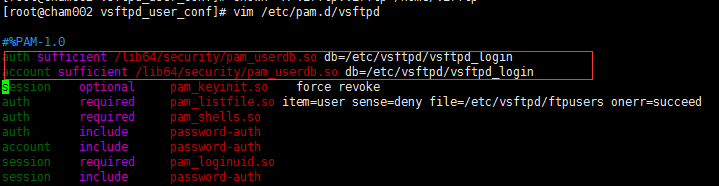
说明: 在该文件中添加这两行内容,用于指定用户密码文件位置。
注意: 在centos6中“/lib64/security/pam_userdb.so”该文件区分版本(32位、64位)。
编辑vsftpd主配置文件
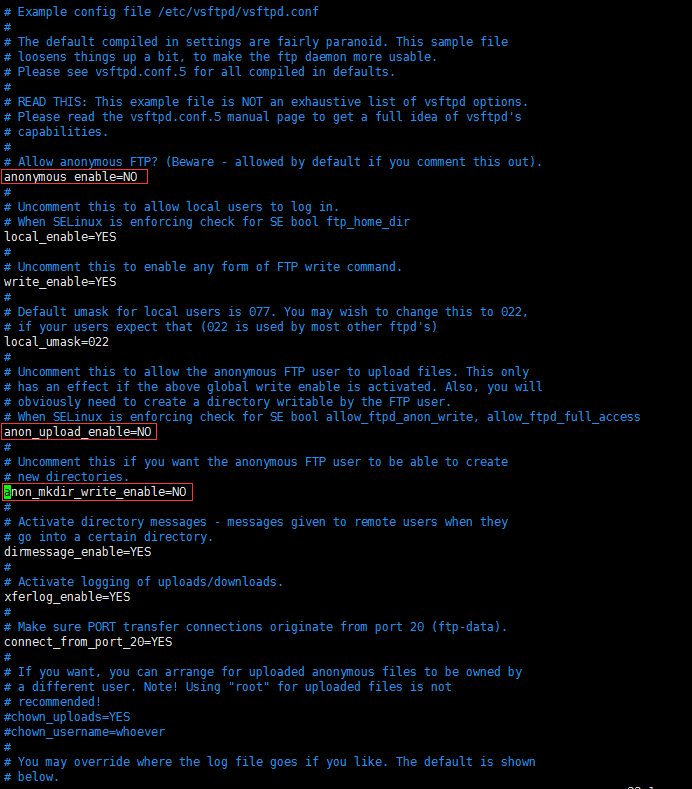
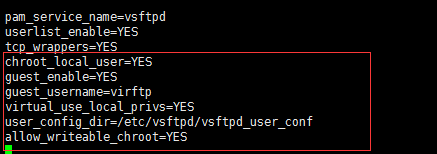
[root@cham002 vsftpd_user_conf]# vim /etc/vsftpd/vsftpd.conf
将anonymous_enable=YES 改为 anonymous_enable=NO
将#anon_upload_enable=YES 改为 anon_upload_enable=NO
将#anon_mkdir_write_enable=YES 改为 anon_mkdir_write_enable=NO
再增加如下内容
chroot_local_user=YES
guest_enable=YES
guest_username=virftp
virtual_use_local_privs=YES
user_config_dir=/etc/vsftpd/vsftpd_user_conf
allow_writeable_chroot=YES
启动服务:
[root@cham002 vsftpd_user_conf]# systemctl start vsftpd
[root@cham002 vsftpd_user_conf]# ps aux |grep vsftpd
root      4623  0.0  0.0  53216   572 ?        Ss   09:06   0:00 /usr/sbin/vsftpd /etc/vsftpd/vsftpd.conf
root      4625  0.0  0.0 112680   976 pts/1    S+   09:06   0:00 grep --color=auto vsftpd
[root@cham002 vsftpd_user_conf]# netstat -lntp
Active Internet connections (only servers)
Proto Recv-Q Send-Q Local Address           Foreign Address         State       PID/Program name
tcp        0      0 0.0.0.0:60523           0.0.0.0:*               LISTEN      1252/rpc.statd
tcp        0      0 0.0.0.0:111             0.0.0.0:*               LISTEN      1/systemd
tcp        0      0 0.0.0.0:80              0.0.0.0:*               LISTEN      2278/nginx: master
tcp        0      0 0.0.0.0:20048           0.0.0.0:*               LISTEN      1680/rpc.mountd
tcp        0      0 0.0.0.0:22              0.0.0.0:*               LISTEN      2065/sshd
tcp        0      0 127.0.0.1:25            0.0.0.0:*               LISTEN      2529/master
tcp        0      0 0.0.0.0:443             0.0.0.0:*               LISTEN      2278/nginx: master
tcp        0      0 0.0.0.0:39551           0.0.0.0:*               LISTEN      -
tcp        0      0 0.0.0.0:2049            0.0.0.0:*               LISTEN      -
tcp6       0      0 :::3306                 :::*                    LISTEN      2483/mysqld
tcp6       0      0 :::111                  :::*                    LISTEN      1/systemd
tcp6       0      0 :::20048                :::*                    LISTEN      1680/rpc.mountd
tcp6       0      0 :::21                   :::*                    LISTEN      4623/vsftpd
tcp6       0      0 :::22                   :::*                    LISTEN      2065/sshd
tcp6       0      0 :::41720                :::*                    LISTEN      -
tcp6       0      0 ::1:25                  :::*                    LISTEN      2529/master
tcp6       0      0 :::2049                 :::*                    LISTEN      -
tcp6       0      0 :::47907                :::*                    LISTEN      1252/rpc.statd
说明: FTP服务监听21端口;sshd监听22端口;telnet监听23端口。!!!!
15.3 使用vsftpd搭建ftp服务(下)
测试
如果在Windows系统进行测试,可以在Windows安装filezilla软件。在Linux中测试,安装lftp工具。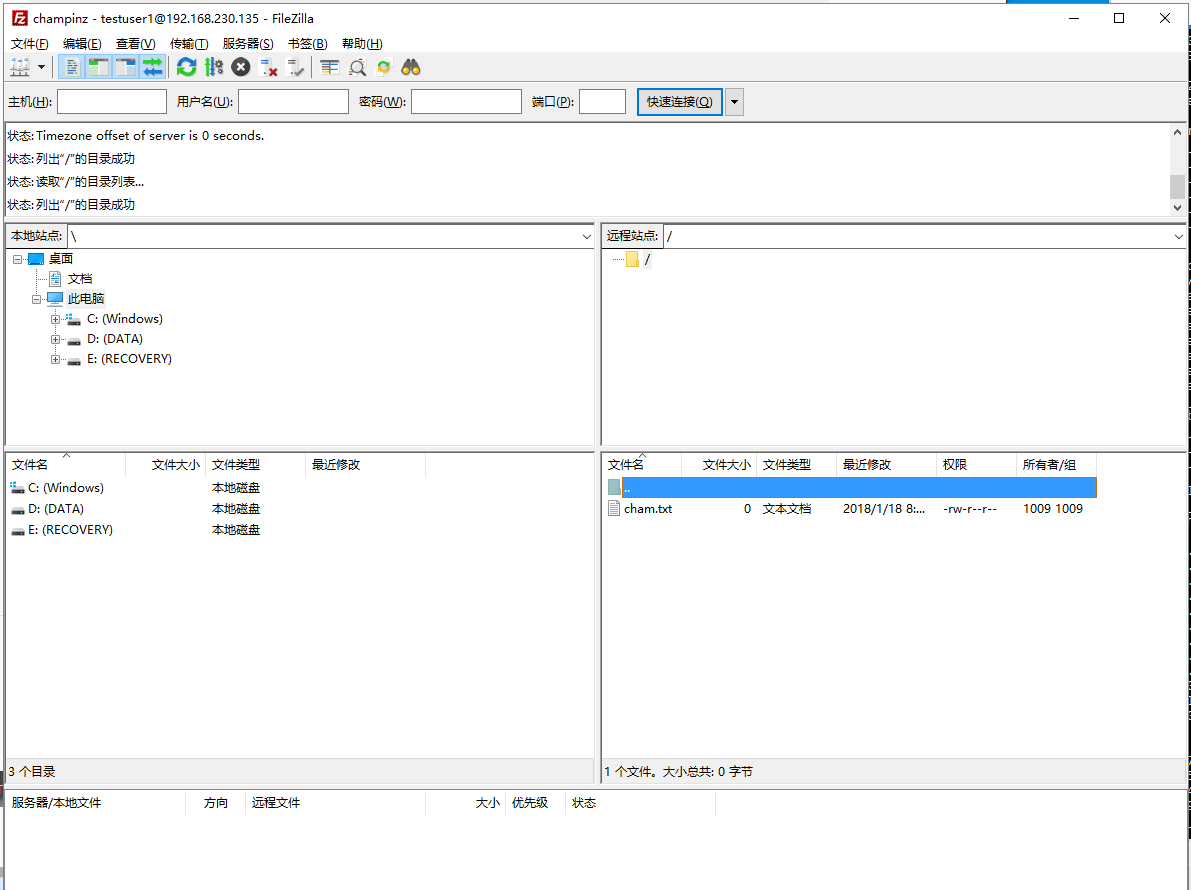
[root@cham002 vsftpd_user_conf]# yum install -y lftp
[root@cham002 vsftpd_user_conf]#  lftp testuser1@127.0.0.1
口令:
lftp testuser1@127.0.0.1:~> ls
-rw-r--r--    1 1009     1009            0 Jan 18 00:51 cham.txt
lftp testuser1@127.0.0.1:/> ?
!<shell-command>                     (commands)                           alias [<name> [<value>]]
attach [PID]                         bookmark [SUBCMD]                    cache [SUBCMD]
cat [-b] <files>                     cd <rdir>                            chmod [OPTS] mode file...
close [-a]                           [re]cls [opts] [path/][pattern]
debug [<level>|off] [-o <file>]      du [options] <dirs>                  exit [<code>|bg]
get [OPTS] <rfile> [-o <lfile>]      glob [OPTS] <cmd> <args>             help [<cmd>]
history -w file|-r file|-c|-l [cnt]  jobs [-v] [<job_no...>]              kill all|<job_no>
lcd <ldir>                           lftp [OPTS] <site>                   ln [-s] <file1> <file2>
ls [<args>]                          mget [OPTS] <files>
mirror [OPTS] [remote [local]]       mkdir [-p] <dirs>                    module name [args]
more <files>                         mput [OPTS] <files>                  mrm <files>
mv <file1> <file2>                   [re]nlist [<args>]                   open [OPTS] <site>
pget [OPTS] <rfile> [-o <lfile>]     put [OPTS] <lfile> [-o <rfile>]      pwd [-p]
queue [OPTS] [<cmd>]                 quote <cmd>
repeat [OPTS] [delay] [command]      rm [-r] [-f] <files>                 rmdir [-f] <dirs>
scache [<session_no>]                set [OPT] [<var> [<val>]]            site <site-cmd>
source <file>                        torrent [-O <dir>] <file|URL>...     user <user|URL> [<pass>]
wait [<jobno>]                       zcat <files>                         zmore <files>

#查询在lftp中可执行的命令
#常用命令:put、get
lftp testuser1@127.0.0.1:/> get cham.txt
lftp testuser1@127.0.0.1:/> quit
[root@cham002 vsftpd_user_conf]# ls
cham.txt  testuser1
[root@cham002 vsftpd_user_conf]#
说明: 下载(get)的内容会保存到当前目录下
使用xshell实现FTP的功能
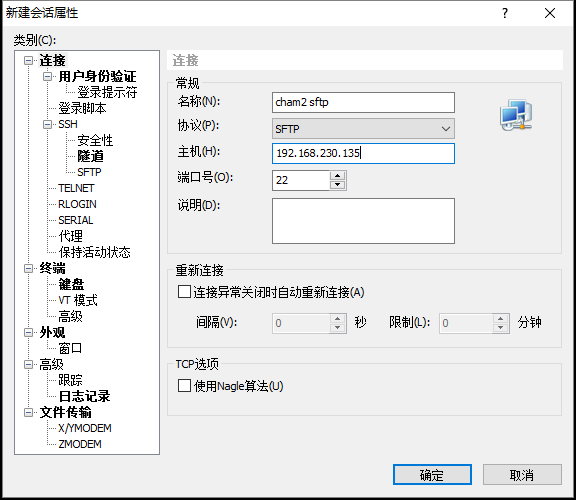
输入用户名和密码。默认是在root下
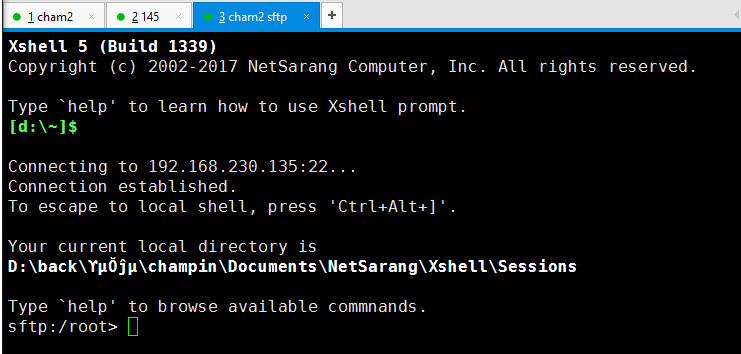
Type `help' to browse available commnands.
sftp:/root> ls
dr-xr-x---   13 root     root         4096 Jan 18 09:12 .
dr-xr-xr-x   20 root     root          282 Dec 14 21:06 ..
-rw-r--r--    1 root     root           18 Dec 29  2013 .bash_logout
-rw-r--r--    1 root     root          176 Dec 29  2013 .bash_profile
-rw-r--r--    1 root     root          176 Dec 29  2013 .bashrc
-rw-r--r--    1 root     root          100 Dec 29  2013 .cshrc
-rw-r--r--    1 root     root          129 Dec 29  2013 .tcshrc
-rw-------    1 root     root         1422 Oct 19 07:00 anaconda-ks.cfg
drwx------    2 root     root           80 Oct 18 23:58 .ssh
-rw-------    1 root     root        29340 Jan 16 23:47 .bash_history
drwxr-xr-x    3 root     root          110 Dec  5 21:23 111
-rw-r--r--    1 root     root          184 Dec  9 17:54 123.txt
-rw-r--r--    1 root     root      4461632 Dec  9 18:00 aaa.txt
-rw-r--r--    1 root     root      4464640 Dec  9 18:04 aaa.txt.tar
drwxr-xr-x    2 root     root           58 Dec 10 21:11 aaaaa
-rw-r--r--    1 root     root        10240 Dec 12 19:59 chamlinux.tar
-rw-r--r--    1 root     root     20395803 Dec 15 15:04 mariadb-10.2.6-linux-glibc_214-x86_64.tar.gz
drwxr-xr-x    2 root     root            6 Dec 16 00:09 apache
-rw-------    1 root     root         1024 Jan  8 23:30 .rnd
-rw-------    1 root     root         1978 Jan 16 01:15 .mysql_history
-rw-r--r--    1 root     root          490 Nov 17 14:21 1.txt
-rw-------    1 root     root         8372 Jan 18 09:06 .viminfo
drwxr-xr-x    3 root     root           18 Jan 18 09:12 .config
-rw-r--r--    1 root     root           31 Nov 17 14:42 2.txt
-rwxrwxrwx    1 user1    test          231 Dec  9 17:49 a.txt
drwxrwxrwx    2 root     user1          19 Dec 12 19:57 chamlinux
drwxr-xr-x    3 root     root           65 Nov 26 13:52 grep
drwxr-xr-x    2 root     root           70 Nov 26 14:20 sed
drwxr-xr-x    2 root     root           35 Nov 22 22:07 awk
-rw-r--r--    1 root     root      8638793 Oct 21 03:39 httpd-2.4.29.tar.gz
drwxr-xr-x    3 root     root           19 Jan 18 09:12 .local
drwxr-----    3 root     root           19 Nov 27 18:56 .pki
sftp:/root> cd /tmp/
sftp:/tmp> get php-fcgi.sock/
sftp: cannot open /tmp/php-fcgi.sock/ to read
sftp:/tmp> get user.sql
Fetching /tmp/user.sql to user.sql
sftp: received 6.83 KB in 0.08 seconds

ctrl+cat+f

相关文章推荐
- FTP服务搭建与配置
- Samba和ftp服务的搭建及配置
- 第15章FTP服务搭建与配置
- Windows IIS配置与Ftp服务搭建
- CentOS7上搭建FTP服务+VSFTPD配置全解析
- OMAP平台开发环境搭建(Ubuntu下ftp服务配置)
- day 56 NFS服务搭建(续)与FTP服务搭建与配置
- FTP服务搭建与配置
- [15] FTP服务搭建与配置
- ftp服务搭建与配置
- Windows IIS配置与Ftp服务搭建
- Windows IIS配置与Ftp服务搭建
- [积累] CentOS 配置 vsftpd 搭建 ftp 服务
- linux中搭建ftp服务配置
- FTP服务搭建与配置
- linux开发环境搭建-----ubuntu14.04安装 配置FTP SSH NFS 服务
- ftp服务的搭建之vsftpd的配置(解决外网无法访问的问题)
- NFS服务搭建与配置(二)exportfs命令,FTP服务搭建
- Windows 下IIS配置与Ftp服务搭建