windows 下编译dlib-18.17及测试
2018-01-12 23:01
501 查看
Dlib是一个机器学习的C++库,里面包含了许多常用的机器学习算法,如人脸检测识别,而且文档和例子都非常详细,学习了OenCV后准备也学习下。
Dlib官网地址:http://www.dlib.net/ml.html
目前官方最新的版本是:19.8。这个版本的dlib只支持VS2015及以后的版本,前面的版本需要自己去捣鼓,而本人用的是VS2013,于是下载了dlib-18.17。下载地址:https://pan.baidu.com/s/1gey9Wd1
1、安装cmake,这个很简单,一直next就可以了。
2、打开cmake,设置source code路径为解压目录,新建生成目录,起名为build,设为二进制生成输出目录。
3、点击Configure生成如下界面:
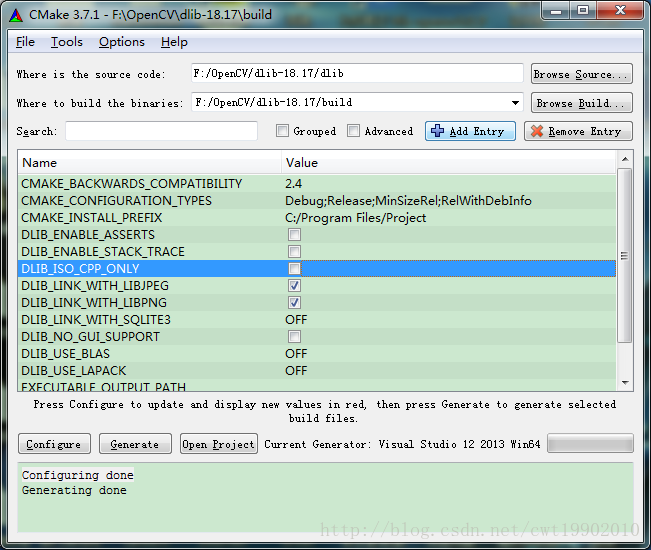
4、确保DLIB_LINK_WITH_LIBJPEG选项和DLIB_LINK_WITH_LIBPNG选项被勾选,再次点击Configure,Configuring done后,然后点击Generate,生成完毕后,在build目录下打开:dlib.vcxproj,然后选择dlib项目,点击生成,记得分别选择Debug 64 和Release 64模式生成对应的静态库文件:dlib.lib。
5、编译完成后,就可以使用了,
在C/C++ —>常规—>附加包含目录中加入 :F:\OpenCV\dlib-18.17,如果出现jpeg和png的错误,记得添加包含F:\OpenCV\dlib-18.17\dlib\external\libjpeg和F:\OpenCV\dlib-18.17\dlib\external\libpng,然后在链接器—>常规—>附加库目录中添加:F:\OpenCV\dlib-18.17\build\Release(如果是Debug模式,则为:F:\OpenCV\dlib-18.17\build\Debug),然后在链接器—>输入,中加入dlib.lib。
为了保证顺利载入jpeg和png图像,还需要在c++的预处理器中加入
DLIB_PNG_SUPPORT
DLIB_JPEG_SUPPORT
6、测试
编译成功,运行就能打开电脑usb摄像头,检测人脸了。
Dlib官网地址:http://www.dlib.net/ml.html
目前官方最新的版本是:19.8。这个版本的dlib只支持VS2015及以后的版本,前面的版本需要自己去捣鼓,而本人用的是VS2013,于是下载了dlib-18.17。下载地址:https://pan.baidu.com/s/1gey9Wd1
1、安装cmake,这个很简单,一直next就可以了。
2、打开cmake,设置source code路径为解压目录,新建生成目录,起名为build,设为二进制生成输出目录。
3、点击Configure生成如下界面:
4、确保DLIB_LINK_WITH_LIBJPEG选项和DLIB_LINK_WITH_LIBPNG选项被勾选,再次点击Configure,Configuring done后,然后点击Generate,生成完毕后,在build目录下打开:dlib.vcxproj,然后选择dlib项目,点击生成,记得分别选择Debug 64 和Release 64模式生成对应的静态库文件:dlib.lib。
5、编译完成后,就可以使用了,
在C/C++ —>常规—>附加包含目录中加入 :F:\OpenCV\dlib-18.17,如果出现jpeg和png的错误,记得添加包含F:\OpenCV\dlib-18.17\dlib\external\libjpeg和F:\OpenCV\dlib-18.17\dlib\external\libpng,然后在链接器—>常规—>附加库目录中添加:F:\OpenCV\dlib-18.17\build\Release(如果是Debug模式,则为:F:\OpenCV\dlib-18.17\build\Debug),然后在链接器—>输入,中加入dlib.lib。
为了保证顺利载入jpeg和png图像,还需要在c++的预处理器中加入
DLIB_PNG_SUPPORT
DLIB_JPEG_SUPPORT
6、测试
// OpenCVDLIB.cpp : 定义控制台应用程序的入口点。
//

#include "stdafx.h"
#include <dlib/opencv.h>
#include <dlib/image_processing/frontal_face_detector.h>
#include <dlib/image_processing/render_face_detections.h>
#include <dlib/image_processing.h>
#include <dlib/gui_widgets.h>
#include<opencv2/highgui/highgui.hpp>
#include<opencv2/core/core.hpp>
#include<opencv2/imgproc/imgproc.hpp>

using namespace cv;
using namespace std;
using namespace dlib;

int _tmain(int argc, _TCHAR* argv[])
{
try
{
cv::VideoCapture cap(0);
if (!cap.isOpened())
{
cerr << "Unable to connect to camera" << endl;
return 1;
}

frontal_face_detector detector = get_frontal_face_detector();
shape_predictor pose_model;
deserialize("shape_predictor_68_face_landmarks.dat") >> pose_model;

cv::namedWindow("show", 0);
while (cv::waitKey(30) != 27)
{
// Grab a frame
cv::Mat temp;
cap >> temp;

cv_image<bgr_pixel> cimg(temp);
std::vector<dlib::rectangle> faces = detector(cimg);
std::vector<full_object_detection> shapes;
for (unsigned long i = 0; i < faces.size(); ++i)
shapes.push_back(pose_model(cimg, faces[i]));

if (!shapes.empty())
{
for (int i = 0; i < 68; i++) {
circle(temp, cvPoint(shapes[0].part(i).x(), shapes[0].part(i).y()), 3, cv::Scalar(0, 0, 255), -1);
}
}
imshow("show", temp);

}
}
catch (serialization_error& e)
{
cout << "You need dlib's default face landmarking model file to run this example." << endl;
cout << "You can get it from the following URL: " << endl;
cout << "   http://dlib.net/files/shape_predictor_68_face_landmarks.dat.bz2" << endl;
cout << endl << e.what() << endl;
}
catch (exception& e)
{
cout << e.what() << endl;
}
}
编译成功,运行就能打开电脑usb摄像头,检测人脸了。

相关文章推荐
- Thrift 学习笔记2——Windows环境下Thrift的安装、编译以及测试
- 编译gRPC(windows)和测试demo
- Windows下编译测试BM3D算法效果
- Windows下VS2013 C++编译测试faster-rcnn
- Windows下编译Qt的Mysql驱动(详细测试可用)
- Caffe-windows入门学习,编译、训练、测试详细教程
- mpg123源代码库在Windows 7 编译测试
- Windows下VS2013 C++编译测试faster-rcnn
- Windows下编译测试BM3D算法效果
- 在Windows下Boost库编译方法与测试
- Thrift 学习笔记2——Windows环境下Thrift的安装、编译以及测试
- Windows下编译测试BM3D算法效果
- 测试GCC在windows下编译宽字符的问题
- Windows下编译测试BM3D算法效果
- Windows2012中Jenkins搭建.NET自动编译测试与发布环境
- Windows10+VS2013环境下Dlib库的编译与使用
- windows编译dlib
- Windows、Linux下“交叉”编译环境的搭建和测试。
- Windows下VS2013 C++编译测试faster-rcnn
- windows下编译dlib