Android字体多样式和动画TextDrawable
2018-01-04 00:00
183 查看
Android字体多样式和动画TextDrawable
在实际的Android开发中,很多时候,需要用TextView表现和展示view的内容和标题、标签之类。但是Android本身提供的TextView只提供了基础的text表现,比较单调乏味,如果要实现丰富多彩的和ImageView那样的样式和表现能力,则需要自己动手实现或者使用第三方开源库。
在github上的第三方开源库TextDrawable(github上的链接地址主页:https://github.com/amulyakhare/TextDrawable )就是这样的TextView+ImageView的实现。
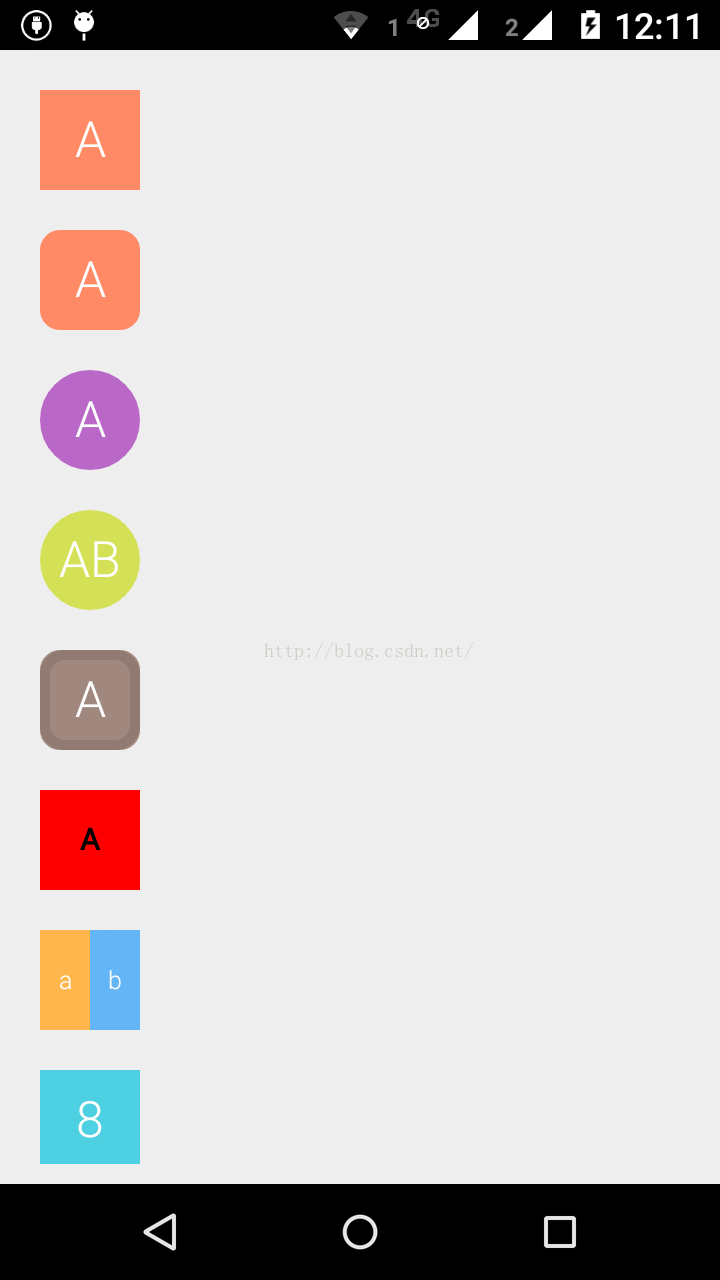
简单的说,TextDrawable的目的,是将一个普通的文本变形为一个“文本”的drawable,一旦成为drawable,那么接下来开发者可以自由使用的空间就很大了,比如可以随意的将此drawable作为源设置到ImageView里面等等。如图所示,就是将TextDrawable生成的各种样式drawable设置到竖直排列的若干个ImageView中:

使用TextDrawable之前首先需要到TextDrawable在github上的主页上把该项目的库文件拖下来,然后作为一个Android的lib,在自己的项目中引用。
给出实现本文图中效果的完整代码。
测试的主activity MainActivity.java:
布局文件activity_main.xml:
代码运行结果就是本文所示结果。
Android字体多样式和动画TextDrawable
在实际的Android开发中,很多时候,需要用TextView表现和展示view的内容和标题、标签之类。但是Android本身提供的TextView只提供了基础的text表现,比较单调乏味,如果要实现丰富多彩的和ImageView那样的样式和表现能力,则需要自己动手实现或者使用第三方开源库。
在github上的第三方开源库TextDrawable(github上的链接地址主页:https://github.com/amulyakhare/TextDrawable )就是这样的TextView+ImageView的实现。
简单的说,TextDrawable的目的,是将一个普通的文本变形为一个“文本”的drawable,一旦成为drawable,那么接下来开发者可以自由使用的空间就很大了,比如可以随意的将此drawable作为源设置到ImageView里面等等。如图所示,就是将TextDrawable生成的各种样式drawable设置到竖直排列的若干个ImageView中:

使用TextDrawable之前首先需要到TextDrawable在github上的主页上把该项目的库文件拖下来,然后作为一个Android的lib,在自己的项目中引用。
给出实现本文图中效果的完整代码。
测试的主activity MainActivity.java:
package zhangphil.text;

import com.amulyakhare.textdrawable.TextDrawable;
import com.amulyakhare.textdrawable.util.ColorGenerator;

import android.app.Activity;
import android.content.res.Resources;
import android.graphics.Color;
import android.graphics.Typeface;
import android.graphics.drawable.AnimationDrawable;
import android.graphics.drawable.Drawable;
import android.graphics.drawable.InsetDrawable;
import android.graphics.drawable.LayerDrawable;
import android.os.Bundle;
import android.util.TypedValue;
import android.widget.ImageView;

public class MainActivity extends Activity {

private ColorGenerator mColorGenerator = ColorGenerator.MATERIAL;

@Override
protected void onCreate(Bundle savedInstanceState) {
super.onCreate(savedInstanceState);
setContentView(R.layout.activity_main);

ImageView image1 = (ImageView) findViewById(R.id.imageView1);
image1.setImageDrawable(TextDrawable.builder().buildRect("A", mColorGenerator.getRandomColor()));

// 圆角为20dip的矩形TextDrawable
ImageView image2 = (ImageView) findViewById(R.id.imageView2);
image2.setImageDrawable(TextDrawable.builder().buildRoundRect("A", mColorGenerator.getRandomColor(), 20));

// 圆形TextDrawable
ImageView image3 = (ImageView) findViewById(R.id.imageView3);
image3.setImageDrawable(TextDrawable.builder().buildRound("A", mColorGenerator.getRandomColor()));

// 多字TextDrawable
ImageView image4 = (ImageView) findViewById(R.id.imageView4);
image4.setImageDrawable(TextDrawable.builder().buildRound("AB", mColorGenerator.getRandomColor()));

// 描边10dip的圆角矩形TextDrawable
ImageView image5 = (ImageView) findViewById(R.id.imageView5);
image5.setImageDrawable(TextDrawable.builder().beginConfig().withBorder(10).endConfig().buildRoundRect("A",
mColorGenerator.getRandomColor(), 20));

// 设定字体和字体颜色的TextDrawable
ImageView image6 = (ImageView) findViewById(R.id.imageView6);
image6.setImageDrawable(TextDrawable.builder().beginConfig().textColor(Color.BLACK).useFont(Typeface.DEFAULT)
.fontSize(30).bold().toUpperCase().endConfig().buildRect("a", Color.RED));

// 分栏的TextDrawable
ImageView image7 = (ImageView) findViewById(R.id.imageView7);
image7.setImageDrawable(get2ItemTextDrawable());

// 动画TextDrawable
ImageView image8 = (ImageView) findViewById(R.id.imageView8);
image8.setImageDrawable(getAnimationTextDrawable());
}

// 两分栏的TextDrawable
public Drawable get2ItemTextDrawable() {
String leftText = "a";
String rightText = "b";

TextDrawable.IBuilder builder = TextDrawable.builder().rect();

TextDrawable left = builder.build(leftText, mColorGenerator.getRandomColor());
TextDrawable right = builder.build(rightText, mColorGenerator.getRandomColor());

Drawable[] layerList = { new InsetDrawable(left, 0, 0, toPix(25), 0),
new InsetDrawable(right, toPix(25), 0, 0, 0) };
return new LayerDrawable(layerList);
}

// 动画TextDrawable
public Drawable getAnimationTextDrawable() {
TextDrawable.IBuilder builder = TextDrawable.builder().rect();
AnimationDrawable animationDrawable = new AnimationDrawable();

for (int i = 0; i < 10; i++) {
TextDrawable frame = builder.build(i + "", mColorGenerator.getRandomColor());
animationDrawable.addFrame(frame, 2000);
}

animationDrawable.setOneShot(false);
animationDrawable.start();

return animationDrawable;
}

// dip转化为pix
public int toPix(int dip) {
Resources resources = getResources();
return (int) TypedValue.applyDimension(TypedValue.COMPLEX_UNIT_DIP, dip, resources.getDisplayMetrics());
}
}
布局文件activity_main.xml:
<ScrollView xmlns:android="http://schemas.android.com/apk/res/android"
xmlns:tools="http://schemas.android.com/tools"
android:layout_width="match_parent"
android:layout_height="match_parent"
android:layout_margin="10dip"
tools:context="zhangphil.text.MainActivity" >

<LinearLayout
android:layout_width="match_parent"
android:layout_height="match_parent"
android:orientation="vertical" >

<ImageView
android:id="@+id/imageView1"
android:layout_width="50dip"
android:layout_height="50dip"
android:layout_margin="10dip" />

<ImageView
android:id="@+id/imageView2"
android:layout_width="50dip"
android:layout_height="50dip"
android:layout_margin="10dip" />

<ImageView
android:id="@+id/imageView3"
android:layout_width="50dip"
android:layout_height="50dip"
android:layout_margin="10dip" />

<ImageView
android:id="@+id/imageView4"
android:layout_width="50dip"
android:layout_height="50dip"
android:layout_margin="10dip" />

<ImageView
android:id="@+id/imageView5"
android:layout_width="50dip"
android:layout_height="50dip"
android:layout_margin="10dip" />

<ImageView
android:id="@+id/imageView6"
android:layout_width="50dip"
android:layout_height="50dip"
android:layout_margin="10dip" />

<ImageView
android:id="@+id/imageView7"
android:layout_width="50dip"
android:layout_height="50dip"
android:layout_margin="10dip" />

<ImageView
android:id="@+id/imageView8"
android:layout_width="50dip"
android:layout_height="50dip"
android:layout_margin="10dip" />
</LinearLayout>

</ScrollView>
代码运行结果就是本文所示结果。
相关文章推荐
- Android TextView设置个别字体样式
- 【Android】 TextView设置个别字体样式
- Android TextView 丰富多彩的字体样式代码
- Android 修改TextView字体样式
- Android的TextView使用Html来处理图片显示、字体样式、超链接等
- Android的TextView/EditText使用CharacterStyle&SpannableString来处理图片显示、字体样式、超链接等
- Android的TextView使用Html来处理图片显示、字体样式、超链接等
- Android的TextView使用Html来处理图片显示、字体样式、超链接等
- android的TextView使用Html来处理图片显示、字体样式、超链接等
- Android在一个TextView里显示不同样式的字体
- Android TextView设置个别字体样式
- Android的TextView使用Html来处理图片显示、字体样式、超链接等
- 【Android---项目中】TextView设置字体样式及粗细
- Android的TextView利用HTML类处理图片显示、字体样式
- Android的TextView使用Html来处理图片显示、字体样式、超链接等
- Android TextView设置个别字体样式
- Android: TextView添加图片(drawable)及动画实例
- Android的TextView使用Html来处理图片显示、字体样式、超链接等
- Android的TextView使用Html来处理图片显示、字体样式、超链接等
- Android的TextView使用Html来处理图片显示、字体样式、超链接等
