C#用户控件的创建
2018-01-03 11:20
459 查看
频繁要用到的控件,在系统控件或者第三方控件又找不到合适的,就做成用户控件,节约时间,方便使用。
这里以自定义按钮控件为例,介绍用户控件创建过程。
1. 新建windows窗体控件库项目。
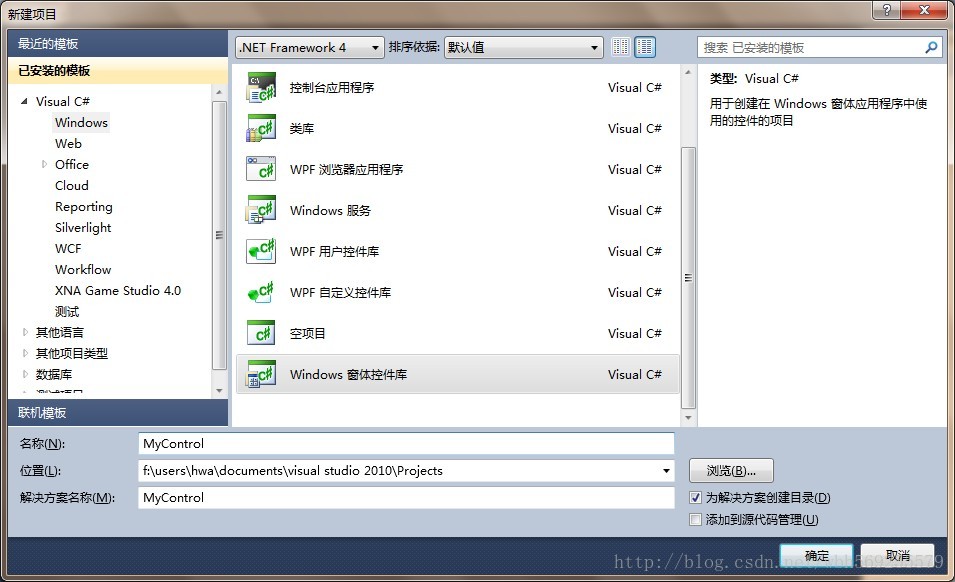
2. 创建成功后,即可看到控件的原始形态。将UserControl1类重命名为MyButton。

3. 这里我们要实现一个自定义的按钮,按钮普通状态下为淡蓝色,鼠标滑过时变为深蓝色,鼠标点击为深蓝色。我首先想到的方法,是使MyButton类继承Button类,并在MouseEnter和MouseLeave事件中修改按钮背景色。但这里有一个问题,Button类在鼠标点击时,会改变颜色以表示点击状态,这与我们想要的按钮不符(我们需要按钮在鼠标滑过和点击时是同样的颜色)。而Button类对按钮改变颜色的操作是在OnMouseDown事件中,若在MyButton中屏蔽该事件,则会导致Click事件不能响应,哪位朋友能知道怎么解决的话,还请赐教。因此,这里MyButton类仍然继承UserControl类。
[csharp] view
plain copy
<span style="font-size:18px;">using System;
using System.Collections.Generic;
using System.ComponentModel;
using System.Drawing;
using
23ff7
System.Data;
using System.Linq;
using System.Text;
using System.Windows.Forms;
namespace My_Control
{
public partial class MyButton : UserControl
{
public MyButton()
{
InitializeComponent();
}
}
}</span>
4.
在设计器中修改MyBotton的BackColor和Size属性,使其外形如下:

5. 按钮上的文字,用Label控件实现。从工具箱中拖出一个Label,注意其属性的设置:Dock设置为Fill,AutoSize设置为false,TextAlign设置为MiddleCenter,Name设置为label。这样label的文字就会始终在按钮中居中。
6. 使用按钮控件时,需要设置按钮的Text属性,在这里就是label的Text属性。因此需要将label的这个属性开放出来。MyButton.cs中加入代码如下:
[csharp] view
plain copy
namespace My_Control
{
public partial class MyButton : UserControl
{
public MyButton()
{
InitializeComponent();
}
[Category("外观")]
[Description("按钮文字")]
[DefaultValue("MyButton")]
[Browsable(true)]
[DesignerSerializationVisibility(DesignerSerializationVisibility.Visible)]
public override string Text
{
get
{
return label.Text;
}
set
{
label.Text = value;
}
}
}
}
重载了UserControl的Text属性,使其绑定到label的对应属性。注意加入的Attribute修饰:
[Category("外观")] 表示在设计器中,Text属性出现在“外观”这一分组
[Description("按钮文字")] 表示对该属性的描述文字
[Browsable(true)] 表示该属性在设计器中可见
[DesignerSerializationVisibility(DesignerSerializationVisibility.Visible)]这修饰很重要,表示在设计器中修改Text属性后,会自动生成设计器代码。若不加该修饰,则必须手工添加代码。
如果需要修改按钮的默认字体或者颜色,则修改MyButton的Font属性和ForeColor属性即可,注意不要修改label的这两个属性。这里讲解一下:在MyButton.Designer.cs中有这句代码:

也就是label作为MyButton的子控件,因此修改MyButton的Font或者ForeColor属性,就会自动对应修改label的Font和ForeColor属性。但若同时也修改了label的属性,则会优先应用label的属性设置,忽略在其父控件中的设置。
7. 添加MouseEnter和MouseLeave的鼠标事件响应,从而改变按钮的颜色,代码如下:
[csharp] view
plain copy
namespace My_Control
{
public partial class MyButton : UserControl
{
public MyButton()
{
InitializeComponent();
this.label.MouseEnter += new EventHandler(label_MouseEnter);
this.label.MouseLeave += new EventHandler(label_MouseLeave);
}
void label_MouseLeave(object sender, EventArgs e)
{
this.BackColor = Color.FromArgb(0, 188, 234);
}
void label_MouseEnter(object sender, EventArgs e)
{
this.BackColor = Color.FromArgb(78, 165, 254);
}
[Category("外观")]
[Description("按钮文字")]
[DefaultValue("MyButton")]
[Browsable(true)]
[DesignerSerializationVisibility(DesignerSerializationVisibility.Visible)]
public override string Text
{
get
{
return label.Text;
}
set
{
label.Text = value;
}
}
}
}
8. 至此,MyButton用户控件就创建完成了。按F5即可运行该控件的测试容器。

9. 使用MyButton:在解决方案中添加Windows Form项目,命名为TestForm。从工具箱中选择MyButton用户控件,拖入Form,即可在设计器中像设置普通按钮那样对MyButton进行设置。

10. 完成后,将Form程序设为启动程序,F5运行,即可查看MyButton的效果。

频繁要用到的控件,在系统控件或者第三方控件又找不到合适的,就做成用户控件,节约时间,方便使用。
这里以自定义按钮控件为例,介绍用户控件创建过程。
1. 新建windows窗体控件库项目。
2. 创建成功后,即可看到控件的原始形态。将UserControl1类重命名为MyButton。
3. 这里我们要实现一个自定义的按钮,按钮普通状态下为淡蓝色,鼠标滑过时变为深蓝色,鼠标点击为深蓝色。我首先想到的方法,是使MyButton类继承Button类,并在MouseEnter和MouseLeave事件中修改按钮背景色。但这里有一个问题,Button类在鼠标点击时,会改变颜色以表示点击状态,这与我们想要的按钮不符(我们需要按钮在鼠标滑过和点击时是同样的颜色)。而Button类对按钮改变颜色的操作是在OnMouseDown事件中,若在MyButton中屏蔽该事件,则会导致Click事件不能响应,哪位朋友能知道怎么解决的话,还请赐教。因此,这里MyButton类仍然继承UserControl类。
[csharp] view
plain copy
<span style="font-size:18px;">using System;
using System.Collections.Generic;
using System.ComponentModel;
using System.Drawing;
using System.Data;
using System.Linq;
using System.Text;
using System.Windows.Forms;
namespace My_Control
{
public partial class MyButton : UserControl
{
public MyButton()
{
InitializeComponent();
}
}
}</span>
4.
在设计器中修改MyBotton的BackColor和Size属性,使其外形如下:
5. 按钮上的文字,用Label控件实现。从工具箱中拖出一个Label,注意其属性的设置:Dock设置为Fill,AutoSize设置为false,TextAlign设置为MiddleCenter,Name设置为label。这样label的文字就会始终在按钮中居中。
6. 使用按钮控件时,需要设置按钮的Text属性,在这里就是label的Text属性。因此需要将label的这个属性开放出来。MyButton.cs中加入代码如下:
[csharp] view
plain copy
namespace My_Control
{
public partial class MyButton : UserControl
{
public MyButton()
{
InitializeComponent();
}
[Category("外观")]
[Description("按钮文字")]
[DefaultValue("MyButton")]
[Browsable(true)]
[DesignerSerializationVisibility(DesignerSerializationVisibility.Visible)]
public override string Text
{
get
{
return label.Text;
}
set
{
label.Text = value;
}
}
}
}
重载了UserControl的Text属性,使其绑定到label的对应属性。注意加入的Attribute修饰:
[Category("外观")] 表示在设计器中,Text属性出现在“外观”这一分组
[Description("按钮文字")] 表示对该属性的描述文字
[Browsable(true)] 表示该属性在设计器中可见
[DesignerSerializationVisibility(DesignerSerializationVisibility.Visible)]这修饰很重要,表示在设计器中修改Text属性后,会自动生成设计器代码。若不加该修饰,则必须手工添加代码。
如果需要修改按钮的默认字体或者颜色,则修改MyButton的Font属性和ForeColor属性即可,注意不要修改label的这两个属性。这里讲解一下:在MyButton.Designer.cs中有这句代码:
也就是label作为MyButton的子控件,因此修改MyButton的Font或者ForeColor属性,就会自动对应修改label的Font和ForeColor属性。但若同时也修改了label的属性,则会优先应用label的属性设置,忽略在其父控件中的设置。
7. 添加MouseEnter和MouseLeave的鼠标事件响应,从而改变按钮的颜色,代码如下:
[csharp] view
plain copy
namespace My_Control
{
public partial class MyButton : UserControl
{
public MyButton()
{
InitializeComponent();
this.label.MouseEnter += new EventHandler(label_MouseEnter);
this.label.MouseLeave += new EventHandler(label_MouseLeave);
}
void label_MouseLeave(object sender, EventArgs e)
{
this.BackColor = Color.FromArgb(0, 188, 234);
}
void label_MouseEnter(object sender, EventArgs e)
{
this.BackColor = Color.FromArgb(78, 165, 254);
}
[Category("外观")]
[Description("按钮文字")]
[DefaultValue("MyButton")]
[Browsable(true)]
[DesignerSerializationVisibility(DesignerSerializationVisibility.Visible)]
public override string Text
{
get
{
return label.Text;
}
set
{
label.Text = value;
}
}
}
}
8. 至此,MyButton用户控件就创建完成了。按F5即可运行该控件的测试容器。
9. 使用MyButton:在解决方案中添加Windows Form项目,命名为TestForm。从工具箱中选择MyButton用户控件,拖入Form,即可在设计器中像设置普通按钮那样对MyButton进行设置。

10. 完成后,将Form程序设为启动程序,F5运行,即可查看MyButton的效果。
频繁要用到的控件,在系统控件或者第三方控件又找不到合适的,就做成用户控件,节约时间,方便使用。
这里以自定义按钮控件为例,介绍用户控件创建过程。
1. 新建windows窗体控件库项目。
2. 创建成功后,即可看到控件的原始形态。将UserControl1类重命名为MyButton。
3. 这里我们要实现一个自定义的按钮,按钮普通状态下为淡蓝色,鼠标滑过时变为深蓝色,鼠标点击为深蓝色。我首先想到的方法,是使MyButton类继承Button类,并在MouseEnter和MouseLeave事件中修改按钮背景色。但这里有一个问题,Button类在鼠标点击时,会改变颜色以表示点击状态,这与我们想要的按钮不符(我们需要按钮在鼠标滑过和点击时是同样的颜色)。而Button类对按钮改变颜色的操作是在OnMouseDown事件中,若在MyButton中屏蔽该事件,则会导致Click事件不能响应,哪位朋友能知道怎么解决的话,还请赐教。因此,这里MyButton类仍然继承UserControl类。
[csharp] view
plain copy
<span style="font-size:18px;">using System;
using System.Collections.Generic;
using System.ComponentModel;
using System.Drawing;
using System.Data;
using System.Linq;
using System.Text;
using System.Windows.Forms;
namespace My_Control
{
public partial class MyButton : UserControl
{
public MyButton()
{
InitializeComponent();
}
}
}</span>
4.
在设计器中修改MyBotton的BackColor和Size属性,使其外形如下:
5. 按钮上的文字,用Label控件实现。从工具箱中拖出一个Label,注意其属性的设置:Dock设置为Fill,AutoSize设置为false,TextAlign设置为MiddleCenter,Name设置为label。这样label的文字就会始终在按钮中居中。
6. 使用按钮控件时,需要设置按钮的Text属性,在这里就是label的Text属性。因此需要将label的这个属性开放出来。MyButton.cs中加入代码如下:
[csharp] view
plain copy
namespace My_Control
{
public partial class MyButton : UserControl
{
public MyButton()
{
InitializeComponent();
}
[Category("外观")]
[Description("按钮文字")]
[DefaultValue("MyButton")]
[Browsable(true)]
[DesignerSerializationVisibility(DesignerSerializationVisibility.Visible)]
public override string Text
{
get
{
return label.Text;
}
set
{
label.Text = value;
}
}
}
}
重载了UserControl的Text属性,使其绑定到label的对应属性。注意加入的Attribute修饰:
[Category("外观")] 表示在设计器中,Text属性出现在“外观”这一分组
[Description("按钮文字")] 表示对该属性的描述文字
[Browsable(true)] 表示该属性在设计器中可见
[DesignerSerializationVisibility(DesignerSerializationVisibility.Visible)]这修饰很重要,表示在设计器中修改Text属性后,会自动生成设计器代码。若不加该修饰,则必须手工添加代码。
如果需要修改按钮的默认字体或者颜色,则修改MyButton的Font属性和ForeColor属性即可,注意不要修改label的这两个属性。这里讲解一下:在MyButton.Designer.cs中有这句代码:
也就是label作为MyButton的子控件,因此修改MyButton的Font或者ForeColor属性,就会自动对应修改label的Font和ForeColor属性。但若同时也修改了label的属性,则会优先应用label的属性设置,忽略在其父控件中的设置。
7. 添加MouseEnter和MouseLeave的鼠标事件响应,从而改变按钮的颜色,代码如下:
[csharp] view
plain copy
namespace My_Control
{
public partial class MyButton : UserControl
{
public MyButton()
{
InitializeComponent();
this.label.MouseEnter += new EventHandler(label_MouseEnter);
this.label.MouseLeave += new EventHandler(label_MouseLeave);
}
void label_MouseLeave(object sender, EventArgs e)
{
this.BackColor = Color.FromArgb(0, 188, 234);
}
void label_MouseEnter(object sender, EventArgs e)
{
this.BackColor = Color.FromArgb(78, 165, 254);
}
[Category("外观")]
[Description("按钮文字")]
[DefaultValue("MyButton")]
[Browsable(true)]
[DesignerSerializationVisibility(DesignerSerializationVisibility.Visible)]
public override string Text
{
get
{
return label.Text;
}
set
{
label.Text = value;
}
}
}
}
8. 至此,MyButton用户控件就创建完成了。按F5即可运行该控件的测试容器。
9. 使用MyButton:在解决方案中添加Windows Form项目,命名为TestForm。从工具箱中选择MyButton用户控件,拖入Form,即可在设计器中像设置普通按钮那样对MyButton进行设置。
10. 完成后,将Form程序设为启动程序,F5运行,即可查看MyButton的效果。
注意:编译路径不能含有特殊字符,例如“#”
这里以自定义按钮控件为例,介绍用户控件创建过程。
1. 新建windows窗体控件库项目。
2. 创建成功后,即可看到控件的原始形态。将UserControl1类重命名为MyButton。
3. 这里我们要实现一个自定义的按钮,按钮普通状态下为淡蓝色,鼠标滑过时变为深蓝色,鼠标点击为深蓝色。我首先想到的方法,是使MyButton类继承Button类,并在MouseEnter和MouseLeave事件中修改按钮背景色。但这里有一个问题,Button类在鼠标点击时,会改变颜色以表示点击状态,这与我们想要的按钮不符(我们需要按钮在鼠标滑过和点击时是同样的颜色)。而Button类对按钮改变颜色的操作是在OnMouseDown事件中,若在MyButton中屏蔽该事件,则会导致Click事件不能响应,哪位朋友能知道怎么解决的话,还请赐教。因此,这里MyButton类仍然继承UserControl类。
[csharp] view
plain copy
<span style="font-size:18px;">using System;
using System.Collections.Generic;
using System.ComponentModel;
using System.Drawing;
using
23ff7
System.Data;
using System.Linq;
using System.Text;
using System.Windows.Forms;
namespace My_Control
{
public partial class MyButton : UserControl
{
public MyButton()
{
InitializeComponent();
}
}
}</span>
4.
在设计器中修改MyBotton的BackColor和Size属性,使其外形如下:
5. 按钮上的文字,用Label控件实现。从工具箱中拖出一个Label,注意其属性的设置:Dock设置为Fill,AutoSize设置为false,TextAlign设置为MiddleCenter,Name设置为label。这样label的文字就会始终在按钮中居中。
6. 使用按钮控件时,需要设置按钮的Text属性,在这里就是label的Text属性。因此需要将label的这个属性开放出来。MyButton.cs中加入代码如下:
[csharp] view
plain copy
namespace My_Control
{
public partial class MyButton : UserControl
{
public MyButton()
{
InitializeComponent();
}
[Category("外观")]
[Description("按钮文字")]
[DefaultValue("MyButton")]
[Browsable(true)]
[DesignerSerializationVisibility(DesignerSerializationVisibility.Visible)]
public override string Text
{
get
{
return label.Text;
}
set
{
label.Text = value;
}
}
}
}
重载了UserControl的Text属性,使其绑定到label的对应属性。注意加入的Attribute修饰:
[Category("外观")] 表示在设计器中,Text属性出现在“外观”这一分组
[Description("按钮文字")] 表示对该属性的描述文字
[Browsable(true)] 表示该属性在设计器中可见
[DesignerSerializationVisibility(DesignerSerializationVisibility.Visible)]这修饰很重要,表示在设计器中修改Text属性后,会自动生成设计器代码。若不加该修饰,则必须手工添加代码。
如果需要修改按钮的默认字体或者颜色,则修改MyButton的Font属性和ForeColor属性即可,注意不要修改label的这两个属性。这里讲解一下:在MyButton.Designer.cs中有这句代码:
也就是label作为MyButton的子控件,因此修改MyButton的Font或者ForeColor属性,就会自动对应修改label的Font和ForeColor属性。但若同时也修改了label的属性,则会优先应用label的属性设置,忽略在其父控件中的设置。
7. 添加MouseEnter和MouseLeave的鼠标事件响应,从而改变按钮的颜色,代码如下:
[csharp] view
plain copy
namespace My_Control
{
public partial class MyButton : UserControl
{
public MyButton()
{
InitializeComponent();
this.label.MouseEnter += new EventHandler(label_MouseEnter);
this.label.MouseLeave += new EventHandler(label_MouseLeave);
}
void label_MouseLeave(object sender, EventArgs e)
{
this.BackColor = Color.FromArgb(0, 188, 234);
}
void label_MouseEnter(object sender, EventArgs e)
{
this.BackColor = Color.FromArgb(78, 165, 254);
}
[Category("外观")]
[Description("按钮文字")]
[DefaultValue("MyButton")]
[Browsable(true)]
[DesignerSerializationVisibility(DesignerSerializationVisibility.Visible)]
public override string Text
{
get
{
return label.Text;
}
set
{
label.Text = value;
}
}
}
}
8. 至此,MyButton用户控件就创建完成了。按F5即可运行该控件的测试容器。
9. 使用MyButton:在解决方案中添加Windows Form项目,命名为TestForm。从工具箱中选择MyButton用户控件,拖入Form,即可在设计器中像设置普通按钮那样对MyButton进行设置。
10. 完成后,将Form程序设为启动程序,F5运行,即可查看MyButton的效果。
频繁要用到的控件,在系统控件或者第三方控件又找不到合适的,就做成用户控件,节约时间,方便使用。
这里以自定义按钮控件为例,介绍用户控件创建过程。
1. 新建windows窗体控件库项目。
2. 创建成功后,即可看到控件的原始形态。将UserControl1类重命名为MyButton。
3. 这里我们要实现一个自定义的按钮,按钮普通状态下为淡蓝色,鼠标滑过时变为深蓝色,鼠标点击为深蓝色。我首先想到的方法,是使MyButton类继承Button类,并在MouseEnter和MouseLeave事件中修改按钮背景色。但这里有一个问题,Button类在鼠标点击时,会改变颜色以表示点击状态,这与我们想要的按钮不符(我们需要按钮在鼠标滑过和点击时是同样的颜色)。而Button类对按钮改变颜色的操作是在OnMouseDown事件中,若在MyButton中屏蔽该事件,则会导致Click事件不能响应,哪位朋友能知道怎么解决的话,还请赐教。因此,这里MyButton类仍然继承UserControl类。
[csharp] view
plain copy
<span style="font-size:18px;">using System;
using System.Collections.Generic;
using System.ComponentModel;
using System.Drawing;
using System.Data;
using System.Linq;
using System.Text;
using System.Windows.Forms;
namespace My_Control
{
public partial class MyButton : UserControl
{
public MyButton()
{
InitializeComponent();
}
}
}</span>
4.
在设计器中修改MyBotton的BackColor和Size属性,使其外形如下:
5. 按钮上的文字,用Label控件实现。从工具箱中拖出一个Label,注意其属性的设置:Dock设置为Fill,AutoSize设置为false,TextAlign设置为MiddleCenter,Name设置为label。这样label的文字就会始终在按钮中居中。
6. 使用按钮控件时,需要设置按钮的Text属性,在这里就是label的Text属性。因此需要将label的这个属性开放出来。MyButton.cs中加入代码如下:
[csharp] view
plain copy
namespace My_Control
{
public partial class MyButton : UserControl
{
public MyButton()
{
InitializeComponent();
}
[Category("外观")]
[Description("按钮文字")]
[DefaultValue("MyButton")]
[Browsable(true)]
[DesignerSerializationVisibility(DesignerSerializationVisibility.Visible)]
public override string Text
{
get
{
return label.Text;
}
set
{
label.Text = value;
}
}
}
}
重载了UserControl的Text属性,使其绑定到label的对应属性。注意加入的Attribute修饰:
[Category("外观")] 表示在设计器中,Text属性出现在“外观”这一分组
[Description("按钮文字")] 表示对该属性的描述文字
[Browsable(true)] 表示该属性在设计器中可见
[DesignerSerializationVisibility(DesignerSerializationVisibility.Visible)]这修饰很重要,表示在设计器中修改Text属性后,会自动生成设计器代码。若不加该修饰,则必须手工添加代码。
如果需要修改按钮的默认字体或者颜色,则修改MyButton的Font属性和ForeColor属性即可,注意不要修改label的这两个属性。这里讲解一下:在MyButton.Designer.cs中有这句代码:
也就是label作为MyButton的子控件,因此修改MyButton的Font或者ForeColor属性,就会自动对应修改label的Font和ForeColor属性。但若同时也修改了label的属性,则会优先应用label的属性设置,忽略在其父控件中的设置。
7. 添加MouseEnter和MouseLeave的鼠标事件响应,从而改变按钮的颜色,代码如下:
[csharp] view
plain copy
namespace My_Control
{
public partial class MyButton : UserControl
{
public MyButton()
{
InitializeComponent();
this.label.MouseEnter += new EventHandler(label_MouseEnter);
this.label.MouseLeave += new EventHandler(label_MouseLeave);
}
void label_MouseLeave(object sender, EventArgs e)
{
this.BackColor = Color.FromArgb(0, 188, 234);
}
void label_MouseEnter(object sender, EventArgs e)
{
this.BackColor = Color.FromArgb(78, 165, 254);
}
[Category("外观")]
[Description("按钮文字")]
[DefaultValue("MyButton")]
[Browsable(true)]
[DesignerSerializationVisibility(DesignerSerializationVisibility.Visible)]
public override string Text
{
get
{
return label.Text;
}
set
{
label.Text = value;
}
}
}
}
8. 至此,MyButton用户控件就创建完成了。按F5即可运行该控件的测试容器。
9. 使用MyButton:在解决方案中添加Windows Form项目,命名为TestForm。从工具箱中选择MyButton用户控件,拖入Form,即可在设计器中像设置普通按钮那样对MyButton进行设置。
10. 完成后,将Form程序设为启动程序,F5运行,即可查看MyButton的效果。
注意:编译路径不能含有特殊字符,例如“#”

相关文章推荐
- C#用户控件的创建
- c#创建透明背景用户控件
- C#创建用户控件:IPv4地址输入框
- C#.net中web工程中创建用户控件和被调用的方法
- C#.net中web工程中创建用户控件和被调用的方法
- C#创建用户控件:IPv4地址输入框
- 使用C#的用户控件创建ActiveX
- 关于在c#中创建用户控件后,winform应用程序在调用中无法通过点击用户控件的子控件为其自动添加事件代码的问题
- [译]使用C#的用户控件创建ActiveX
- C#创建用户控件 - IPv4地址输入框
- 在服务中创建用户进程的方法(C#版)
- C#日期用户控件代码
- C#线程间操作无效: 从不是创建控件“dataGridView1”的线程访问它
- shawl.qiu c# .net 发邮件用户控件 v1.0
- 使用C#开发用户控件
- C# 线程间操作无效: 从不是创建控件“receivemsg”的线程访问它。
- 简介Winform中创建用户控件
- C#线程间操作无效: 从不是创建控件" XX" 的线程访问它
- C# 自定义用户控件
- 关于VS2008中,C#创建ASP.NET Web应用程序无法添加和使用web控件