【安卓开发】UI设计基础2:用线性布局实现计算器UI布局
2017-12-27 16:30
701 查看
线性布局
1、线性布局的摆放规则是子视图按照纵向(由上到下)或者横向(由左到右)单向排列。通过 android:orientation 属性来选择其子视图是纵向(值为 vertical)还是横向(值为 horizontal,默认值)排列。2、 线性布局中的子视图,可以通过设置 layout_weight 属性,来声明自己占据的空间的比例权值。
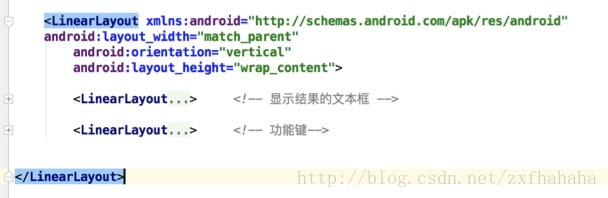
布局层次
红色框为父视图分为垂直的两个布局,蓝色框为功能键分为垂直的五个布局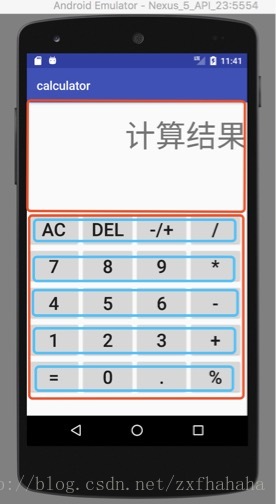
• 父视图包含垂直的两个布局
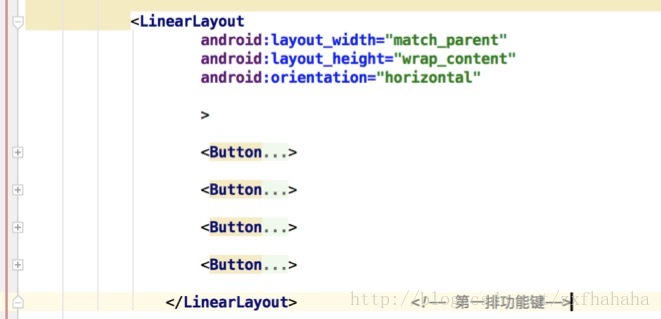
• 功能键这一布局中包含五个垂直的布局,每个布局为一排功能键

• 每排功能键布局中有四个水平放置的按钮
代码实现
<LinearLayout xmlns:android="http://schemas.android.com/apk/res/android"
xmlns:tools="http://schemas.android.com/tools"
android:layout_width="match_parent"
android:orientation="vertical"
android:layout_height="wrap_content">

<LinearLayout
android:layout_width="match_parent"
android:layout_height="wrap_content">

<TextView
android:layout_width="match_parent"
android:layout_height="wrap_content"
android:layout_marginTop="20dp"
android:layout_marginBottom="70dp"
android:text="计算结果"
android:textSize="50dp"
android:gravity="right|bottom"
/>

</LinearLayout>     <!-- 显示结果的文本框 -->

<LinearLayout
android:layout_width="match_parent"
android:layout_height="match_parent"
android:layout_marginTop="20dp"
android:orientation="vertical"
tools:ignore="ExtraText">
>

<!--因为此布局是功能键的一排,因此宽应该是填满功能键的宽度,高应该是把内容显示出来,四个键是水平分布的-->
<LinearLayout
android:layout_width="match_parent"
android:layout_height="wrap_content"
android:orientation="horizontal"

>

<!--  button 的水平方向和垂直方向都应该是把内容显示出来所以都要wrap_content-->

<Button
android:layout_width="wrap_content"
android:layout_height="wrap_content"
android:text="AC"
android:textSize="30dp"/>
<!--  每个button中的text为内容,textsize为字体大小-->

<Button
android:layout_width="wrap_content"
android:layout_height="wrap_content"
android:layout_marginRight="0dp"
android:text="DEL"
android:textSize="30dp" />
<!--  除第一个button外,其余的button可以设置与左边button的距离,我这里设置的0dp也就是默认值-->
<Button
android:layout_width="wrap_content"
android:layout_height="wrap_content"
android:layout_marginRight="0dp"
android:text="-/+"
android:textSize="30dp" />

<Button
android:layout_width="wrap_content"
android:layout_height="wrap_content"
android:layout_marginRight="0dp"
android:text="/"
android:textSize="30dp" />

</LinearLayout>             <!-- 第一排功能键-->

<LinearLayout
android:layout_width="match_parent"
android:layout_height="wrap_content"
android:orientation="horizontal"

>
<Button
android:layout_width="wrap_content"
android:layout_height="wrap_content"
android:text="7"
android:textSize="30dp"/>

<Button
android:layout_width="wrap_content"
android:layout_height="wrap_content"
android:layout_marginRight="0dp"
android:text="8"
android:textSize="30dp"/>
<Button
android:layout_width="wrap_content"
android:layout_height="wrap_content"
android:layout_marginRight="0dp"
android:text="9"
android:textSize="30dp"/>

<Button
android:layout_width="wrap_content"
android:layout_height="wrap_content"
android:layout_marginRight="0dp"
android:text="*"
android:textSize="30dp" />
</LinearLayout>                 <!-- 第二排功能键-->

<LinearLayout
android:layout_width="match_parent"
android:layout_height="wrap_content"
android:orientation="horizontal"

>
<Button
android:layout_width="wrap_content"
android:layout_height="wrap_content"
android:text="4"

android:textSize="30dp"/>

<Button
android:layout_width="wrap_content"
android:layout_height="wrap_content"
android:layout_marginRight="0dp"
android:text="5"
android:textSize="30dp"/>
<Button
android:layout_width="wrap_content"
android:layout_height="wrap_content"
android:layout_marginRight="0dp"
android:text="6"
android:textSize="30dp"/>
<Button
android:layout_width="wrap_content"
android:layout_height="wrap_content"
android:layout_marginRight="0dp"
android:text="-"
android:textSize="30dp"/>

</LinearLayout>             <!-- 第三排功能键-->

<LinearLayout
android:layout_width="match_parent"
android:layout_height="wrap_content"

android:orientation="horizontal"

>

<LinearLayout
android:layout_width="wrap_content"
android:layout_height="wrap_content">

<Button
android:layout_width="wrap_content"
android:layout_height="wrap_content"
android:text="1"
android:textSize="30dp"/>

<Button
android:layout_width="wrap_content"
android:layout_height="wrap_content"
android:layout_marginRight="0dp"
android:text="2"
android:textSize="30dp"/>

<Button
android:layout_width="wrap_content"
android:layout_height="wrap_content"
android:layout_marginRight="0dp"
android:text="3"
android:textSize="30dp"/>

<Button
android:layout_width="wrap_content"
android:layout_height="wrap_content"
android:layout_marginRight="0dp"
android:text="+"
android:textSize="30dp" />

</LinearLayout>

</LinearLayout>                 <!-- 第四排功能键-->

<LinearLayout
android:layout_width="match_parent"
android:layout_height="wrap_content"
android:orientation="horizontal"

>

<Button
android:layout_width="wrap_content"
android:layout_height="wrap_content"
android:text="="
android:textSize="30dp" />

<Button
android:layout_width="wrap_content"
android:layout_height="wrap_content"
android:text="0"
android:textSize="30dp" />

<Button
android:layout_width="wrap_content"
android:layout_height="wrap_content"

android:layout_marginRight="0dp"
android:text="."
android:textSize="30dp" />
<Button
android:layout_width="wrap_content"
android:layout_height="wrap_content"
android:layout_marginRight="0dp"

android:text="%"
android:textSize="30dp" />

</LinearLayout>                 <!-- 第五排功能键-->

</LinearLayout>

</LinearLayout>

相关文章推荐
- 【安卓开发】UI设计基础4:用网格布局 GridLayout 实现计算器UI
- 【安卓开发】UI设计基础3:用相对布局RelativeLayout实现计算器
- 【安卓开发】UI设计基础5:用约束布局 ConstraintLayout实现计算器UI
- ios开发UI基础—使用纯代码自定义UItableviewcell实现一个简单的微博界面布局
- iOS开发之UI基础--纯代码自定义UItableviewcell实现一个简单的微博界面布局
- ioS开发之UI基础--使用xib自定义UItableviewcell实现一个简单的团购应用界面布局
- iOS开发UI基础—23使用xib自定义UItableviewcell实现一个简单的团购应用界面布局
- iOS开发UI基础—24使用纯代码自定义UItableviewcell实现一个简单的微博界面布局
- 安卓TV开发(三) 移动智能设备之实现主流TV电视盒子焦点可控UI
- 14天学会安卓开发(第四天)基础UI控件
- iOS开发UI基础—22实现UItableview控件数据刷新
- iOS开发之UI控件——UIPickerView实现点菜系统界面布局
- android基础之UI设计与开发--------后台与UI的交互
- iOS开发UI基础—30在UItableview中实现加载更多功能
- 安卓TV开发(四) 实现主流智能TV视频播放器UI
- 安卓TV开发(五) 移动智能终端UI之实现主流TV焦点可控UI
- 【Android 应用开发】AndroidUI设计之 布局管理器 - 详细解析布局实现
- ios开发-UI基础-应用管理(单纯界面)实现1
- 14天学会安卓开发(第三天)UI事件处理与布局管理
- 【Android 应用开发】AndroidUI设计之 布局管理器 - 详细解析布局实现