yii2 手动安装第三方扩展
2017-12-20 13:56
218 查看
1、不使用composer,有autoloader
在入口文件index.php中有两个自动加载,一个是自己的一个值composer的:
2、没有composer,没有autoloader
只要符合PSR-4编写规则就ok:
首先目录结构:
Hello.php内容是:
然后打开vendor/yiisoft/extensions.php文件,在里面数组中增加一项,如下面代码:
开始测试:

在入口文件index.php中有两个自动加载,一个是自己的一个值composer的:
require __DIR__ . '/../../vendor/autoload.php';
require __DIR__ . '/../../vendor/yiisoft/yii2/Yii.php';
添加你需要的autoloader:
require(__DIR__ . '/../vendor/autoload.php');
require(__DIR__ . '/../vendor/alidayu/TopSdk.php'); //这是你需要的autoloader
require(__DIR__ . '/../vendor/yiisoft/yii2/Yii.php');
2、没有composer,没有autoloader
只要符合PSR-4编写规则就ok:
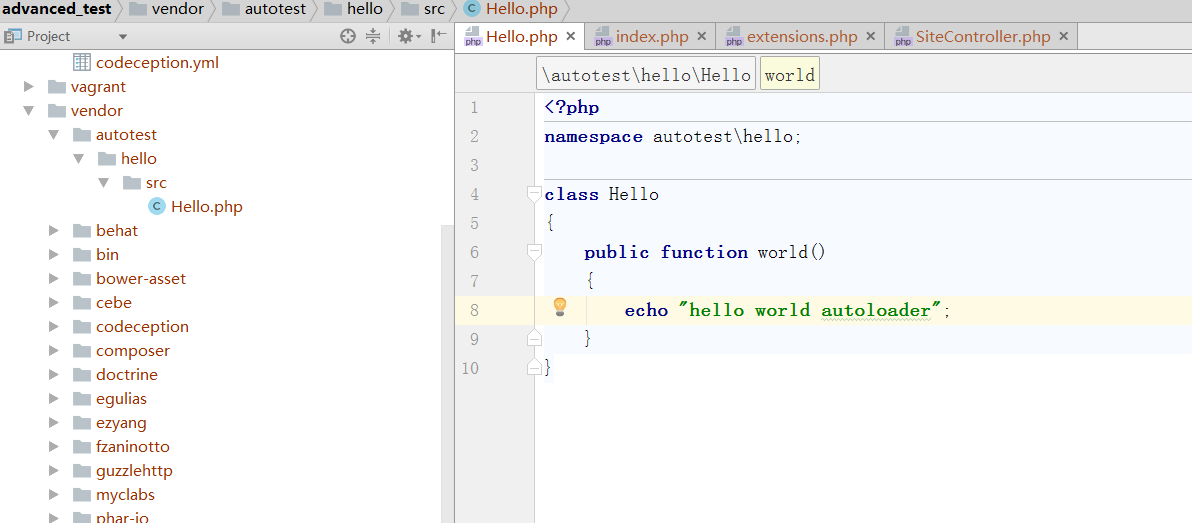
首先目录结构:
autotest\hello
autotest\hello\src\Hello.php
Hello.php内容是:
namespace autotest\hello;

class Hello
{
public function world()
{
echo "hello world autoloader";
}
}把autotest文件放到vendor下;然后打开vendor/yiisoft/extensions.php文件,在里面数组中增加一项,如下面代码:
'autotest/hello' =>
array (
'name' => 'autotest/hello',
'version' => '0.0.1.0',
'alias' =>
array (
'@autotest/hello' => $vendorDir . '/autotest/hello/src',
),
),
重点是alisas设置,代表命名空间到src的映射。
开始测试:
namespace frontend\controllers;

use autotest\hello\Hello;
use yii\web\Controller;

class SiteController extends Controller
{
public function actionTest()
{
$autoTest = new Hello();
echo $autoTest->world();
exit();
}
}

相关文章推荐
- 10分钟教你学会Yii2手动安装第三方扩展
- python手动安装第三方扩展库的有效方法
- Yii2 手动增加第三方扩展的方法
- 如何在Chrome浏览器安装chrome应用商店外的第三方扩展程序
- 在windows中手动安装第三方模块
- 如何安装python的第三方扩展库
- 如何在 Chrome 浏览器安装 Web Store 外的第三方扩展程序
- PHP安装与使用VLD查看opcode代码【PHP安装第三方扩展的方法】
- Yii2 扩展插件yii2-kartikgii(windows下安装)
- 手动为php安装memcached扩展模块 推荐
- 如何在Chrome浏览器安装第三方扩展
- Yii2第三方类库插件Imagine的安装和使用
- Linux下手动编译安装PHP扩展的例子分享
- Linux下手动编译安装PHP扩展的例子分享
- Yii2 手动安装yii2-imagine插件
- 关闭Chrome安装第三方插件之后反复提示“请停用以开发者模式运行的扩展程序”
- PHP安装与使用VLD查看opcode代码【PHP安装第三方扩展的方法】
- PyCharm无法导入手动安装的第三方库
- Laravel安装第三方扩展包 mews/captcha