怎么在ubuntu下装ORB-SLAM2,并用单目摄像头实时跑起来
2017-12-09 14:32
603 查看
最新的是ORB-SLAM2,支持单目、双目和RGB-D接口
(1)更新apt库
1
(2)安装Git
1
(3)安装cmake
1
(4)安装Pangolin (for visualization and user interface:可视化与用户界面)
了解Pangolin网址:https://github.com/stevenlovegrove/Pangolin
安装依赖:
a、opengl:
b、GLEW:
1
c、Boost:
1
d、Python2/Python3:
1
e、编译基础库
1
2
终端里输入
2
3
4
5
1
2
3
4
5
(5)安装OpenCV (manipulate images and features:
操纵图像和特征点)
安装依赖:
a、编译器相关:
1
b、必须依赖:
2
1
2
c、可选安装:
1
安装OpenCV:
a、官网下载OpenCV 2.4.11 for Linux下载地址,解压到Ubuntu中
b、进入OpenCV文件夹,配置工程
2
3
1
2
3
c、编译
2
1
2
(6)安装Eigen (We use modified versions of theDBoW2 library
to perform place recognition--进行位置识别 andg2o library to perform non-linear optimizations--进行非线性优化. Both modified libraries
(which are BSD) are included in theThirdparty folder.)
下载Eigen下载地址,进入到在解压后的Eigen文件夹(例如eigen-eigen-07105f7124f9)下
(7)安装BLAS and LAPACK库
2
1
2
Building these examples is optional. In case you want to use ROS, a version Hydro or newer is needed.
其实build.sh就是前面第三方库的编译+ORB_SLAM2的编译,以后可以自己写一个 类似的终端命令脚本,就不需要每次编译都手敲一遍。如果发现编译出错,尽量从github或者官网上面git clone源码,里面有很多issus可供参考。
3.安装ORB_SLAM:
(1)Clone the repository:
1
(2)编译:我们提供一个脚本build.sh建立第三方库和orb-slam2。请确保您已安装所有所需的依赖项
下载内存较大,最好用硬盘下好
uncompress it.
Execute the following command. Change TUMX.yaml to TUM1.yaml,TUM2.yaml or TUM3.yaml for freiburg1, freiburg2 and freiburg3 sequences respectively. Change PATH_TO_SEQUENCE_FOLDERto the uncompressed sequence folder.
e the following command. Change KITTIX.yamlby KITTI00-02.yaml, KITTI03.yaml or KITTI04-12.yaml for sequence 0 to 2, 3, and 4 to 12 respectively. Change PATH_TO_DATASET_FOLDER to the uncompressed dataset folder. Change SEQUENCE_NUMBER
to 00, 01, 02,.., 11.
Execute the following command. Change KITTIX.yamlto KITTI00-02.yaml, KITTI03.yaml or KITTI04-12.yaml for sequence 0 to 2, 3, and 4 to 12 respectively. Change PATH_TO_DATASET_FOLDER to the uncompressed dataset folder. Change
SEQUENCE_NUMBER to 00, 01, 02,.., 11.
uncompress it.
/. You can generate your own associations file executing:
python associate.py PATH_TO_SEQUENCE/rgb.txt PATH_TO_SEQUENCE/depth.txt > associations.txt
Execute the following command. Change TUMX.yaml to TUM1.yaml,TUM2.yaml or TUM3.yaml for freiburg1, freiburg2 and freiburg3 sequences respectively. Change PATH_TO_SEQUENCE_FOLDERto the uncompressed sequence folder. Change ASSOCIATIONS_FILE
to the path to the corresponding associations file.
SLAM system. Stereo input must be synchronized and rectified. RGB-D input must be synchronized and depth registered.
参考博客:http://blog.csdn.net/zhjm07054115/article/details/51706706
https://github.com/raulmur/ORB_SLAM2
5.实时用摄像头(可笔记本自带或者外加摄像头)跑数据
(1)安装usb_cam package
笔记本自带的摄像头的设备号一般为/dev/video0 外接摄像头一般是
(2)把ORB-SLAM2,和 usb_cam放到catkin下src目录下
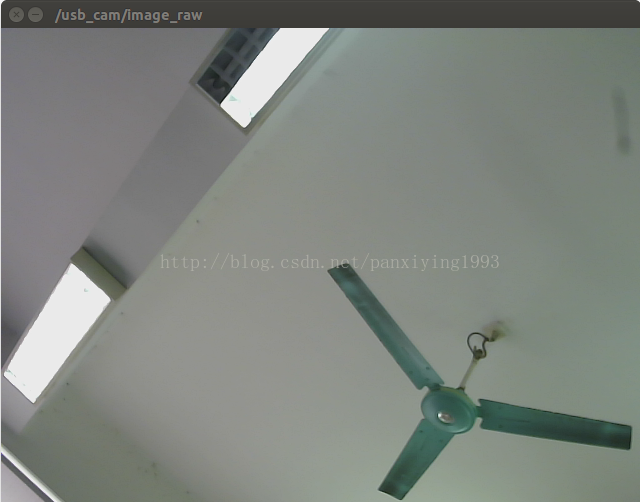
此时证明摄像头可以正常使用
~~~使用自定义 launch 文件设置摄像头:
usb_cam 给了我们一个默认的 launch 文件在如下目录
如果想要自定义一个我们自己的launch文件,我们可以复制这个文件为一个 usb_cam.launch,然后打开这个文件:
其中 /div/video0 表示是第一个摄像头,如果你有多个摄像头,可以将此改为 /div/video1 等等。想要查看当前连接设备,使用如下命令即可:
其余参数请见参考文献[1]的说明。修改好后运行这个文件:
错误提示:
1、Error: package ‘image_view’ not found
如果出现:
表明你的 image_view 没有安装,可以执行以下命令安装即可:
(3)用ORB-SLAM2实时跑数据(记住:若是用外加摄像头,需要在usb_cam-test.launch和usb_cam_node.cpp把摄像头的设备号改为/dev/video1)
6.标定摄像头(为了防止镜头下的图片发生畸变)
1)摄像头标定时所处的平面位置一旦改变,一般会影响相机内参,需重新标定
2)将标定后的参数替换相机原有的内参,重新跑一遍即可
安装必备软件:为了方便.最好先把要下载的库先在windows下下载好(注意下载的版本).不装在系统盘
(1)更新apt库sudo apt-get update[/code]1
1
(2)安装Git
sudo apt-get install git[/code]1
1
(3)安装cmake
sudo apt-get install cmake[/code]1
1
(4)安装Pangolin (for visualization and user interface:可视化与用户界面)
了解Pangolin网址:https://github.com/stevenlovegrove/Pangolin
安装依赖:
a、opengl:
b、GLEW:
sudo apt-get install libglew-dev[/code]1
1
c、Boost:
sudo apt-get install libboost-dev libboost-thread-dev libboost-filesystem-dev[/code]1
1
d、Python2/Python3:
sudo apt-get install libpython2.7-dev[/code]1
1
e、编译基础库
sudo apt-get install build-essential[/code]1
1
2
终端里输入
cd Pangolin
mkdir build
cd build
cmake -DCPP11_NO_BOOST=1 ..
make -j
(建议不要使用make -j,使用make。如果用make -j是使用多处理器编译,可能造成死机)
[/code]1
2
3
4
5
1
2
3
4
5
(5)安装OpenCV (manipulate images and features:
操纵图像和特征点)
安装依赖:
a、编译器相关:
sudo apt-get install build-essential[/code]1
1
b、必须依赖:
sudo apt-get install cmake git libgtk2.0-dev pkg-config libavcodec-dev
libavformat-dev libswscale-dev
[/code]1
2
1
2
c、可选安装:
sudo apt-get install python-dev python-numpy libtbb2 libtbb-dev libjpeg-dev libpng-dev libtiff-dev libjasper-dev libdc1394-22-dev[/code]1
1
安装OpenCV:
a、官网下载OpenCV 2.4.11 for Linux下载地址,解压到Ubuntu中
b、进入OpenCV文件夹,配置工程
mkdir release
cd release
cmake -D CMAKE_BUILD_TYPE=RELEASE -D CMAKE_INSTALL_PREFIX=/usr/local ..
[/code]1
2
3
1
2
3
c、编译
make
sudo make install
[/code]1
2
1
2
(6)安装Eigen (We use modified versions of theDBoW2 library
to perform place recognition--进行位置识别 andg2o library to perform non-linear optimizations--进行非线性优化. Both modified libraries
(which are BSD) are included in theThirdparty folder.)
下载Eigen下载地址,进入到在解压后的Eigen文件夹(例如eigen-eigen-07105f7124f9)下
mkdir build[/code]
cd build
cmake ..
make sudo make install
(7)安装BLAS and LAPACK库
sudo apt-get install libblas-dev
sudo apt-get install liblapack-dev
[/code]1
2
1
2
ROS (optional)
We provide some examples to process the live input of a monocular, stereo or RGB-D camera usingROS.Building these examples is optional. In case you want to use ROS, a version Hydro or newer is needed.
其实build.sh就是前面第三方库的编译+ORB_SLAM2的编译,以后可以自己写一个 类似的终端命令脚本,就不需要每次编译都手敲一遍。如果发现编译出错,尽量从github或者官网上面git clone源码,里面有很多issus可供参考。
3.安装ORB_SLAM:
(1)Clone the repository:
git clone https://github.com/raulmur/ORB_SLAM2.git ORB_SLAM2[/code]1
1
(2)编译:我们提供一个脚本build.sh建立第三方库和orb-slam2。请确保您已安装所有所需的依赖项
cd ORB_SLAM2
chmod +x build.sh
./build.sh
ORB-SLAM2最后编译遇到的问题
1)强制类型转换问题
错误信息:/home/melanie/tools/eigen/Eigen/src/Core/AssignEvaluator.h:817:3: error: static assertion failed: YOU_MIXED_DIFFERENT_NUMERIC_TYPES__YOU_NEED_TO_USE_THE_CAST_METHOD_OF_MATRIXBASE_TO_CAST_NUMERIC_TYPES_EXPLICITLY EIGEN_CHECK_BINARY_COMPATIBILIY(Func,typename ActualDstTypeCleaned::Scalar,typename Src::Scalar); ^ CMakeFiles/ORB_SLAM2.dir/build.make:350: recipe for target 'CMakeFiles/ORB_SLAM2.dir/src/Optimizer.cc.o' failed make[2]: *** [CMakeFiles/ORB_SLAM2.dir/src/Optimizer.cc.o] Error 1 CMakeFiles/Makefile2:178: recipe for target 'CMakeFiles/ORB_SLAM2.dir/all' failed make[1]: *** [CMakeFiles/ORB_SLAM2.dir/all] Error 2 Makefile:83: recipe for target 'all' failed make: *** [all] Error 2解决方案:打开Thirdparty/g2o/g2o/solvers/linear_solver_eigen.h,将以下代码 template <typename MatrixType>class LinearSolverEigen: public LinearSolver<MatrixType>{ public: typedef Eigen::SparseMatrix<double, Eigen::ColMajor> SparseMatrix;typedef Eigen::Triplet<double> Triplet;typedef Eigen::PermutationMatrix<Eigen::Dynamic, Eigen::Dynamic, SparseMatrix::Index> PermutationMatrix;修改为:template <typename MatrixType>class LinearSolverEigen: public LinearSolver<MatrixType>{ public:typedef Eigen::SparseMatrix<double, Eigen::ColMajor> SparseMatrix;typedef Eigen::Triplet<double> Triplet;typedef Eigen::PermutationMatrix<Eigen::Dynamic, Eigen::Dynamic, int> PermutationMatrix;2)usleep未定义:
错误信息:/home/melanie/source/SmartCar/ORM_SLAM2/ORB_SLAM2/src/Viewer.cc:159:28:error: ‘usleep’ was not declared in this scope usleep(3000);^ CMakeFiles/ORB_SLAM2.dir/build.make:494: recipe for target'CMakeFiles/ORB_SLAM2.dir/src/Viewer.cc.o' failed make[2]:*** [CMakeFiles/ORB_SLAM2.dir/src/Viewer.cc.o]Error 1 CMakeFiles/Makefile2:178: recipe for target 'CMakeFiles/ORB_SLAM2.dir/all' failed make[1]: *** [CMakeFiles/ORB_SLAM2.dir/all]Error 2 Makefile:83: recipe for target 'all' failedmake: *** [all] Error 2解决方案:在source文件的开头增加include #include <unistd.h>需要增加unistd.h的文件有:Examples/Monocular/mono_euroc.ccExamples/Monocular/mono_kitti.ccExamples/Monocular/mono_tum.ccExamples/RGB-D/rgbd_tum.ccExamples/Stereo/stereo_euroc.ccExamples/Stereo/stereo_kitti.ccsrc/LocalMapping.ccsrc/LoopClosing.ccsrc/System.ccsrc/Tracking.ccsrc/Viewer.cc4.测试ORB_SLAM2
(1)官网下载测试数据集下载内存较大,最好用硬盘下好
Monocular 实例
TUM 数据集
Download a sequence from http://vision.in.tum.de/data/datasets/rgbd-dataset/download anduncompress it.
Execute the following command. Change TUMX.yaml to TUM1.yaml,TUM2.yaml or TUM3.yaml for freiburg1, freiburg2 and freiburg3 sequences respectively. Change PATH_TO_SEQUENCE_FOLDERto the uncompressed sequence folder.
./Examples/Monocular/mono_tum Vocabulary/ORBvoc.txt Examples/Monocular/TUMX.yaml PATH_TO_SEQUENCE_FOLDER
KITTI 数据集
Execute download the dataset (grayscale images) fromhttp://www.cvlibs.net/datasets/kitti/eval_odometry.phpe the following command. Change KITTIX.yamlby KITTI00-02.yaml, KITTI03.yaml or KITTI04-12.yaml for sequence 0 to 2, 3, and 4 to 12 respectively. Change PATH_TO_DATASET_FOLDER to the uncompressed dataset folder. Change SEQUENCE_NUMBER
to 00, 01, 02,.., 11.
./Examples/Monocular/mono_kitti Vocabulary/ORBvoc.txt Examples/Monocular/KITTIX.yaml PATH_TO_DATASET_FOLDER/dataset/sequences/SEQUENCE_NUMBER
Stereo 实例
KITTI 数据集
Download the dataset (grayscale images) from http://www.cvlibs.net/datasets/kitti/eval_odometry.phpExecute the following command. Change KITTIX.yamlto KITTI00-02.yaml, KITTI03.yaml or KITTI04-12.yaml for sequence 0 to 2, 3, and 4 to 12 respectively. Change PATH_TO_DATASET_FOLDER to the uncompressed dataset folder. Change
SEQUENCE_NUMBER to 00, 01, 02,.., 11.
./Examples/Stereo/stereo_kitti Vocabulary/ORBvoc.txt Examples/Stereo/KITTIX.yaml PATH_TO_DATASET_FOLDER/dataset/sequences/SEQUENCE_NUMBER
RGB-D 实例
TUM 数据集
Associate RGB images and depth images using the python script associate.py. We already provide associations for some of the sequences in Examples/RGB-D/associations download a sequence fromhttp://vision.in.tum.de/data/datasets/rgbd-dataset/download anduncompress it.
/. You can generate your own associations file executing:
python associate.py PATH_TO_SEQUENCE/rgb.txt PATH_TO_SEQUENCE/depth.txt > associations.txt
Execute the following command. Change TUMX.yaml to TUM1.yaml,TUM2.yaml or TUM3.yaml for freiburg1, freiburg2 and freiburg3 sequences respectively. Change PATH_TO_SEQUENCE_FOLDERto the uncompressed sequence folder. Change ASSOCIATIONS_FILE
to the path to the corresponding associations file.
./Examples/RGB-D/rgbd_tum Vocabulary/ORBvoc.txt Examples/RGB-D/TUMX.yaml PATH_TO_SEQUENCE_FOLDER ASSOCIATIONS_FILE
ROS 实例
处理你自己的实例
你需要创建一个配置文件来校正你的摄像机。可以参照我们为TUM 和 KITTI 数据集提供的例子在monocular, stereo and RGB-D cameras情况下. 我们使用OpenCV的摄像机校正模型。 See the examples to learn how to create a program that makes use of the ORB-SLAM2 library and how to pass images to theSLAM system. Stereo input must be synchronized and rectified. RGB-D input must be synchronized and depth registered.
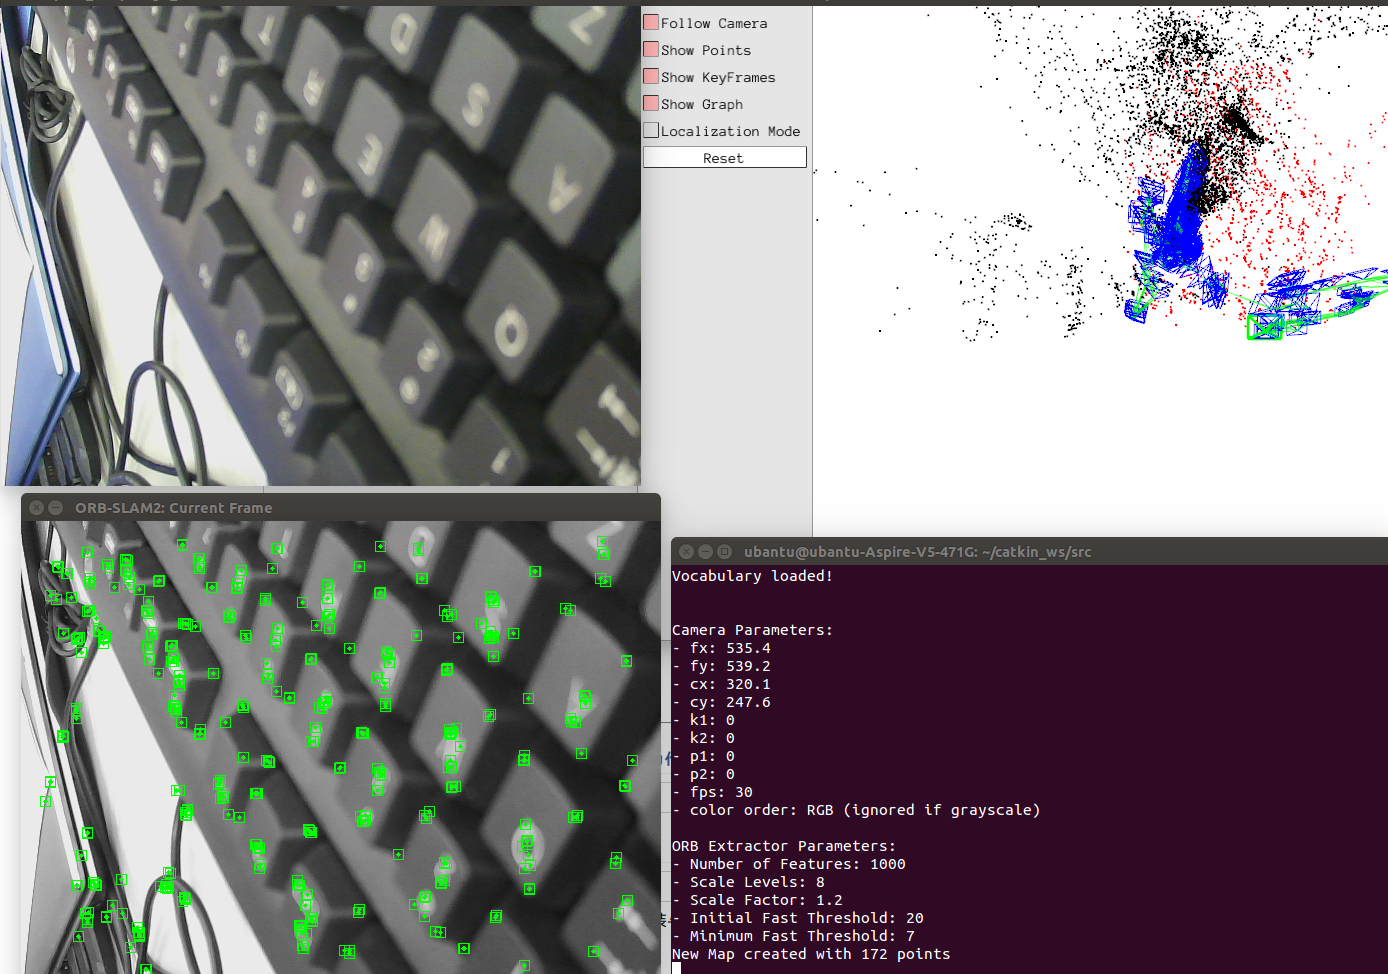
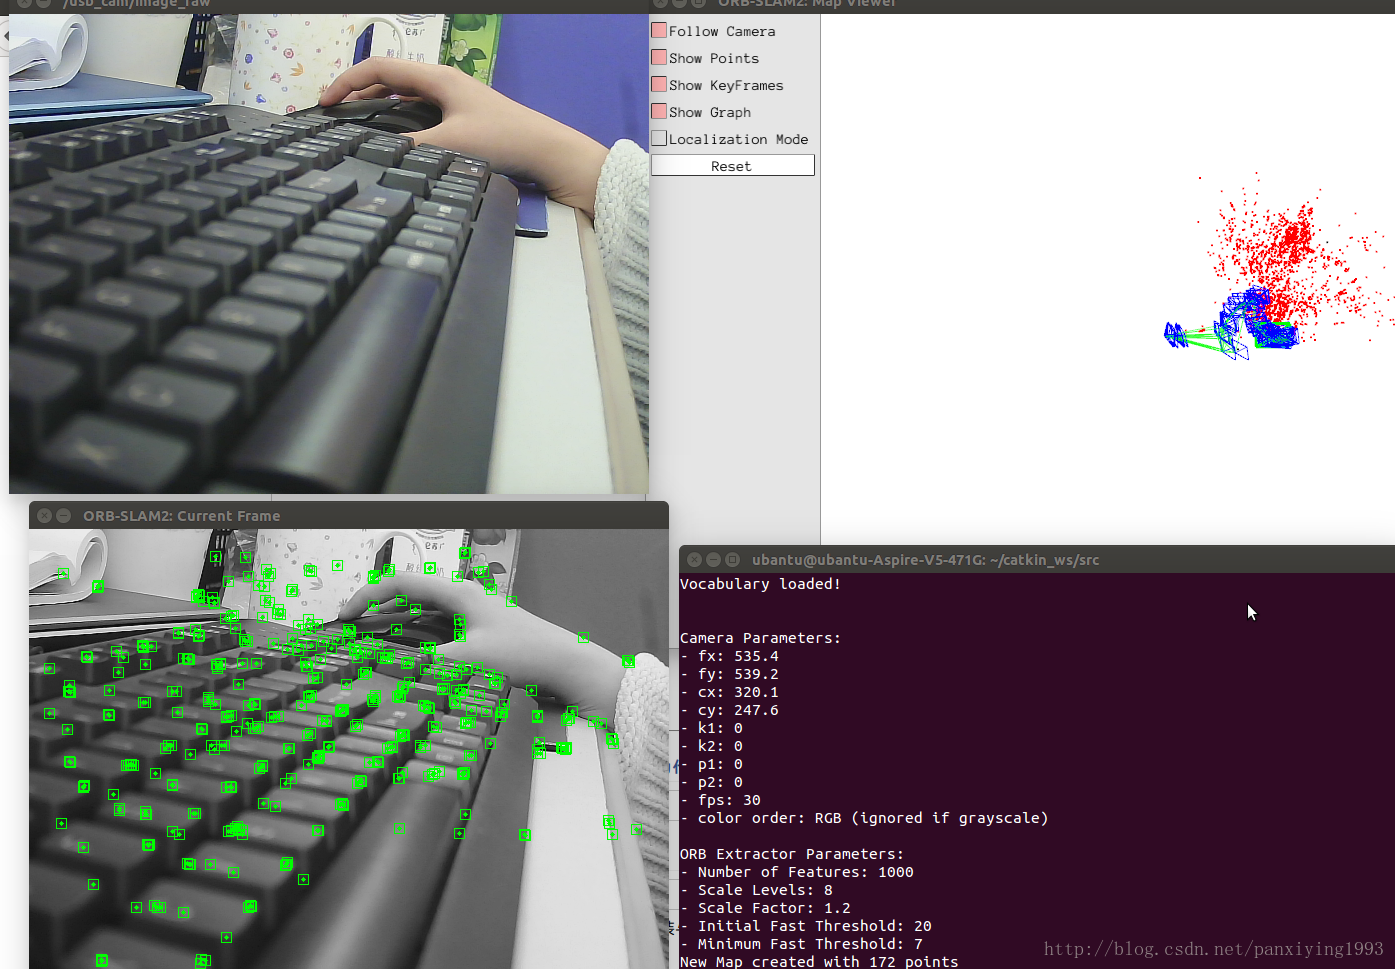
SLAM 和 Localization 模式
你可以使用GUI在SLAM 和 Localization 模式下自由切换SLAM 模式
这是默认模式. 此模式下,系统有三个线程并行工作: Tracking, Local Mapping and Loop Closing. 系统不断定位相机,构建新的地图然后试图闭合环形路径。Localization 模式
当你有一个比较好的地图的时候,你可以使用此模式。在这种模式下,局部地图构建以及环路闭合将不起作用。 系统在你提供的地图上定位相机 (which is no longer updated), using relocalization if needed.参考博客:http://blog.csdn.net/zhjm07054115/article/details/51706706
https://github.com/raulmur/ORB_SLAM2
5.实时用摄像头(可笔记本自带或者外加摄像头)跑数据
(1)安装usb_cam package
$ cd ~/catkin_ws/src
$ git clone https://github.com/bosch-ros-pkg/usb_cam.git $ cd ~/catkin_ws
$ catkin_make
笔记本自带的摄像头的设备号一般为/dev/video0 外接摄像头一般是
$ cd ~/catkin_ws/src
$ roscore    //初始化
$ roslaunch usb_cam usb_cam-test.launch     //启动usb_cam包下的.launch文件启动摄像头。
此时证明摄像头可以正常使用
~~~使用自定义 launch 文件设置摄像头:
usb_cam 给了我们一个默认的 launch 文件在如下目录
| 1 | ~/catkin-ws/usb_cam/src/usb_cam/launch/usb_cam-test.launch |
| 1 2 3 4 5 6 7 8 9 10 11 12 13 14 | <launch> <nodename="usb_cam"pkg="usb_cam"type="usb_cam_node"output="screen"> <paramname="video_device"value="/dev/video0"/> <paramname="image_width"value="640"/> <paramname="image_height"value="480"/> <paramname="pixel_format"value="yuyv"/> <paramname="camera_frame_id"value="usb_cam"/> <paramname="io_method"value="mmap"/> </node> <nodename="image_view"pkg="image_view"type="image_view"respawn="false"output="screen"> <remapfrom="image"to="/usb_cam/image_raw"/> <paramname="autosize"value="true"/> </node> </launch> |
| 1 | ls/dev/video* |
| 1 | roslaunchusb_camusb_cam.launch |
1、Error: package ‘image_view’ not found
如果出现:
| 1 | [rospack]Error:package'image_view'notfound |
| 1 | sudo apt-getinstallros-indigo-image-view |
$ cd ~/catkin_ws/src
$ rosrun ORB_SLAM2 Mono /home/ubantu/catkin_ws/src/ORB_SLAM2/Vocabulary/ORBvoc.txt
/home/ubantu/catkin_ws/src/ORB_SLAM2/Examples/ROS/ORB_SLAM2/Asus.yaml
(即 rosrun ORB-SLAN2 Mono    ORBvoc.txt路径    Asus.yaml路径)
6.标定摄像头(为了防止镜头下的图片发生畸变)
1)摄像头标定时所处的平面位置一旦改变,一般会影响相机内参,需重新标定
2)将标定后的参数替换相机原有的内参,重新跑一遍即可

相关文章推荐
- 怎么在ubuntu下装ORB-SLAM2,并用单目摄像头实时跑起来
- 关于SLAM的那些事——实时RGBD_ORB_SLAM (Ubuntu+Xtion)
- 实时RGBD_ORB_SLAM (Ubuntu+Xtion)
- ORB SLAM2 USB摄像头 实验环境ubuntu 14.04+ros indigo
- 关于SLAM的那些事——实时RGBD_ORB_SLAM (Ubuntu+Xtion)
- [置顶] ubuntu14.04 + ROS下编译Pangolin和ORB_SLAM2死机的解决办法
- ORB SLAM在Ubuntu14.04下环境配置
- 编译安装及运行单目ORBSLAM2在Ubuntu14.04
- UBUNTU 1604 虚拟机 ORB SLAM 安装笔记
- 使用自己笔记本摄像头运行orbslam2
- ubuntu 16.04 x64 ROS kinetic 安装ORB—SLAM
- Ubuntu 16.04 ORB_SLAM2+ROS+usb_cam+AR
- Ubuntu14.04安装调试ORB-SLAM——依赖库的安装
- ubuntu16.04编译ORBSLAM2问题解决
- Tegra(ubuntu)调用摄像头V4L2,并用YUV转RGB
- 编译安装及运行单目ORBSLAM2在Ubuntu14.04
- ubuntu16.04编译ORBSLAM2出错
- ORB SLAM在Ubuntu14.04下环境配置
- 关于ORB_SLAM2在Ubuntu16.04下编译出错的解决办法之一
- MYNTEYE双目摄像头orb-slam & okvis demo