Tomcat8+Spring-Security 启用安全通道(https)的一步步实现
2017-12-08 14:07
357 查看
近日学习Spring Security框架,学习到利用安全框架完成系统的安全通道控制时,来来回回遇到了不少问题。spring教程上写的略简单,对于我等小白来讲不足以支撑看书编码,好在网络上有资料可以查询,在吸取了他人经验,再结合自身的调试,最终实现了想要的效果。接下来,我就一步一步还原这个实现的过程,请往下看。
一、关于Tomcat的证书安装,ssl监听端口的实现说明
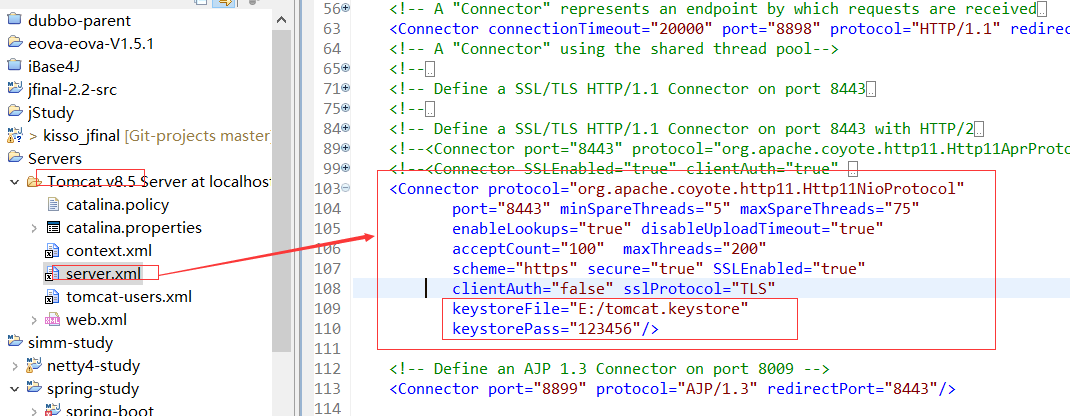
使用Tomcat启用ssl,需要在server.xml文件中 添加ssl请求的监听设置。方式有多种,这里提供一种,不是重点,不做赘述。
1.使用jdk的keytool工具,生成服务端证书

2.配置server.xml的ssl监听
3.(可以选择)直接配置web.xml,完成安全通道的拦截开启。这种方式不需要spring security框架。
二、验证Spring Security 安全通道设置的实现说明
1、参考spring教程说明,完成第一次的启用https的尝试。对 /free/** 的请求开启安全连接。

我的设置代码 ( .and().requiresChannel().antMatchers("/free/**").requiresSecure())
测试一下。报出了一堆filter执行的错误,并且将请求的路径也改了,多了一级applicationContext。

跟踪源码,查看一下错误原因。堆栈调用过程这里就不细讲了,这里只说一下问题根源。
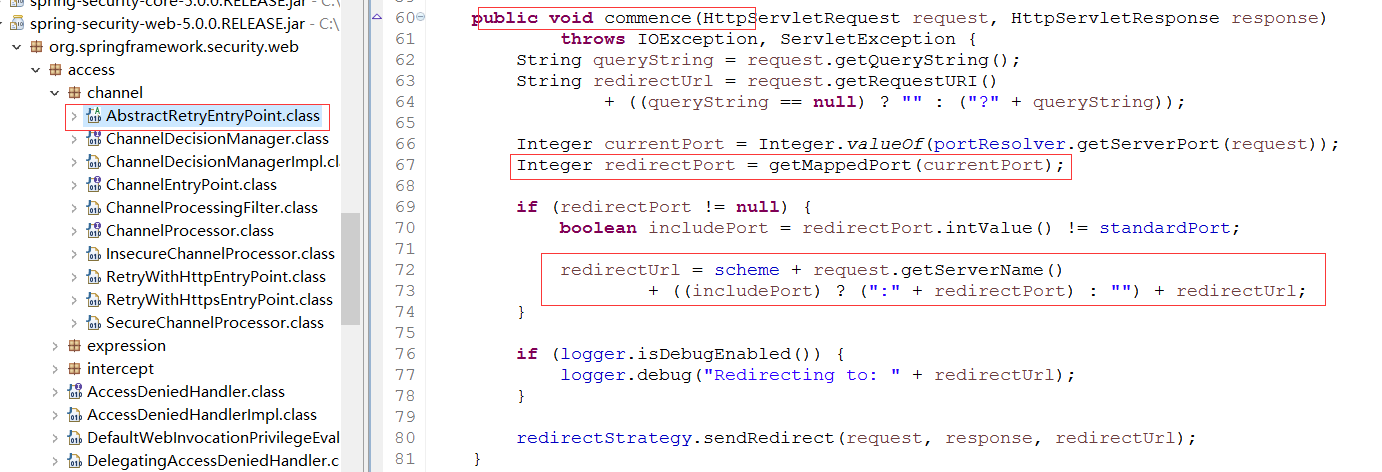
如图1,调试发现需要启动安全访问的请求都会进入这个方法,组装重定向地址。redirectPort 应该返回https请求监听端口,但是很遗憾的是这个值是null。
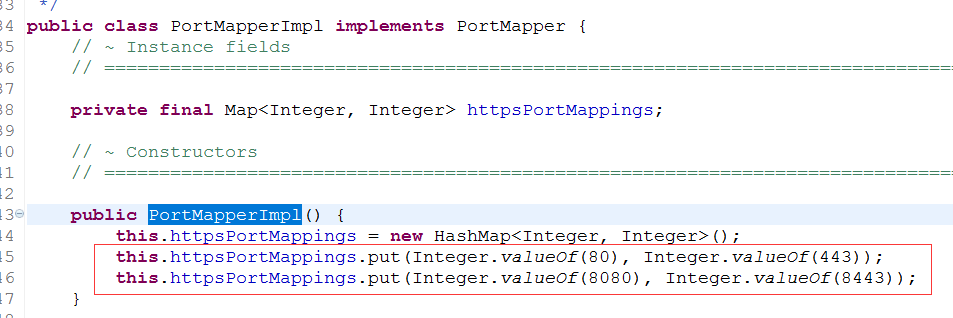
如图2,接下来我看了下 getMappedPort这个方法,发现Spring Security默认是内置个两组对应的映射端口(80->443,8080->8443)。到这里上面出错就好理解了,我测试用的tomcat,设置的http请求监听端口是8898,根本就找不到对应的https端口。知道了问题,接下来就开始整改吧。
2、个人源码分析,暴力指定自己的通道请求处理,设置channelProcessors。
我的整改代码
测试一下,看看结果。不出所料,已经可以了!

3.、回头想想,框架不会这么烂吧?不可能一个端口映射,还得自己分析一堆源码才知道怎么玩?会不会是我自己没找到门路?答案是肯定的,实际上框架真的已经提供了配置端口映射的方法。接下来就是优雅的第3版实现,请往下看。
我的整改代码
测试一下,看看结果。非常不错,这才是正确的道路!
4、试了几把跳转,发现点击退出系统按钮,退回到登录页面也成了https请求,不符合我想要的设置效果啊。按这个测试结果来看,猜测整个过程应该是这样的。当我们成功进入一次https请求后,之后的请求因为都是指定的相对路径,所以全部指向了8443端口。需要有个显示的设置,让其他请求被http架构处理。接下来是我的第4版实现,请往下看。
我的整改代码
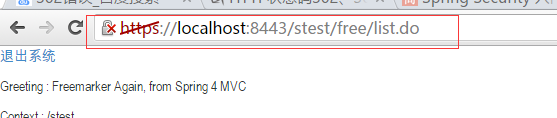
测试一下,看看结果。可以了,现在可以做到只对/free/路径下的请求开启https安全通道了!

至此开启安全访问通道的功能实现就完成了。希望对读到结尾的你有所帮助!如果有好的意见,欢迎评论交流。
一、关于Tomcat的证书安装,ssl监听端口的实现说明
使用Tomcat启用ssl,需要在server.xml文件中 添加ssl请求的监听设置。方式有多种,这里提供一种,不是重点,不做赘述。
1.使用jdk的keytool工具,生成服务端证书
keytool -genkeypair -alias tomcat -keyalg RSA -keypass 123456 -storepass 123456 -keystore E:/tomcat.keystore
2.配置server.xml的ssl监听
<Connector protocol="org.apache.coyote.http11.Http11NioProtocol"
port="8443" minSpareThreads="5" maxSpareThreads="75"
enableLookups="true" disableUploadTimeout="true"
acceptCount="100"  maxThreads="200"
scheme="https" secure="true" SSLEnabled="true"
clientAuth="false" sslProtocol="TLS"
keystoreFile="E:/tomcat.keystore"
keystorePass="123456"/>
3.(可以选择)直接配置web.xml,完成安全通道的拦截开启。这种方式不需要spring security框架。
<login-config>
<auth-method>CLIENT-CERT</auth-method>
<realm-name>Client Cert Users-only Area</realm-name>
</login-config>
<security-constraint>
<web-resource-collection>
<web-resource-name >SSL</web-resource-name>
<url-pattern>/*</url-pattern>
</web-resource-collection>
<user-data-constraint>
<transport-guarantee>CONFIDENTIAL</transport-guarantee>
</user-data-constraint>
</security-constraint>
</web-app>
二、验证Spring Security 安全通道设置的实现说明
1、参考spring教程说明,完成第一次的启用https的尝试。对 /free/** 的请求开启安全连接。
我的设置代码 ( .and().requiresChannel().antMatchers("/free/**").requiresSecure())
@Configuration
@EnableWebSecurity
public class SecurityConfig extends WebSecurityConfigurerAdapter {
/**
* HTTP请求处理
*/
@Override
protected void configure(HttpSecurity http) throws Exception {
http
.formLogin().loginPage("/user/login.do")
.defaultSuccessUrl("/free/list.do")//启用FORM登录
.and().authorizeRequests().antMatchers("/user/login.do").permitAll()//登录页允许所有人访问
.and().authorizeRequests().antMatchers("/**/*.do").authenticated()
.and().requiresChannel().antMatchers("/free/**").requiresSecure()
//.channelProcessors(getChannelProcessors())
.and().csrf().disable();  //暂时禁用CSRF
}
测试一下。报出了一堆filter执行的错误,并且将请求的路径也改了,多了一级applicationContext。
跟踪源码,查看一下错误原因。堆栈调用过程这里就不细讲了,这里只说一下问题根源。
如图1,调试发现需要启动安全访问的请求都会进入这个方法,组装重定向地址。redirectPort 应该返回https请求监听端口,但是很遗憾的是这个值是null。
如图2,接下来我看了下 getMappedPort这个方法,发现Spring Security默认是内置个两组对应的映射端口(80->443,8080->8443)。到这里上面出错就好理解了,我测试用的tomcat,设置的http请求监听端口是8898,根本就找不到对应的https端口。知道了问题,接下来就开始整改吧。
2、个人源码分析,暴力指定自己的通道请求处理,设置channelProcessors。
我的整改代码
/**
* HTTP请求处理
*/
@Override
protected void configure(HttpSecurity http) throws Exception {
http
.formLogin().loginPage("/user/login.do")
.defaultSuccessUrl("/free/list.do")//启用FORM登录
.and().authorizeRequests().antMatchers("/user/login.do").permitAll()//登录页允许所有人访问
.and().authorizeRequests().antMatchers("/**/*.do").authenticated()
.and().requiresChannel().channelProcessors(getChannelProcessors())
.antMatchers("/free/**").requiresSecure()
.and().csrf().disable();  //暂时禁用CSRF
}
/**
* 设置自己的通道处理器
* @return
*/
private List<ChannelProcessor> getChannelProcessors(){
List<ChannelProcessor> list = new ArrayList<ChannelProcessor>();
SecureChannelProcessor processor = new SecureChannelProcessor();

RetryWithHttpsEntryPoint entryPoint = ((RetryWithHttpsEntryPoint)processor.getEntryPoint());
//重新定义port映射
PortMapperImpl portMapper = new PortMapperImpl();
HashMap<String,String> maper = new HashMap<String,String>();
maper.put("80","443");
maper.put("8080","8443");
maper.put("8898","8443");
portMapper.setPortMappings(maper);
entryPoint.setPortMapper(portMapper);
list.add(processor);
list.add(new InsecureChannelProcessor());
return list;
}
测试一下,看看结果。不出所料,已经可以了!
3.、回头想想,框架不会这么烂吧?不可能一个端口映射,还得自己分析一堆源码才知道怎么玩?会不会是我自己没找到门路?答案是肯定的,实际上框架真的已经提供了配置端口映射的方法。接下来就是优雅的第3版实现,请往下看。
我的整改代码
@Configuration
@EnableWebSecurity
public class SecurityConfig extends WebSecurityConfigurerAdapter {
/**
* HTTP请求处理
*/
@Override
protected void configure(HttpSecurity http) throws Exception {
http
.formLogin().loginPage("/user/login.do")
.defaultSuccessUrl("/free/list.do")//启用FORM登录
.and().authorizeRequests().antMatchers("/user/login.do").permitAll()//登录页允许所有人访问
.and().portMapper().http(8898).mapsTo(8443)  //添加端口映射,做测试用
.and().authorizeRequests().antMatchers("/**/*.do").authenticated()
.and().requiresChannel().antMatchers("/free/**").requiresSecure()
.and().requiresChannel().anyRequest().requiresInsecure()
.and().httpBasic()
.and().csrf().disable();  //暂时禁用CSRF
}
测试一下,看看结果。非常不错,这才是正确的道路!
4、试了几把跳转,发现点击退出系统按钮,退回到登录页面也成了https请求,不符合我想要的设置效果啊。按这个测试结果来看,猜测整个过程应该是这样的。当我们成功进入一次https请求后,之后的请求因为都是指定的相对路径,所以全部指向了8443端口。需要有个显示的设置,让其他请求被http架构处理。接下来是我的第4版实现,请往下看。
我的整改代码
@Configuration
@EnableWebSecurity
public class SecurityConfig extends WebSecurityConfigurerAdapter {
/**
* HTTP请求处理
*/
@Override
protected void configure(HttpSecurity http) throws Exception {
http
.formLogin().loginPage("/user/login.do")
.defaultSuccessUrl("/free/list.do")//启用FORM登录
.and().authorizeRequests().antMatchers("/user/login.do").permitAll()//登录页允许所有人访问
.and().portMapper().http(8898).mapsTo(8443)  //添加端口映射,做测试用
.and().authorizeRequests().antMatchers("/**/*.do").authenticated()
.and().requiresChannel().antMatchers("/free/**").requiresSecure()
.and().requiresChannel().anyRequest().requiresInsecure()
.and().csrf().disable();  //暂时禁用CSRF
}
测试一下,看看结果。可以了,现在可以做到只对/free/路径下的请求开启https安全通道了!
至此开启安全访问通道的功能实现就完成了。希望对读到结尾的你有所帮助!如果有好的意见,欢迎评论交流。

相关文章推荐
- Tomcat8+Spring-Security 启用安全通道(https)的一步步实现
- 配置https实现请求安全
- tomcat6.0实现https安全访问
- HTTP严格安全传输(HTTP Strict Transport Security, HSTS)chromuim实现源码分析(一)
- 在tomcat中实现https安全验证
- tomcat6.0实现https安全访问 (面试时提问)
- 未能创建SSL/TLS安全通道,导致的通过HTTPS协议访问WCF服务
- Tomcat双向Https验证搭建,亲自实现与主流浏览器、Android/iOS移动客户端超安全通信
- Spring Security + JWT 实现基于Token的安全验证
- tomcat6.0实现https安全访问
- websphere 启用http/https 通道由war包配置决定,https使用何种协议ie和was都需要配置 tls1.2需要was7以后版本
- 利用struts2-ssl-plugin实现https安全链接
- 【网络安全】HTTPS以及socket实现代码(1)
- HTTP严格安全传输(HTTP Strict Transport Security, HSTS)chromuim实现源码分析(一)
- 云安全之Neutron 是如何实现虚机防火墙的 [How Neutron Implements Security Group]
- 在tomcat中实现https安全连接的方法
- 利用struts2-ssl-plugin实现https安全链接
- 在Tomcat中实现https安全连接
- https 请求被中止: 未能创建 SSL/TLS 安全通道
- android Retrofit+OkHttp使用自制的证书实现https安全传输