Android-布局管理-表格布局
2017-12-07 00:00
447 查看
摘要: 《Android从入门到精通》
TableLayout继承了LinearLayout,因此它完全支持LinearLayout所支持的全部XML属性。
LinearLayout相关介绍
同时还支持如下所示的XML属性
效果图如下:
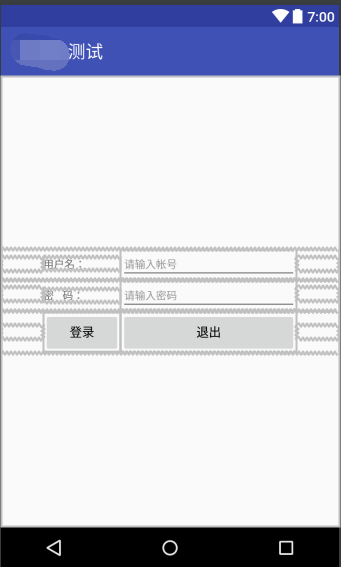
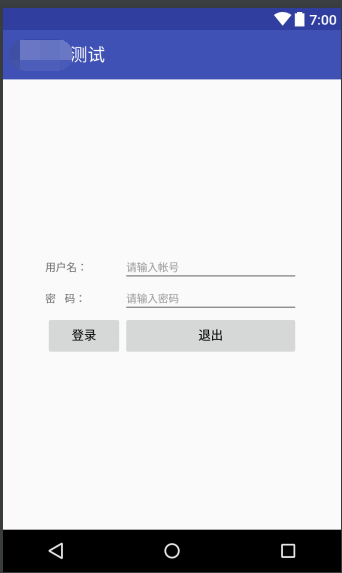
简要概述:
表格布局与常见的彪哥类似,以行、列的形式来管理放入其中的UI组件。表格布局使用<TableLayout>标记定义,在表格布局中,可以添加多个<TableRow>标记,每个<TableRow>标记占用一行。由于<TableRow>标记也是容器,所有还可在该标记找那个添加其他组件,每没加一个组件,表格就会增加一列。在XML中表格布局的基本语法格式如下:<TableLayout xmlns:android="http://schemas.android.com/apk/res/android" 属性列表> <TableRow 属性列表>需要添加的UI组件</TableRow> 多个<TableRow> </TableLayout>
TableLayout继承了LinearLayout,因此它完全支持LinearLayout所支持的全部XML属性。
LinearLayout相关介绍
同时还支持如下所示的XML属性
| XML属性 | 描述 |
| android:collapseColumns | 设置需要被隐藏列的列序号(序号从0开始),多个列序号之间用逗号“,”分割。 |
| android:shrinkColumns | 设置允许被收缩列的列序号(序号从0开始),多个列序号之间用逗号“,”分割。 |
| android:stretchColumns | 设置允许被拉伸列的列序号(序号从0开始),多个列序号之间用逗号“,”分割。 |
| android:layout_column | 该单元格在第几列显示 |
| android:layout_span | 该单元格占据列数,默认为1 |
样例代码清单:
<?xml version="1.0" encoding="utf-8"?>
<TableLayout xmlns:android="http://schemas.android.com/apk/res/android"
android:layout_width="match_parent"
android:layout_height="match_parent"
android:gravity="center"
android:stretchColumns="0,3">

<TableRow
android:id="@+id/tablerow1"
android:layout_weight="wrap_content"
android:layout_height="wrap_content">
<TextView />
<TextView
android:id="@+id/textview1"
android:layout_weight="wrap_content"
android:layout_height="wrap_content"
android:text="用户名:"
android:textSize="24px">
<EditText
android:id="@+id/edittext1"
android:layout_weight="wrap_content"
android:layout_height="wrap_content"
android:hint="请输入帐号"
android:textSize="24px"
android:minWidth="400px"/>
<TextView />

</TableRow>
<TableRow
android:id="@+id/tablerow2"
android:layout_weight="wrap_content"
android:layout_height="wrap_content">
<TextView />
<TextView
android:id="@+id/textview2"
android:layout_weight="wrap_content"
android:layout_height="wrap_content"
android:text="密    码:"
android:textSize="24px"/>
<EditText
android:id="@+id/edittext2"
android:layout_weight="wrap_content"
android:layout_height="wrap_content"
android:hint="请输入密码"
android:textSize="24px"
android:minWidth="400px"/>
<TextView />

</TableRow>
<TableRow
android:id="@+id/tablerow3"
android:layout_weight="wrap_content"
android:layout_height="wrap_content">
<TextView />
<Button
android:id="@+id/button1"
android:layout_weight="wrap_content"
android:layout_height="wrap_content"
android:text="登录"/>

<Button
android:id="@+id/button2"
android:layout_weight="wrap_content"
android:layout_height="wrap_content"
android:text="退出"/>
<TextView />

</TableRow>

</TableLayout>
效果图如下:

相关文章推荐
- Android -- UI布局管理,相对布局,线性布局,表格布局,绝对布局,帧布局
- Android的布局管理:表格布局
- Android -- UI布局管理,相对布局,线性布局,表格布局,绝对布局,帧布局
- Android-布局管理-表格布局
- Android-布局管理-相对布局
- 【Android】之 布局文件管理 与 包结构
- Android--表格布局
- android表格布局TableLayout的使用
- Android:控件布局(表格布局)TableLayout
- 第004课:Android中资源文件与布局管理(1)
- android:TableLayout表格布局详解
- 安卓表格布局android:collapseColumns,android:shrinkColumns和stretchColumn .
- Android第十四课;表格布局
- android:TableLayout表格布局详解
- 我的课表—android 表格布局应用
- Android笔记(十) Android中的布局——表格布局
- 学习android笔记(5) 动态建立TableLayout 表格布局
- android五大布局之TableLayout(表格布局)
- android 五大布局(2)帧布局和表格布局
- Android UI 中如何利用表格进行布局