Android Studio:基本UI界面设计 (详细)
2017-12-02 15:01
645 查看
一、 实验题目
基本UI界面设计二、 实现内容
实现一个 Android 应用,界面呈现如下效果:
三、 实验过程
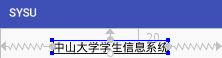
(1)标题首先我们建立一个TextView控件来写标题。
实验对标题的要求如下:
1 标题字体大小 20sp(android:textSize="20sp")
2 与顶部距离 20dp (与父容器顶部对齐后再设置与顶部距离20dp)

3 居中 (与父容器左右都对齐后即可)

实现效果如下:
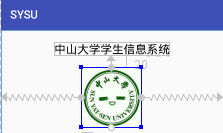
(2)图片
建立一个ImageView控件来写标题。先将图片复制到res/drawable目录下,然后通过app:srcCompat="@drawable/sysu"来引用。
实验对图片的要求如下:
1 图片与标题的间距为 20dp (先将图片顶部与标题底部对齐,再设置20dp的间距)

2 居中 (与父容器左右都对齐后即可,就不再放代码了)
实现效果如下:
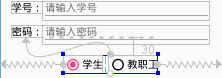
(3)输入框
先建立两个TextView控件,用来写“学号”和“密码”。“学号”(user_id)控件放在距离图片20dp,与屏幕左边也距离20dp。

“密码”(user_pwd)控件放在user_id下方20dp处,用以实现上下两栏间距 20dp。

接着设置建立两个EditView控件,用来输入学号和密码。
输入学号的控件布局设置如下:
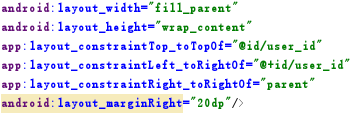
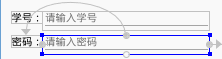
由上面代码可知道,我们将其放在user_id控件右边,同时距离屏幕右边20dp。但是下划线长度一直保持跟hint字数长短一致,查阅资料后,将layout_width的属性由wrap_content改为fill_parent才使得下划线由下图左的状态变为下图右。

→

输入密码的控件布局设置如法炮制即可。
同时注意以下两点:
1 学号对应的 EditText 只能输入数字:android:digits="0123456789"
2 密码对应的 EditText 输入方式为密码:android:password="true"
3 下划线上面固定的字体应这样设置:android:hint="请输入学号(密码)"
实现效果如下:
(4)单选按钮
由于是单选按钮,所以我们先建立一个RadioGroup,之后再在里面建立两个单选按钮RadioButton。先让RadioGroup与容器左右都对齐,这样能实现两个单选按钮整体居中。对第2个按钮设置android:layout_marginLeft="10dp",使得两个按钮间距10dp。因为要求默认选中的按钮为第一个,所以对第一个按钮设置android:checked="true"
实现效果如下:
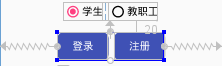
(5)按钮
因为我无法实现两个按钮整体居中(也许可以通过数值坐标设定使得看起来“居中”,但是不够准确...),于是我先设置了一个id为“button_box”的View控件并使其居中,然后再将两个按钮放入其中。View的布局就是将其放在RadioGroup下方20dp处并居中,代码便不放了。
接下来就是建立两个Button控件,将第一个button与View左上对齐,第二个button设置其左边与第一个button右边距离10dp,从而实现按钮间的间距为10dp。

实验要求“按钮背景框左右边框与文字间距 10dp,上下边框与文字间距 5dp,圆角半径 10dp,背景色为#3F51B5”,本来是想在button控件下直接设置的,但是无法实现。后来查阅资料后才找到以下的解决方法:
先是在res/drawable下新建一个shape.xml文件,在里面写上background属性设置:
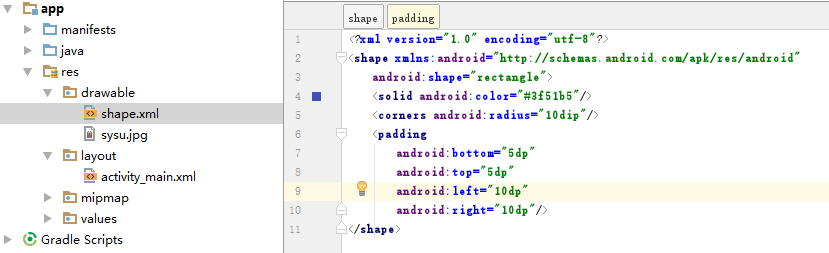
然后返回activity_main.xml文件,在button控件下进行引用:

实现效果如下:
(这里的圆角框有点被虚线挡住)
(6)实验结果
在Android Studio的布局为图1。将app导入手机中运行结果如图2(手机截图)。
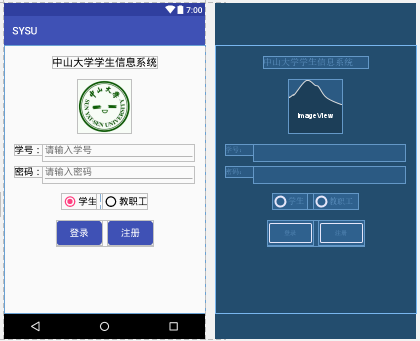
图1
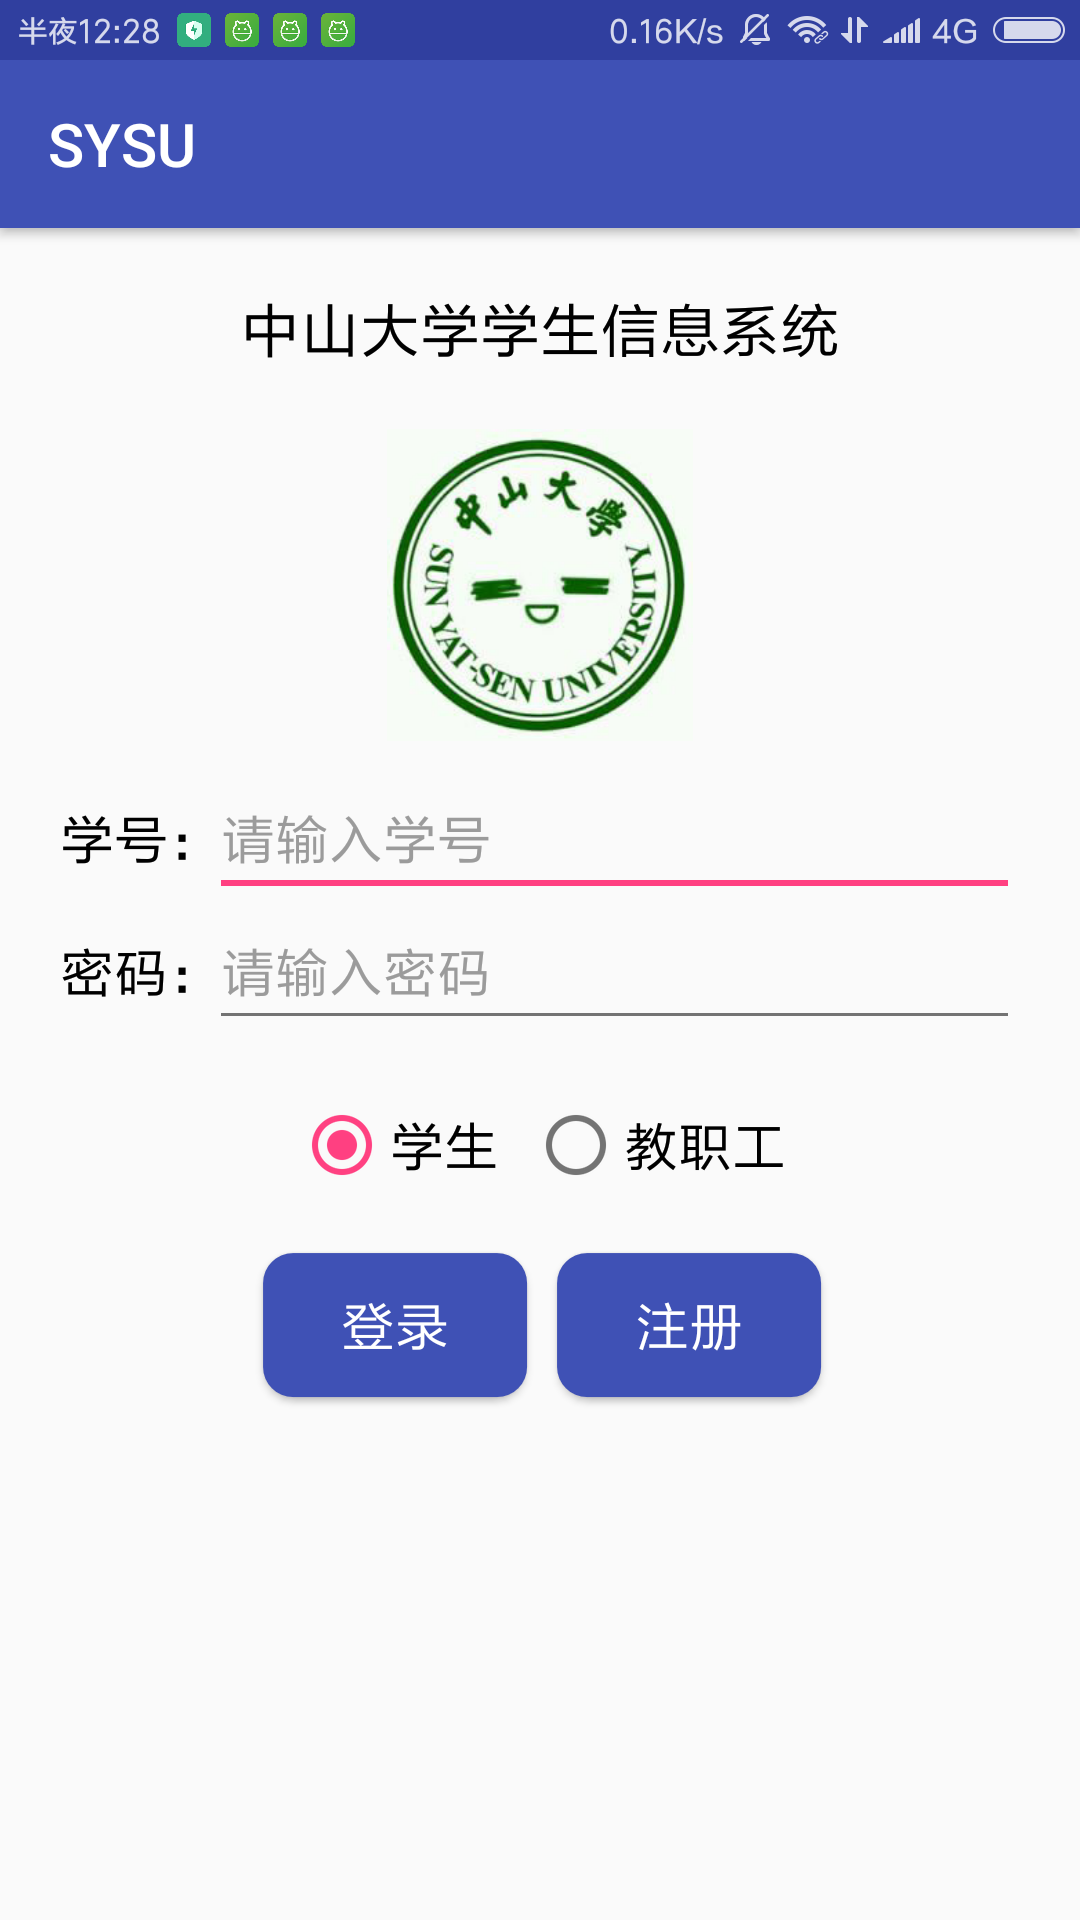
图2
四、 实验思考及感想
1 在做实验之前,我并没有好好看下载包里的实验文档,只是粗略看了下实验要求便开始着手打代码。实验中途遇到了一些不了解的困难也都是自己手动搜索了蛮久才找到适合的解决方案,有点费时费力。后来实验做完了又浏览了下实验文档,才发现里面讲了很多关于布局和控件的知识点,如果早点看到就不用浪费自己那么多精力去搜索相应的知识点了。以后每次实验一定要先仔细看看实验文档,做好基础打底。另外,设置RadioButton时漏看了“默认第一个按钮已选中”这个要求,添加代码之后也得顺道把实验报告里相关截图重新改了,实在麻烦,以后须更加细心。2 之前选修过web课程,在AS上进行控件布局时发现了其与网页CSS布局有很多相同之处,包括位置的约束、属性的设定。这使得我更容易去理解、学会UI布局。编程开发大抵都有相通之处吧。
最后放上代码。
activity_main.xml
<?xml version="1.0" encoding="utf-8"?>
<android.support.constraint.ConstraintLayout xmlns:android="http://schemas.android.com/apk/res/android"
xmlns:app="http://schemas.android.com/apk/res-auto"
xmlns:tools="http://schemas.android.com/tools"
android:layout_width="match_parent"
android:layout_height="match_parent"
tools:context="com.example.yc.sysu.MainActivity">

<TextView
android:id="@+id/title"
andr
b062
oid:layout_width="wrap_content"
android:layout_height="wrap_content"
android:text="中山大学学生信息系统"
android:textSize="20sp"
android:textColor="#000000"
app:layout_constraintTop_toTopOf="parent"
android:layout_marginTop="20dp"
app:layout_constraintLeft_toLeftOf="parent"
app:layout_constraintRight_toRightOf="parent"/>

<ImageView
android:id="@+id/icon"
android:layout_width="104dp"
android:layout_height="104dp"
app:srcCompat="@drawable/sysu"
app:layout_constraintTop_toBottomOf="@id/title"
android:layout_marginTop="20dp"
app:layout_constraintLeft_toLeftOf="parent"
app:layout_constraintRight_toRightOf="parent" />

<TextView
android:id="@+id/user_id"
android:text="学号:"
android:textColor="#000000"
android:textSize="18sp"
android:layout_width="wrap_content"
android:layout_height="wrap_content"
app:layout_constraintLeft_toLeftOf="parent"
android:layout_marginLeft="20dp"
app:layout_constraintTop_toBottomOf="@id/icon"
android:layout_marginTop="20dp" />

<TextView
android:id="@+id/user_pwd"
android:text="密码:"
android:textColor="#000000"
android:textSize="18sp"
android:layout_width="wrap_content"
android:layout_height="wrap_content"
app:layout_constraintLeft_toLeftOf="parent"
android:layout_marginLeft="20dp"
app:layout_constraintTop_toBottomOf="@id/user_id"
android:layout_marginTop="20dp"/>

<EditText
android:id="@+id/text_userid"
android:hint="请输入学号"
android:textColor="#000000"
android:textSize="18sp"
android:paddingTop="0dp"
android:digits="0123456789"
android:layout_width="fill_parent"
android:layout_height="wrap_content"
app:layout_constraintTop_toTopOf="@id/user_id"
app:layout_constraintLeft_toRightOf="@+id/user_id"
app:layout_constraintRight_toRightOf="parent"
android:layout_marginRight="20dp"/>

<EditText
android:id="@+id/text_userpwd"
android:hint="请输入密码"
android:textColor="#000000"
android:textSize="18sp"
android:password="true"
android:paddingTop="0dp"
android:layout_width="fill_parent"
android:layout_height="wrap_content"
app:layout_constraintTop_toTopOf="@id/user_pwd"
app:layout_constraintLeft_toRightOf="@+id/user_pwd"
app:layout_constraintRight_toRightOf="parent"
android:layout_marginRight="20dp" />

<RadioGroup
android:id="@+id/radioButton"
android:orientation="horizontal"
android:layout_width="wrap_content"
android:layout_height="wrap_content"
app:layout_constraintLeft_toLeftOf="parent"
app:layout_constraintRight_toRightOf="parent"
app:layout_constraintTop_toBottomOf="@id/user_pwd"
android:layout_marginTop="30dp">

<RadioButton
android:id="@+id/radioButton1"
android:text="学生"
android:textColor="#000000"
android:textSize="18sp"
android:checked="true"
android:layout_width="wrap_content"
android:layout_height="wrap_content"/>

<RadioButton
android:id="@+id/radioButton2"
android:text="教职工"
android:textColor="#000000"
android:textSize="18sp"
android:layout_width="wrap_content"
android:layout_height="wrap_content"
android:layout_marginLeft="10dp"/>
</RadioGroup>

<View
android:id="@+id/button_box"
android:layout_height="50dp"
android:layout_width="185dp"
app:layout_constraintTop_toBottomOf="@id/radioButton"
android:layout_marginTop="20dp"
app:layout_constraintLeft_toLeftOf="parent"
app:layout_constraintRight_toRightOf="parent"/>

<Button
android:id="@+id/button1"
android:text="登录"
android:textColor="#ffffff"
android:background="@drawable/shape"
android:textSize="18sp"
android:layout_width="wrap_content"
android:layout_height="wrap_content"
app:layout_constraintLeft_toLeftOf="@id/button_box"
app:layout_constraintTop_toTopOf="@id/button_box" />

<Button
android:id="@+id/button2"
android:text="注册"
android:textColor="#ffffff"
android:background="@drawable/shape"
android:textSize="18sp"
android:layout_width="wrap_content"
android:layout_height="wrap_content"
app:layout_constraintLeft_toRightOf="@id/button1"
android:layout_marginLeft="10dp"
app:layout_constraintTop_toTopOf="@id/button_box"/>

</android.support.constraint.ConstraintLayout>
shape.xml
<?xml version="1.0" encoding="utf-8"?>
<shape xmlns:android="http://schemas.android.com/apk/res/android"
android:shape="rectangle">
<solid android:color="#3f51b5"/>
<corners android:radius="10dip"/>
<padding
android:bottom="5dp"
android:top="5dp"
android:left="10dp"
android:right="10dp"/>
</shape>

相关文章推荐
- QT学习 第一章:基本对话框--利用Qt Designer设计多个UI界面
- Android开发1:基本UI界面设计——布局和组件
- 史上最详细的Android Studio系列教程二--基本设置与运行
- 详细设计的基本任务
- 史上最详细的Android Studio系列教程二--基本设置与运行
- 史上最详细的Android Studio系列教程二--基本设置与运行
- 史上最详细的Android Studio系列教程二--基本设置与运行
- 史上最详细的Android Studio系列教程二--基本设置与运行
- 史上最详细的Android Studio系列教程二--基本设置与运行
- 史上最详细的Android Studio系列教程二--基本设置与运行
- Android Studio 安装配置详细步骤,以及使用的基本操作
- Android Studio安装配置、环境搭建详细步骤及基本使用
- Android Studio官方文档之使用布局编辑器来设计UI界面
- 史上最详细的Android Studio系列教程二--基本设置与运行
- 史上最详细的Android Studio系列教程二--基本设置与运行
- 详细设计的基本内容
- 史上最详细的Android Studio系列教程二--基本设置与运行
- 史上最详细的Android Studio系列教程(二)--基本设置与运行
- 安卓开发(2):基本UI界面设计
- 史上最详细的Android Studio系列教程二--基本设置与运行