centos7卸载自带maridb,安装mysql5.6
2017-11-26 12:23
225 查看
1.列出安装的包
# rpm -qa | grep mariadb
mariadb-libs-5.5.41-2.el7_0.x86_64
2.卸载包
# rpm -e --nodeps mariadb-libs-5.5.41-2.el7_0.x86_64
3.安装rpm包
# rpm -Uvh http://dev.mysql.com/get/mysql-community-release-el7-5.noarch.rpm
[root@localhost ~]# rpm -Uvh http://dev.mysql.com/get/mysql-community-release-el7-5.noarch.rpm
Retrieving http://dev.mysql.com/get/mysql-community-release-el7-5.noarch.rpm
curl: (7) Failed connect to dev.mysql.com:443; Connection refused
error: skipping http://dev.mysql.com/get/mysql-community-release-el7-5.noarch.rpm - transfer failed
[root@localhost ~]# rpm -Uvh http://dev.mysql.com/get/mysql-community-release-el7-5.noarch.rpm
Retrieving http://dev.mysql.com/get/mysql-community-release-el7-5.noarch.rpm
Preparing... ################################# [100%]
Updating / installing...
1:mysql-community-release-el7-5 ################################# [100%]
4.查看当前可用的mysql安装资源
[root@localhost ~]# yum repolist enabled | grep "mysql.*-community.*"
Existing lock /var/run/yum.pid: another copy is running as pid 48035.
Another app is currently holding the yum lock; waiting for it to exit...
The other application is: PackageKit
Memory : 152 M RSS (557 MB VSZ)
Started: Sat Nov 25 18:27:02 2017 - 37:44 ago
State : Sleeping, pid: 48035
5.原因就是yum在自动更新 只要关掉他就可以了
[root@localhost ~]# rm -f /var/run/yum.pid
[root@localhost ~]# yum repolist enabled | grep "mysql.*-community.*"
mysql-connectors-community/x86_64 MySQL Connectors Community 42
mysql-tools-community/x86_64 MySQL Tools Community 53
mysql56-community/x86_64 MySQL 5.6 Community Server 361
6.yum方式安装了MySQL5.6版本
[root@localhost ~]# yum -y install mysql-community-server
Loaded plugins: fastestmirror, langpacks
Loading mirror speeds from cached hostfile
* base: mirrors.zju.edu.cn
* extras: mirrors.zju.edu.cn
* updates: mirrors.cn99.com
Resolving Dependencies
--> Running transaction check
.....
Dependency Installed:
mysql-community-client.x86_64 0:5.6.38-2.el7 mysql-community-common.x86_64 0:5.6.38-2.el7
mysql-community-libs.x86_64 0:5.6.38-2.el7 perl-Compress-Raw-Bzip2.x86_64 0:2.061-3.el7
perl-Compress-Raw-Zlib.x86_64 1:2.061-4.el7 perl-DBI.x86_64 0:1.627-4.el7
perl-Data-Dumper.x86_64 0:2.145-3.el7 perl-IO-Compress.noarch 0:2.061-2.el7
perl-Net-Daemon.noarch 0:0.48-5.el7 perl-PlRPC.noarch 0:0.2020-14.el7
Complete!
7.安装成功后,将其加入开机启动
[root@localhost ~]# systemctl enable mysqld
8.启动mysql服务进程
[root@localhost ~]# systemctl start mysqld
9.配置mysql(设置密码等)
[root@localhost ~]# mysql_secure_installation
NOTE: RUNNING ALL PARTS OF THIS SCRIPT IS RECOMMENDED FOR ALL MySQL
SERVERS IN PRODUCTION USE! PLEASE READ EACH STEP CAREFULLY!
In order to log into MySQL to secure it, we'll need the current
password for the root user. If you've just installed MySQL, and
you haven't set the root password yet, the password will be blank,
so you should just press enter here.
Enter current password for root (enter for none):
OK, successfully used password, moving on...
Setting the root password ensures that nobody can log into the MySQL
root user without the proper authorisation.
Set root password? [Y/n] y[设置root用户密码]
New password:
Re-enter new password:
Password updated successfully!
Reloading privilege tables..
... Success!
By default, a MySQL installation has an anonymous user, allowing anyone
to log into MySQL without having to have a user account created for
them. This is intended only for testing, and to make the installation
go a bit smoother. You should remove them before moving into a
production environment.
Remove anonymous users? [Y/n] y[删除匿名用户]
... Success!
Normally, root should only be allowed to connect from 'localhost'. This
ensures that someone cannot guess at the root password from the network.
Disallow root login remotely? [Y/n] y[禁止root远程登录]
... Success!
By default, MySQL comes with a database named 'test' that anyone can
access. This is also intended only for testing, and should be removed
before moving into a production environment.
Remove test database and access to it? [Y/n] y[删除test数据库]
- Dropping test database...
ERROR 1008 (HY000) at line 1: Can't drop database 'test'; database doesn't exist
... Failed! Not critical, keep moving...
- Removing privileges on test database...
... Success!
Reloading the privilege tables will ensure that all changes made so far
will take effect immediately.
Reload privilege tables now? [Y/n] y[刷新权限]
... Success!
All done! If you've completed all of the above steps, your MySQL
installation should now be secure.
Thanks for using MySQL!
Cleaning up...
10.进入mysql
# mysql -uroot -p
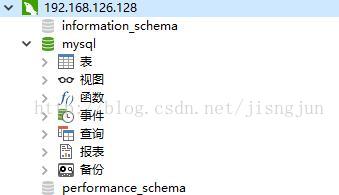
11.通过window上navcat连接远程库
mysql> GRANT ALL PRIVILEGES ON *.* TO 'root'@'%' IDENTIFIED BY '123456' WITH GRANT OPTION
-> ;
Query OK, 0 rows affected (0.00 sec)
mysql> flush privileges;
Query OK, 0 rows affected (0.00 sec)
mysql> flush privileges;
Query OK, 0 rows affected (0.00 sec)
12.防火墙设置
mysql> Ctrl-C -- exit!
Aborted
[root@localhost ~]# firewall-cmd --zone=public --add-port=3306/tcp --permanent
success
[root@localhost ~]# firewall-cmd --reload
success
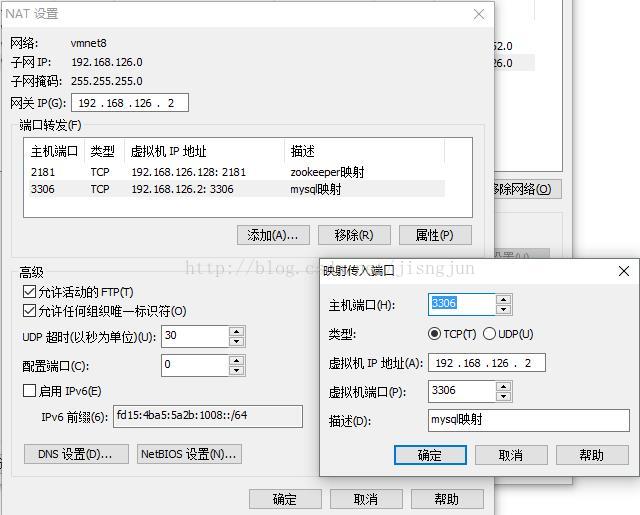
13.虚拟机设置
菜单"编辑"->"虚拟机网络编辑器"->"NAT模式"->"NAT设置"->"端口转发设置"添加端口:
over
# rpm -qa | grep mariadb
mariadb-libs-5.5.41-2.el7_0.x86_64
2.卸载包
# rpm -e --nodeps mariadb-libs-5.5.41-2.el7_0.x86_64
3.安装rpm包
# rpm -Uvh http://dev.mysql.com/get/mysql-community-release-el7-5.noarch.rpm
[root@localhost ~]# rpm -Uvh http://dev.mysql.com/get/mysql-community-release-el7-5.noarch.rpm
Retrieving http://dev.mysql.com/get/mysql-community-release-el7-5.noarch.rpm
curl: (7) Failed connect to dev.mysql.com:443; Connection refused
error: skipping http://dev.mysql.com/get/mysql-community-release-el7-5.noarch.rpm - transfer failed
[root@localhost ~]# rpm -Uvh http://dev.mysql.com/get/mysql-community-release-el7-5.noarch.rpm
Retrieving http://dev.mysql.com/get/mysql-community-release-el7-5.noarch.rpm
Preparing... ################################# [100%]
Updating / installing...
1:mysql-community-release-el7-5 ################################# [100%]
4.查看当前可用的mysql安装资源
[root@localhost ~]# yum repolist enabled | grep "mysql.*-community.*"
Existing lock /var/run/yum.pid: another copy is running as pid 48035.
Another app is currently holding the yum lock; waiting for it to exit...
The other application is: PackageKit
Memory : 152 M RSS (557 MB VSZ)
Started: Sat Nov 25 18:27:02 2017 - 37:44 ago
State : Sleeping, pid: 48035
5.原因就是yum在自动更新 只要关掉他就可以了
[root@localhost ~]# rm -f /var/run/yum.pid
[root@localhost ~]# yum repolist enabled | grep "mysql.*-community.*"
mysql-connectors-community/x86_64 MySQL Connectors Community 42
mysql-tools-community/x86_64 MySQL Tools Community 53
mysql56-community/x86_64 MySQL 5.6 Community Server 361
6.yum方式安装了MySQL5.6版本
[root@localhost ~]# yum -y install mysql-community-server
Loaded plugins: fastestmirror, langpacks
Loading mirror speeds from cached hostfile
* base: mirrors.zju.edu.cn
* extras: mirrors.zju.edu.cn
* updates: mirrors.cn99.com
Resolving Dependencies
--> Running transaction check
.....
Dependency Installed:
mysql-community-client.x86_64 0:5.6.38-2.el7 mysql-community-common.x86_64 0:5.6.38-2.el7
mysql-community-libs.x86_64 0:5.6.38-2.el7 perl-Compress-Raw-Bzip2.x86_64 0:2.061-3.el7
perl-Compress-Raw-Zlib.x86_64 1:2.061-4.el7 perl-DBI.x86_64 0:1.627-4.el7
perl-Data-Dumper.x86_64 0:2.145-3.el7 perl-IO-Compress.noarch 0:2.061-2.el7
perl-Net-Daemon.noarch 0:0.48-5.el7 perl-PlRPC.noarch 0:0.2020-14.el7
Complete!
7.安装成功后,将其加入开机启动
[root@localhost ~]# systemctl enable mysqld
8.启动mysql服务进程
[root@localhost ~]# systemctl start mysqld
9.配置mysql(设置密码等)
[root@localhost ~]# mysql_secure_installation
NOTE: RUNNING ALL PARTS OF THIS SCRIPT IS RECOMMENDED FOR ALL MySQL
SERVERS IN PRODUCTION USE! PLEASE READ EACH STEP CAREFULLY!
In order to log into MySQL to secure it, we'll need the current
password for the root user. If you've just installed MySQL, and
you haven't set the root password yet, the password will be blank,
so you should just press enter here.
Enter current password for root (enter for none):
OK, successfully used password, moving on...
Setting the root password ensures that nobody can log into the MySQL
root user without the proper authorisation.
Set root password? [Y/n] y[设置root用户密码]
New password:
Re-enter new password:
Password updated successfully!
Reloading privilege tables..
... Success!
By default, a MySQL installation has an anonymous user, allowing anyone
to log into MySQL without having to have a user account created for
them. This is intended only for testing, and to make the installation
go a bit smoother. You should remove them before moving into a
production environment.
Remove anonymous users? [Y/n] y[删除匿名用户]
... Success!
Normally, root should only be allowed to connect from 'localhost'. This
ensures that someone cannot guess at the root password from the network.
Disallow root login remotely? [Y/n] y[禁止root远程登录]
... Success!
By default, MySQL comes with a database named 'test' that anyone can
access. This is also intended only for testing, and should be removed
before moving into a production environment.
Remove test database and access to it? [Y/n] y[删除test数据库]
- Dropping test database...
ERROR 1008 (HY000) at line 1: Can't drop database 'test'; database doesn't exist
... Failed! Not critical, keep moving...
- Removing privileges on test database...
... Success!
Reloading the privilege tables will ensure that all changes made so far
will take effect immediately.
Reload privilege tables now? [Y/n] y[刷新权限]
... Success!
All done! If you've completed all of the above steps, your MySQL
installation should now be secure.
Thanks for using MySQL!
Cleaning up...
10.进入mysql
# mysql -uroot -p
11.通过window上navcat连接远程库
mysql> GRANT ALL PRIVILEGES ON *.* TO 'root'@'%' IDENTIFIED BY '123456' WITH GRANT OPTION
-> ;
Query OK, 0 rows affected (0.00 sec)
mysql> flush privileges;
Query OK, 0 rows affected (0.00 sec)
mysql> flush privileges;
Query OK, 0 rows affected (0.00 sec)
12.防火墙设置
mysql> Ctrl-C -- exit!
Aborted
[root@localhost ~]# firewall-cmd --zone=public --add-port=3306/tcp --permanent
success
[root@localhost ~]# firewall-cmd --reload
success
13.虚拟机设置
菜单"编辑"->"虚拟机网络编辑器"->"NAT模式"->"NAT设置"->"端口转发设置"添加端口:
over

相关文章推荐
- CentOS6.2卸载系统自带 openjdk安装sun jdk
- Centos卸载自带jdk,安装自己的sdk
- CentOS卸载系统自带的OpenJDK并安装Sun的JDK的方法
- CentOS6.2卸载系统自带 openjdk安装sun jdk
- centos7-x86-64卸载自带jdk并安装1.8jdk
- 卸载CentOS7-x64自带的OpenJDK并安装Sun的JDK7的方法
- 卸载CentOS7-x64自带的OpenJDK并安装Sun的JDK8的方法
- CentOS6.5自带jdk卸载和安装
- 1 复习ha相关 + weekend110的hive的元数据库mysql方式安装配置(完全正确配法)(CentOS版本)(包含卸载系统自带的MySQL)
- 卸载centos自带的jdk并安装新的
- CentOS6.4安装JDK,卸载自带的OpenJDK
- CentOS卸载系统自带的OpenJDK并安装Sun的JDK的方法
- CentOS卸载系统自带的OpenJDK安装sun公司的jdk
- 使用CentOS 7.5卸载自带jdk安装自己的JDK1.8
- Centos7-卸载自带的jdk 安装jdk8
- 卸载CentOS7-x64自带的OpenJDK并安装Sun的JDK7的方法
- centos7.1卸载自带jdk1.7和安装jdk1.8
- CentOS卸载系统自带的OpenJDK并安装Sun的JDK的方法
- centos6.8卸载自带安装的apache
- CentOS6.4安装JDK,卸载自带的OpenJDK