下拉图片放大,稍微修改第三方的代码,用法与第三方相同
2017-11-26 00:00
369 查看
https://github.com/lelandrichardson/react-native-parallax-view 此第三方的Github地址
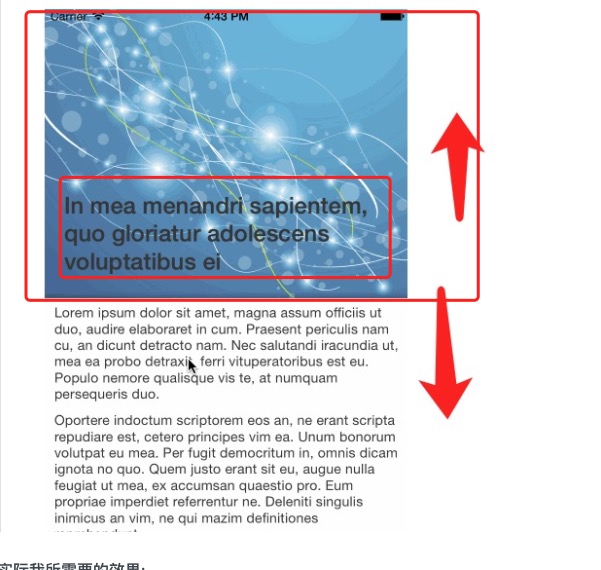
实际我所需要的效果:
如上图所示,在开发过程中我们遇到了以下问题:
背景中的内容部分(如图红色框)没有完全在背景容器中的时候,其是通过margin等方法将部分露出来,在向下滚动过程中,我发现背景中的内容部分(如图红色分)会渐渐透明度为0,透明度为0后露出下面的空白一大片的空间,且背景图片上移动的速度比下面页面慢,导致造成的效果仿佛是下面的页面部分把背景给盖上去了,十分丑陋,而且超出头部背景区域后无法点击,如上图第二图所示
修改了移动的速度
去掉了渲染头部的容器,否则超出背景区域外无法点击
为何修改?
官方的原效果:实际我所需要的效果:
如上图所示,在开发过程中我们遇到了以下问题:
背景中的内容部分(如图红色框)没有完全在背景容器中的时候,其是通过margin等方法将部分露出来,在向下滚动过程中,我发现背景中的内容部分(如图红色分)会渐渐透明度为0,透明度为0后露出下面的空白一大片的空间,且背景图片上移动的速度比下面页面慢,导致造成的效果仿佛是下面的页面部分把背景给盖上去了,十分丑陋,而且超出头部背景区域后无法点击,如上图第二图所示
修改了哪些
去掉了透明度修改了移动的速度
去掉了渲染头部的容器,否则超出背景区域外无法点击
'use strict';

var React = require('react');
var ReactNative = require('react-native');
var {
Dimensions,
StyleSheet,
View,
ScrollView,
Animated,
} = ReactNative;
/**
* BlurView temporarily removed until semver stuff is set up properly
*/
//var BlurView /* = require('react-native-blur').BlurView */;
var ScrollableMixin = require('react-native-scrollable-mixin');
var screen = Dimensions.get('window');
import PropTypes from 'prop-types';
var ScrollViewPropTypes = ScrollView.propTypes;
var createReactClass=require("create-react-class");
var ParallaxView = createReactClass({
mixins: [ScrollableMixin],
propTypes: {
...ScrollViewPropTypes,
windowHeight: PropTypes.number,
backgroundSource:PropTypes.oneOfType([
PropTypes.shape({
uri: PropTypes.string,
}),
// Opaque type returned by require('./image.jpg')
PropTypes.number,
]),
header:PropTypes.node,
blur: PropTypes.string,
contentInset:PropTypes.object,
},

getDefaultProps: function () {
return {
windowHeight: 300,
contentInset: {
top: screen.scale
}
};
},

getInitialState: function () {
return {
scrollY: new Animated.Value(0)
};
},

/**
* IMPORTANT: You must return the scroll responder of the underlying
* scrollable component from getScrollResponder() when using ScrollableMixin.
*/
getScrollResponder() {
return this._scrollView.getScrollResponder();
},

setNativeProps(props) {
this._scrollView.setNativeProps(props);
},

renderBackground: function () {
var { windowHeight, backgroundSource, blur } = this.props;
var { scrollY } = this.state;
if (!windowHeight || !backgroundSource) {
return null;
}
return (
<Animated.Image
style={[styles.background, {
height: windowHeight,
transform: [{
translateY: scrollY.interpolate({
inputRange: [ -windowHeight, 0, windowHeight],
//原本是-windowHeight/3
outputRange: [windowHeight/2, 0, -windowHeight]
})
},{
scale: scrollY.interpolate({
inputRange: [ -windowHeight, 0, windowHeight],
outputRange: [2, 1, 1]
})
}]
}]}
source={backgroundSource}>
{/*
!!blur && (BlurView || (BlurView = require('react-native-blur').BlurView)) &&
<BlurView blurType={blur} style={styles.blur} />
*/}
</Animated.Image>
);
},

renderHeader: function () {
var { windowHeight, backgroundSource } = this.props;
var { scrollY } = this.state;
if (!windowHeight || !backgroundSource) {
return null;
}
return (
<Animated.View style={{
position: 'relative',
height: windowHeight,
// opacity: scrollY.interpolate({
//     inputRange: [-windowHeight, 0, windowHeight / 1.2],
//     outputRange: [1, 1, 0]
// }),
}}>
{this.props.header}
</Animated.View>
);
},

render: function () {
var { style, ...props } = this.props;
return (
<View style={[styles.container, style]}>
{/*{this.renderBackground()}以前的*/}
{this.props.header}  {/*修改后的*/}
<ScrollView
ref={component => { this._scrollView = component; }}
{...props}
style={styles.scrollView}
onScroll={
Animated.event([{ nativeEvent: { contentOffset: { y: this.state.scrollY }}}])
}
scrollEventThrottle={16}>
{this.renderHeader()}
{/*<View style={[styles.content, props.scrollableViewStyle]}>*/}
{this.props.children}
{/*</View>*/}
</ScrollView>
</View>
);
}
});

var styles = StyleSheet.create({
container: {
flex: 1,
borderColor: 'transparent',
},
scrollView: {
backgroundColor: 'transparent',
},
background: {
position: 'absolute',
backgroundColor: '#2e2f31',
width: screen.width,
resizeMode: 'cover'
},
blur: {
position: 'absolute',
left: 0,
right: 0,
top: 0,
bottom: 0,
backgroundColor: 'transparent',
},
content: {
shadowColor: '#222',
shadowOpacity: 0.3,
shadowRadius: 2,
backgroundColor: '#fff',
flex: 1,
flexDirection: 'column'
}
});

export default ParallaxView;

相关文章推荐
- Android图片放大修改代码
- Android图片放大修改代码
- 在WORD文档里每一页的相同位置插入不同的图片的宏代码如何修改?
- 网站后台修改图片尺寸代码
- UITableView头部带有图片并且下拉图片放大效果
- 提取图片中任意形状的区域(我的简单修改及代码)
- Listview + 下拉图片放大,手指放开图片缩回
- 猫猫学iOS之tableView的下拉放大图片的方法
- Android 代码修改按钮上的图片
- C# 图片缩放放大剪切代码
- PullToZoomScrollViewEx 下拉放大图片处理类
- C# 批量修改图片尺寸的代码
- 可拖拽、拼接、放大图片的jQuery相册特效代码
- c# 怎样实现用几张图片制作 gif?怎样对图片像素值进行修改?上代码
- Android WindowManager进行图片放大时全屏的代码
- 利用UIScrollView 使加到其上的图片(下拉放大)
- Swift实现下拉图片放大效果
- 纯代码系列:Python实现验证码图片(PIL库经典用法用法,爬虫12306思路)
- 用代码修改图片颜色