C语言输出DEBUG调试信息的方法
2017-11-21 16:57
549 查看
问题提出
我们在调试程序时,输出调试信息(又称为”打桩”或者”插桩”)是一种普遍、有效的方法。我们输出的信息通常包括行号、函数名、程序变量等。
但是我们在程序BUG修复后,又会特别烦我们之间插入的哪些调试语句,客户是不会理解我们那些调试语句曾经又多少汗马功劳,而太多的调试语句也影响我们程序运行时输出的美观和清晰,于是很多情况下我们需要手动将那些调试语句注释掉或者删掉,这对于小项目来说,我们还可以忍受,但是对于大项目,如果我们还是手动删除,我们只能。。。。呵呵,这不是程序猿该干的事。。。
下面我们给出几种调试方式方便大家使用。
手工环境下BUG程序中的调试信息
/*  debug.c  */
#include <stdio.h>
#include <stdlib.h>

//#define DEBUG

/*  计算n的阶乘n!  */
long Fac(int n);

/* 主函数
* 输入一个n计算n的阶乘  */
int main(void)
{
int     n;
long    fac;

while(scanf("%d", &n) != EOF)
{
printf("%d! = %ld\n", n, Fac(n));
}

return EXIT_SUCCESS;
}

/*  计算n的阶乘n!  */
long Fac(int n)
{
int i;
long fac;

for(i = 1; i <= n; i++)
{
fac *= i;
printf("调试信息 %d! = %ld\n", i, fac);/*  调试信息  */

}

return fac;
}12
3
4
5
6
7
8
9
10
11
12
13
14
15
16
17
18
19
20
21
22
23
24
25
26
27
28
29
30
31
32
33
34
35
36
37
38
39
40
[/code]
这个程序是有BUG的,在程序第40行,变量fac未初始化为1。
插入的调试信息
printf("%d! = %ld\n", i, fac);/* 调试信息 */1[/code]
在不需要时我们只能将此调试信息注释掉,这个是最原始,最人工的一种方式。
优势:
方便简单,易于操作,简单易读
缺点:
非常灵活,单一的调试信息会造成错误输出过于冗余
用预处理指令封装调试信息
通过预处理指令将调试信息封闭起来,如下#ifdef DEBUG
printf("%d! = %ld\n", i, fac);
#endif12
3
4
[/code]
这样调试的信息只存在与插桩信息宏DEBUG的预处理指令下,如果需要打开调试信息就定义插桩信息宏DEBUG,否则就将插桩信息宏DEBUG注释掉(也可以undef或者删掉)。
这样我们的代码就变成
/*  debug.c  */
#include <stdio.h>
#include <stdlib.h>

/*  插桩信息宏  */
#define DEBUG   /*  如果需要调试信息请使用该宏,如果想取消调试信息,请注释掉或者*/
//#undef DEBUG   /*  取消插桩信息宏DEBUG  */

/*  计算n的阶乘n!  */
long Fac(int n);

/* 主函数
* 输入一个n计算n的阶乘  */
int main(void)
{
int     n;
long    fac;

while(scanf("%d", &n) != EOF)
{
printf("%d! = %ld\n", n, Fac(n));
}

return EXIT_SUCCESS;
}

/*  计算n的阶乘n!  */
long Fac(int n)
{
int i;
long fac;

for(i = 1; i <= n; i++)
{
fac *= i;

#ifdef DEBUG
printf("调试信息 %d! = %ld\n", i, fac);
#endif
}

return fac;
}12
3
4
5
6
7
8
9
10
11
12
13
14
15
16
17
18
19
20
21
22
23
24
25
26
27
28
29
30
31
32
33
34
35
36
37
38
39
40
41
42
43
44
45
[/code]
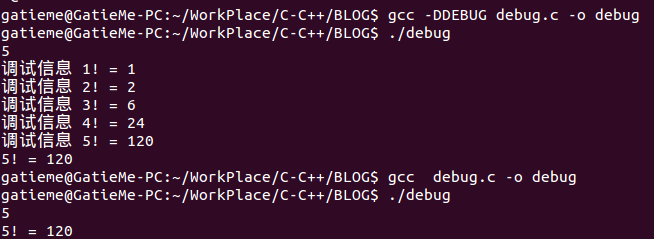
其实我们也可以不在代码中添加插桩信息宏DEBUG,gcc为我们提供了一个更简单的方法,那就是gcc -D编译选项
-DDEBUG 以字符串“1”定义 DEBUG 宏。
-DDEBUG=DEFN 以字符串“DEFN”定义 DEBUG 宏。
1
2
[/code]
因此我们可以直接
gcc -DDEBUG debug.c -o debug1
[/code]
优势:
方便简单,易于操作,简单易读
缺点:
①不灵活,单一的调试宏,对于小项目来说可以,但是对于大项目同样会造成错误输出过于冗余,在大项目中,为了增加灵活性,往往通过定义多个等级的DEBUG(如DEBUG1,DEBUG2,DEBUG3等)或者不同名称的DEBUG(如DEBUG_DATA,DEBUG_COMM,DEBUG_APP等),来为不同的模块,或者错误等级进行调试,但是也会引入其他一些更复杂的问题,如项目难以管理,难以整合等问题。
②每个调试信息都会被成对的预处理指令包含,造成项目代码的过度膨胀,延长预处理时间;同时也不利于代码的阅读。
预处理指令+自定义调试函数
通过预处理指令定义调试函数的不同实现
(编译阶段)能避免使用宏可能带来的副作用,而且方便日后定制debug信息的输出,特别方便维护和修改。我可以随时修改它,比如打印到网络服务器,本地文件,其他终端等,很方便的重定向。这是我最喜欢使用的方法。#ifdef DEBUG
static int DebugPrintf(const char *format, ...)
{
va_list argPtr;
int count;
va_start(argPtr, format); /* 获取可变参数列表 */
fflush(stdout); /* 强制刷新输出缓冲区 */
count = vfprintf(stderr, format, argPtr); /* 将信息输出到标准出错流设备 */
va_end(argPtr); /* 可变参数列表结束 */
}
#else
static inline int DebugPrintf(const char *format, ...)
{
}
#endif12
3
4
5
6
7
8
9
10
11
12
13
14
15
16
17
[/code]
或者
static int DebugPrintf(const char *format, ...)
{
#ifdef DEBUG

va_list argPtr;
int     count;

va_start(argPtr, format);                  /*  获取可变参数列表  */
fflush(stdout);                            /*  强制刷新输出缓冲区  */
count = vfprintf(stderr, format, argPtr);  /*  将信息输出到标准出错流设备  */
va_end(argPtr);                            /*  可变参数列表结束  */

#else
/*  未定义插桩调试宏DEBUG,NOP空函数体  */
/*
do
{
}while(0);
*/
#endif
}12
3
4
5
6
7
8
9
10
11
12
13
14
15
16
17
18
19
20
21
[/code]
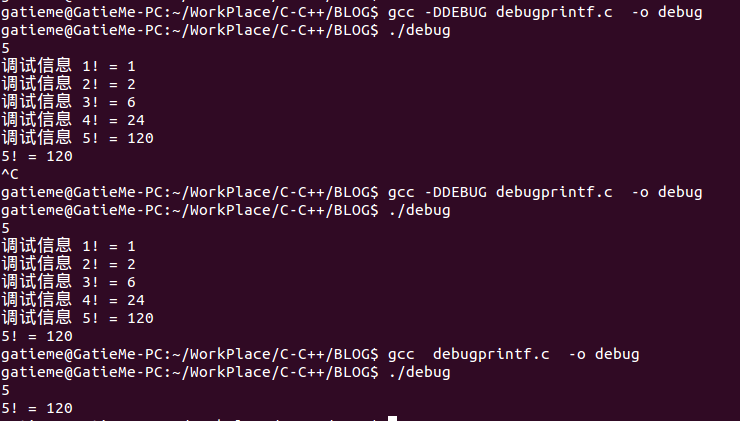
这里我们依旧使用了插桩调试宏DEBUG,但是在宏定义和未定义的时候,分别定义了不同的DebugPrintf调试信息函数。这种方法的本质其实就是重写了一个我们自己的printf函数,在Glibc或者其他C运行库中,printf就是用vfprintf或者vprintf来实现的。
在定义了插桩调试宏DEBUG时,DebugPrintf被定义为一个向标准出错流输出信息的输出函数。但是在未定义插桩调试宏DEBUG时,DebugPrintf被定义为一个内联的空函数(当然也可以不使用内联,但是空函数为增加额外开销,C语言本身是不支持内联函数的,在C标准C99中C语言支持了内联函数)。
其中的空函数体不是很清晰,如果别人看我们代码的时候,可能会很疑惑为什么,我们可以加上注释或者采用如下代码代替
do
{
}while(0);12
3
[/code]
这样我们同样通过插桩调试宏DEBUG的定义与否来实现调试信息的开启和关闭。
这样我们的程序就变为
//debugprintf.c
#include <stdio.h>
#include <stdlib.h>

//#define DEBUG
//#undef DEBUG

#ifdef DEBUG
#include <stdarg.h>
static int DebugPrintf(const char *format, ...)
{
va_list argPtr;
int     count;

va_start(argPtr, format);                  /*  获取可变参数列表  */
fflush(stdout);                            /*  强制刷新输出缓冲区  */
count = vfprintf(stderr, format, argPtr);  /*  将信息输出到标准出错流设备  */
va_end(argPtr);                            /*  可变参数列表结束  */
f530

}

#else

static inline int DebugPrintf(const char *format, ...)
{

}

#endif

/*  计算n的阶乘n!  */
long Fac(int n);

/* 主函数
* 输入一个n计算n的阶乘  */
int main(void)
{
int     n;
long    fac;

while(scanf("%d", &n) != EOF)
{
printf("%d! = %ld\n", n, Fac(n));
}

return EXIT_SUCCESS;
}

/*  计算n的阶乘n!  */
long Fac(int n)
{
int i;
long fac = 1;

for(i = 1; i <= n; i++)
{
fac *= i;

DebugPrintf("调试信息 %d! = %ld\n", i, fac);
}

return fac;
}12
3
4
5
6
7
8
9
10
11
12
13
14
15
16
17
18
19
20
21
22
23
24
25
26
27
28
29
30
31
32
33
34
35
36
37
38
39
40
41
42
43
44
45
46
47
48
49
50
51
52
53
54
55
56
57
58
59
60
61
62
63
64
65
[/code]
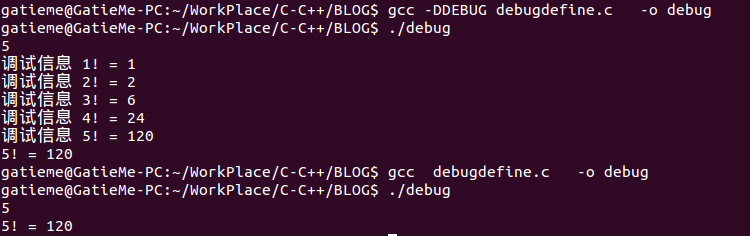
定义调试函数并通过宏定义重定向调试函数
这种方式跟上一种方式有点区别,但是本质上是一样的,上面我们看到,我们通过插桩调试宏来控制调试函数的不同实现,未定义插桩信息宏时,调试函数被定义会空函数,但是这种方式有个缺点,就是会造成目标代码的膨胀。下面这种方式,我们首先实现一个调试函数,然后通过宏定义来指向
#include <stdarg.h>
static int MyDebugPrintf(const char *format, ...)
{
va_list argPtr;
int     count;

va_start(argPtr, format);                  /*  获取可变参数列表  */
fflush(stdout);                            /*  强制刷新输出缓冲区  */
count = vfprintf(stderr, format, argPtr);  /*  将信息输出到标准出错流设备  */
va_end(argPtr);                            /*  可变参数列表结束  */
}

#ifdef DEBUG   /*  如果定义了插桩信息宏,就将调试信息指向调试函数  */
#define DebugPrintf  MyDebugPrintf

#else           /*  如果未定义插桩信息宏,那么就将调试信息指向空NOP  */
#define DebugPrintf

#endif12
3
4
5
6
7
8
9
10
11
12
13
14
15
16
17
18
19
[/code]
这样我们的程序变为
#include <stdio.h>1
#include <stdlib.h>
//#define DEBUG
//#undef DEBUG
#include <stdarg.h> static int MyDebugPrintf(const char *format, ...) { va_list argPtr; int count; va_start(argPtr, format); /* 获取可变参数列表 */ fflush(stdout); /* 强制刷新输出缓冲区 */ count = vfprintf(stderr, format, argPtr); /* 将信息输出到标准出错流设备 */ va_end(argPtr); /* 可变参数列表结束 */ } #ifdef DEBUG /* 如果定义了插桩信息宏,就将调试信息指向调试函数 */ #define DebugPrintf MyDebugPrintf #else /* 如果未定义插桩信息宏,那么就将调试信息指向空NOP */ #define DebugPrintf #endif
/* 计算n的阶乘n! */
long Fac(int n);
/* 主函数
* 输入一个n计算n的阶乘 */
int main(void)
{
int n;
long fac;
while(scanf("%d", &n) != EOF)
{
printf("%d! = %ld\n", n, Fac(n));
}
return EXIT_SUCCESS;
}
/* 计算n的阶乘n! */
long Fac(int n)
{
int i;
long fac = 1;
for(i = 1; i <= n; i++)
{
fac *= i;
DebugPrintf("调试信息 %d! = %ld\n", i, fac);
}
return fac;
}
2
3
4
5
6
7
8
9
10
11
12
13
14
15
16
17
18
19
20
21
22
23
24
25
26
27
28
29
30
31
32
33
34
35
36
37
38
39
40
41
42
43
44
45
46
47
48
49
50
51
52
53
54
55
56
57
58
59
60
61
62
63
64
65
[/code]
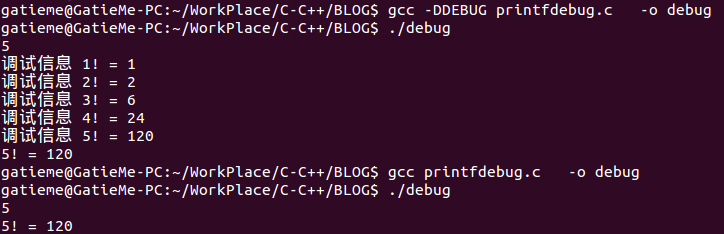
不定义调试函数而直接使用printf
前面的两种方法,我们都是用vfprintf或者vprintf自己重新实现了一个输出函数,但是我们要想了我们是否可以使用printf函数呢,当然可以了#ifdef DEBUG
#define DebugPrintf(format, arg...) \
printf(format, ## arg)
#else
#define DebugPrintf(format, arg...) do { } while (0)
#endif12
3
4
5
6
7
8
9
10
11
[/code]
代码如下
#include <stdio.h>1
#include <stdlib.h>
//#define DEBUG
//#undef DEBUG
#ifdef DEBUG

#define DebugPrintf(format, arg...)              \
printf(format, ## arg)

#else

#define DebugPrintf(format, arg...) do {  } while (0)

#endif
/* 计算n的阶乘n! */
long Fac(int n);
/* 主函数
* 输入一个n计算n的阶乘 */
int main(void)
{
int n;
long fac;
while(scanf("%d", &n) != EOF)
{
printf("%d! = %ld\n", n, Fac(n));
}
return EXIT_SUCCESS;
}
/* 计算n的阶乘n! */
long Fac(int n)
{
int i;
long fac = 1;
for(i = 1; i <= n; i++)
{
fac *= i;
DebugPrintf("调试信息 %d! = %ld\n", i, fac);
}
return fac;
}
2
3
4
5
6
7
8
9
10
11
12
13
14
15
16
17
18
19
20
21
22
23
24
25
26
27
28
29
30
31
32
33
34
35
36
37
38
39
40
41
42
43
44
45
46
47
48
49
50
51
52
53
54
55
56
57
[/code]
使用全局变量(不推荐)
这种方式其实就是将原来定义的调试信息宏DEBUG更换未全局变量isDebugstatic int isDebug = 0;
#define DebugPrintf(format, arg...) \
do
{ \
if (isDebug) \
printf(format , ## arg); \
} while (0)12
3
4
5
6
7
8
9
[/code]
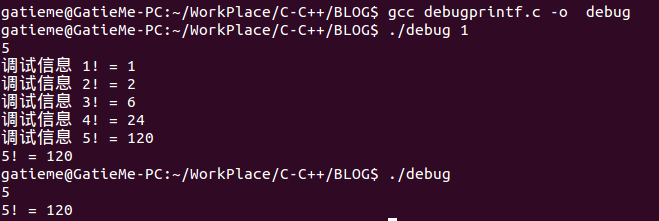
带调试等级的插桩调试信息
前面的方法,如果进行调试或者取消调试,都需要重新编译,这样我们就可以使用调试等级来确定。我们可以根据调试信息的细节程度,将调试信息分成不同的等级。调试信息的等级必须大于0,若调试信息细节程度越高,则等级越高。在输出调试信息时,若调试等级高于调试信息等级才输出调试信息,否则忽略该调试信息,如程序5。当调试等级为0时,则不输出任何调试信息。
下面我们以通过预处理指令定义调试函数的不同实现为例子,说明以下带调试等级的插桩调试信息
//debugprintf.c
#include <stdio.h>
#include <stdlib.h>

static int debugLevel  = 0;
#include <stdarg.h>

static int DebugPrintf(const char *format, ...)
{
if (debugLevel >= 1)
{
va_list argPtr;
int     count;

va_start(argPtr, format);                  /*  获取可变参数列表  */
fflush(stdout);                            /*  强制刷新输出缓冲区  */
count = vfprintf(stderr, format, argPtr);  /*  将信息输出到标准出错流设备  */
va_end(argPtr);                            /*  可变参数列表结束  */
}
}

/*  计算n的阶乘n!  */
long Fac(int n);

/* 主函数
* 输入一个n计算n的阶乘  */
int main(int argc, char *argv[])
{
if(argc < 2)
{
debugLevel = 0;
}
else
{
debugLevel = atoi(argv[1]);
}

int     n;
long    fac;

while(scanf("%d", &n) != EOF)
{
printf("%d! = %ld\n", n, Fac(n));
}

return EXIT_SUCCESS;
}

/*  计算n的阶乘n!  */
long Fac(int n)
{
int i;
long fac = 1;

for(i = 1; i <= n; i++)
{
fac *= i;

DebugPrintf("调试信息 %d! = %ld\n", i, fac);
}

return fac;
}12
3
4
5
6
7
8
9
10
11
12
13
14
15
16
17
18
19
20
21
22
23
24
25
26
27
28
29
30
31
32
33
34
35
36
37
38
39
40
41
42
43
44
45
46
47
48
49
50
51
52
53
54
55
56
57
58
59
60
61
62
63
64
65
66
67
68
69
70
71
[/code]
<link rel="stylesheet" href="http://static.blog.csdn.net/public/res-min/markdown_views.css?v=2.0">
</div>

相关文章推荐
- C语言输出DEBUG调试信息的方法
- Linux 程序开发打印 Debug 信息的使用技巧--C语言中几种输出调试信息的方法
- Linux 程序开发打印 Debug 信息的使用技巧--C语言中几种输出调试信息的方法
- C语言中几种输出调试信息的方法
- C语言中几种输出调试信息的方法
- win32使用OutputDebugString输出调试信息的方法
- C语言中几种输出调试信息的方法
- C语言中几种输出调试信息的方法
- C语言中几种输出调试信息的方法
- Windows和Linux系统的Debug调试信息输出方法
- win32使用OutputDebugString输出调试信息的方法
- C语言中几种输出调试信息的方法
- C语言中几种输出调试信息的方法
- IPhone 程序的调试信息只在 debug 模式下输出
- 手机调试安卓代码时,看到debug信息的方法
- Windows程序中增加consle窗显示printf输出调试信息的一种方法
- vc6.0或者vs2008 MFC程序采用console输出调试信息的方法
- Debug模式应用程序输出Debug调试信息
- win32调试工具原理OutputDebugString以及如何获取输出信息
- 两种输出调试信息的方法