Cloud in Action: Prepare for OpenStack Code
2017-11-09 02:29
555 查看
Cloud in Action: Prepare for OpenStack Code
薛国锋 xueguofeng2011@gmail.com
Deploying OpenStack manually can tell you the flow and configuration details, while learning and debugging OpenStack code can greatly help you understand how OpenStack really works. As the leading open-source software platform for cloud computing and in order to prevent from reinventing the wheel,the OpenStack community has adopted many open-source frameworks, middlewares, libraries and tools for its implementation, such as Setuptools, WSGI, Eventlet,Paste Deploy, Routes and Webob etc; without a deep understanding of them, going to Openstack code directly would be a terrible and frustrating experience.Today we will have a quick review of these softwares and tools, and make uswell prepared for the next step – learning and debugging OpenStack code.
Setuptools
Setuptools is a package development process library designedto facilitate packaging Python projects by enhancing the Python standard library Distutils (distribution utilities). It includes: Python package and module definitions; distribution package metadata; test hooks; project installation; platform-specific details and Python 3 support (similar to Mavenin Java).
Setup.py is a python file, which usually tells you that the module/package you are about to install has been packaged and distributed with Distutils,which is the standard for distributing Python Modules. The __init__.py files are required to make Python treat the directories as containing packages; in the simplest case, __init__.py can just be an empty file, but it can also execute initialization code for the package or set the __all__ variable. A"Python egg", the same concept as a .jar in Java, is a logical structure embodying the release of a specific version of a Python project,comprising its code, resources, and metadata.
//////////////////// Build a Python packagein ‘Host A’
// Install Setuptools
gset@ubuntu:~$ sudo apt-get install python-setuptools
// Create the below directory and files
gset@ubuntu:~/test$tree
.
├── setup.py
└──src
└── helloworld
├── aaa.txt
├──data
│ ├── abc.dat
│ └── abcd.dat
├── __init__.py
├── moda.py
└── modb.py
3 directories, 7 files
gset@ubuntu:~/test$gedit setup.py
from setuptools import setup, find_packages
setup(
name ="helloworld",
version ="1.0",
packages =find_packages('src'),
package_dir ={'':'src'},
package_data = {
'': ['*.txt'],
'helloworld':['data/*.dat'],
},
entry_points = {
'console_scripts': [
'xgf =helloworld:test'
]
},
author = 'Richard',
license = 'PSF'
)
gset@ubuntu:~/test$ gedit src/helloworld/__init__.py
#!/usr/bin/env python
#-*- coding:utf-8 -*-
def test():
print "helloworld!"
if __name__ == '__main__':
test()
gset@ubuntu:~/test$python setup.py sdist
gset@ubuntu:~/test$tree
.
├── dist
│ └──helloworld-1.0.tar.gz
├── setup.py
└── src
├── helloworld
│ ├── aaa.txt
│ ├── data
│ │ ├── abc.dat
│ │ └── abcd.dat
│ ├── __init__.py
│ ├── moda.py
│ └── modb.py
└──helloworld.egg-info
├──dependency_links.txt
├──entry_points.txt
├── PKG-INFO
├── SOURCES.txt
└── top_level.txt
5 directories, 13 files
gset@ubuntu:~/test$ file dist/helloworld-1.0.tar.gz
dist/helloworld-1.0.tar.gz: gzip compressed data, was"dist/helloworld-1.0.tar", last modified: Sun Nov 5 14:42:44 2017, max compression
gset@ubuntu:~/test$tar -tf dist/helloworld-1.0.tar.gz
helloworld-1.0/
helloworld-1.0/PKG-INFO
helloworld-1.0/setup.cfg
helloworld-1.0/src/
helloworld-1.0/src/helloworld.egg-info/
helloworld-1.0/src/helloworld.egg-info/PKG-INFO
helloworld-1.0/src/helloworld.egg-info/entry_points.txt
helloworld-1.0/src/helloworld.egg-info/SOURCES.txt
helloworld-1.0/src/helloworld.egg-info/top_level.txt
helloworld-1.0/src/helloworld.egg-info/dependency_links.txt
helloworld-1.0/src/helloworld/
helloworld-1.0/src/helloworld/modb.py
helloworld-1.0/src/helloworld/moda.py
helloworld-1.0/src/helloworld/aaa.txt
helloworld-1.0/src/helloworld/__init__.py
helloworld-1.0/src/helloworld/data/
helloworld-1.0/src/helloworld/data/abcd.dat
helloworld-1.0/src/helloworld/data/abc.dat
helloworld-1.0/setup.py
//////////////////// Install and use the Python package in ‘Host B’
// Copy helloworld-1.0.tar.gz from ‘Host A’ to ‘Host B’, and unzip it
gset@ubuntu:~/demo/helloworld-1.0$ tree
.
├── PKG-INFO
├──setup.cfg
├──setup.py
└── src
├── helloworld
│ ├── aaa.txt
│ ├── data
│ │ ├── abc.dat
│ │ └── abcd.dat
│ ├── __init__.py
│ ├── moda.py
│ └── modb.py
└──helloworld.egg-info
├──dependency_links.txt
├──entry_points.txt
├── PKG-INFO
├── SOURCES.txt
└── top_level.txt
4 directories, 14 files
// Install the package
gset@ubuntu:~/demo/helloworld-1.0$ sudo python setup.py install
gset@ubuntu:~/demo/helloworld-1.0$ tree
.
├── build
│ ├── bdist.linux-x86_64
│ └── lib.linux-x86_64-2.7
│ └── helloworld
│ ├── aaa.txt
│ ├── data
│ │ ├── abc.dat
│ │ └── abcd.dat
│ ├── __init__.py
│ ├── moda.py
│ └── modb.py
├── dist
│ └── helloworld-1.0-py2.7.egg
├── PKG-INFO
├── setup.cfg
├── setup.py
└── src
├── helloworld
│ ├── aaa.txt
│ ├── data
│ │ ├── abc.dat
│ │ └── abcd.dat
│ ├── __init__.py
│ ├── moda.py
│ └── modb.py
└──helloworld.egg-info
├──dependency_links.txt
├──entry_points.txt
├── PKG-INFO
├── SOURCES.txt
└── top_level.txt
10 directories, 21 files
gset@ubuntu:~/demo/helloworld-1.0$ unzip -l/usr/local/lib/python2.7/dist-packages/helloworld-1.0-py2.7.egg
Archive: /usr/local/lib/python2.7/dist-packages/helloworld-1.0-py2.7.egg
Length Date Time Name
--------- --------------- ----
1 2017-11-05 06:49 EGG-INFO/zip-safe
1 2017-11-05 06:49 EGG-INFO/dependency_links.txt
41 2017-11-05 06:49 EGG-INFO/entry_points.txt
364 2017-11-05 06:49 EGG-INFO/SOURCES.txt
178 2017-11-05 06:49 EGG-INFO/PKG-INFO
11 2017-11-05 06:49 EGG-INFO/top_level.txt
354 2017-11-05 06:49 helloworld/__init__.pyc
55 2017-11-05 05:46 helloworld/moda.py
395 2017-11-05 06:49 helloworld/modb.pyc
124 2017-11-05 06:30 helloworld/__init__.py
0 2017-11-04 19:15 helloworld/aaa.txt
306 2017-11-05 06:49 helloworld/moda.pyc
104 2017-11-05 06:42 helloworld/modb.py
0 2017-11-04 19:16 helloworld/data/abc.dat
0 2017-11-04 19:16 helloworld/data/abcd.dat
--------- -------
1934 15 files
// Use the package
gset@ubuntu:~/demo/helloworld-1.0$ python
Python 2.7.12 (default, Nov 19 2016, 06:48:10)
[GCC 5.4.0 20160609] on linux2
Type "help", "copyright","credits" or "license" for more information.
>>> fromhelloworld import modb
>>> modb.modb_print()
modb: hello world!
moda: hello world!
>>> fromhelloworld.moda import moda_print
>>> moda_print()
moda: hello world!
>>> fromhelloworld import test
>>> test()
hello world!
gset@ubuntu:~/demo/helloworld-1.0$ xgf
hello world!
gset@ubuntu:~/demo/helloworld-1.0$ cat /usr/local/bin/xgf
#!/usr/bin/python
# EASY-INSTALL-ENTRY-SCRIPT:'helloworld==1.0','console_scripts','xgf'
__requires__ = 'helloworld==1.0'
import sys
from pkg_resources import load_entry_point
if __name__ == '__main__':
sys.exit(
load_entry_point('helloworld==1.0', 'console_scripts', 'xgf')()
)
WSGI– Web Server Gateway Interface
The Web Server Gateway Interface (WSGI) is a specification for simple and universal interface between web servers and web applications or frameworks for the Python programming language. It was originally specified in PEP333 and published on 7 December 2003. It has since been adopted as a standard for Python web application development.
The WSGI interface has two sides: the server/gateway and the application side; beside this strict distinction there are so called “middleware” components which implement server and application sides at the same time:
WSGI application is a callable object (a function, method, class, or an instance with a __call__ method) that accepts two positional arguments: WSGI environment variables and a callable with two required positional arguments which starts the response.
WSGI server prepares the evnironment vaiables and invokes the callable object which returns response.
WSGI middleware is used to routing to a different URL based on environ parameters,logging, handling exceptions and performing any kind of preprocess/postprocess operations.
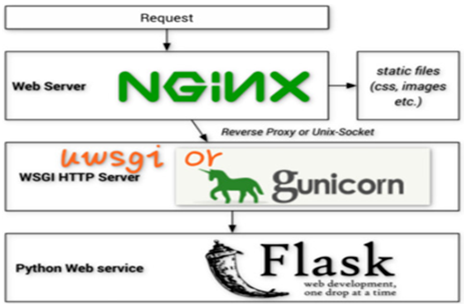
Generally a WSGI server/container is a separate running process that runs on a different port than your Web/HTTP server; your Web/HTTPserver is configured to pass requests to the WSGI server/container, aka ReverseProxy, which actually runs your web application, then pass the response (in the form of HTML) back to the requester. The Web/HTTP server and WSGIserver/container can communicate via TCP/IP Socket or UNIX Socket (more secure and faster).
Here are some combinations which we will practice in the following tests:
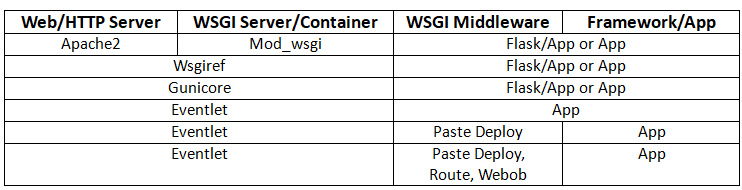
//////////////////// Apache2 + Mod_wsgi + Flask/App
Mod_wsgi is an Apache module that embeds a Python application within the server and allow them to communicate through the Python WSGI interface as defined in the Python PEP 333.It can work in embeded mode or daemon mode.
sudo pip install Flask
sudo apt-get install pache2
sudo apt-get install libapache2-mod-wsgi
sudo gedit /etc/apache2/sites-enabled/000-default.conf
WSGIPythonPath /var/www/html
<VirtualHost *:80>
ServerAdminwebmaster@localhost
DocumentRoot/var/www/html
WSGIScriptAlias / /var/www/html/app.wsgi
<Directory /var/www/html/> <Files app.wsgi>
Order deny,allow
Allow from all
</Files>
</Directory>ErrorLog ${APACHE_LOG_DIR}/error.log CustomLog${APACHE_LOG_DIR}/access.log combined
</VirtualHost>
sudo gedit /var/www/html/app.wsgi
from test import app as application
'''
def application(environ,start_response):
status='200 OK'
output='Hello wsgi,this is Richard\r\n'
response_headers=[('Content-type','text/plain'),
('Content-Length',str(len(output)))]
start_response(status,response_headers)
return[output]
'''
sudo gedit /var/www/html/test.py
from flask import Flask
app = Flask(__name__)
@app.route('/',methods=['GET'])
def root_get():
return'GET - This is Richard\r\n'
@app.route('/hello/<id>')
def hello_world(id):
return'Hello World: {}\r\n'.format(id)
@app.route('/add/<int:id>')
def add(id):
return'Sum: %d\r\n' %id
if __name__ == '__main__':
app.run(host='0.0.0.0') sudo /etc/init.d/apache2restart
gset@ubuntu:~$ curl http://127.0.0.1:80 GET - This is Richard
gset@ubuntu:~$ curl http://127.0.0.1:80/hello/1000 Hello World: 1000
gset@ubuntu:~$ curl http://127.0.0.1:80/add/10 Sum: 10
gset@ubuntu:~$ ls/etc/apache2
apache2.conf conf-enabled magic mods-enabled sites-available
conf-available envvars mods-available ports.conf sites-enabled
gset@ubuntu:~$ ls/var/www/html
app.wsgi index.html test.py
//////////////////// Wsgiref + Flask/App
Wsgiref is a reference implementation of the WSGI specification that can be used to add WSGI support to a web server or framework. It provides utilities for manipulating WSGI environment variables and response headers, base classes for implementing WSGIservers, a demo HTTP server that serves WSGI applications, and a validation tool that checks WSGI servers and applications for conformance to the WSGI specification.
gset@ubuntu:~$ gedit test.py
from wsgiref.simple_server import make_server
from flask import Flask
app = Flask(__name__)
@app.route('/',methods=['GET'])
def root_get():
return 'GET - Thisis Richard\r\n'
@app.route('/hello/<id>')
def hello_world(id):
return 'HelloWorld: {}\r\n'.format(id)
@app.route('/add/<int:id>')
def add(id):
return 'Sum:%d\r\n' %id
'''
def app(environ, start_response):
status = '200 OK' #HTTP Status
headers =[('Content-type', 'text/plain')]
start_response(status, headers)
return ["HelloWorld\r\n"]
'''
def main():
httpd =make_server('', 8000, app)
print "Servingon port 8000..."
httpd.serve_forever()
if __name__ == '__main__':
main() gset@ubuntu:~$ curl http://127.0.0.1:8000 GET - This is Richard
gset@ubuntu:~$ curl http://127.0.0.1:8000/hello/10000 Hello World: 10000
gset@ubuntu:~$ curl http://127.0.0.1:8000/add/10 Sum: 10
//////////////////// Gunicore + Flask/App
Gunicorn 'Green Unicorn' is a Python WSGI HTTP Server for UNIX. It's a pre-fork worker model ported from Ruby's Unicorn project. The Gunicorn server is broadly compatible with various web frameworks, simply implemented, light on server resource usage, and fairly speedy.
sudo pip install gunicorn
gset@ubuntu:~$ gedit test.py
from flask import Flask
app = Flask(__name__)
@app.route('/',methods=['GET'])
def root_get():
return'GET - This is Richard\r\n'
@app.route('/hello/<id>')
def hello_world(id):
return'Hello World: {}\r\n'.format(id)
@app.route('/add/<int:id>')
def add(id):
return'Sum: %d\r\n' %id
if __name__ == '__main__':
app.run(host='0.0.0.0')
gset@ubuntu:~$ gunicorn--workers=3 test:app -b 0.0.0.0:9000
[2017-11-05 09:16:53 +0000] [9244] [INFO] Starting gunicorn19.7.1
[2017-11-05 09:16:53 +0000] [9244] [INFO] Listening at:http://0.0.0.0:9000 (9244)
[2017-11-05 09:16:53 +0000] [9244] [INFO] Using worker: sync
[2017-11-05 09:16:53 +0000] [9249] [INFO] Booting worker withpid: 9249
[2017-11-05 09:16:53 +0000] [9250] [INFO] Booting worker withpid: 9250
[2017-11-05 09:16:54 +0000] [9253] [INFO] Booting worker withpid: 9253
gset@ubuntu:~$ curl http://127.0.0.1:9000 GET - This is Richard
gset@ubuntu:~$ curl http://127.0.0.1:9000/hello/10000 Hello World: 10000
gset@ubuntu:~$ curl http://127.0.0.1:9000/add/10 Sum: 10
gset@ubuntu:~$
//////////////////// Eventlet + App
Eventlet is a concurrent networking library for Python that allows you to change how you run your code, not how you write it. It uses epoll or kqueue or libevent for highlyscalable non-blocking I/O. Coroutines ensure that the developer uses a blocking style of programming that is similarto threading, but provide the benefits of non-blocking I/O. The event dispatch is implicit, which means you can easily use Eventlet from the Python interpreter, or as a small part of a larger application.
Eventlet is built around the concept of green threads (i.e.coroutines, we use the terms interchangeably) that are launched to donetwork-related work. Green threads differ from normal threads in two mainways:
1) Green threads are so cheap they are nearly free. You donot have to conserve green threads like you would do for normal threads. Ingeneral, there will be at least one green thread per network connection.
2) Green threads cooperatively yield to each other instead of preemptively being scheduled. The major advantage from this behavior is that shared data structures don’t need locks, because only if a yield is explicitlycalled can another green thread have access to the data structure.
sudo pip install eventlet
// Example 1
gset@ubuntu:~$ gedit test1.py
import eventlet
from eventlet import wsgi
class AnimalApplication(object):
def __init__(self):
pass
def __call__(self,environ, start_response):
start_response('200 OK', [('Content-Type', 'text/plain')])
return ['HelloWorld, this is Richard\r\n']
if '__main__' == __name__:
application = AnimalApplication()# wsgi.server(eventlet.listen(('', 7000)), application) server =eventlet.spawn(wsgi.server, eventlet.listen(('',7000)), application)
server.wait()
gset@ubuntu:~$ curl http://127.0.0.1:7000 Hello World, this is Richard
// Example 2
gset@ubuntu:~$ gedit test2.py
import eventlet
#eventlet.monkey_patch()
from eventlet.green import urllib2
import time
urls = ["http://www.tudou.com",
"http://www.baidu.com"
]
def test_1(url):
try:
print "open tudou"
time.sleep(5) // without the monkey patch, the current thread would stop
urllib2.urlopen(url).read()
print "done open tudou"
except urllib2.HTTPError:
return
def test_2(url):
try:
print "open baidu"
urllib2.urlopen(url).read()
print "done open baidu"
except urllib2.HTTPError:
return
pool = eventlet.GreenPool(100)
pool.spawn(test_1, urls[0])
pool.spawn(test_2, urls[1])
pool.waitall()
// Example 3
gset@ubuntu:~$ gedit test3.py
import eventlet
eventlet.monkey_patch
def handle(fd):
print "clientconnected"
while True:
# pass through every non-eof line
x =fd.readline()
if not x:break
fd.write(x)
fd.flush()
print"echoed", x,
print "clientdisconnected"
print "server socket listening on port 6000"
server = eventlet.listen(('0.0.0.0', 6000))
pool = eventlet.GreenPool()
while True:
try:
new_sock,address = server.accept()
print"accepted", address
pool.spawn_n(handle, new_sock.makefile('rw'))
except (SystemExit,KeyboardInterrupt):
break
//////////////////// Eventlet + Paste Deploy + App
Paste Deployment is a system for finding and configuring WSGI applications and servers. For WSGI application consumers it provides a single,simple function (loadapp) for loading a WSGI application from a configuration file or a Python Egg. For WSGI application providers it only asks for a single,simple entry point to your application, so that application users don’t need to be exposed to the implementation details of your application. The result is something a system administrator can install and manage without knowing any Python, or the details of the WSGI application or its container.
sudo pip install paste
sudo pip install pastedeploy
gset@ubuntu:~$ gedit animal.ini
[composite:main] # dispatch the request to applications
use = egg:Paste#urlmap # use the composite application named urlmap from the Paste package
#urlmap uses a path prefix to map your requests to applications.
/ = animal_pipeline # map ‘127.0.0.0:7000’ to the pipeline: animal_pipeline, “ip_balcklist +animal”
/hello:show # map ‘127.0.0.0:7000/hello’ to the app: show
[pipeline:animal_pipeline]
pipeline = ip_blacklist animal # (1) ip_balcklist -> (2) animal
[filter:ip_blacklist]
paste.filter_factory = hello:IPBlacklistMiddleware.factory
[app:animal] # You can define multiple applications in asingle file
paste.app_factory = hello:AnimalApplication.factory
[app:show]
paste.app_factory = hello:HelloShow.factory
gset@ubuntu:~$ gedit hello.py
import os
import eventlet
from eventlet import wsgi
from paste.deploy import loadapp
class AnimalApplication(object):
def __init__(self):
pass
def __call__(self,environ, start_response):
start_response('200 OK', [('Content-Type', 'text/plain')])
return ['Thisis a animal applicaltion!\r\n']
@classmethod
def factory(cls, global_conf,**kwargs):
return cls()
class HelloShow(object):
def __init__(self):
pass
def __call__(self,environ, start_response):
start_response('200 OK', [('Content-Type', 'text/plain')])
return ['HelloWorld, this is Richard !\r\n']
@classmethod
def factory(cls,global_conf, **kwargs):
return cls()
class IPBlacklistMiddleware(object):
def __init__(self,application):
self.application = application
def __call__(self,environ, start_response):
ip_addr =environ.get('HTTP_HOST').split(':')[0]
if ip_addr notin ('127.0.0.1'):
start_response('403 Forbidden\r\n', [('Content-Type', 'text/plain')])
return['Forbidden']
returnself.application(environ, start_response)
@classmethod
def factory(cls, global_conf,**local_conf):
def_factory(application):
returncls(application)
return _factory
if '__main__' == __name__:
config_file ="animal.ini"
print"config:%s" % os.path.abspath(config_file)
application =loadapp("config:%s" % os.path.abspath(config_file))
server =eventlet.spawn(wsgi.server,eventlet.listen(('', 7000)), application)
server.wait()
gset@ubuntu:~$ curl127.0.0.1:7000
This is a animal applicaltion!
gset@ubuntu:~$ curl127.0.0.1:7000/hello
Hello World, this is Richard !
//////////////////// Eventlet + Paste Deploy + Routes + Webob + App
Routes is a Python re-implementation of the Rails routes system for mapping URLs to application actions, and conversely to generate URLs. Routes makes it easy to create pretty and concise URLs that are RESTful with little effort. Routes allows conditional matching based on domain,cookies, HTTP method, or a custom function. Sub-domain support is built in.Routes comes with an extensive unit test suite.
WebOb is a Python library that provides wrappers around the WSGI request environment, and an object to help create WSGI responses. The objects map much of the specified behavior of HTTP, including header parsing,content negotiation and correct handling of conditional and range requests. This helps you create rich applications and valid middleware without knowing all the complexities of WSGI and HTTP.
sudo pip install routes
sudo pip install webob
gset@ubuntu:~$ gedit animal.ini
[composite:main]
use = egg:Paste#urlmap
/ = animal_pipeline
[pipeline:animal_pipeline]
pipeline = ip_blacklist animal # (1) ip_balcklist -> (2)animal
[filter:ip_blacklist]
paste.filter_factory = hello:IPBlacklistMiddleware.factory
[app:animal]
paste.app_factory = hello:AnimalApplication.factory
gset@ubuntu:~$ gedit hello.py
import os
import eventlet
from eventlet import wsgi
from paste.deploy import loadapp
import routes
import routes.middleware as middleware
import webob.dec
import webob.exc
class Resource(object):
def __init__(self,controller):
self.controller= controller()
@webob.dec.wsgify
def __call__(self,req):
match =req.environ['wsgiorg.routing_args'][1]
action =match['action']
ifhasattr(self.controller, action):
method =getattr(self.controller, action)
returnmethod(req)
returnwebob.exc.HTTPNotFound()
class CatController(object):
def index(self,req):
return 'Listcats.'
def create(self,req):
return 'createcat.'
def delete(self,req):
return 'deletecat.'
def update(self,req):
return 'updatecat.'
class DogController(object):
def index(self,req):
return 'Listdogs.'
def create(self,req):
return 'create dog.'
def delete(self,req):
return 'deletedog.'
def update(self,req):
return 'updatedog.'
class AnimalApplication(object):
def __init__(self):
self.mapper =routes.Mapper()
self.mapper.resource('cat', 'cats', controller=Resource(CatController))
self.mapper.resource('dog', 'dogs', controller=Resource(DogController))
self.router =middleware.RoutesMiddleware(self.dispatch, self.mapper)
@webob.dec.wsgify
def __call__(self,req):
returnself.router
@classmethod
def factory(cls,global_conf, **local_conf):
return cls()
@staticmethod
@webob.dec.wsgify
def dispatch(req):
match =req.environ['wsgiorg.routing_args'][1]
returnmatch['controller'] if match else webob.exc.HTTPNotFound()
class IPBlacklistMiddleware(object):
def __init__(self,application):
self.application = application
def __call__(self,environ, start_response):
ip_addr =environ.get('HTTP_HOST').split(':')[0]
if ip_addr notin ('127.0.0.1'):
start_response('403 Forbidden', [('Content-Type', 'text/plain')])
return['Forbidden']
returnself.application(environ, start_response)
@classmethod
def factory(cls,global_conf, **local_conf):
def_factory(application):
returncls(application)
return _factory
if '__main__' == __name__:
config_file ="animal.ini"
print"config:%s" % os.path.abspath(config_file)
application =loadapp("config:%s" % os.path.abspath(config_file))
server =eventlet.spawn(wsgi.server, eventlet.listen(('', 8080)), application)
server.wait()
curl 127.0.0.1:8080/cats
curl -X POST 127.0.0.1:8080/cats
curl -X DELETE 127.0.0.1:8080/cats/kitty
curl 127.0.0.1:8080/dogs
curl -X DELETE 127.0.0.1:8080/dogs/wangcai
Debug Python Code
//////////////////// Debug by Python Debugger – Nonintrusive
gset@ubuntu:~$ gedit hello.py
a = 1+1
def greet_user(username="No Name",age=20):
print("Hello," + username.title()+ ":" + str(age) + " !")
returnusername.title()+ ":" + str(age)
greet_user("richard xue", 30)
greet_user(age=40, username="richard xue")
temp = greet_user()
print(temp)
gset@ubuntu:~$ python-m pdb hello.py
> /home/gset/hello.py(1)<module>()
-> a = 1+1
(Pdb) l
1 -> a= 1+1
2
3 defgreet_user(username="No Name",age=20):
4 print("Hello," + username.title()+ ":" + str(age) + " !")
5 returnusername.title()+ ":" + str(age)
6 greet_user("richardxue", 30)
7 greet_user(age=40,username="richard xue")
8
9 temp= greet_user()
10 print(temp)
11
(Pdb) n
> /home/gset/hello.py(3)<module>()
-> def greet_user(username="No Name",age=20):
(Pdb) p a
2
(Pdb) exit
//////////////////// Debug by Python Debugger – Intrusive
gset@ubuntu:~$ gedit hello.py
import pdb
a = 1+1
def greet_user(username="No Name",age=20):
print("Hello," + username.title()+ ":" + str(age) + " !")
returnusername.title()+ ":" + str(age)
pdb.set_trace()
greet_user("richard xue", 30)
greet_user(age=40, username="richard xue")
temp = greet_user()
print(temp)
gset@ubuntu:~$ python hello.py
> /home/gset/hello.py(9)<module>()
-> greet_user("richard xue", 30)
(Pdb) l
4
5 defgreet_user(username="No Name",age=20):
6 print("Hello," + username.title()+ ":" + str(age) + " !")
7 returnusername.title()+ ":" + str(age)
8 pdb.set_trace()
9 -> greet_user("richardxue", 30)
10 greet_user(age=40,username="richard xue")
11
12 temp= greet_user()
13 print(temp)
14
(Pdb) p a
2
(Pdb) n
Hello, Richard Xue:30 !
> /home/gset/hello.py(10)<module>()
-> greet_user(age=40, username="richard xue")
(Pdb) c
Hello, Richard Xue:40 !
Hello, No Name:20 !
No Name:20
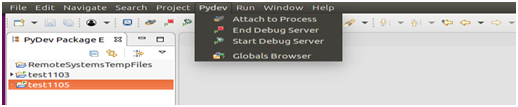
//////////////////// LocalDebug by Eclispe/PyDev – Nonintrusive
// Install Java
sudo apt-get install openjdk-8-jre
su root
echo'JAVA_HOME="/usr/lib/jvm/java-8-openjdk-amd64"' >> /etc/environment
source /etc/environment
// Download and install eclispe-installer(c/c++)
http://www.eclipse.org/downloads/
// Install and configure PyDev in Eclipse
gset@ubuntu:~$ which python
/usr/bin/python


//////////////////// Remote Debug by Eclispe/PyDev – Intrusive
//Configure the port number for remote debugger


// Start the debug server in ‘Host A’
// Run the Python code in ‘Host B’
sudo pip install pydevd
gset@ubuntu:~$ gedit test.py
import keystoneclient.v2_0.client as ksclient
import glanceclient
import pydevd
pydevd.settrace(host='127.0.0.1',port=5678,stdoutToServer=True,stderrToServer=True,suspend=True)
#pydevd.settrace(host='10.0.0.11',port=5678,stdoutToServer=True,stderrToServer=True,suspend=True)
keystone= ksclient.Client(auth_url="http://10.0.0.11:5000/v2.0",
username="admin",password="ipcc2014",tenant_name="admin")
endpoint=keystone.service_catalog.url_for(service_type='compute',endpoint_type='publicURL')
print(endpoint)
endpoint=keystone.service_catalog.url_for(service_type='image',endpoint_type='publicURL')
print(endpoint)
glance= glanceclient.Client('2',endpoint, token=keystone.auth_token)
images= glance.images.list()
forimage in glance.images.list():
print(image.id + " " +image.name)
gset@ubuntu:~$ python test.py
// Debug the Python code in ‘Host A’

DebugOpenStack Code (nova)
//////////////////// Debug by Python Debugger – Nonintrusive
gset@controller:~$ ps-ef | grep nova-api
gset@controller:~$ sudo service nova-api stop
gset@controller:~$ sudo python -m pdb /usr/bin/nova-api --debug --config-file=/etc/nova/nova.conf
> /usr/bin/nova-api(4)<module>()
-> import sys
(Pdb) l
1 #!/usr/bin/python
2 #PBR Generated from u'console_scripts'
3
4 -> importsys
5
6 fromnovaNaNd.api import main
7
8
9 if__name__ == "__main__":
10 sys.exit(main())
[EOF]
(Pdb) n
> /usr/bin/nova-api(6)<module>()
-> from novaNaNd.api import main
(Pdb) n
> /usr/bin/nova-api(9)<module>()
-> if __name__ == "__main__":
(Pdb) l
4 importsys
5
6 fromnovaNaNd.api import main
7
8
9 -> if__name__ == "__main__":
10 sys.exit(main())
[EOF]
(Pdb) s
> /usr/bin/nova-api(10)<module>()
-> sys.exit(main())
(Pdb) s
--Call--
>/usr/lib/python2.7/dist-packages/nova/cmd/api.py(39)main()
-> def main():
(Pdb) n
>/usr/lib/python2.7/dist-packages/nova/cmd/api.py(42)main()
-> config.parse_args(sys.argv)
//////////////////// Debug by Python Debugger – Intrusive
gset@controller:~$ sudo service nova-api stop
gset@controller:~$ sudo /usr/bin/nova-api --debug --config-file=/etc/nova/nova.conf
> /usr/lib/python2.7/dist-packages/nova/cmd/api.py(42)main()
-> config.parse_args(sys.argv)
(Pdb) l
37 CONF= nova.conf.CONF
38
39 defmain():
40 import pdb
41 pdb.set_trace()
42 -> config.parse_args(sys.argv)
43 logging.setup(CONF, "nova")
44 utils.monkey_patch()
45 objects.register_all()
46 if 'osapi_compute' in CONF.enabled_apis:
47 # NOTE(mriedem): This is needed forcaching the nova-compute service
(Pdb) n
> /usr/lib/python2.7/dist-packages/nova/cmd/api.py(43)main()
-> logging.setup(CONF, "nova")
//////////////////// Remote/Local Debug by Eclispe/PyDev – Intrusive
// Install Eclipse/PyDev in Controller which actually runs OpenStack and run Eclipse as Root user
gset@controller:~$ su root
root@controller:~#/home/gset/eclipse/cpp-oxygen/eclipse/eclipse
// Install pydevd and make sure it is ready
gset@controller:~$ sudo pip install pydevd
gset@controller:~$ python
Python 2.7.12 (default, Nov 19 2016, 06:48:10)
[GCC 5.4.0 20160609] on linux2
Type "help", "copyright","credits" or "license" for more information.
>>> import pydevd
>>>
// Turn off thread patching to enable theremote debugger
gset@controller:~$ grep -rn eventlet.monkey_patch /usr/lib/python2.7/dist-packages/nova
gset@controller:~$ sudo gedit /usr/lib/python2.7/dist-packages/nova/cmd/__init__.py
importeventlet
fromnova import debugger
ifdebugger.enabled():
# turn off thread patching to enable theremote debugger
eventlet.monkey_patch(os=False, thread=False)
else:
eventlet.monkey_patch(os=False)
Notes: Using the remote debug option changes how Nova uses the eventlet library to supportasync IO, and could result in failures that do not occur under normal operation,so we have to turn off thread patching for debugging; while Monkey patchingwith thread=False is also likely to cause problems, even simple concurrency scenarios can result in deadlocks with this sort of setup.
https://specs.openstack.org/openstack/openstack-specs/specs/eventlet-best-practices.html
////////////Example 1: debug ‘nova/cmd/api.py’
1 - insert pydevd.settrace in nova/cmd/api.py
gset@controller:~$ sudo gedit /usr/lib/python2.7/dist-packages/nova/cmd/api.py
def main():
import pydevd
pydevd.settrace(host='10.0.0.11',port=5678,stdoutToServer=True,stderrToServer=True,suspend=True) ………………..
2 - Stop and start the debug server in Eclispe/PyDev
3 - Run “nova-api”
gset@controller:~$ sudo service nova-api stop
gset@controller:~$ sudo /usr/bin/nova-api --remote_debug-host 10.0.0.11--remote_debug-port 5678 --config-file=/etc/nova/nova.conf

////////// Example2: debug ‘get_all’ for openstack server list
1 - insert pydevd.settrace in nova/compute/api.py
gset@controller:~$ sudo gedit /usr/lib/python2.7/dist-packages/nova/compute/api.py
def get_all(self, context,search_opts=None, limit=None, marker=None,
expected_attrs=None,sort_keys=None, sort_dirs=None):
import pydevd
pydevd.settrace(host='10.0.0.11',port=5678,stdoutToServer=True,stderrToServer=True,suspend=True)
………………..
2 - Stop and start the debug server in Eclispe/PyDev
3 - Run “nova-api”
gset@controller:~$ sudo service nova-api stop
gset@controller:~$ sudo /usr/bin/nova-api --remote_debug-host 10.0.0.11--remote_debug-port 5678 --config-file=/etc/nova/nova.conf
4 - Run “openstack server list”
gset@controller:~$ . admin-openrc
gset@controller:~$ openstack server list

薛国锋 xueguofeng2011@gmail.com
Deploying OpenStack manually can tell you the flow and configuration details, while learning and debugging OpenStack code can greatly help you understand how OpenStack really works. As the leading open-source software platform for cloud computing and in order to prevent from reinventing the wheel,the OpenStack community has adopted many open-source frameworks, middlewares, libraries and tools for its implementation, such as Setuptools, WSGI, Eventlet,Paste Deploy, Routes and Webob etc; without a deep understanding of them, going to Openstack code directly would be a terrible and frustrating experience.Today we will have a quick review of these softwares and tools, and make uswell prepared for the next step – learning and debugging OpenStack code.
Setuptools
Setuptools is a package development process library designedto facilitate packaging Python projects by enhancing the Python standard library Distutils (distribution utilities). It includes: Python package and module definitions; distribution package metadata; test hooks; project installation; platform-specific details and Python 3 support (similar to Mavenin Java).
Setup.py is a python file, which usually tells you that the module/package you are about to install has been packaged and distributed with Distutils,which is the standard for distributing Python Modules. The __init__.py files are required to make Python treat the directories as containing packages; in the simplest case, __init__.py can just be an empty file, but it can also execute initialization code for the package or set the __all__ variable. A"Python egg", the same concept as a .jar in Java, is a logical structure embodying the release of a specific version of a Python project,comprising its code, resources, and metadata.
//////////////////// Build a Python packagein ‘Host A’
// Install Setuptools
gset@ubuntu:~$ sudo apt-get install python-setuptools
// Create the below directory and files
gset@ubuntu:~/test$tree
.
├── setup.py
└──src
└── helloworld
├── aaa.txt
├──data
│ ├── abc.dat
│ └── abcd.dat
├── __init__.py
├── moda.py
└── modb.py
3 directories, 7 files
gset@ubuntu:~/test$gedit setup.py
from setuptools import setup, find_packages
setup(
name ="helloworld",
version ="1.0",
packages =find_packages('src'),
package_dir ={'':'src'},
package_data = {
'': ['*.txt'],
'helloworld':['data/*.dat'],
},
entry_points = {
'console_scripts': [
'xgf =helloworld:test'
]
},
author = 'Richard',
license = 'PSF'
)
gset@ubuntu:~/test$ gedit src/helloworld/__init__.py
#!/usr/bin/env python
#-*- coding:utf-8 -*-
def test():
print "helloworld!"
if __name__ == '__main__':
test()
gset@ubuntu:~/test$python setup.py sdist
gset@ubuntu:~/test$tree
.
├── dist
│ └──helloworld-1.0.tar.gz
├── setup.py
└── src
├── helloworld
│ ├── aaa.txt
│ ├── data
│ │ ├── abc.dat
│ │ └── abcd.dat
│ ├── __init__.py
│ ├── moda.py
│ └── modb.py
└──helloworld.egg-info
├──dependency_links.txt
├──entry_points.txt
├── PKG-INFO
├── SOURCES.txt
└── top_level.txt
5 directories, 13 files
gset@ubuntu:~/test$ file dist/helloworld-1.0.tar.gz
dist/helloworld-1.0.tar.gz: gzip compressed data, was"dist/helloworld-1.0.tar", last modified: Sun Nov 5 14:42:44 2017, max compression
gset@ubuntu:~/test$tar -tf dist/helloworld-1.0.tar.gz
helloworld-1.0/
helloworld-1.0/PKG-INFO
helloworld-1.0/setup.cfg
helloworld-1.0/src/
helloworld-1.0/src/helloworld.egg-info/
helloworld-1.0/src/helloworld.egg-info/PKG-INFO
helloworld-1.0/src/helloworld.egg-info/entry_points.txt
helloworld-1.0/src/helloworld.egg-info/SOURCES.txt
helloworld-1.0/src/helloworld.egg-info/top_level.txt
helloworld-1.0/src/helloworld.egg-info/dependency_links.txt
helloworld-1.0/src/helloworld/
helloworld-1.0/src/helloworld/modb.py
helloworld-1.0/src/helloworld/moda.py
helloworld-1.0/src/helloworld/aaa.txt
helloworld-1.0/src/helloworld/__init__.py
helloworld-1.0/src/helloworld/data/
helloworld-1.0/src/helloworld/data/abcd.dat
helloworld-1.0/src/helloworld/data/abc.dat
helloworld-1.0/setup.py
//////////////////// Install and use the Python package in ‘Host B’
// Copy helloworld-1.0.tar.gz from ‘Host A’ to ‘Host B’, and unzip it
gset@ubuntu:~/demo/helloworld-1.0$ tree
.
├── PKG-INFO
├──setup.cfg
├──setup.py
└── src
├── helloworld
│ ├── aaa.txt
│ ├── data
│ │ ├── abc.dat
│ │ └── abcd.dat
│ ├── __init__.py
│ ├── moda.py
│ └── modb.py
└──helloworld.egg-info
├──dependency_links.txt
├──entry_points.txt
├── PKG-INFO
├── SOURCES.txt
└── top_level.txt
4 directories, 14 files
// Install the package
gset@ubuntu:~/demo/helloworld-1.0$ sudo python setup.py install
gset@ubuntu:~/demo/helloworld-1.0$ tree
.
├── build
│ ├── bdist.linux-x86_64
│ └── lib.linux-x86_64-2.7
│ └── helloworld
│ ├── aaa.txt
│ ├── data
│ │ ├── abc.dat
│ │ └── abcd.dat
│ ├── __init__.py
│ ├── moda.py
│ └── modb.py
├── dist
│ └── helloworld-1.0-py2.7.egg
├── PKG-INFO
├── setup.cfg
├── setup.py
└── src
├── helloworld
│ ├── aaa.txt
│ ├── data
│ │ ├── abc.dat
│ │ └── abcd.dat
│ ├── __init__.py
│ ├── moda.py
│ └── modb.py
└──helloworld.egg-info
├──dependency_links.txt
├──entry_points.txt
├── PKG-INFO
├── SOURCES.txt
└── top_level.txt
10 directories, 21 files
gset@ubuntu:~/demo/helloworld-1.0$ unzip -l/usr/local/lib/python2.7/dist-packages/helloworld-1.0-py2.7.egg
Archive: /usr/local/lib/python2.7/dist-packages/helloworld-1.0-py2.7.egg
Length Date Time Name
--------- --------------- ----
1 2017-11-05 06:49 EGG-INFO/zip-safe
1 2017-11-05 06:49 EGG-INFO/dependency_links.txt
41 2017-11-05 06:49 EGG-INFO/entry_points.txt
364 2017-11-05 06:49 EGG-INFO/SOURCES.txt
178 2017-11-05 06:49 EGG-INFO/PKG-INFO
11 2017-11-05 06:49 EGG-INFO/top_level.txt
354 2017-11-05 06:49 helloworld/__init__.pyc
55 2017-11-05 05:46 helloworld/moda.py
395 2017-11-05 06:49 helloworld/modb.pyc
124 2017-11-05 06:30 helloworld/__init__.py
0 2017-11-04 19:15 helloworld/aaa.txt
306 2017-11-05 06:49 helloworld/moda.pyc
104 2017-11-05 06:42 helloworld/modb.py
0 2017-11-04 19:16 helloworld/data/abc.dat
0 2017-11-04 19:16 helloworld/data/abcd.dat
--------- -------
1934 15 files
// Use the package
gset@ubuntu:~/demo/helloworld-1.0$ python
Python 2.7.12 (default, Nov 19 2016, 06:48:10)
[GCC 5.4.0 20160609] on linux2
Type "help", "copyright","credits" or "license" for more information.
>>> fromhelloworld import modb
>>> modb.modb_print()
modb: hello world!
moda: hello world!
>>> fromhelloworld.moda import moda_print
>>> moda_print()
moda: hello world!
>>> fromhelloworld import test
>>> test()
hello world!
gset@ubuntu:~/demo/helloworld-1.0$ xgf
hello world!
gset@ubuntu:~/demo/helloworld-1.0$ cat /usr/local/bin/xgf
#!/usr/bin/python
# EASY-INSTALL-ENTRY-SCRIPT:'helloworld==1.0','console_scripts','xgf'
__requires__ = 'helloworld==1.0'
import sys
from pkg_resources import load_entry_point
if __name__ == '__main__':
sys.exit(
load_entry_point('helloworld==1.0', 'console_scripts', 'xgf')()
)
WSGI– Web Server Gateway Interface
The Web Server Gateway Interface (WSGI) is a specification for simple and universal interface between web servers and web applications or frameworks for the Python programming language. It was originally specified in PEP333 and published on 7 December 2003. It has since been adopted as a standard for Python web application development.
The WSGI interface has two sides: the server/gateway and the application side; beside this strict distinction there are so called “middleware” components which implement server and application sides at the same time:
WSGI application is a callable object (a function, method, class, or an instance with a __call__ method) that accepts two positional arguments: WSGI environment variables and a callable with two required positional arguments which starts the response.
WSGI server prepares the evnironment vaiables and invokes the callable object which returns response.
WSGI middleware is used to routing to a different URL based on environ parameters,logging, handling exceptions and performing any kind of preprocess/postprocess operations.
Generally a WSGI server/container is a separate running process that runs on a different port than your Web/HTTP server; your Web/HTTPserver is configured to pass requests to the WSGI server/container, aka ReverseProxy, which actually runs your web application, then pass the response (in the form of HTML) back to the requester. The Web/HTTP server and WSGIserver/container can communicate via TCP/IP Socket or UNIX Socket (more secure and faster).
Here are some combinations which we will practice in the following tests:
//////////////////// Apache2 + Mod_wsgi + Flask/App
Mod_wsgi is an Apache module that embeds a Python application within the server and allow them to communicate through the Python WSGI interface as defined in the Python PEP 333.It can work in embeded mode or daemon mode.
sudo pip install Flask
sudo apt-get install pache2
sudo apt-get install libapache2-mod-wsgi
sudo gedit /etc/apache2/sites-enabled/000-default.conf
WSGIPythonPath /var/www/html
<VirtualHost *:80>
ServerAdminwebmaster@localhost
DocumentRoot/var/www/html
WSGIScriptAlias / /var/www/html/app.wsgi
<Directory /var/www/html/> <Files app.wsgi>
Order deny,allow
Allow from all
</Files>
</Directory>ErrorLog ${APACHE_LOG_DIR}/error.log CustomLog${APACHE_LOG_DIR}/access.log combined
</VirtualHost>
sudo gedit /var/www/html/app.wsgi
from test import app as application
'''
def application(environ,start_response):
status='200 OK'
output='Hello wsgi,this is Richard\r\n'
response_headers=[('Content-type','text/plain'),
('Content-Length',str(len(output)))]
start_response(status,response_headers)
return[output]
'''
sudo gedit /var/www/html/test.py
from flask import Flask
app = Flask(__name__)
@app.route('/',methods=['GET'])
def root_get():
return'GET - This is Richard\r\n'
@app.route('/hello/<id>')
def hello_world(id):
return'Hello World: {}\r\n'.format(id)
@app.route('/add/<int:id>')
def add(id):
return'Sum: %d\r\n' %id
if __name__ == '__main__':
app.run(host='0.0.0.0') sudo /etc/init.d/apache2restart
gset@ubuntu:~$ curl http://127.0.0.1:80 GET - This is Richard
gset@ubuntu:~$ curl http://127.0.0.1:80/hello/1000 Hello World: 1000
gset@ubuntu:~$ curl http://127.0.0.1:80/add/10 Sum: 10
gset@ubuntu:~$ ls/etc/apache2
apache2.conf conf-enabled magic mods-enabled sites-available
conf-available envvars mods-available ports.conf sites-enabled
gset@ubuntu:~$ ls/var/www/html
app.wsgi index.html test.py
//////////////////// Wsgiref + Flask/App
Wsgiref is a reference implementation of the WSGI specification that can be used to add WSGI support to a web server or framework. It provides utilities for manipulating WSGI environment variables and response headers, base classes for implementing WSGIservers, a demo HTTP server that serves WSGI applications, and a validation tool that checks WSGI servers and applications for conformance to the WSGI specification.
gset@ubuntu:~$ gedit test.py
from wsgiref.simple_server import make_server
from flask import Flask
app = Flask(__name__)
@app.route('/',methods=['GET'])
def root_get():
return 'GET - Thisis Richard\r\n'
@app.route('/hello/<id>')
def hello_world(id):
return 'HelloWorld: {}\r\n'.format(id)
@app.route('/add/<int:id>')
def add(id):
return 'Sum:%d\r\n' %id
'''
def app(environ, start_response):
status = '200 OK' #HTTP Status
headers =[('Content-type', 'text/plain')]
start_response(status, headers)
return ["HelloWorld\r\n"]
'''
def main():
httpd =make_server('', 8000, app)
print "Servingon port 8000..."
httpd.serve_forever()
if __name__ == '__main__':
main() gset@ubuntu:~$ curl http://127.0.0.1:8000 GET - This is Richard
gset@ubuntu:~$ curl http://127.0.0.1:8000/hello/10000 Hello World: 10000
gset@ubuntu:~$ curl http://127.0.0.1:8000/add/10 Sum: 10
//////////////////// Gunicore + Flask/App
Gunicorn 'Green Unicorn' is a Python WSGI HTTP Server for UNIX. It's a pre-fork worker model ported from Ruby's Unicorn project. The Gunicorn server is broadly compatible with various web frameworks, simply implemented, light on server resource usage, and fairly speedy.
sudo pip install gunicorn
gset@ubuntu:~$ gedit test.py
from flask import Flask
app = Flask(__name__)
@app.route('/',methods=['GET'])
def root_get():
return'GET - This is Richard\r\n'
@app.route('/hello/<id>')
def hello_world(id):
return'Hello World: {}\r\n'.format(id)
@app.route('/add/<int:id>')
def add(id):
return'Sum: %d\r\n' %id
if __name__ == '__main__':
app.run(host='0.0.0.0')
gset@ubuntu:~$ gunicorn--workers=3 test:app -b 0.0.0.0:9000
[2017-11-05 09:16:53 +0000] [9244] [INFO] Starting gunicorn19.7.1
[2017-11-05 09:16:53 +0000] [9244] [INFO] Listening at:http://0.0.0.0:9000 (9244)
[2017-11-05 09:16:53 +0000] [9244] [INFO] Using worker: sync
[2017-11-05 09:16:53 +0000] [9249] [INFO] Booting worker withpid: 9249
[2017-11-05 09:16:53 +0000] [9250] [INFO] Booting worker withpid: 9250
[2017-11-05 09:16:54 +0000] [9253] [INFO] Booting worker withpid: 9253
gset@ubuntu:~$ curl http://127.0.0.1:9000 GET - This is Richard
gset@ubuntu:~$ curl http://127.0.0.1:9000/hello/10000 Hello World: 10000
gset@ubuntu:~$ curl http://127.0.0.1:9000/add/10 Sum: 10
gset@ubuntu:~$
//////////////////// Eventlet + App
Eventlet is a concurrent networking library for Python that allows you to change how you run your code, not how you write it. It uses epoll or kqueue or libevent for highlyscalable non-blocking I/O. Coroutines ensure that the developer uses a blocking style of programming that is similarto threading, but provide the benefits of non-blocking I/O. The event dispatch is implicit, which means you can easily use Eventlet from the Python interpreter, or as a small part of a larger application.
Eventlet is built around the concept of green threads (i.e.coroutines, we use the terms interchangeably) that are launched to donetwork-related work. Green threads differ from normal threads in two mainways:
1) Green threads are so cheap they are nearly free. You donot have to conserve green threads like you would do for normal threads. Ingeneral, there will be at least one green thread per network connection.
2) Green threads cooperatively yield to each other instead of preemptively being scheduled. The major advantage from this behavior is that shared data structures don’t need locks, because only if a yield is explicitlycalled can another green thread have access to the data structure.
sudo pip install eventlet
// Example 1
gset@ubuntu:~$ gedit test1.py
import eventlet
from eventlet import wsgi
class AnimalApplication(object):
def __init__(self):
pass
def __call__(self,environ, start_response):
start_response('200 OK', [('Content-Type', 'text/plain')])
return ['HelloWorld, this is Richard\r\n']
if '__main__' == __name__:
application = AnimalApplication()# wsgi.server(eventlet.listen(('', 7000)), application) server =eventlet.spawn(wsgi.server, eventlet.listen(('',7000)), application)
server.wait()
gset@ubuntu:~$ curl http://127.0.0.1:7000 Hello World, this is Richard
// Example 2
gset@ubuntu:~$ gedit test2.py
import eventlet
#eventlet.monkey_patch()
from eventlet.green import urllib2
import time
urls = ["http://www.tudou.com",
"http://www.baidu.com"
]
def test_1(url):
try:
print "open tudou"
time.sleep(5) // without the monkey patch, the current thread would stop
urllib2.urlopen(url).read()
print "done open tudou"
except urllib2.HTTPError:
return
def test_2(url):
try:
print "open baidu"
urllib2.urlopen(url).read()
print "done open baidu"
except urllib2.HTTPError:
return
pool = eventlet.GreenPool(100)
pool.spawn(test_1, urls[0])
pool.spawn(test_2, urls[1])
pool.waitall()
// Example 3
gset@ubuntu:~$ gedit test3.py
import eventlet
eventlet.monkey_patch
def handle(fd):
print "clientconnected"
while True:
# pass through every non-eof line
x =fd.readline()
if not x:break
fd.write(x)
fd.flush()
print"echoed", x,
print "clientdisconnected"
print "server socket listening on port 6000"
server = eventlet.listen(('0.0.0.0', 6000))
pool = eventlet.GreenPool()
while True:
try:
new_sock,address = server.accept()
print"accepted", address
pool.spawn_n(handle, new_sock.makefile('rw'))
except (SystemExit,KeyboardInterrupt):
break
//////////////////// Eventlet + Paste Deploy + App
Paste Deployment is a system for finding and configuring WSGI applications and servers. For WSGI application consumers it provides a single,simple function (loadapp) for loading a WSGI application from a configuration file or a Python Egg. For WSGI application providers it only asks for a single,simple entry point to your application, so that application users don’t need to be exposed to the implementation details of your application. The result is something a system administrator can install and manage without knowing any Python, or the details of the WSGI application or its container.
sudo pip install paste
sudo pip install pastedeploy
gset@ubuntu:~$ gedit animal.ini
[composite:main] # dispatch the request to applications
use = egg:Paste#urlmap # use the composite application named urlmap from the Paste package
#urlmap uses a path prefix to map your requests to applications.
/ = animal_pipeline # map ‘127.0.0.0:7000’ to the pipeline: animal_pipeline, “ip_balcklist +animal”
/hello:show # map ‘127.0.0.0:7000/hello’ to the app: show
[pipeline:animal_pipeline]
pipeline = ip_blacklist animal # (1) ip_balcklist -> (2) animal
[filter:ip_blacklist]
paste.filter_factory = hello:IPBlacklistMiddleware.factory
[app:animal] # You can define multiple applications in asingle file
paste.app_factory = hello:AnimalApplication.factory
[app:show]
paste.app_factory = hello:HelloShow.factory
gset@ubuntu:~$ gedit hello.py
import os
import eventlet
from eventlet import wsgi
from paste.deploy import loadapp
class AnimalApplication(object):
def __init__(self):
pass
def __call__(self,environ, start_response):
start_response('200 OK', [('Content-Type', 'text/plain')])
return ['Thisis a animal applicaltion!\r\n']
@classmethod
def factory(cls, global_conf,**kwargs):
return cls()
class HelloShow(object):
def __init__(self):
pass
def __call__(self,environ, start_response):
start_response('200 OK', [('Content-Type', 'text/plain')])
return ['HelloWorld, this is Richard !\r\n']
@classmethod
def factory(cls,global_conf, **kwargs):
return cls()
class IPBlacklistMiddleware(object):
def __init__(self,application):
self.application = application
def __call__(self,environ, start_response):
ip_addr =environ.get('HTTP_HOST').split(':')[0]
if ip_addr notin ('127.0.0.1'):
start_response('403 Forbidden\r\n', [('Content-Type', 'text/plain')])
return['Forbidden']
returnself.application(environ, start_response)
@classmethod
def factory(cls, global_conf,**local_conf):
def_factory(application):
returncls(application)
return _factory
if '__main__' == __name__:
config_file ="animal.ini"
print"config:%s" % os.path.abspath(config_file)
application =loadapp("config:%s" % os.path.abspath(config_file))
server =eventlet.spawn(wsgi.server,eventlet.listen(('', 7000)), application)
server.wait()
gset@ubuntu:~$ curl127.0.0.1:7000
This is a animal applicaltion!
gset@ubuntu:~$ curl127.0.0.1:7000/hello
Hello World, this is Richard !
//////////////////// Eventlet + Paste Deploy + Routes + Webob + App
Routes is a Python re-implementation of the Rails routes system for mapping URLs to application actions, and conversely to generate URLs. Routes makes it easy to create pretty and concise URLs that are RESTful with little effort. Routes allows conditional matching based on domain,cookies, HTTP method, or a custom function. Sub-domain support is built in.Routes comes with an extensive unit test suite.
WebOb is a Python library that provides wrappers around the WSGI request environment, and an object to help create WSGI responses. The objects map much of the specified behavior of HTTP, including header parsing,content negotiation and correct handling of conditional and range requests. This helps you create rich applications and valid middleware without knowing all the complexities of WSGI and HTTP.
sudo pip install routes
sudo pip install webob
gset@ubuntu:~$ gedit animal.ini
[composite:main]
use = egg:Paste#urlmap
/ = animal_pipeline
[pipeline:animal_pipeline]
pipeline = ip_blacklist animal # (1) ip_balcklist -> (2)animal
[filter:ip_blacklist]
paste.filter_factory = hello:IPBlacklistMiddleware.factory
[app:animal]
paste.app_factory = hello:AnimalApplication.factory
gset@ubuntu:~$ gedit hello.py
import os
import eventlet
from eventlet import wsgi
from paste.deploy import loadapp
import routes
import routes.middleware as middleware
import webob.dec
import webob.exc
class Resource(object):
def __init__(self,controller):
self.controller= controller()
@webob.dec.wsgify
def __call__(self,req):
match =req.environ['wsgiorg.routing_args'][1]
action =match['action']
ifhasattr(self.controller, action):
method =getattr(self.controller, action)
returnmethod(req)
returnwebob.exc.HTTPNotFound()
class CatController(object):
def index(self,req):
return 'Listcats.'
def create(self,req):
return 'createcat.'
def delete(self,req):
return 'deletecat.'
def update(self,req):
return 'updatecat.'
class DogController(object):
def index(self,req):
return 'Listdogs.'
def create(self,req):
return 'create dog.'
def delete(self,req):
return 'deletedog.'
def update(self,req):
return 'updatedog.'
class AnimalApplication(object):
def __init__(self):
self.mapper =routes.Mapper()
self.mapper.resource('cat', 'cats', controller=Resource(CatController))
self.mapper.resource('dog', 'dogs', controller=Resource(DogController))
self.router =middleware.RoutesMiddleware(self.dispatch, self.mapper)
@webob.dec.wsgify
def __call__(self,req):
returnself.router
@classmethod
def factory(cls,global_conf, **local_conf):
return cls()
@staticmethod
@webob.dec.wsgify
def dispatch(req):
match =req.environ['wsgiorg.routing_args'][1]
returnmatch['controller'] if match else webob.exc.HTTPNotFound()
class IPBlacklistMiddleware(object):
def __init__(self,application):
self.application = application
def __call__(self,environ, start_response):
ip_addr =environ.get('HTTP_HOST').split(':')[0]
if ip_addr notin ('127.0.0.1'):
start_response('403 Forbidden', [('Content-Type', 'text/plain')])
return['Forbidden']
returnself.application(environ, start_response)
@classmethod
def factory(cls,global_conf, **local_conf):
def_factory(application):
returncls(application)
return _factory
if '__main__' == __name__:
config_file ="animal.ini"
print"config:%s" % os.path.abspath(config_file)
application =loadapp("config:%s" % os.path.abspath(config_file))
server =eventlet.spawn(wsgi.server, eventlet.listen(('', 8080)), application)
server.wait()
curl 127.0.0.1:8080/cats
curl -X POST 127.0.0.1:8080/cats
curl -X DELETE 127.0.0.1:8080/cats/kitty
curl 127.0.0.1:8080/dogs
curl -X DELETE 127.0.0.1:8080/dogs/wangcai
Debug Python Code
//////////////////// Debug by Python Debugger – Nonintrusive
gset@ubuntu:~$ gedit hello.py
a = 1+1
def greet_user(username="No Name",age=20):
print("Hello," + username.title()+ ":" + str(age) + " !")
returnusername.title()+ ":" + str(age)
greet_user("richard xue", 30)
greet_user(age=40, username="richard xue")
temp = greet_user()
print(temp)
gset@ubuntu:~$ python-m pdb hello.py
> /home/gset/hello.py(1)<module>()
-> a = 1+1
(Pdb) l
1 -> a= 1+1
2
3 defgreet_user(username="No Name",age=20):
4 print("Hello," + username.title()+ ":" + str(age) + " !")
5 returnusername.title()+ ":" + str(age)
6 greet_user("richardxue", 30)
7 greet_user(age=40,username="richard xue")
8
9 temp= greet_user()
10 print(temp)
11
(Pdb) n
> /home/gset/hello.py(3)<module>()
-> def greet_user(username="No Name",age=20):
(Pdb) p a
2
(Pdb) exit
//////////////////// Debug by Python Debugger – Intrusive
gset@ubuntu:~$ gedit hello.py
import pdb
a = 1+1
def greet_user(username="No Name",age=20):
print("Hello," + username.title()+ ":" + str(age) + " !")
returnusername.title()+ ":" + str(age)
pdb.set_trace()
greet_user("richard xue", 30)
greet_user(age=40, username="richard xue")
temp = greet_user()
print(temp)
gset@ubuntu:~$ python hello.py
> /home/gset/hello.py(9)<module>()
-> greet_user("richard xue", 30)
(Pdb) l
4
5 defgreet_user(username="No Name",age=20):
6 print("Hello," + username.title()+ ":" + str(age) + " !")
7 returnusername.title()+ ":" + str(age)
8 pdb.set_trace()
9 -> greet_user("richardxue", 30)
10 greet_user(age=40,username="richard xue")
11
12 temp= greet_user()
13 print(temp)
14
(Pdb) p a
2
(Pdb) n
Hello, Richard Xue:30 !
> /home/gset/hello.py(10)<module>()
-> greet_user(age=40, username="richard xue")
(Pdb) c
Hello, Richard Xue:40 !
Hello, No Name:20 !
No Name:20
//////////////////// LocalDebug by Eclispe/PyDev – Nonintrusive
// Install Java
sudo apt-get install openjdk-8-jre
su root
echo'JAVA_HOME="/usr/lib/jvm/java-8-openjdk-amd64"' >> /etc/environment
source /etc/environment
// Download and install eclispe-installer(c/c++)
http://www.eclipse.org/downloads/
// Install and configure PyDev in Eclipse
gset@ubuntu:~$ which python
/usr/bin/python
//////////////////// Remote Debug by Eclispe/PyDev – Intrusive
//Configure the port number for remote debugger
// Start the debug server in ‘Host A’
// Run the Python code in ‘Host B’
sudo pip install pydevd
gset@ubuntu:~$ gedit test.py
import keystoneclient.v2_0.client as ksclient
import glanceclient
import pydevd
pydevd.settrace(host='127.0.0.1',port=5678,stdoutToServer=True,stderrToServer=True,suspend=True)
#pydevd.settrace(host='10.0.0.11',port=5678,stdoutToServer=True,stderrToServer=True,suspend=True)
keystone= ksclient.Client(auth_url="http://10.0.0.11:5000/v2.0",
username="admin",password="ipcc2014",tenant_name="admin")
endpoint=keystone.service_catalog.url_for(service_type='compute',endpoint_type='publicURL')
print(endpoint)
endpoint=keystone.service_catalog.url_for(service_type='image',endpoint_type='publicURL')
print(endpoint)
glance= glanceclient.Client('2',endpoint, token=keystone.auth_token)
images= glance.images.list()
forimage in glance.images.list():
print(image.id + " " +image.name)
gset@ubuntu:~$ python test.py
// Debug the Python code in ‘Host A’
DebugOpenStack Code (nova)
//////////////////// Debug by Python Debugger – Nonintrusive
gset@controller:~$ ps-ef | grep nova-api
gset@controller:~$ sudo service nova-api stop
gset@controller:~$ sudo python -m pdb /usr/bin/nova-api --debug --config-file=/etc/nova/nova.conf
> /usr/bin/nova-api(4)<module>()
-> import sys
(Pdb) l
1 #!/usr/bin/python
2 #PBR Generated from u'console_scripts'
3
4 -> importsys
5
6 fromnovaNaNd.api import main
7
8
9 if__name__ == "__main__":
10 sys.exit(main())
[EOF]
(Pdb) n
> /usr/bin/nova-api(6)<module>()
-> from novaNaNd.api import main
(Pdb) n
> /usr/bin/nova-api(9)<module>()
-> if __name__ == "__main__":
(Pdb) l
4 importsys
5
6 fromnovaNaNd.api import main
7
8
9 -> if__name__ == "__main__":
10 sys.exit(main())
[EOF]
(Pdb) s
> /usr/bin/nova-api(10)<module>()
-> sys.exit(main())
(Pdb) s
--Call--
>/usr/lib/python2.7/dist-packages/nova/cmd/api.py(39)main()
-> def main():
(Pdb) n
>/usr/lib/python2.7/dist-packages/nova/cmd/api.py(42)main()
-> config.parse_args(sys.argv)
//////////////////// Debug by Python Debugger – Intrusive
gset@controller:~$ sudo service nova-api stop
gset@controller:~$ sudo /usr/bin/nova-api --debug --config-file=/etc/nova/nova.conf
> /usr/lib/python2.7/dist-packages/nova/cmd/api.py(42)main()
-> config.parse_args(sys.argv)
(Pdb) l
37 CONF= nova.conf.CONF
38
39 defmain():
40 import pdb
41 pdb.set_trace()
42 -> config.parse_args(sys.argv)
43 logging.setup(CONF, "nova")
44 utils.monkey_patch()
45 objects.register_all()
46 if 'osapi_compute' in CONF.enabled_apis:
47 # NOTE(mriedem): This is needed forcaching the nova-compute service
(Pdb) n
> /usr/lib/python2.7/dist-packages/nova/cmd/api.py(43)main()
-> logging.setup(CONF, "nova")
//////////////////// Remote/Local Debug by Eclispe/PyDev – Intrusive
// Install Eclipse/PyDev in Controller which actually runs OpenStack and run Eclipse as Root user
gset@controller:~$ su root
root@controller:~#/home/gset/eclipse/cpp-oxygen/eclipse/eclipse
// Install pydevd and make sure it is ready
gset@controller:~$ sudo pip install pydevd
gset@controller:~$ python
Python 2.7.12 (default, Nov 19 2016, 06:48:10)
[GCC 5.4.0 20160609] on linux2
Type "help", "copyright","credits" or "license" for more information.
>>> import pydevd
>>>
// Turn off thread patching to enable theremote debugger
gset@controller:~$ grep -rn eventlet.monkey_patch /usr/lib/python2.7/dist-packages/nova
gset@controller:~$ sudo gedit /usr/lib/python2.7/dist-packages/nova/cmd/__init__.py
importeventlet
fromnova import debugger
ifdebugger.enabled():
# turn off thread patching to enable theremote debugger
eventlet.monkey_patch(os=False, thread=False)
else:
eventlet.monkey_patch(os=False)
Notes: Using the remote debug option changes how Nova uses the eventlet library to supportasync IO, and could result in failures that do not occur under normal operation,so we have to turn off thread patching for debugging; while Monkey patchingwith thread=False is also likely to cause problems, even simple concurrency scenarios can result in deadlocks with this sort of setup.
https://specs.openstack.org/openstack/openstack-specs/specs/eventlet-best-practices.html
////////////Example 1: debug ‘nova/cmd/api.py’
1 - insert pydevd.settrace in nova/cmd/api.py
gset@controller:~$ sudo gedit /usr/lib/python2.7/dist-packages/nova/cmd/api.py
def main():
import pydevd
pydevd.settrace(host='10.0.0.11',port=5678,stdoutToServer=True,stderrToServer=True,suspend=True) ………………..
2 - Stop and start the debug server in Eclispe/PyDev
3 - Run “nova-api”
gset@controller:~$ sudo service nova-api stop
gset@controller:~$ sudo /usr/bin/nova-api --remote_debug-host 10.0.0.11--remote_debug-port 5678 --config-file=/etc/nova/nova.conf
////////// Example2: debug ‘get_all’ for openstack server list
1 - insert pydevd.settrace in nova/compute/api.py
gset@controller:~$ sudo gedit /usr/lib/python2.7/dist-packages/nova/compute/api.py
def get_all(self, context,search_opts=None, limit=None, marker=None,
expected_attrs=None,sort_keys=None, sort_dirs=None):
import pydevd
pydevd.settrace(host='10.0.0.11',port=5678,stdoutToServer=True,stderrToServer=True,suspend=True)
………………..
2 - Stop and start the debug server in Eclispe/PyDev
3 - Run “nova-api”
gset@controller:~$ sudo service nova-api stop
gset@controller:~$ sudo /usr/bin/nova-api --remote_debug-host 10.0.0.11--remote_debug-port 5678 --config-file=/etc/nova/nova.conf
4 - Run “openstack server list”
gset@controller:~$ . admin-openrc
gset@controller:~$ openstack server list

相关文章推荐
- ThinkAir: Dynamic resource allocation and parallel execution in the cloud for mobile code offloading阅读笔记
- How OpenStack Should Prepare Itself for the Enterprise
- Wrong codepoints for non-ASCII characters inserted in UTF-8 database using CLP
- Hadoop出现错误:WARN util.NativeCodeLoader: Unable to load native-hadoop library for your platform... using builtin-java classes where applicable,解决方案
- Request Flow for Provisioning Instance in Openstack
- No configuration found for the specified action: 'xxx/xxx.action' in namespace: ''. Form action def
- CodeSign error: code signing is required for product type Application in SDK iOS
- Debugging Lua Project created in Cocos Code IDE creates “Waiting for debugger to connect” in Win-7
- WARN util.NativeCodeLoader: Unable to load native-hadoop library for your platform... using builtin-
- 警告: No configuration found for the specified action: 'hello/sum' in namespace: '/hello'. Form action
- 使用Struts2的标签报“警告: No configuration found for the specified action: 'login.action' in ...”的处理方法
- [深度学习论文笔记][Video Classification] Two-Stream Convolutional Networks for Action Recognition in Videos
- error: No resource identifier found for attribute 'showAsAction' in package 'com.ymeng.项目名字'
- WARN util.NativeCodeLoader: Unable to load native-hadoop library for your platform... using builtin-
- Atlas Control Toolkit and Source Code for the Build-in Asp.Net 2.0 Providers
- WebKit discarded an uncaught exception in the webView:decidePolicyForNavigationAction
- Unable to instantiate Action, xxxAction, defined for 'xxx' in namespace '/'xxxAction解决方式
- Request Flow for Provisioning Instance in Openstack
- Mybatis问题-----There is no getter for property named 'productCode' in 'class java.lang.Strin g'