linux--系统中的简单分区和管理储存
2017-11-06 19:13
288 查看
一、设备的查看
1.发现系统中的设备
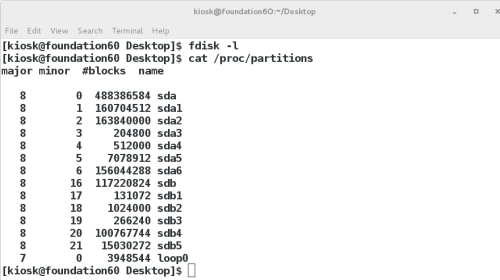
fdisk -l
cat /proc/partitions
图示:发现设备
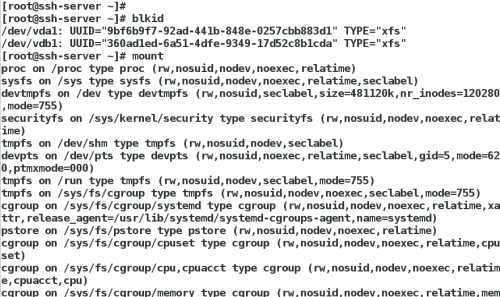
2.系统发现的,但是没用投入使用,随时可以使用设备
blkid #查看设备的id信息
3.发现并且在使用的设备
df -h #2的n次方
df -H #10的n次方
图示:正在使用的设备
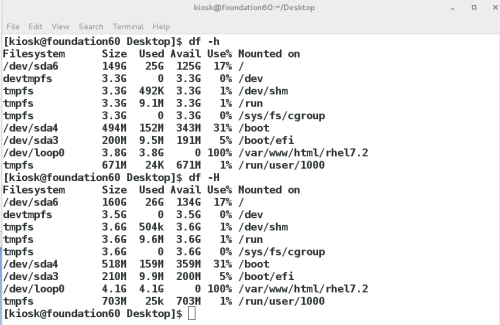
**两者的区别:统计的计算方法不同
二、设备名称的读取
/dev/xd*
x=s /dev/sd* #sata硬盘,过着iscsi网络储存
x=v /dev/vd* #虚拟硬盘,一般出现杂u虚拟机里
x=h /dev/hd* #ide硬盘,一般出现在老式电脑
*=a~... #/dev/vda,系统中第一款虚拟硬盘
/dev/sda1 #系统中第一块sata硬盘的第一个分区
/dev/cdrom,/dev/sr[0-...] #系统中的光驱
/dev/mapper/* #系统中的虚拟设备
三、设备的使用
设备必须要用目录来对设备中的内容进行读取
设备在使用时需要作挂载动作
1.设备挂载
blkid 识别可用设备
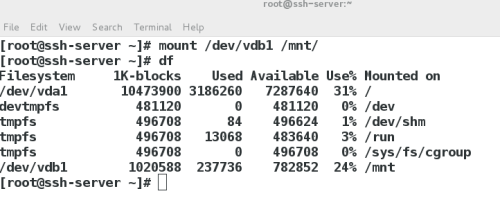
mount 设备的挂载
图示:正在挂载的设备
mount /dev/vdb1 /mnt ##把系统中第二块硬盘的第一个分区挂载到 mnt下
图示:挂载到/mnt
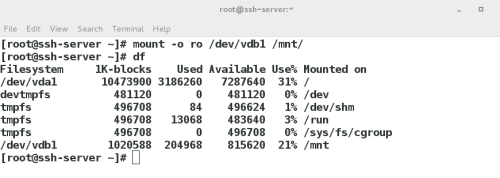
mount -o ro /dev/vdb1 /mnt/ ##只读挂载到第二块硬盘的第一个分区挂载到mnt下
图示:只读挂载
2.设备卸载
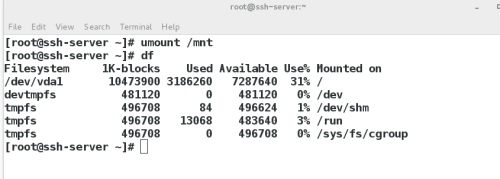
umount 设备|挂载点
umount /dev/sdb1 | /mnt
图示:卸载设备
当出现以下这种情况时,表示设备正在运行,不能卸载
umount: /mnt: target is busy.
(In some cases useful info aboutprocesses that use
the device is found by lsof(8)or fuser(1))
需执行以下操作强行关闭正在进行的程序
fuser -kvm /mnt
再进行卸载
四、分区划分
1.建立分区
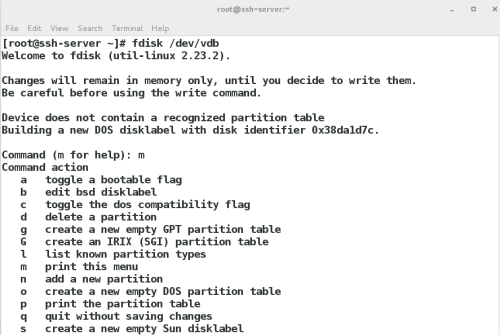
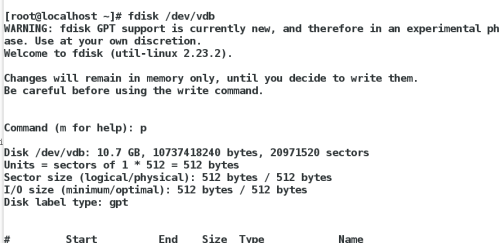
fdisk /dev/vdb
elcome to fdisk (util-linux 2.23.2).
Changes will remain in memory only, until you decide to write them.
Be careful before using the write command.
Command (m for help): m ##帮助
Command action
a toggle a bootable flag
b edit bsd disklabel
c toggle the dos compatibility flag
d delete a partition ##删除分区
g create a new empty GPT partition table
G create an IRIX (SGI) partition table
l list known partition types ##列出系统可用的分区类型
m print this menu
n add a new partition ##新建分区
o create a new empty DOS partition table
p print the partition table ##显示分区
q quit without saving changes ##退出
s create a new empty Sun disklabel
t change a partition's system id ##修改分区功能id
u change display/entry units
v verify the partition table
w write table to disk and exit ##保存更改到分区表中
x extra functionality (experts only)
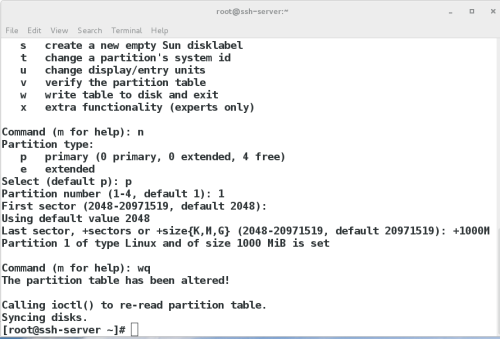
Command (m for help): n ##新建分区
Partition type:
p primary (0 primary, 0 extended, 4 free) ##分区类型位主分区
e extended ##分区类型位扩展分区
Select (default p): ##默认位主分区
Using default response p
Partition number (1-4, default 1): 1 ##确定主分区id
First sector (2048-20971519, default 2048): ##此分区起始块位置
Using default value 2048
Last sector, +sectors or +size{K,M,G} (2048-20971519, default 20971519): +100M ##分区结束块位置,用+大小
Partition 1 of type Linux and of size 100 MiB is set
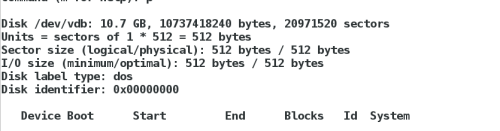
Command (m for help): p ##查看已经建立分区
Disk /dev/vdb: 10.7 GB, 10737418240 bytes, 20971520 sectors
Units = sectors of 1 * 512 = 512 bytes
Sector size (logical/physical): 512 bytes / 512 bytes
I/O size (minimum/optimal): 512 bytes / 512 bytes
Disk label type: dos
Disk identifier: 0x193488c3
Device Boot Start End Blocks Id System
/dev/vdb1 2048 206847 102400 83 Linux ##默认情况下此分区是linux分区的普通分区
Command (m for help): wq ##保存推出,如果安q表示放弃更改退出
图示:建立分区
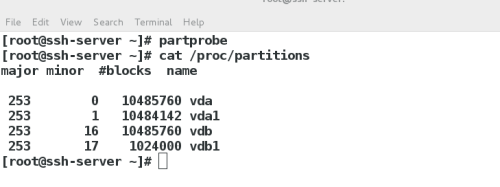
[root@ssh-server ~]# partprobe ##同步分区表
cat /proc/partitions ##查看系统识别的分区信息
图示:同步分区表并查看
2.设备的挂载
--设备临时挂载
mkfs.xfs /dev/vdb1 ##格式化设备,载设备上安装文件系统xfs
图示:格式化设备

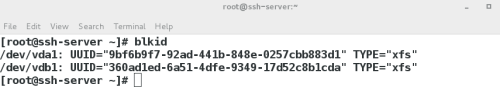
blkid ##查看可用设备,可以看到被格式化的后的/dev/vdb1
图示:查看可用设备
mount /dev/vdb1 /mnt ##临时挂载设备,使设备投入使用
图示:挂载到/mnt

--设备永久挂载
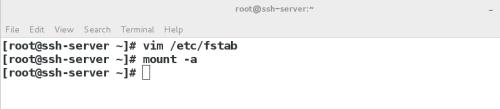
vim /etc/fstab ## 设备永久挂载策略文件
图示:修改策略文件
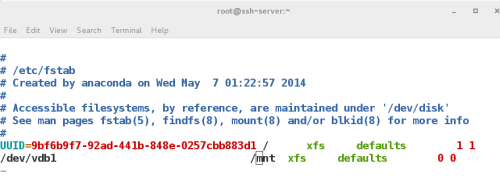
设备 挂载点 文件系统类型 挂载参数 是否备份设备 是否设备检测
devic mountpoint ftype defaults(mountpoint) 0 0
/dev/vdb1 /mnt xfs defaults 0 0
mount -a #使/etc/fstab中记录的未生效挂载策略生效
图示:策略文件修改内容
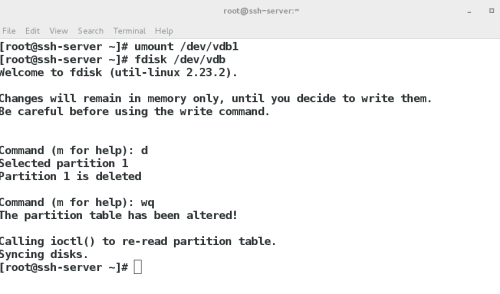
3.删除分区
umount /dev/vdbl
fdisk /dev/vdb
图示:删除分区
五、swap分区
##swap 交换分区,系统自己使用,不需要挂载
1.swap分区的查看
swapon -s swap分区信息
Filename Type
/dev/sda7 partition
2.swap分区的建立
划分分区,并修改分区的id为swap
fdisk /dev/vdb 建立分区
Device Boot Start End Blocks Id System
/dev/vdb1 2048 2050047 1024000 83 Linux swap / Solaris
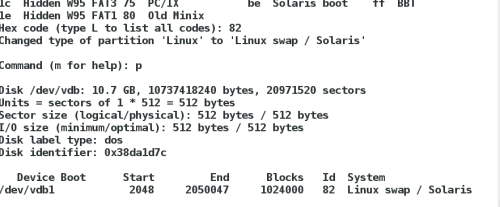
Command (m for help): t ##修改分区id
Selected partition 1
Hex code (type L to list all codes): l ##列出所有id类型代码
Hex code (type L to list all codes): 82 ##把/dev/vdb1的分区类型修改为swap,swap类型代码为82
Changed type of partition 'Linux' to 'Linux swap / Solaris'
Device Boot Start End Blocks Id System
/dev/vdb1 2048 2050047 1024000 82 Linux swap / Solaris
Command (m for help): wq
[root@ssh-server ~]# mkswap /dev/vdb1 ##格式化设备为swap文件系统格式
[root@ssh-server ~]# swapon -a /dev/vdb1 ##激活swap设备,使系统利用此设备
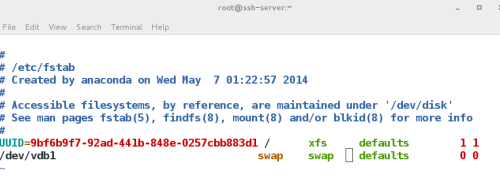
[root@ssh-server ~]# vim /etc/fstab ##让此设备开机自动激活
UUID=9bf6b9f7-92ad-441b-848e-0257cbb883d1 / xfs defaults 1 1
/dev/vdb1 swap swap defaults 0 0
图示:swap分区的建立200944 201027

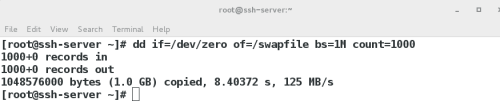
##当磁盘全部被占用时,不能创建新分区时,可用文件来代替分区
[root@ssh-server ~]# dd if=/dev/zero of=/swapfile bs=1M count=1000
图示:文件代替分区201505
此文件创建后的步骤和设备的步骤一致
[root@ssh-server ~]# mkdir /swapfile
[root@ssh-server ~]# swapon -s
UUID=9bf6b9f7-92ad-441b-848e-0257cbb883d1 / xfs defaults 1 1
/dev/vdb1 swap swap defaults 0 0
图示:修改策略文件
3.swap分区的删除
[root@ssh-server ~]# swapoff /dev/vdb1
[root@ssh-server ~]# swapoff /swapfile
[root@ssh-server ~]# fdisk /dev/vdb
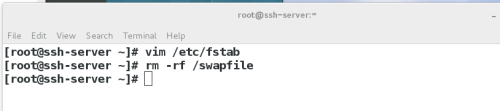
[root@ssh-server ~]# rm -rf /swapfile
图示:删除swap分区
六、配额
为磁盘使用用户分配额度
分区配额针对设备
激活设备配额参数
mount -o usrquota /dev/vdb1 /mnt
chmod 777 /mnt
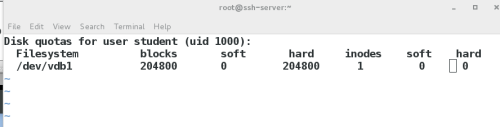
edquota -u student /dev/vdb1
Disk quotas for user student (uid 1000):
Filesystem blocks soft hard inodes soft hard
/dev/vdb1 2048 0 204800 1 0 0
图示:修改配置文件
测试
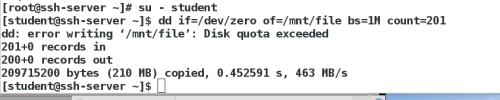
su - student
[student@done2 ~]$dd if=/dev/zero of=/pub/file bs=1M count=201
dd: error writing ‘/mnt/file’: Disk quota exceeded ##超过配额限制
201+0 records in
200+0 records out
209715200 bytes (210 MB) copied, 0.763976 s, 275 MB/s
图示:测试
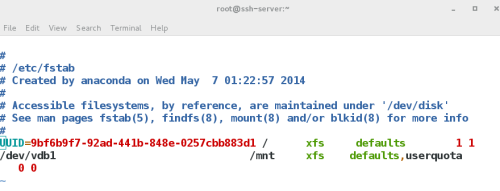
[root@ssh-server ~]# vim /etc/fstab ##开机自动激活配额
图示:修改策略文件
七、gpt分区方式的设定
1.dos--->gpt
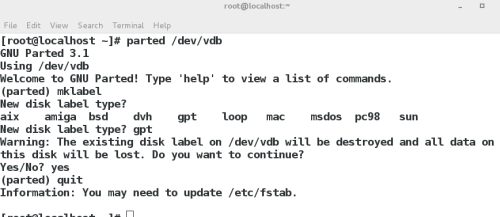
[root@server0 ~]# parted /dev/vdb
GNU Parted 3.1
Using /dev/vdb
Welcome to GNU Parted! Type 'help' to view a list of commands.
(parted) mklabel ##修改设备分区方式标签
New disk label type? ##所有的标签类型(连续两次按Tab按键可出现)
aix amiga bsd dvh gpt loop mac msdos pc98 sun
New disk label type? gpt ##把原有mbr标签格式改为gpt标签
Warning: The existing disk label on /dev/vdb will be destroyed and all data onthis disk will be lost. Do you
want to continue?
Yes/No? y
(parted) quit
图示:更改为gpt格式
2.gpt--->dos
[root@ssh-server ~]# parted /dev/vdb
GNU Parted 3.1
Using /dev/vdb
Welcome to GNU Parted! Type 'help' to view a list of commands.
(parted) mklabel ##修改设备分区方式标签
New disk label type? mac ##把原有gpt标签格式改为mbr标签
Warning: The existing disk label on /dev/vdb will be destroyed and all data onthis disk will be lost. Do you
want to continue?
Yes/No? y
(parted) quit
图示:更改为doc格式

八、磁盘加密
1.磁盘加密
*建立分区
fdisk /dev/vdb
*加密
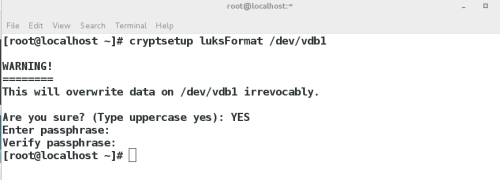
[root@localhost ~]# cryptsetup luksFormat /dev/vdb1
WARNING!
========
This will overwrite data on /dev/vdb1 irrevocably.
Are you sure? (Type uppercase yes): YES ##需要大写
Enter passphrase: ##密码需超过8位,不能有相关用过的单词
Verify passphrase:
图示:加密过程
*将文件保存到westos中
cryptsetup open /dev/vdb1 westos
*格式化设备
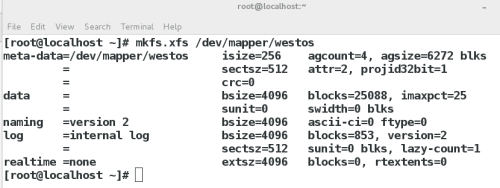
mkfs.xfs /dev/mapper/westos
图示:格式化
*挂载
mount /dev/mapper/westos /mnt/
touch /mnt/file{1..5}
*卸载
umount /mnt/
*关闭westos
cryptsetup close westos
*再次打开
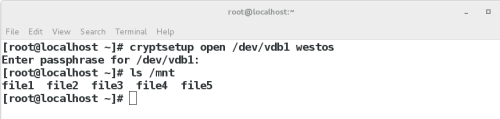
cryptsetup open /dev/vdb1 westos
mount /dev/mapper/westos /mnt
图示:当再次打开时需要密码进入,可以看到之前建立的file文件
2.加密设备的永久挂载
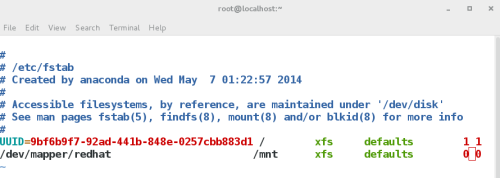
vim /etc/crypttab
解密后设备管理文件 设备 加密字符存放文件
redhat /dev/vdb1 /root/lukspsfile
图示:配置文件内容

vim /root/lukspsfile
chmod 600 /root/lukspsfile
图示:配置文件内容

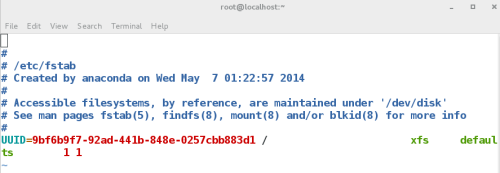
vim /etc/fstab
图示:配置文件内容
reboot
3.加密清除
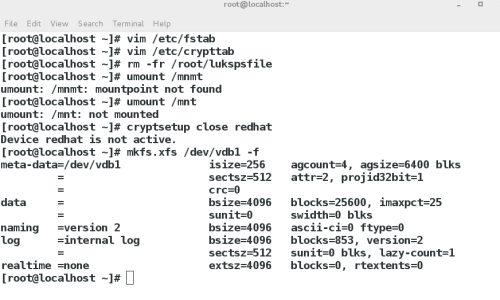
vim /etc/fstab
vim /etc/crypttab
rm -fr /root/lukspsfile
umount /mnt/
cryptsetup close redhat
mkfs.xfs /dev/vdb1 -f
图示:清除加密后配置文件内容
###end###
1.发现系统中的设备
fdisk -l
cat /proc/partitions
图示:发现设备
2.系统发现的,但是没用投入使用,随时可以使用设备
blkid #查看设备的id信息
3.发现并且在使用的设备
df -h #2的n次方
df -H #10的n次方
图示:正在使用的设备
**两者的区别:统计的计算方法不同
二、设备名称的读取
/dev/xd*
x=s /dev/sd* #sata硬盘,过着iscsi网络储存
x=v /dev/vd* #虚拟硬盘,一般出现杂u虚拟机里
x=h /dev/hd* #ide硬盘,一般出现在老式电脑
*=a~... #/dev/vda,系统中第一款虚拟硬盘
/dev/sda1 #系统中第一块sata硬盘的第一个分区
/dev/cdrom,/dev/sr[0-...] #系统中的光驱
/dev/mapper/* #系统中的虚拟设备
三、设备的使用
设备必须要用目录来对设备中的内容进行读取
设备在使用时需要作挂载动作
1.设备挂载
blkid 识别可用设备
mount 设备的挂载
图示:正在挂载的设备
mount /dev/vdb1 /mnt ##把系统中第二块硬盘的第一个分区挂载到 mnt下
图示:挂载到/mnt
mount -o ro /dev/vdb1 /mnt/ ##只读挂载到第二块硬盘的第一个分区挂载到mnt下
图示:只读挂载
2.设备卸载
umount 设备|挂载点
umount /dev/sdb1 | /mnt
图示:卸载设备
当出现以下这种情况时,表示设备正在运行,不能卸载
umount: /mnt: target is busy.
(In some cases useful info aboutprocesses that use
the device is found by lsof(8)or fuser(1))
需执行以下操作强行关闭正在进行的程序
fuser -kvm /mnt
再进行卸载
四、分区划分
1.建立分区
fdisk /dev/vdb
elcome to fdisk (util-linux 2.23.2).
Changes will remain in memory only, until you decide to write them.
Be careful before using the write command.
Command (m for help): m ##帮助
Command action
a toggle a bootable flag
b edit bsd disklabel
c toggle the dos compatibility flag
d delete a partition ##删除分区
g create a new empty GPT partition table
G create an IRIX (SGI) partition table
l list known partition types ##列出系统可用的分区类型
m print this menu
n add a new partition ##新建分区
o create a new empty DOS partition table
p print the partition table ##显示分区
q quit without saving changes ##退出
s create a new empty Sun disklabel
t change a partition's system id ##修改分区功能id
u change display/entry units
v verify the partition table
w write table to disk and exit ##保存更改到分区表中
x extra functionality (experts only)
Command (m for help): n ##新建分区
Partition type:
p primary (0 primary, 0 extended, 4 free) ##分区类型位主分区
e extended ##分区类型位扩展分区
Select (default p): ##默认位主分区
Using default response p
Partition number (1-4, default 1): 1 ##确定主分区id
First sector (2048-20971519, default 2048): ##此分区起始块位置
Using default value 2048
Last sector, +sectors or +size{K,M,G} (2048-20971519, default 20971519): +100M ##分区结束块位置,用+大小
Partition 1 of type Linux and of size 100 MiB is set
Command (m for help): p ##查看已经建立分区
Disk /dev/vdb: 10.7 GB, 10737418240 bytes, 20971520 sectors
Units = sectors of 1 * 512 = 512 bytes
Sector size (logical/physical): 512 bytes / 512 bytes
I/O size (minimum/optimal): 512 bytes / 512 bytes
Disk label type: dos
Disk identifier: 0x193488c3
Device Boot Start End Blocks Id System
/dev/vdb1 2048 206847 102400 83 Linux ##默认情况下此分区是linux分区的普通分区
Command (m for help): wq ##保存推出,如果安q表示放弃更改退出
图示:建立分区
[root@ssh-server ~]# partprobe ##同步分区表
cat /proc/partitions ##查看系统识别的分区信息
图示:同步分区表并查看
2.设备的挂载
--设备临时挂载
mkfs.xfs /dev/vdb1 ##格式化设备,载设备上安装文件系统xfs
图示:格式化设备
blkid ##查看可用设备,可以看到被格式化的后的/dev/vdb1
图示:查看可用设备
mount /dev/vdb1 /mnt ##临时挂载设备,使设备投入使用
图示:挂载到/mnt
--设备永久挂载
vim /etc/fstab ## 设备永久挂载策略文件
图示:修改策略文件
设备 挂载点 文件系统类型 挂载参数 是否备份设备 是否设备检测
devic mountpoint ftype defaults(mountpoint) 0 0
/dev/vdb1 /mnt xfs defaults 0 0
mount -a #使/etc/fstab中记录的未生效挂载策略生效
图示:策略文件修改内容
3.删除分区
umount /dev/vdbl
fdisk /dev/vdb
图示:删除分区
五、swap分区
##swap 交换分区,系统自己使用,不需要挂载
1.swap分区的查看
swapon -s swap分区信息
Filename Type
/dev/sda7 partition
2.swap分区的建立
划分分区,并修改分区的id为swap
fdisk /dev/vdb 建立分区
Device Boot Start End Blocks Id System
/dev/vdb1 2048 2050047 1024000 83 Linux swap / Solaris
Command (m for help): t ##修改分区id
Selected partition 1
Hex code (type L to list all codes): l ##列出所有id类型代码
Hex code (type L to list all codes): 82 ##把/dev/vdb1的分区类型修改为swap,swap类型代码为82
Changed type of partition 'Linux' to 'Linux swap / Solaris'
Device Boot Start End Blocks Id System
/dev/vdb1 2048 2050047 1024000 82 Linux swap / Solaris
Command (m for help): wq
[root@ssh-server ~]# mkswap /dev/vdb1 ##格式化设备为swap文件系统格式
[root@ssh-server ~]# swapon -a /dev/vdb1 ##激活swap设备,使系统利用此设备
[root@ssh-server ~]# vim /etc/fstab ##让此设备开机自动激活
UUID=9bf6b9f7-92ad-441b-848e-0257cbb883d1 / xfs defaults 1 1
/dev/vdb1 swap swap defaults 0 0
图示:swap分区的建立200944 201027
##当磁盘全部被占用时,不能创建新分区时,可用文件来代替分区
[root@ssh-server ~]# dd if=/dev/zero of=/swapfile bs=1M count=1000
图示:文件代替分区201505
此文件创建后的步骤和设备的步骤一致
[root@ssh-server ~]# mkdir /swapfile
[root@ssh-server ~]# swapon -s
UUID=9bf6b9f7-92ad-441b-848e-0257cbb883d1 / xfs defaults 1 1
/dev/vdb1 swap swap defaults 0 0
图示:修改策略文件
3.swap分区的删除
[root@ssh-server ~]# swapoff /dev/vdb1
[root@ssh-server ~]# swapoff /swapfile
[root@ssh-server ~]# fdisk /dev/vdb
[root@ssh-server ~]# rm -rf /swapfile
图示:删除swap分区
六、配额
为磁盘使用用户分配额度
分区配额针对设备
激活设备配额参数
mount -o usrquota /dev/vdb1 /mnt
chmod 777 /mnt
edquota -u student /dev/vdb1
Disk quotas for user student (uid 1000):
Filesystem blocks soft hard inodes soft hard
/dev/vdb1 2048 0 204800 1 0 0
图示:修改配置文件
测试
su - student
[student@done2 ~]$dd if=/dev/zero of=/pub/file bs=1M count=201
dd: error writing ‘/mnt/file’: Disk quota exceeded ##超过配额限制
201+0 records in
200+0 records out
209715200 bytes (210 MB) copied, 0.763976 s, 275 MB/s
图示:测试
[root@ssh-server ~]# vim /etc/fstab ##开机自动激活配额
图示:修改策略文件
七、gpt分区方式的设定
1.dos--->gpt
[root@server0 ~]# parted /dev/vdb
GNU Parted 3.1
Using /dev/vdb
Welcome to GNU Parted! Type 'help' to view a list of commands.
(parted) mklabel ##修改设备分区方式标签
New disk label type? ##所有的标签类型(连续两次按Tab按键可出现)
aix amiga bsd dvh gpt loop mac msdos pc98 sun
New disk label type? gpt ##把原有mbr标签格式改为gpt标签
Warning: The existing disk label on /dev/vdb will be destroyed and all data onthis disk will be lost. Do you
want to continue?
Yes/No? y
(parted) quit
图示:更改为gpt格式
2.gpt--->dos
[root@ssh-server ~]# parted /dev/vdb
GNU Parted 3.1
Using /dev/vdb
Welcome to GNU Parted! Type 'help' to view a list of commands.
(parted) mklabel ##修改设备分区方式标签
New disk label type? mac ##把原有gpt标签格式改为mbr标签
Warning: The existing disk label on /dev/vdb will be destroyed and all data onthis disk will be lost. Do you
want to continue?
Yes/No? y
(parted) quit
图示:更改为doc格式
八、磁盘加密
1.磁盘加密
*建立分区
fdisk /dev/vdb
*加密
[root@localhost ~]# cryptsetup luksFormat /dev/vdb1
WARNING!
========
This will overwrite data on /dev/vdb1 irrevocably.
Are you sure? (Type uppercase yes): YES ##需要大写
Enter passphrase: ##密码需超过8位,不能有相关用过的单词
Verify passphrase:
图示:加密过程
*将文件保存到westos中
cryptsetup open /dev/vdb1 westos
*格式化设备
mkfs.xfs /dev/mapper/westos
图示:格式化
*挂载
mount /dev/mapper/westos /mnt/
touch /mnt/file{1..5}
*卸载
umount /mnt/
*关闭westos
cryptsetup close westos
*再次打开
cryptsetup open /dev/vdb1 westos
mount /dev/mapper/westos /mnt
图示:当再次打开时需要密码进入,可以看到之前建立的file文件
2.加密设备的永久挂载
vim /etc/crypttab
解密后设备管理文件 设备 加密字符存放文件
redhat /dev/vdb1 /root/lukspsfile
图示:配置文件内容
vim /root/lukspsfile
chmod 600 /root/lukspsfile
图示:配置文件内容
vim /etc/fstab
图示:配置文件内容
reboot
3.加密清除
vim /etc/fstab
vim /etc/crypttab
rm -fr /root/lukspsfile
umount /mnt/
cryptsetup close redhat
mkfs.xfs /dev/vdb1 -f
图示:清除加密后配置文件内容
###end###

相关文章推荐
- Linux--RH134---unit 4 管理系统中的简单分区和文件系统
- Linux高级管理之管理系统中的简单分区和文件系统
- Linux学习第四单元-管理系统中的简单分区和文件系统
- Linux运维笔记----管理系统中的简单分区和文件系统
- Linux运维笔记-文档总结-管理系统中的简单分区和文件系统
- liunx初级学习之管理系统中的简单分区和文件系统2-4
- Linux系统的磁盘管理及分区应用
- Linux操作系统的管理(系统软件安装及简单管理)五
- unit4 管理系统中的简单分区和文件系统
- Linux 系统的简单介绍,分区讲解,查看命令,文件目录内容
- 管理系统中的简单分区和文件系统
- linux的存储管理:硬盘、分区及文件系统
- linux 磁盘管理三部曲——(2)管理分区,文件系统类型格式化
- LINUX 文件分区系统管理
- 第二课unit4 管理系统中的简单分区和文件系统
- Linux学习笔记------讲9.3.1文件系统管理-----fdisk分区---分区过程
- 管理系统中的简单分区和文件系统
- Linux系统管理.Linux中的分区与格式化
- Linux之文件系统管理-分区和文件系统
- Linux 文件系统管理---分区介绍