Butter Knife使用详解
2017-11-01 22:57
363 查看
Butter Knife
Github地址: https://github.com/JakeWharton/butterknife

官方说明给出的解释是 Bind Android views and callbacks to fields and methods.
Field and method binding for Android views which uses annotation processing to generate boilerplate code for you.
Eliminate
Group multiple views in a list or array. Operate on all of them at once with actions, setters, or properties.
Eliminate anonymous inner-classes for listeners by annotating methods with
Eliminate resource lookups by using resource annotations on fields.
意思就是:将Android视图和回调绑定到字段和方法。使用注释处理为您生成样板代码的Android视图的字段和方法绑定。通过在字段上使用@BindView消除findViewById调用。在列表或数组中分组多个视图。 使用操作,设置器或属性一次操作所有这些。通过使用@OnClick和其他方法注释方法,消除匿名内部类的侦听器。通过在字段上使用资源注释来消除资源查找。
官方文档给出了Butter Knife在Gradle里面如何配置

下面我们就来配置Buffer Knife到工程里面
新建Android Studio工程(作者的Android Studio版本是2.3)
项目主体结构如下:

首先,配置build.gradle(Project:XXX)
新建工程的build.gradle(Project:XXX)初始样子如下:
然后我们按照官方文档进行配置
在repositories {}里面添加
在dependencies {}里面添加
build.gradle(Project:XXX)完整代码即:
其次,修改build.gradle(Module:XXX)
新建工程的build.gradle(Module:XXX)初始样子如下:
然后我们按照官方文档进行配置

又有同学问了,我在Github上面看到大神们用Butter Knife去编写代码,初始化的时候总是蒙圈。其实 Butter Knife的初衷就是简化代码,让程序员更有效率的开发。
这时候可以利用Android Studio里面的 Plugins来辅助我们开发。
File -> Settings -> Plguins
然后在右面的搜索框里面输入 ButterKnife,然后点击下面的 Search in repositories

就会出现下图的场景:
选择第一个 Android ButterKnife PPlugin Plus 然后点击 Install,重启Android Studio
重启之后,Butter Knife就可以很好的为我们效劳了。
那么Butter Knife如何使用呢?
首先,打开布局文件
Android Studio更新到2.3以后的布局文件初始是这样的

为了做演示,我们稍微修改一下,添加几个控件。
一个EditText,两个Button

在布局文件上面右键,选择Generate

然后选择 Generate Butterknife Injections

这里我们可以看到布局文件中的控件都出现在上面,可以额外选择点击事件OnClick
Confirm之后的场景如下:
可以清晰的看到 Butter Knife 已经开始为我们效劳了。
(注意:ButterKnife.bind(this) 是一定要写在onCreate里面)
学会使用 BUffer Knife,可以让程序自动化帮忙减轻工作量!
原文来自:http://www.cnblogs.com/cnwutianhao/p/6610529.html
Github地址: https://github.com/JakeWharton/butterknife
官方说明给出的解释是 Bind Android views and callbacks to fields and methods.
Field and method binding for Android views which uses annotation processing to generate boilerplate code for you.
Eliminate
findViewByIdcalls by using
@BindViewon fields.
Group multiple views in a list or array. Operate on all of them at once with actions, setters, or properties.
Eliminate anonymous inner-classes for listeners by annotating methods with
@OnClickand others.
Eliminate resource lookups by using resource annotations on fields.
意思就是:将Android视图和回调绑定到字段和方法。使用注释处理为您生成样板代码的Android视图的字段和方法绑定。通过在字段上使用@BindView消除findViewById调用。在列表或数组中分组多个视图。 使用操作,设置器或属性一次操作所有这些。通过使用@OnClick和其他方法注释方法,消除匿名内部类的侦听器。通过在字段上使用资源注释来消除资源查找。
官方文档给出了Butter Knife在Gradle里面如何配置
下面我们就来配置Buffer Knife到工程里面
新建Android Studio工程(作者的Android Studio版本是2.3)
项目主体结构如下:
首先,配置build.gradle(Project:XXX)
新建工程的build.gradle(Project:XXX)初始样子如下:
然后我们按照官方文档进行配置
在repositories {}里面添加
mavenCentral()
在dependencies {}里面添加
classpath 'com.jakewharton:butterknife-gradle-plugin:8.5.1'
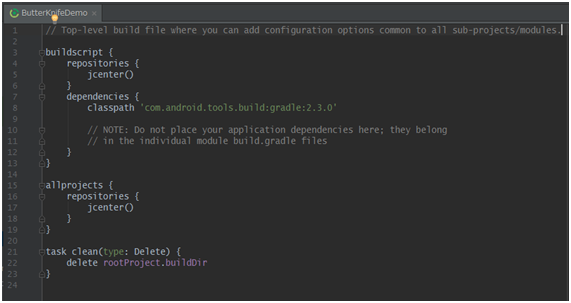
build.gradle(Project:XXX)完整代码即:
// Top-level build file where you can add configuration options common to all sub-projects/modules.

buildscript {
repositories {
jcenter()
mavenCentral()
}
dependencies {
classpath 'com.android.tools.build:gradle:2.3.0'
classpath 'com.jakewharton:butterknife-gradle-plugin:8.5.1'

// NOTE: Do not place your application dependencies here; they belong
// in the individual module build.gradle files
}
}

allprojects {
repositories {
jcenter()
}
}

task clean(type: Delete) {
delete rootProject.buildDir
}
其次,修改build.gradle(Module:XXX)
新建工程的build.gradle(Module:XXX)初始样子如下:
然后我们按照官方文档进行配置
在开头添加
apply plugin: 'com.jakewharton.butterknife'
在dependencies {} 里面添加compile 'com.jakewharton:butterknife:8.5.1' annotationProcessor 'com.jakewharton:butterknife-compiler:8.5.1'
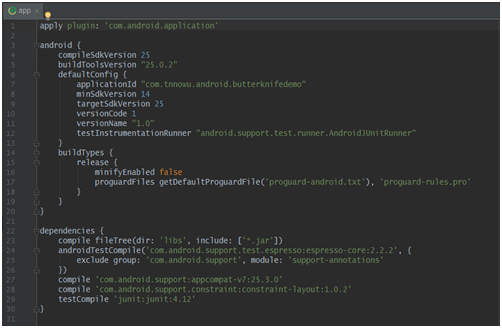
build.gradle(Module:XXX)完整代码即:
apply plugin: 'com.android.application'
apply plugin: 'com.jakewharton.butterknife'
android {
compileSdkVersion 25
buildToolsVersion "25.0.2"
defaultConfig {
applicationId "com.tnnowu.android.butterknifedemo"
minSdkVersion 14
targetSdkVersion 25
versionCode 1
versionName "1.0"
testInstrumentationRunner "android.support.test.runner.AndroidJUnitRunner"
}
buildTypes {
release {
minifyEnabled false
proguardFiles getDefaultProguardFile('proguard-android.txt'), 'proguard-rules.pro'
}
}
}
dependencies {
compile fileTree(dir: 'libs', include: ['*.jar'])
androidTestCompile('com.android.support.test.espresso:espresso-core:2.2.2', {
exclude group: 'com.android.support', module: 'support-annotations'
})
compile 'com.android.support:appcompat-v7:25.3.0'
compile 'com.android.support.constraint:constraint-layout:1.0.2'
testCompile 'junit:junit:4.12'
compile 'com.jakewharton:butterknife:8.5.1'
annotationProcessor 'com.jakewharton:butterknife-compiler:8.5.1'
}
至此,我们的Butter Knife就已经正确的配置到我们的工程里面了。
彩蛋:
做过安卓项目的同学都知道,比如工程里面的get、set 方法,都是通过Generate快速编译的。(说到这里如果你没看懂的话,说明你的Android开发经验太少了,请自行百度查找)
又有同学问了,我在Github上面看到大神们用Butter Knife去编写代码,初始化的时候总是蒙圈。其实 Butter Knife的初衷就是简化代码,让程序员更有效率的开发。
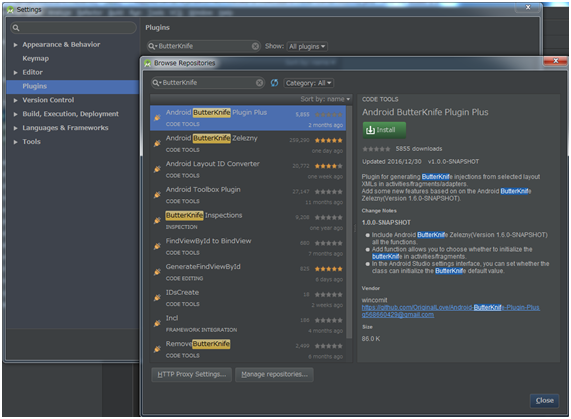
这时候可以利用Android Studio里面的 Plugins来辅助我们开发。
File -> Settings -> Plguins
然后在右面的搜索框里面输入 ButterKnife,然后点击下面的 Search in repositories
就会出现下图的场景:
选择第一个 Android ButterKnife PPlugin Plus 然后点击 Install,重启Android Studio
重启之后,Butter Knife就可以很好的为我们效劳了。
那么Butter Knife如何使用呢?
首先,打开布局文件
Android Studio更新到2.3以后的布局文件初始是这样的
为了做演示,我们稍微修改一下,添加几个控件。
一个EditText,两个Button
<?xml version="1.0" encoding="utf-8"?>
<LinearLayout xmlns:android="http://schemas.android.com/apk/res/android"
xmlns:tools="http://schemas.android.com/tools"
android:layout_width="match_parent"
android:layout_height="match_parent"
android:orientation="vertical"
tools:context="com.tnnowu.android.butterknifedemo.MainActivity">

<EditText
android:id="@+id/edit_text"
android:layout_width="match_parent"
android:layout_height="50dp" />

<Button
android:id="@+id/btn1"
android:layout_width="match_parent"
android:layout_height="50dp" />

<Button
android:id="@+id/btn2"
android:layout_width="match_parent"
android:layout_height="50dp" />

</LinearLayout>
然后,我到Class类里面去用 Butter Knife绑定控件,代替 findViewById

初始Class类文件如下:
在布局文件上面右键,选择Generate
然后选择 Generate Butterknife Injections
这里我们可以看到布局文件中的控件都出现在上面,可以额外选择点击事件OnClick
Confirm之后的场景如下:
package com.tnnowu.android.butterknifedemo;

import android.os.Bundle;
import android.support.v7.app.AppCompatActivity;
import android.view.View;
import android.widget.Button;
import android.widget.EditText;

import butterknife.BindView;
import butterknife.ButterKnife;
import butterknife.OnClick;

public class MainActivity extends AppCompatActivity implements View.OnClickListener {

@BindView(R.id.edit_text)
EditText editText;
@BindView(R.id.btn1)
Button btn1;
@BindView(R.id.btn2)
Button btn2;

@Override
protected void onCreate(Bundle savedInstanceState) {
super.onCreate(savedInstanceState);
setContentView(R.layout.activity_main);
ButterKnife.bind(this);
}

@OnClick({R.id.btn1, R.id.btn2})
public void onClick(View view) {
switch (view.getId()) {
case R.id.btn1:
break;
case R.id.btn2:
break;
}
}
}
可以清晰的看到 Butter Knife 已经开始为我们效劳了。
(注意:ButterKnife.bind(this) 是一定要写在onCreate里面)
学会使用 BUffer Knife,可以让程序自动化帮忙减轻工作量!
原文来自:http://www.cnblogs.com/cnwutianhao/p/6610529.html

相关文章推荐
- ButterKnife框架使用详解
- 【Android】Android开发之著名框架ButterKnife的使用详解,butterknife8.1.0版本的使用方法
- butterknife的注册和使用详解
- Android依赖注入框架:ButterKnife 8.4.0新版本导入及使用详解
- 关于butterknife:8.4.0使用详解。
- ButterKnife使用详解
- ButterKnife8.10的使用详解
- Butter Knife 配置及使用入门详解
- Butter Knife 配置及使用入门详解
- Android ButterKnife 注解框架的使用详解和原理分析
- ButterKnife使用详解
- Android框架ButterKnife的使用详解,butterknife8.x.x版本的使用方法
- Android 之ButterKnife配置和使用详解
- Android Studio中ButterKnife插件的安装与使用详解
- ButterKnife框架使用详解
- ButterKnife使用详解
- Android注解使用之ButterKnife 8.0详解
- Android Studio ButterKnife使用详解---省时省力的神器
- ButterKnife框架使用详解
- ButterKnife使用详解