基于HTML5 Canvas的工控SCADA模拟飞机飞行
2017-11-01 14:08
846 查看
来看下具体实现的效果:
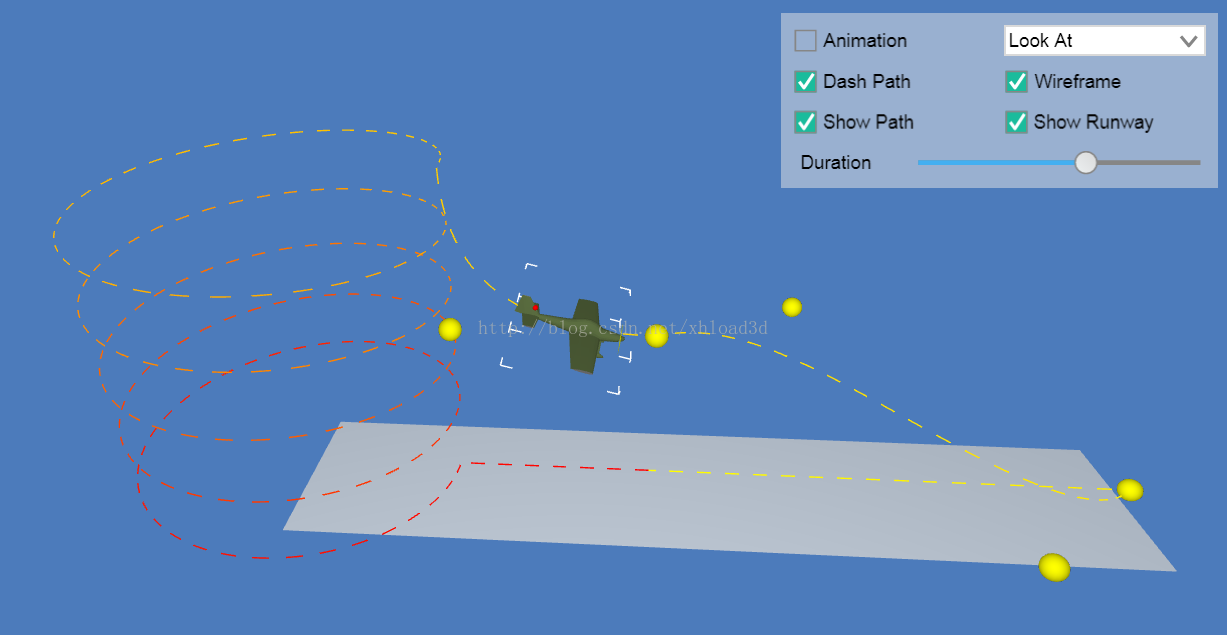
这个例子基本上完全模拟了飞机的飞行模式,包括起飞跑道,包括飞机的移动路径,螺旋桨的旋转,机尾的指示灯等部分。
首先,最重要的是我们的飞机模型,前面有文章写到过,HT 内部封装了一个方法 ht.Default.loadObj 来加载 OBJ 文件:
这里面的 modelMap.propeller 是 OBJ 文件中定义好的 modelMap 对象中的 propeller 对象,你可以试着打印 modelMap 看看输出结果。
这个方法里的 finishFunc(modelMap, array, rawS3) 用于加载后的回调处理,具体查阅 HT for Web OBJ 手册,我们还添加了一个在 OBJ 模型中没有的飞机尾部的“红色闪烁指示灯”,这里用到的是组合模型
array(所有材质组成的数组,里面有至少一个模型),我们在 array中加入一个新的球模型:
这里的 shape3d 是 HT 封装的一个属性名,通过 setShape3dModel(name, model) 函数注册的或者是通过 getShape3dModel(name) 函数返回的注册过的 3D 模型,如何注册 3D 模型可查阅 HT
for Web 建模手册。
color 属性名对应了一个对象,这边的定义是这样的,color 直接通过 data.getAttr('a') 获取 data.setAttr(‘a’, value) 中的值,这样做有两个好处,一是可以不污染 HT 的常用属性操作,所以 HT 专门定义了这个 attr 属性类型,是 HT 预留给用户存储业务数据的;二是这样也很方便数据绑定,我们可以通过在需要更改属性的地方调用 setAttr 方法,非常方便。
接着我们通过 ht.Default.setShape3dModel(name, model) 来将我们刚刚组合好的模型 array 注册成我们要的“plane”模型:
注册好模型后肯定是要调用这个模型,我们可以通过 shape3d 属性来调用这个模型,并且在这个模型中自定义上面代码中出现过的 light 属性和 angle 属性:
因为飞机还有螺旋桨、指示灯两个功能,我们还得对这两个模型做动画效果,可查阅 HT for Web 动画手册,通过用户在 form 表单上选择的结果来决定飞机飞行持续时间、看飞机的视角、飞机沿着“航线”飞行所要旋转的角度、机尾指示灯的“闪烁”功能等等,最后别忘了飞机停止飞行时,如果要让飞机继续飞行,就得回调这个动画,并且设置灯不再闪烁,别忘了要启动动画:
其实最让我们好奇的是描绘的路径跟飞机本身的飞行并没有关系,还有那么多左拐右拐的,要如何做才能做到呢?
接下来我们来描绘路径,首先这个路径是由 ht.Polyline 作为基础来描绘的:
上面的代码只是向 datamodel 数据模型中添加了一个 polyline 管线而已,不会显示任何东西,要显示“航道”首先就要设置航道所在的点,我们先设置航道的初始点:
这个 points 和 segments 是 HT for Web Shape 手册中定义的,points 是 ht.List 类型数组的定点信息,顶点为 { x: 100, y: 200 } 格式的对象;segments 是 ht.List 类型的线段数组信息,代表
points 数组中的顶点按数组顺序的连接方式。
图中“航道”左侧的多个圆形轨道也是通过设置 points 和 segments 来设置的:
接下来几个拐点也是这种方法来实现的,这里就不赘述了,如果你还没看手册的话,这里标明一点,segments 只能取值 1~5,1 代表一个新路径的起点;2 代表从上次最后点连接到该点;3 占用两个点信息,第一个点作为曲线控制点,第二个点作为曲线结束点;4 占用3个点信息,第一和第二个点作为曲线控制点,第三个点作为曲线结束点;5 不占用点信息,代表本次绘制路径结束,并闭合到路径的起始点:
我们已经把路径上的点都添加进“航道”中了,接下来要把点都设置到管道上去才会显示在界面上:
“跑道”就比较简单了,只是一个 Node 节点然后设置基础效果而已,没什么特别的:
最后,在界面上添加一个 formPane 表单面板,定义好之后可以直接添加到 body 上,这样就不会跟 graph3dView 有显示的联系了。【本文由“编程小王子”发布,2017年11月1日】
这个例子基本上完全模拟了飞机的飞行模式,包括起飞跑道,包括飞机的移动路径,螺旋桨的旋转,机尾的指示灯等部分。
首先,最重要的是我们的飞机模型,前面有文章写到过,HT 内部封装了一个方法 ht.Default.loadObj 来加载 OBJ 文件:
1 ht.Default.loadObj('obj/plane.obj', 'obj/plane.mtl', {
2     center: true,
3     r3: [0, -Math.PI/2, 0], // make plane face right
4     s3: [0.15, 0.15, 0.15], // make plane smaller
5     finishFunc: function(modelMap, array, rawS3){
6         if(modelMap){
7             modelMap.propeller.r3 = {//propeller 螺旋桨
8             func: function(data){
9                 return [data.a('angle'), 0, 0];
10             }
11         };
12         // make propeller a litter bigger
13         modelMap.propeller.s3 = [1, 1.2, 1.2];
14         modelMap.propeller.color = 'yellow';
15     }
16 });
这里面的 modelMap.propeller 是 OBJ 文件中定义好的 modelMap 对象中的 propeller 对象,你可以试着打印 modelMap 看看输出结果。
这个方法里的 finishFunc(modelMap, array, rawS3) 用于加载后的回调处理,具体查阅 HT for Web OBJ 手册,我们还添加了一个在 OBJ 模型中没有的飞机尾部的“红色闪烁指示灯”,这里用到的是组合模型
array(所有材质组成的数组,里面有至少一个模型),我们在 array中加入一个新的球模型:
1 // add a sphere model as an indicator light 指示灯
2 array.push({
3     shape3d: ht.Default.createSmoothSphereModel(),
4     t3: [-40, 10, 0],
5     s3: [6, 6, 6],
6     color: {
7         func: function(data){
8             return data.a('light') ? 'red': 'black';
9         }
10     }
11 });
这里的 shape3d 是 HT 封装的一个属性名,通过 setShape3dModel(name, model) 函数注册的或者是通过 getShape3dModel(name) 函数返回的注册过的 3D 模型,如何注册 3D 模型可查阅 HT
for Web 建模手册。
color 属性名对应了一个对象,这边的定义是这样的,color 直接通过 data.getAttr('a') 获取 data.setAttr(‘a’, value) 中的值,这样做有两个好处,一是可以不污染 HT 的常用属性操作,所以 HT 专门定义了这个 attr 属性类型,是 HT 预留给用户存储业务数据的;二是这样也很方便数据绑定,我们可以通过在需要更改属性的地方调用 setAttr 方法,非常方便。
接着我们通过 ht.Default.setShape3dModel(name, model) 来将我们刚刚组合好的模型 array 注册成我们要的“plane”模型:
1 ht.Default.setShape3dModel('plane', array);注册好模型后肯定是要调用这个模型,我们可以通过 shape3d 属性来调用这个模型,并且在这个模型中自定义上面代码中出现过的 light 属性和 angle 属性:
1 plane = new ht.Node();
2 plane.s3(200, 200, 200);
3 plane.s3(rawS3);
4 plane.s({
5     'shape3d': 'plane',
6     'shape3d.scaleable': false,
7     'wf.visible': true,//线框是否可见
8     'wf.color': 'white',
9     'wf.short': true //是否显示封闭的线框,true为不封闭的短线框
10 });
11 plane.a({
12     'angle': 0,
13     'light': false
14 });
因为飞机还有螺旋桨、指示灯两个功能,我们还得对这两个模型做动画效果,可查阅 HT for Web 动画手册,通过用户在 form 表单上选择的结果来决定飞机飞行持续时间、看飞机的视角、飞机沿着“航线”飞行所要旋转的角度、机尾指示灯的“闪烁”功能等等,最后别忘了飞机停止飞行时,如果要让飞机继续飞行,就得回调这个动画,并且设置灯不再闪烁,别忘了要启动动画:
1 params = {
2     delay: 1500,
3     duration: 20000,
4     easing: function(t){
5         return (t *= 2) < 1 ? 0.5 * t * t : 0.5 * (1 - (--t) * (t - 2));
6     },
7     action: function(v, t){
8         var length = g3d.getLineLength(polyline),
9         offset = g3d.getLineOffset(polyline, length*v),
10         point = offset.point,
11         px = point.x,
12         py = point.y,
13         pz = point.z,
14         tangent = offset.tangent,
15         tx = tangent.x,
16         ty = tangent.y,
17         tz = tangent.z;
18         plane.p3(px, py, pz);
19         plane.lookAt([px + tx, py + ty, pz + tz], 'right');
20
21         var camera = formPane.v('Camera');
22         if(camera === 'Look At'){
23             g3d.setCenter(px, py, pz);
24         }
25         else if(camera === 'First Person'){
26             g3d.setEye(px - tx * 400, py - ty * 400 + 30, pz - tz * 400);
27             g3d.setCenter(px, py, pz);
28         }
29
30         plane.a('angle', v*Math.PI*120);
31         if(this.duration * t % 1000 > 500){
32             plane.a('light', false);
33         }else{
34             plane.a('light', true);
35         }
36     },
37     finishFunc: function(){
38         animation = ht.Default.startAnim(params);
39         plane.a('light', false);
40     }
41 };
42
43 animation = ht.Default.startAnim(params);
其实最让我们好奇的是描绘的路径跟飞机本身的飞行并没有关系,还有那么多左拐右拐的,要如何做才能做到呢?
接下来我们来描绘路径,首先这个路径是由 ht.Polyline 作为基础来描绘的:
1 polyline = new ht.Polyline();
2 polyline.setThickness(2);
3 polyline.s({
4     'shape.border.pattern': [16, 16],
5     'shape.border.color': 'red',
6     'shape.border.gradient.color': 'yellow',
7     'shape3d.resolution': 300,
8     '3d.selectable': false
9 });
10 dataModel.add(polyline);
上面的代码只是向 datamodel 数据模型中添加了一个 polyline 管线而已,不会显示任何东西,要显示“航道”首先就要设置航道所在的点,我们先设置航道的初始点:
1 points = [{ x: 0, y: 0, e: 0 }];
2 segments = [1];
这个 points 和 segments 是 HT for Web Shape 手册中定义的,points 是 ht.List 类型数组的定点信息,顶点为 { x: 100, y: 200 } 格式的对象;segments 是 ht.List 类型的线段数组信息,代表
points 数组中的顶点按数组顺序的连接方式。
图中“航道”左侧的多个圆形轨道也是通过设置 points 和 segments 来设置的:
1 for(var k=0; k<count+1; k++){
2     var angle = k * Math.PI * 2 * round / count;
3     points.push({
4         x: cx + radius * Math.cos(angle),
5         y: cy + radius * Math.sin(angle),
6         e: k * height / count
7     });
8     segments.push(2);
9 }
接下来几个拐点也是这种方法来实现的,这里就不赘述了,如果你还没看手册的话,这里标明一点,segments 只能取值 1~5,1 代表一个新路径的起点;2 代表从上次最后点连接到该点;3 占用两个点信息,第一个点作为曲线控制点,第二个点作为曲线结束点;4 占用3个点信息,第一和第二个点作为曲线控制点,第三个点作为曲线结束点;5 不占用点信息,代表本次绘制路径结束,并闭合到路径的起始点:
1 points.push({ x: cx+radius, y: 0, e: height/2 });
2 points.push({ x: 0, y: 0, e: height/2 });
3 segments.push(3);
4
5 points.push({ x: radius, y: -radius, e: height/2*0.7 });
6 points.push({ x: radius*2, y: radius, e: height/2*0.3 });
7 points.push({ x: radius*3, y: 0, e: 0 });
8 segments.push(4);
9
10 points.push({ x: 0, y: 0, e: 0 });
11 segments.push(2);
我们已经把路径上的点都添加进“航道”中了,接下来要把点都设置到管道上去才会显示在界面上:
1 polyline.setPoints(points);
2 polyline.setSegments(segments);
“跑道”就比较简单了,只是一个 Node 节点然后设置基础效果而已,没什么特别的:
1 runway = new ht.Node();
2 runway.s3(-cx+radius*3, 1, 200);
3 runway.p3(cx+runway.getWidth()/2, -22, 0);
4 runway.s({
5     'all.color': '#FAFAFA',
6     'all.transparent': true,
7     'all.reverse.cull': true,
8     'all.opacity': 0.8,
9     '3d.selectable': false
10 });
11 dataModel.add(runway);
最后,在界面上添加一个 formPane 表单面板,定义好之后可以直接添加到 body 上,这样就不会跟 graph3dView 有显示的联系了。【本文由“编程小王子”发布,2017年11月1日】

相关文章推荐
- 基于HTML5 Canvas的工控SCADA模拟飞机飞行
- 基于HTML5 Canvas的工控SCADA模拟飞机飞行
- [置顶] 基于HTML5 Canvas的工控SCADA模拟飞机飞行
- 基于HTML5 Canvas实现工控2D叶轮旋转
- 基于HTML5 Canvas 实现矢量工控风机叶轮旋转
- 基于HTML5 Canvas实现工控2D叶轮旋转
- 基于 HTML5 Canvas 的工控机柜 U 位动态管理
- 基于HTML5 Canvas 实现矢量工控风机叶轮旋转
- 基于HTML5 Canvas实现工控2D叶轮旋转
- 基于HTML5 Canvas 实现矢量工控风机叶轮旋转
- 基于HTML5 Canvas 实现地铁站监控
- 推荐18个基于 HTML5 Canvas 开发的图表库
- 基于 HTML5 Canvas 绘制的电信网络拓扑图
- ECharts:基于HTML5 Canvas的JavaScript图表库
- 基于Html5的Canvas实现的Clocks (钟表)
- 基于 HTML5 Canvas 的交互式地铁线路图
- html5编辑器(图片编辑器基于canvas)
- 基于HTML5 Canvas实现用户交互
- 基于html5 canvas实现漫天飞雪效果实例
- 基于unity的飞行模拟设计