RHCA CL220 CloudForms 3.1 配置虚拟机
2017-10-29 22:29
211 查看
4provisioning virtual machines
目录
Provisioning via Native Clone
理论
实验
Defining ISO Image Type
理论
实验
Provisioning via Customization Templates
理论
实验
Provisioning via PXE
理论
实验
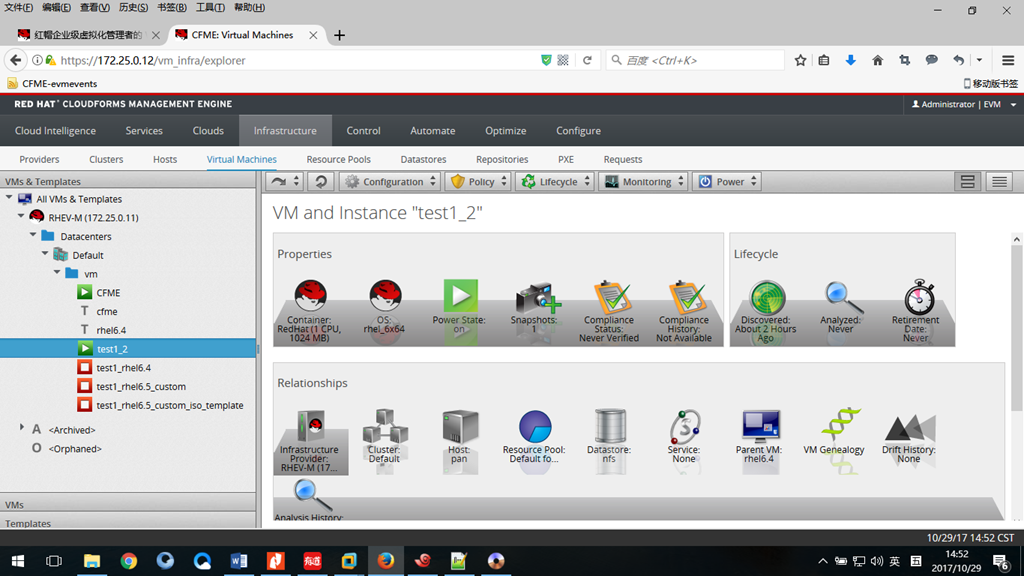
主要是2个web界面的内容:
infractructure>virtual machine/PXE创建虚拟机操作界面。
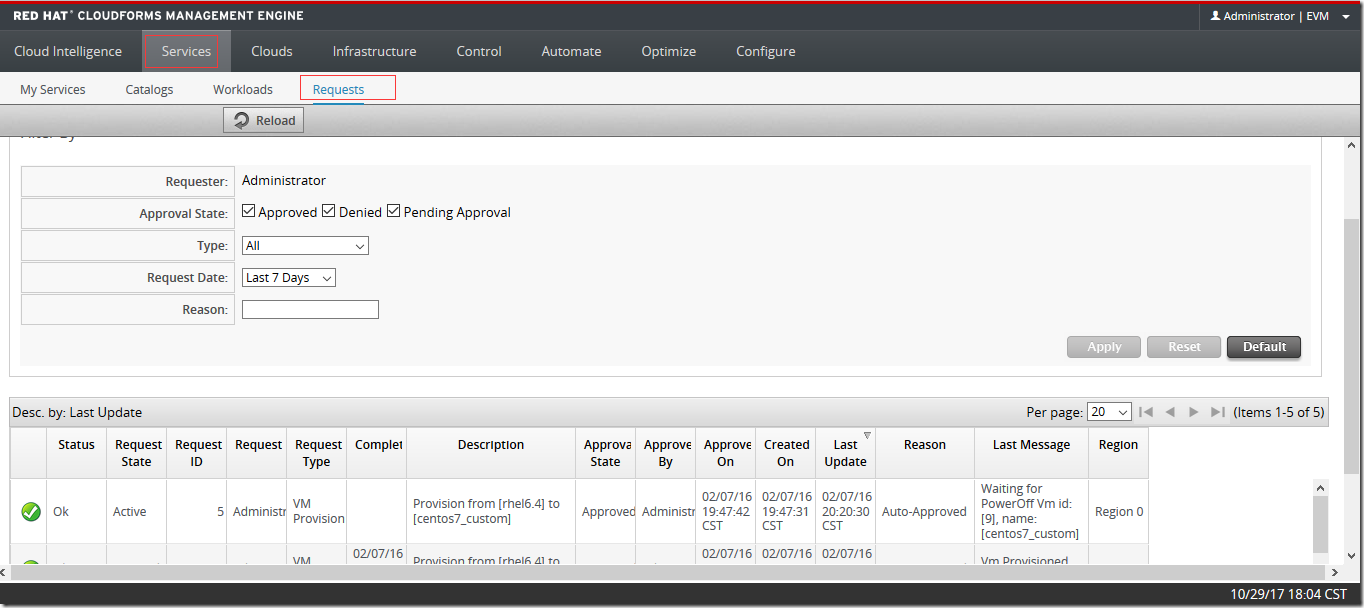
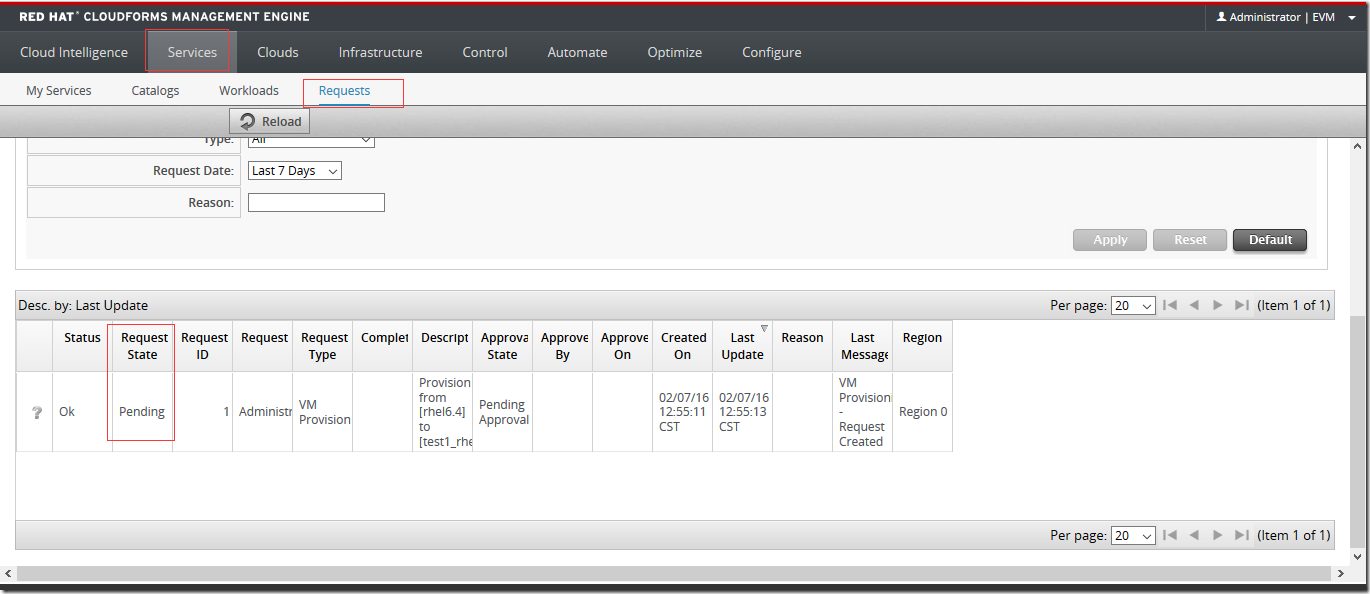
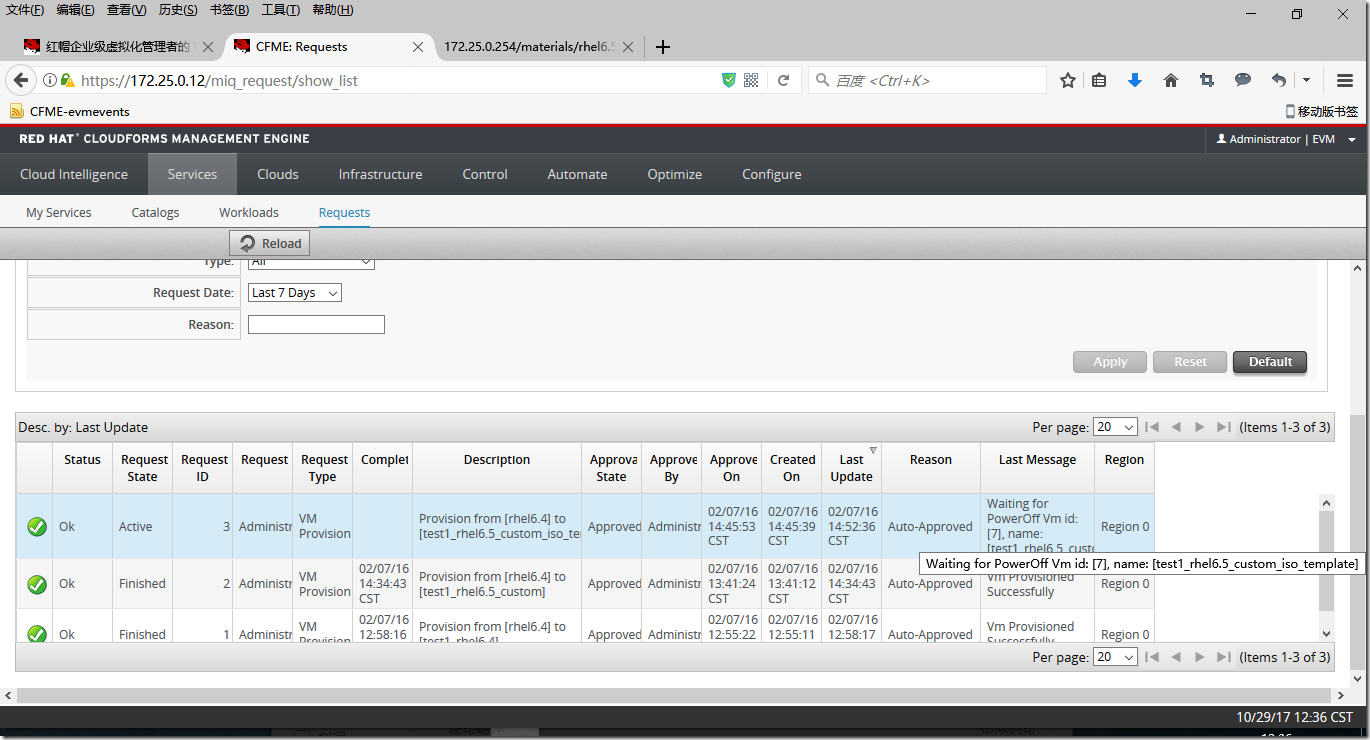
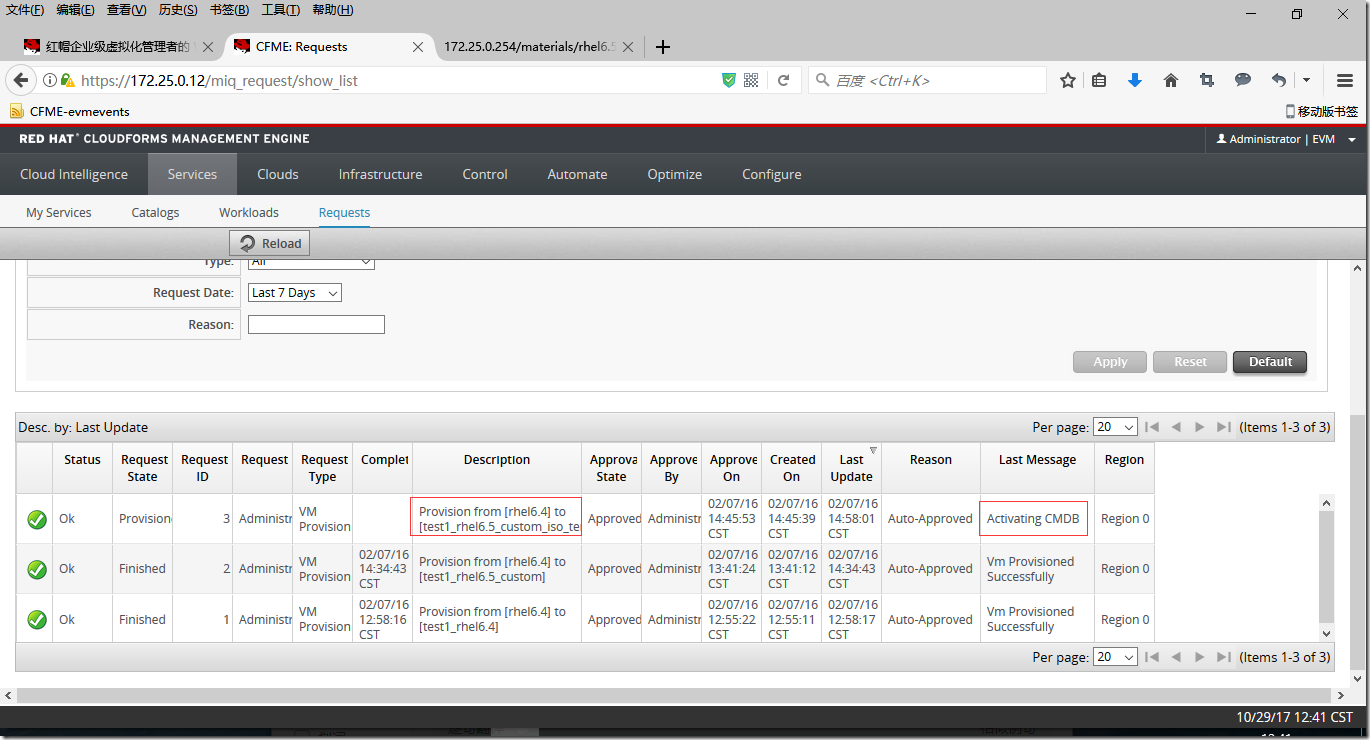
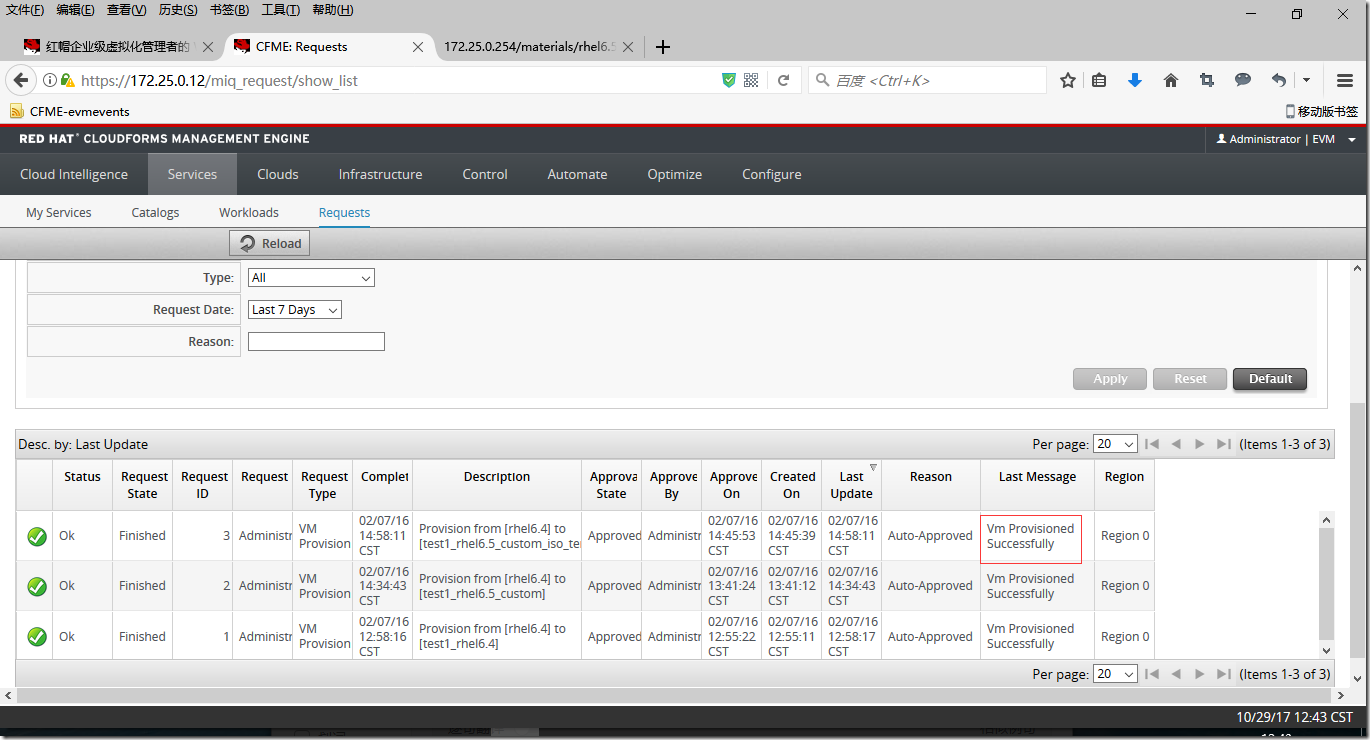
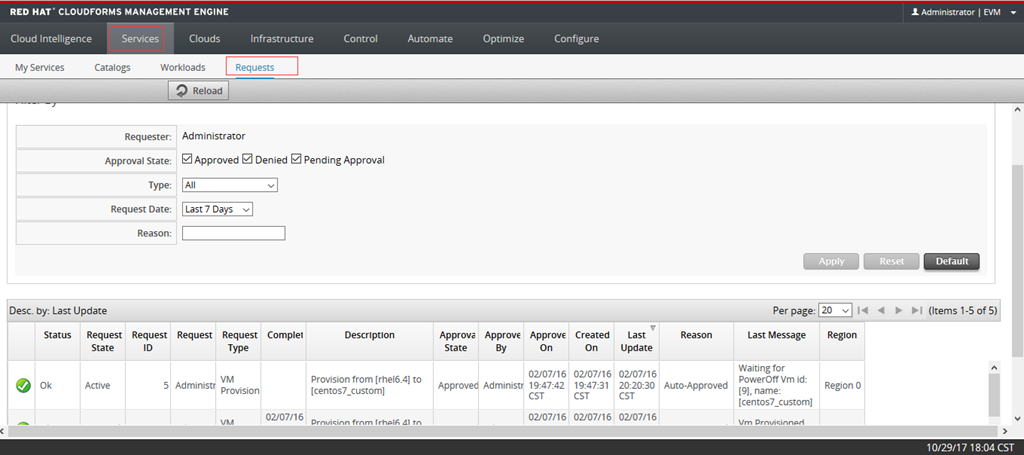
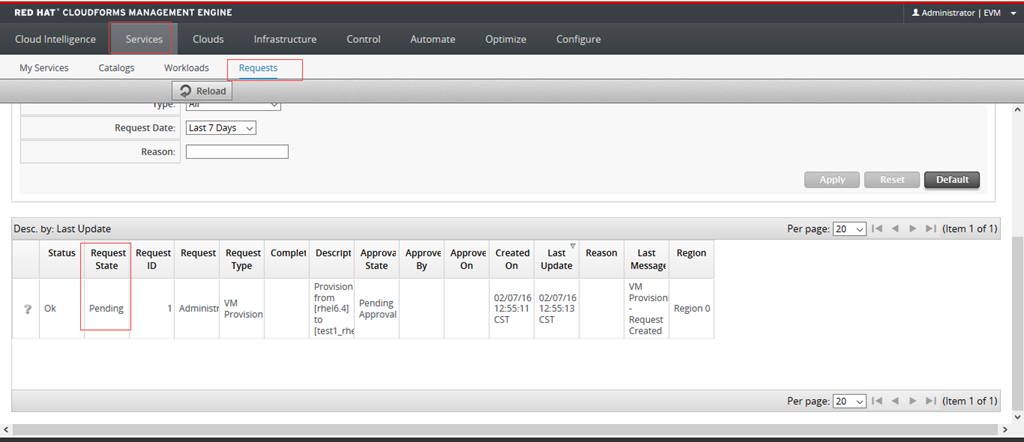
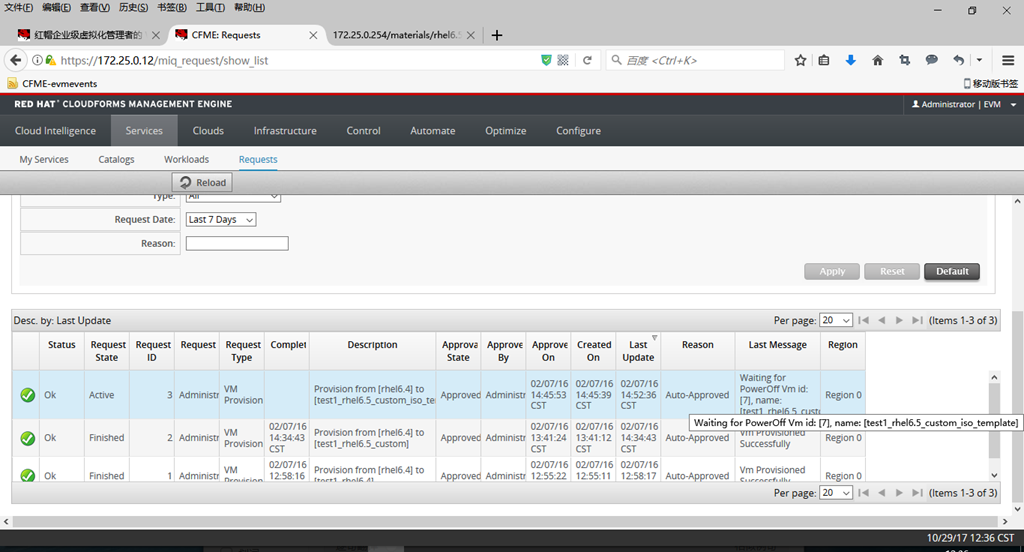
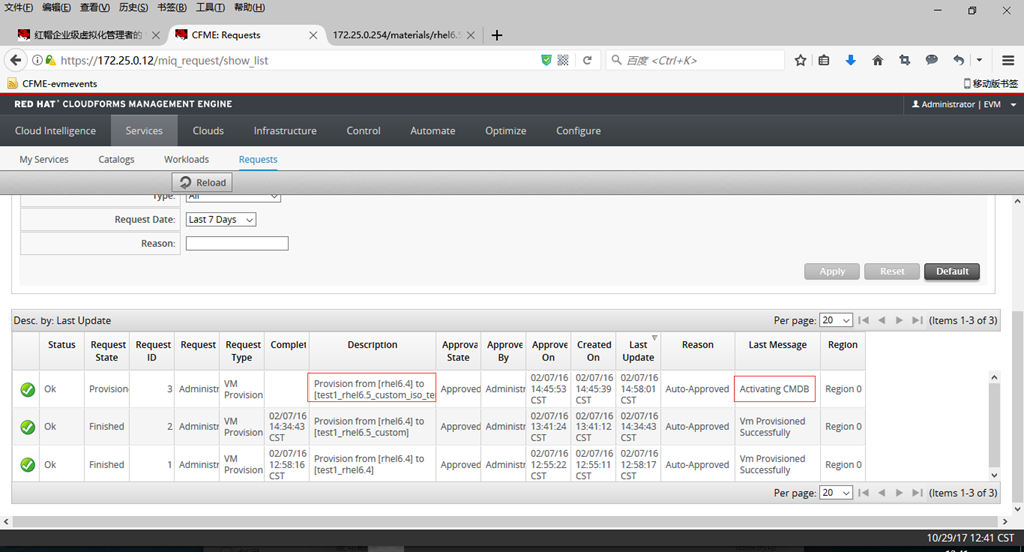
service>request创建虚拟机进度等信息。

基础设施可以发布资源和管理它们的生命周期。
资源包含:虚拟机/存储空间/或者其它基础设施可管理的资源。
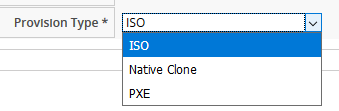
通过CFME配置虚拟机有三种方式:template(native clone)/ISO/PXE

2. 如何配置虚拟机?
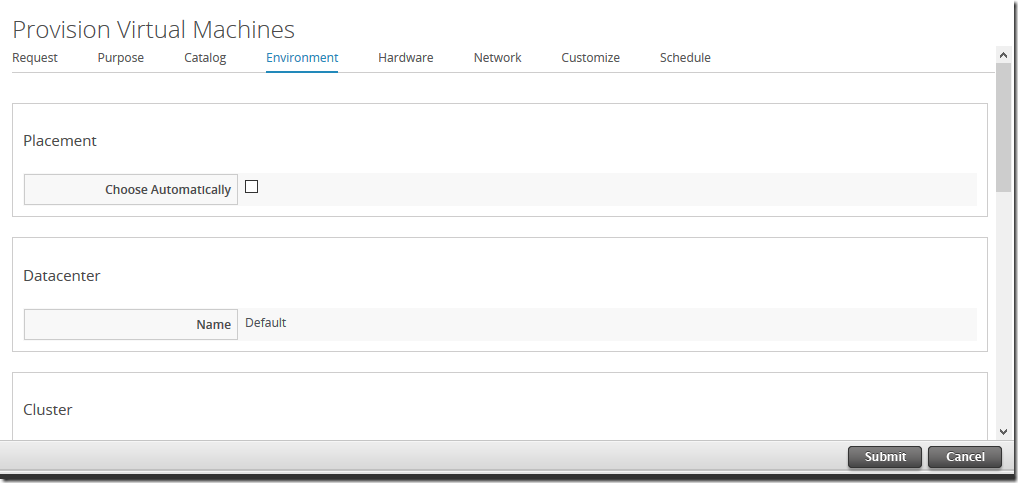
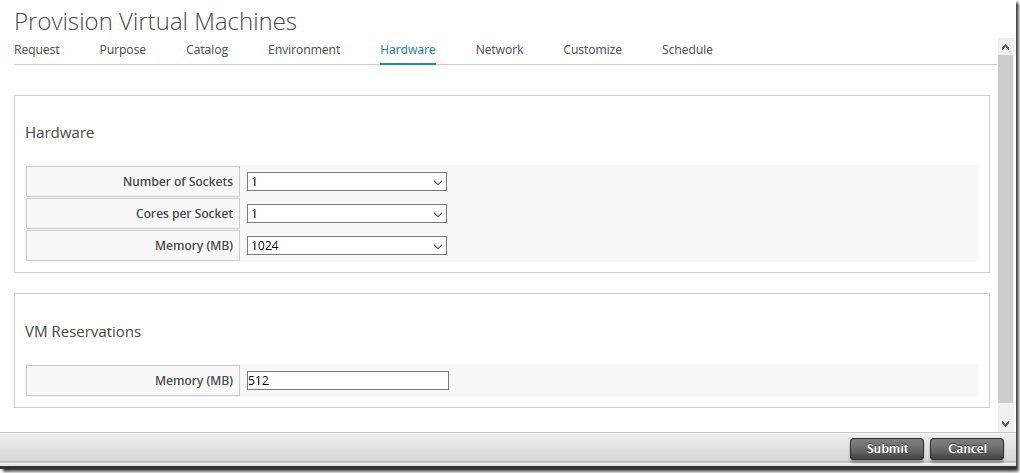
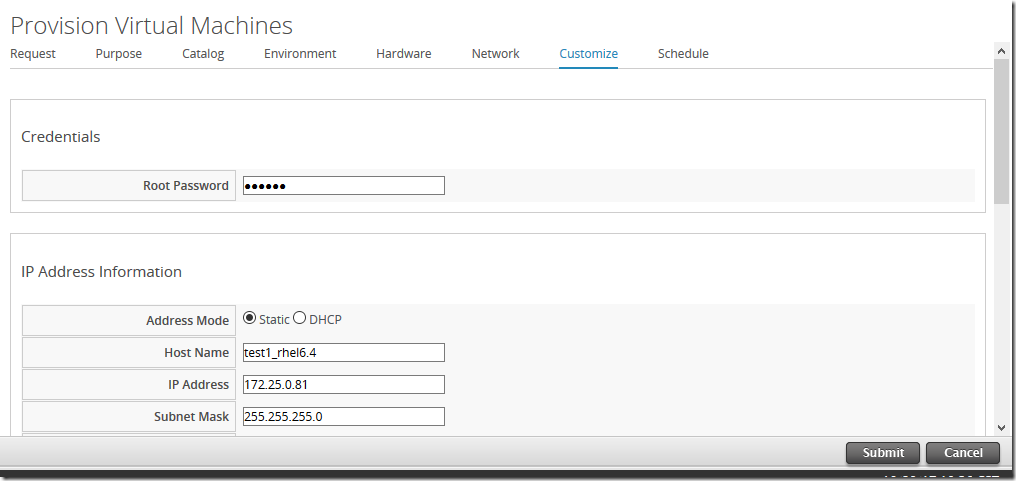
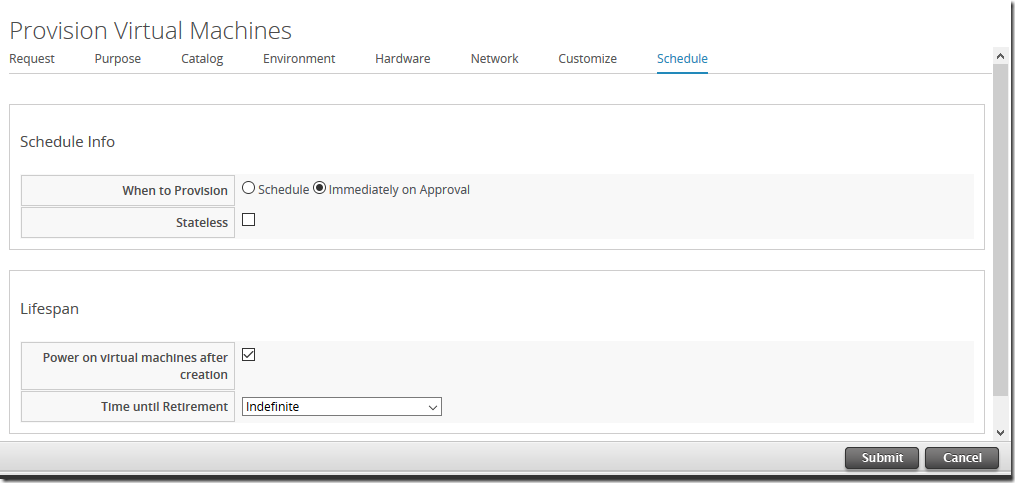
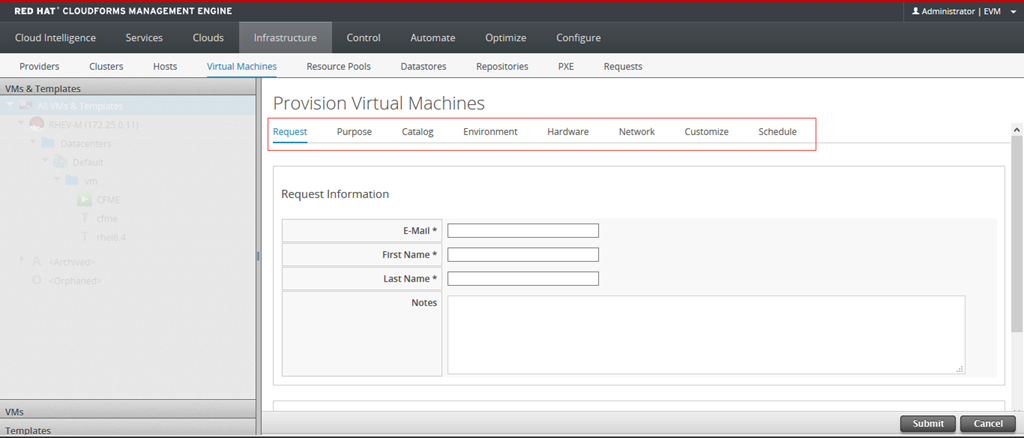
配置虚拟机有8大选项
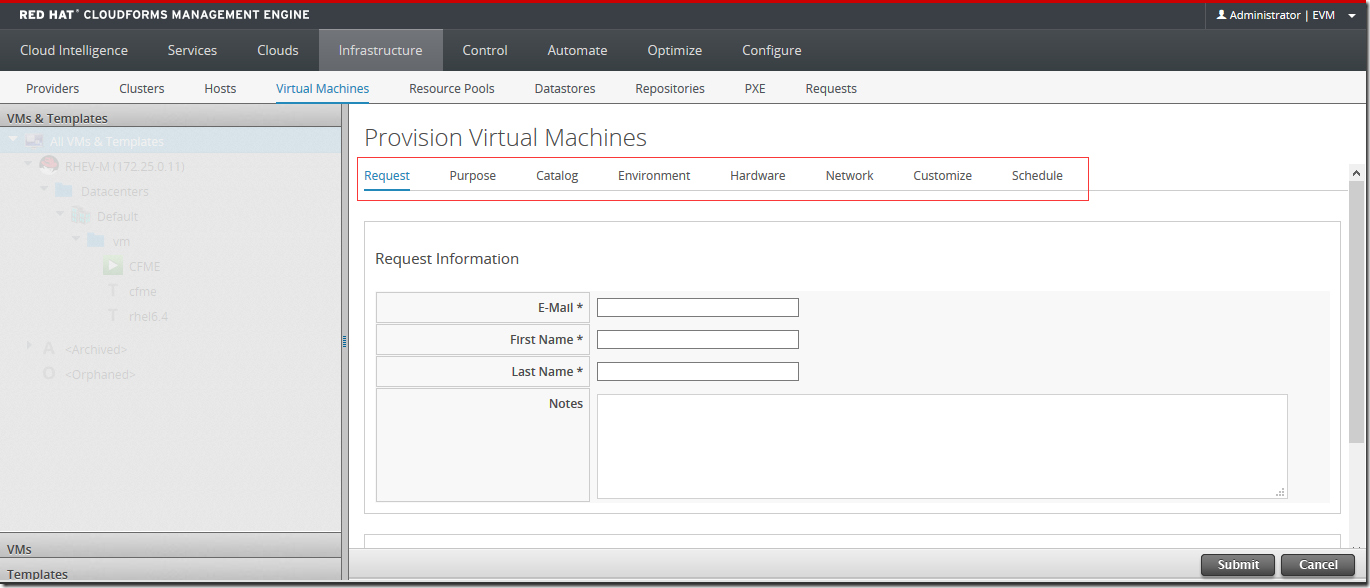
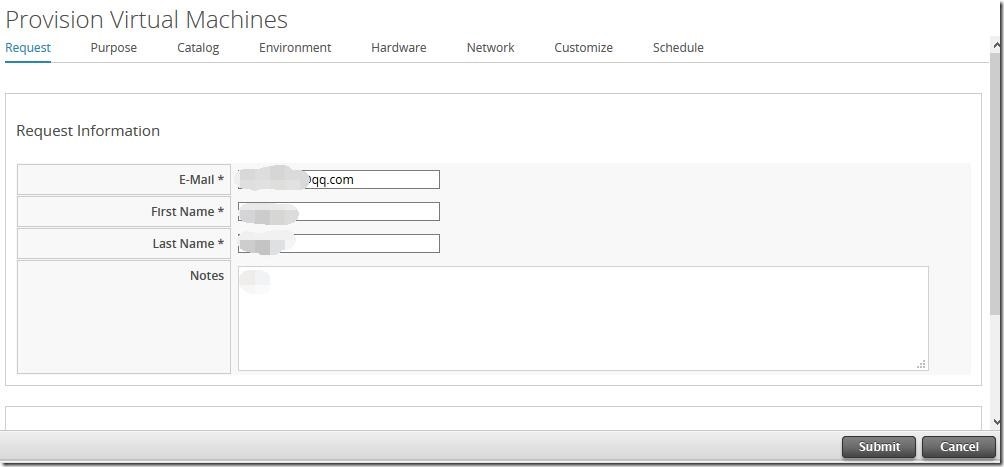
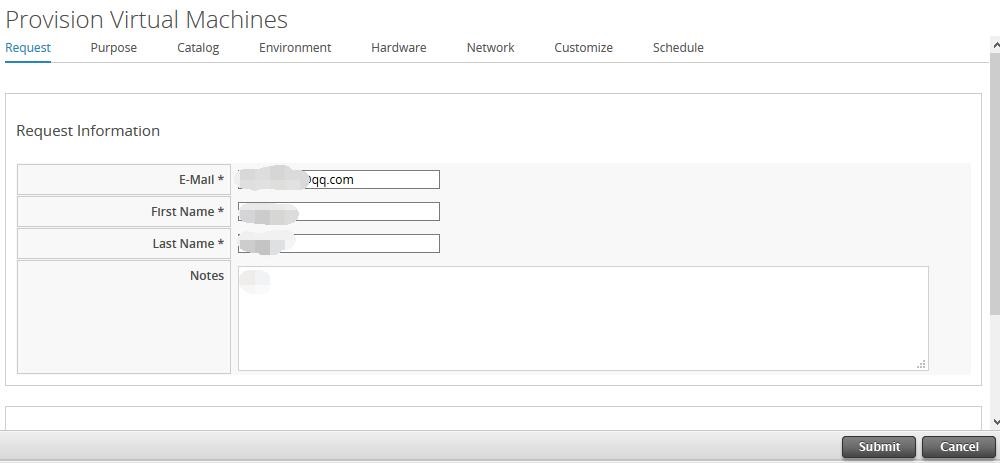
request:指虚拟机的管理员信息,例如邮箱,姓名等。
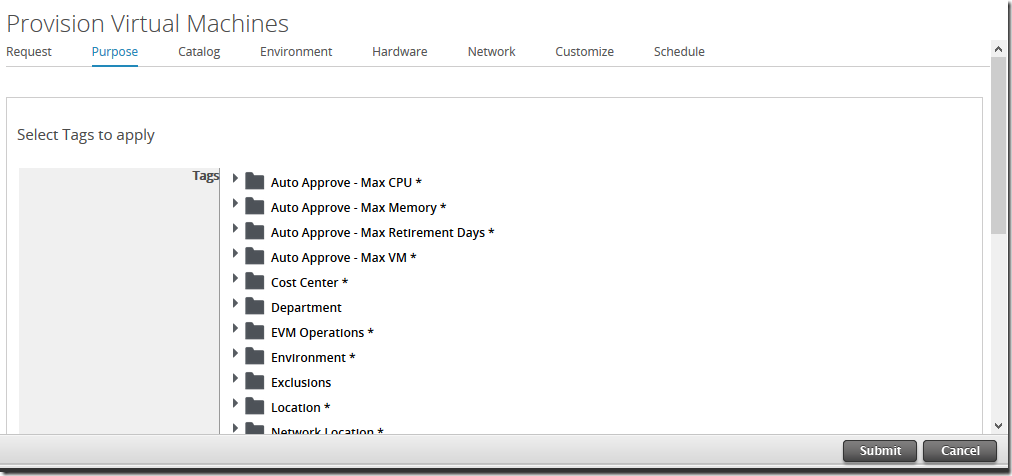
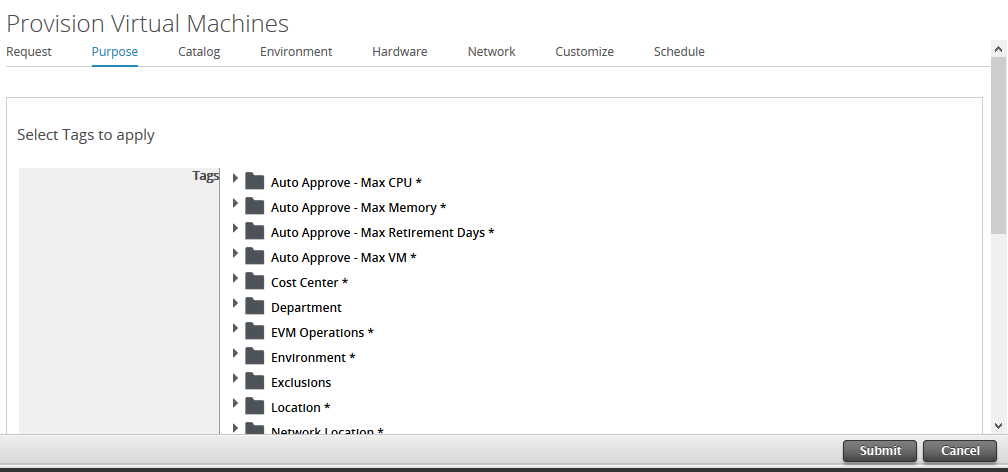
purpose:虚拟机属于哪个tag,例如一个catelogies可能是一个项目,然后tag是这个项目的标记,指虚拟机属于哪个项目。
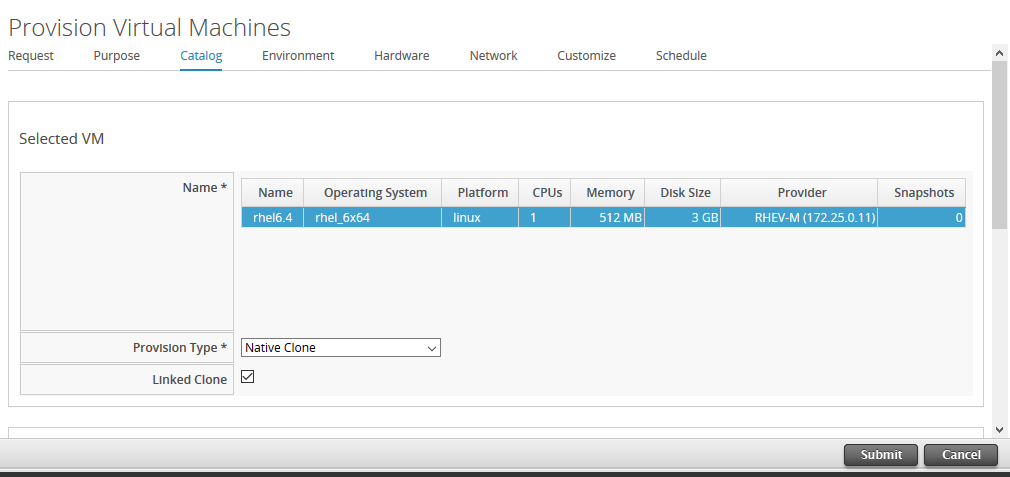
catelog:虚拟机的基本信息,例如多少台虚拟机,虚拟机是通过哪种方式创建的(模板/ISO/PXE),虚拟机的名字等。
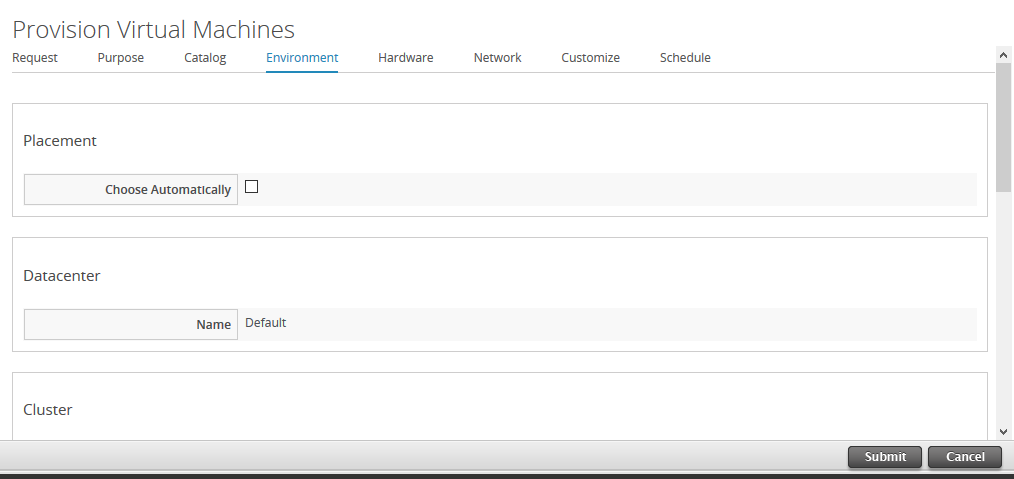
environment:指虚拟机创建在哪,例如哪个集群,运行在哪台主机,存放在哪个存储域上等。
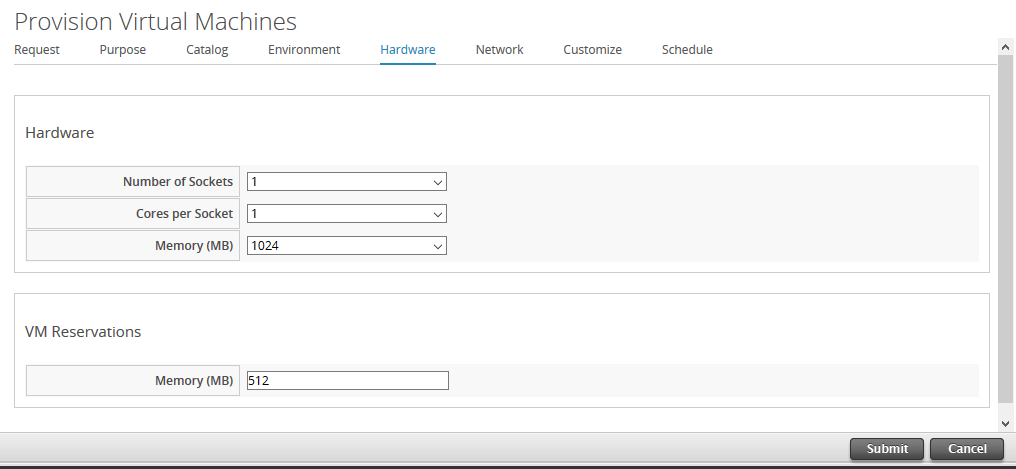
hareware:指虚拟机的硬件信息,例如CPU个数,内存多大等。
network:虚拟机所在的网络。
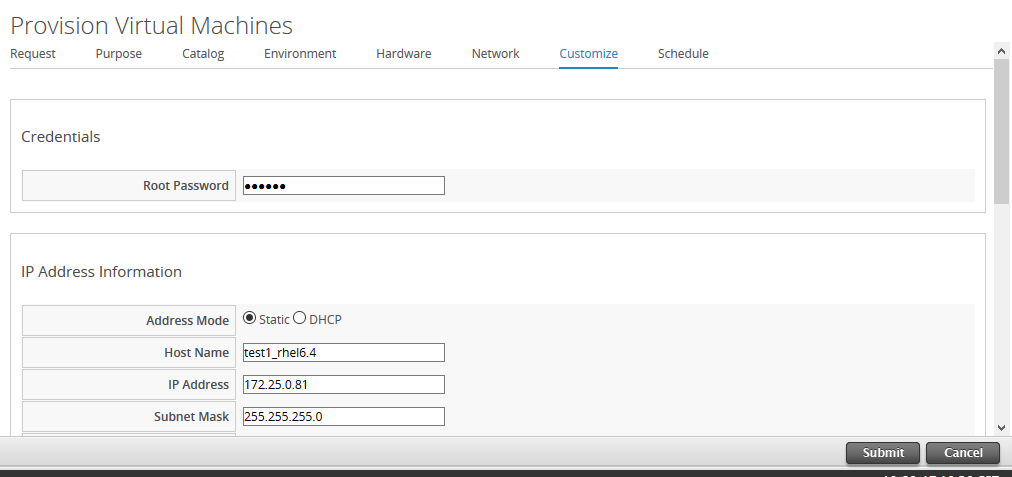
customize:指定制虚拟机的密码,IP,DNS等。
schedule:指虚拟机在什么时候创建,什么时候开机等。


点提交后会自动跳转到services>request
实验1. 下载rhel的ova模板
2. 将rhel的ova导入到rhevm
3. 在RHEV平台创建rhev模板
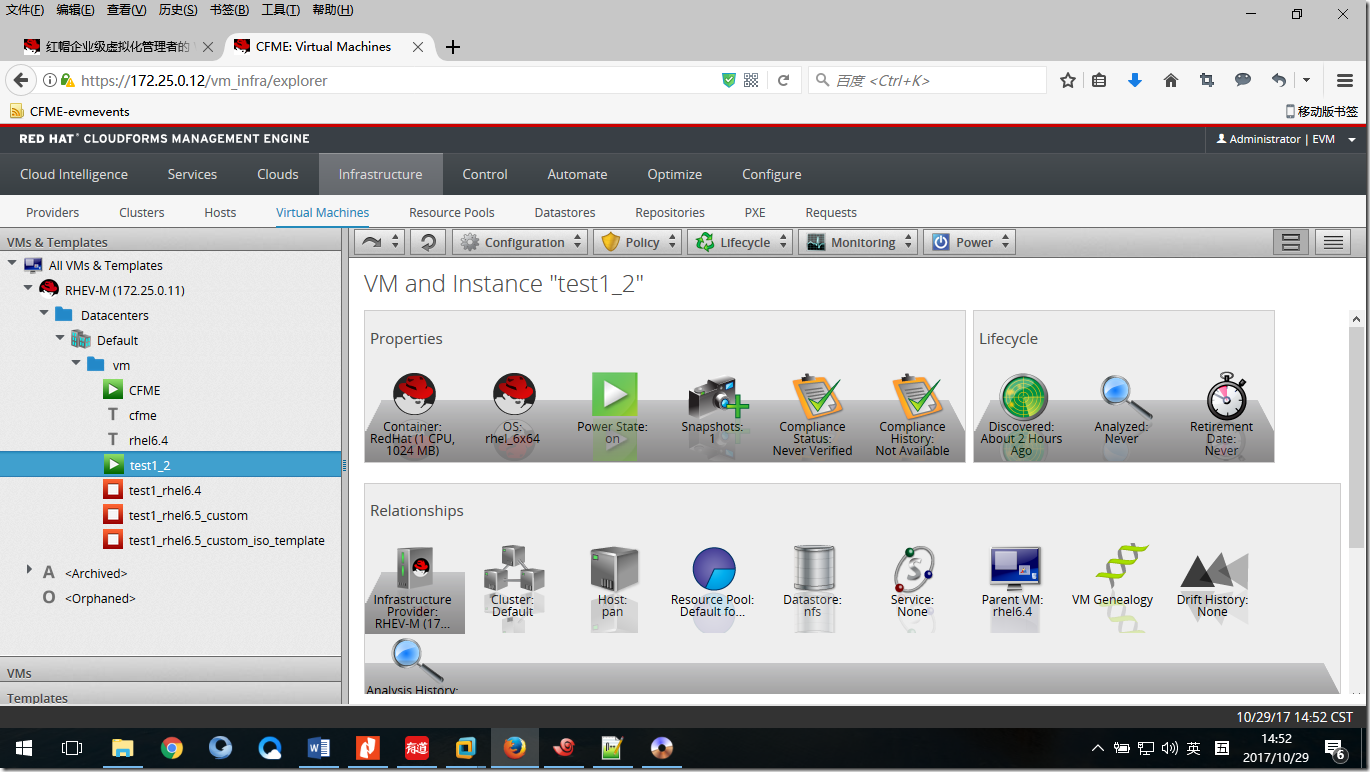
4. 在CFME通过模板配置VM
5. 监控配置信息,配置进度等
6. 检验VM是否配置成功
另一种配置虚拟机的方式是ISO。
但通过官方的ISO需要手动安装,无法自动安装,这里您需要自定义isolinux中的ks文件,然后生成一个自定义的ISO,使其可以自动安装。
自定义ISO:
https://jingyan.baidu.com/article/c1a3101eef3ee6de656debb8.html
2. CFME如何配置ISO
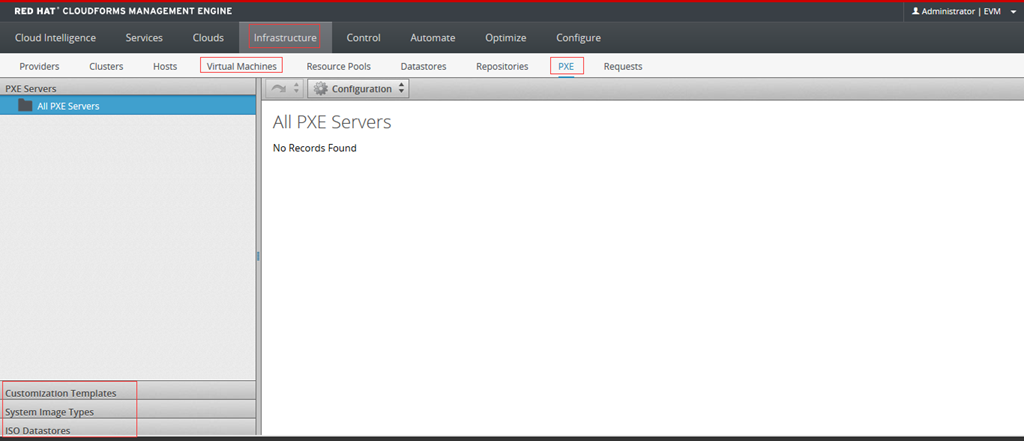
首先需要配置ISO datastore。
导航:infrastructure>PXE>ISO datastore添加一个现有的provider(例如RHEV)中的iso。
添加完后需要点刷新”relationship”,才会出现RHEV平台中的ISO。
接着需要edit它的iso type,这里我选的rhel6。
iso type可以通过左边导航的上级选项”system image type”来添加。
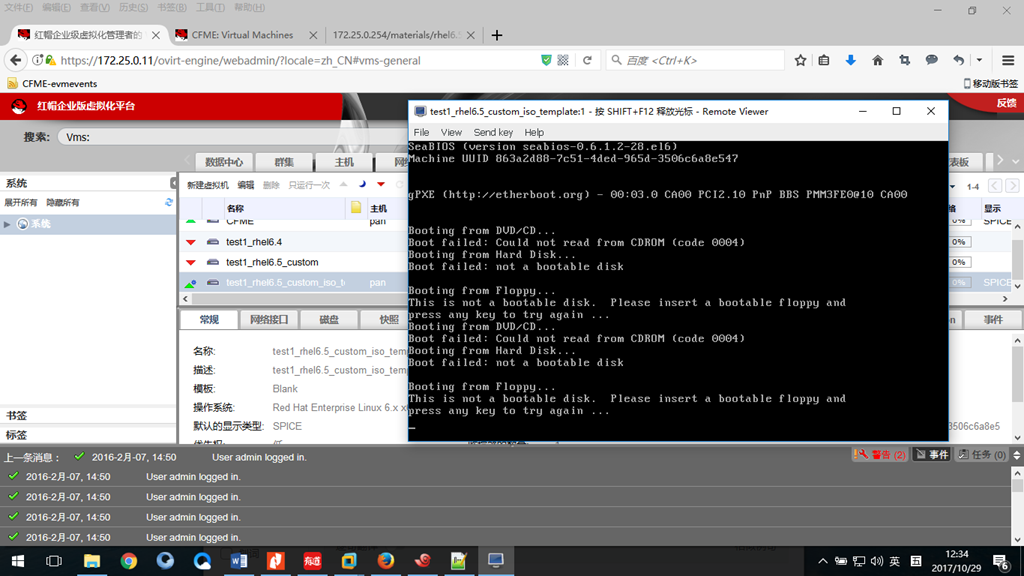
3. 通过自定义ISO配置虚拟机
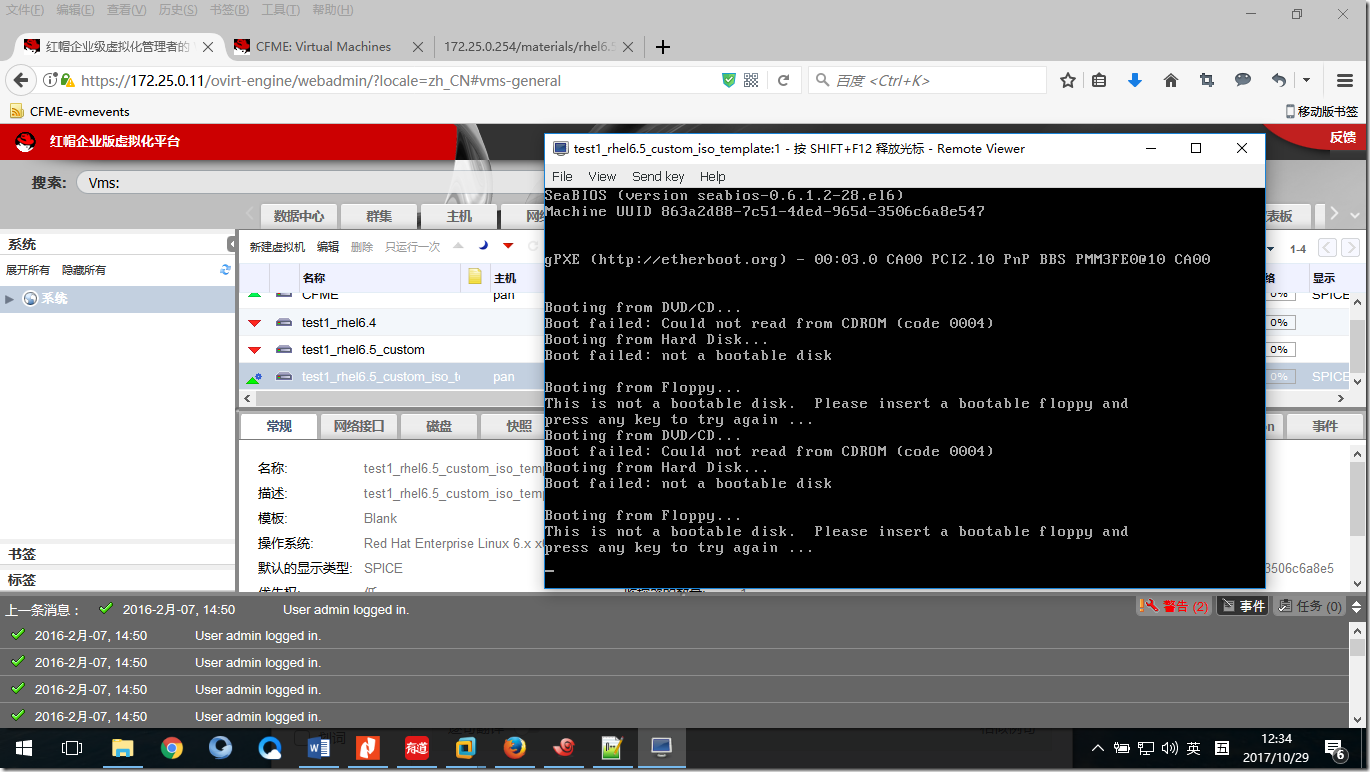
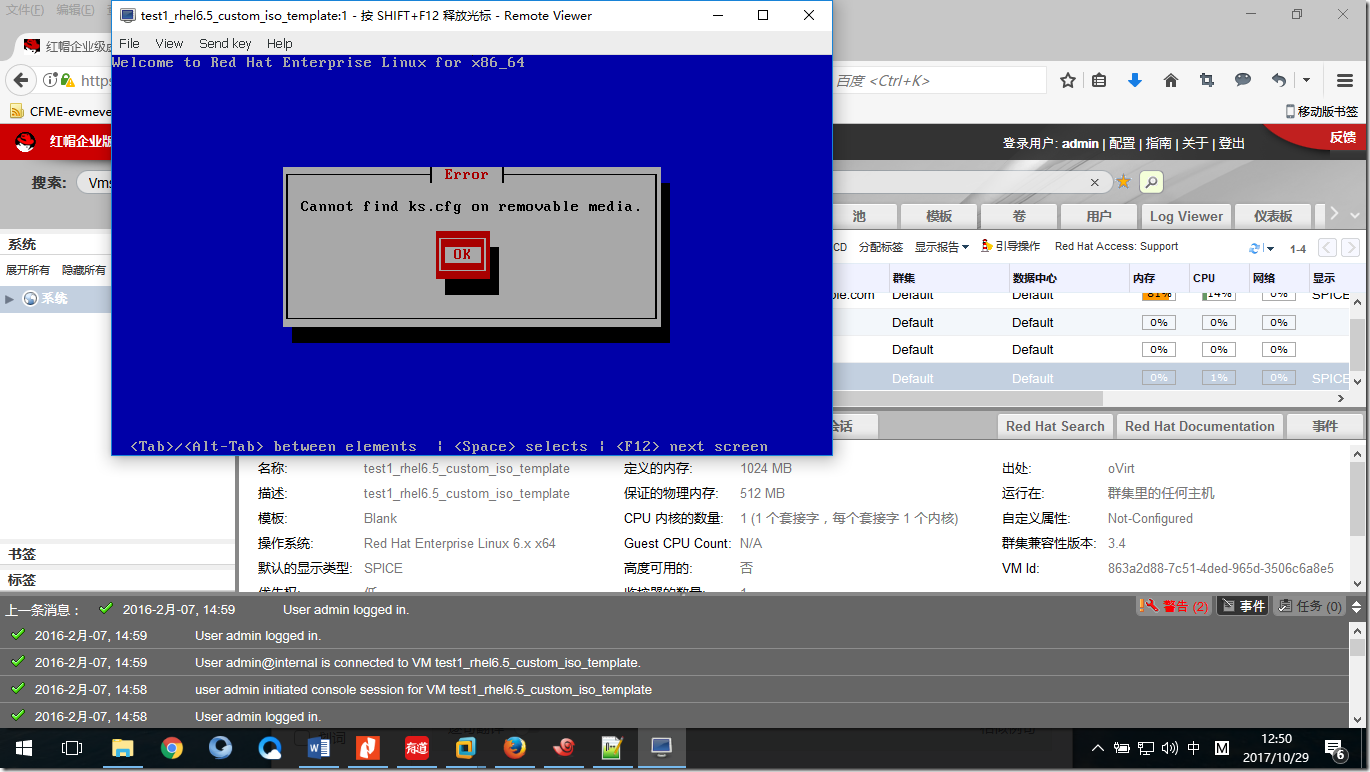
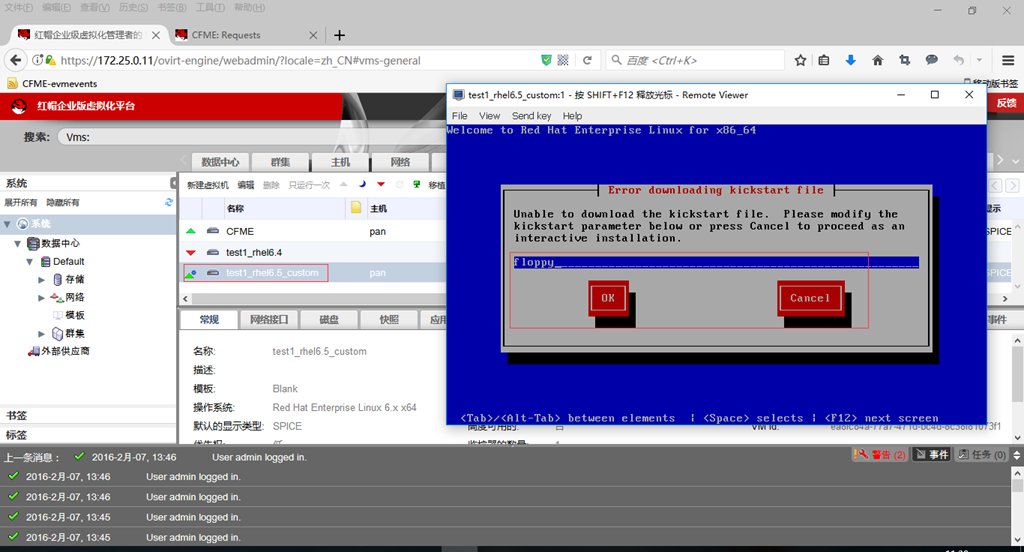
红帽给的自定义ISO有问题:卡在这里了
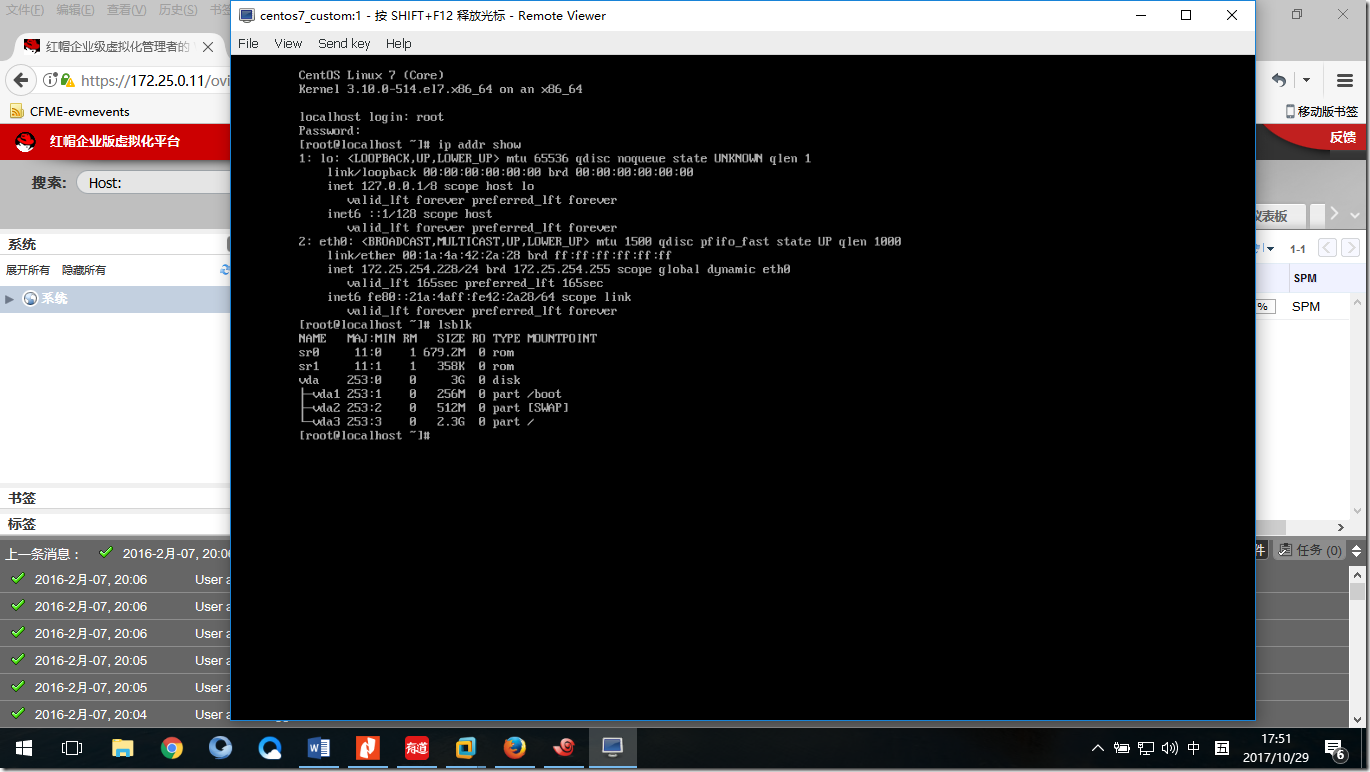
这个自定义ISO会自己创建一个3G的磁盘(和上面的template一样)。
这里使用的ISO是rhel-server-6.5-x86_64-custom.iso,其实这只一个引导盘,里面的KS文件没啥用。本单元主要是为下个单元做准备。
如果您需要通过自定义ISO配置虚拟机,也可以自己创建自定义的ISO与KS文件。
实验1. 下载自定义的ISO
2. 上传ISO到RHEV平台
3. 在CFME创建ISO datastore
4. 创建system image type
5. 将刚刚创建的system image type和ISO datastore中的ISO关联
在一些企业可能需要一个定制化的虚拟机。
这时您可以通过”自定义模板”来配置虚拟机:
windows:syspre file
linux: ks file
2. 制作自定义光盘
如何做一个定制化的iso,使系统自动根据我们预定义好的参数来安装系统呢?
这里需要用到ks文件,并在引导光盘时自动加载ks文件的效果。通过光盘引导系统时会加载光盘中isolinux中的isolinux.cfg,从而得到引导列表,那么可以在读取某个引导列表中的选项时自动读取ks文件,这里只需将ks文件的路径加到引导项中就可以实现自动安装。
下面在F0安装kickstart工具,然后制作一个最小化安装的自定义centos7光盘,达到不用人为选择安装项,自动安装定制化系统的效果。
官方centos小最化的镜像:CentOS-7-x86_64-Minimal-1611.iso
步骤:
yum install -y system-config-kickstart #安装ks文件制作工具
system-config-kickstart #打开图形化的ks文件制作工具,制作好后将ks另存为ks.cfg
mkdir /mnt/iso #光盘的挂载目录
mount /dev/sr0 /mnt/iso/ #将光盘挂载
mkdir hrr #新建一个目录,用于放从光盘拷贝过来的文件
cp -arp /mnt/iso/* hrr/ #将光盘的文件全部拷贝到新目录中
vim isolinux.cfg #在isolinux.cfg中定义ks文件路径,这里ks.cfg放在hrr目录中
cat isolinux.cfg #以下是isolinux.cfg的内容
default vesamenu.c32
timeout 600
display boot.msg
# Clear the screen when exiting the menu, instead of leaving the menu displayed.
# For vesamenu, this means the graphical background is still displayed without
# the menu itself for as long as the screen remains in graphics mode.
menu clear
menu background splash.png
menu title CentOS Linux 7
menu vshift 8
menu rows 18
menu margin 8
#menu hidden
menu helpmsgrow 15
menu tabmsgrow 13
# Border Area
menu color border * #00000000 #00000000 none
# Selected item
menu color sel 0 #ffffffff #00000000 none
# Title bar
menu color title 0 #ff7ba3d0 #00000000 none
# Press [Tab] message
menu color tabmsg 0 #ff3a6496 #00000000 none
# Unselected menu item
menu color unsel 0 #84b8ffff #00000000 none
# Selected hotkey
menu color hotsel 0 #84b8ffff #00000000 none
# Unselected hotkey
menu color hotkey 0 #ffffffff #00000000 none
# Help text
menu color help 0 #ffffffff #00000000 none
# A scrollbar of some type? Not sure.
menu color scrollbar 0 #ffffffff #ff355594 none
# Timeout msg
menu color timeout 0 #ffffffff #00000000 none
menu color timeout_msg 0 #ffffffff #00000000 none
# Command prompt text
menu color cmdmark 0 #84b8ffff #00000000 none
menu color cmdline 0 #ffffffff #00000000 none
# Do not display the actual menu unless the user presses a key. All that is displayed is a timeout message.
menu tabmsg Press Tab for full configuration options on menu items.
menu separator # insert an empty line
menu separator # insert an empty line
label linux
menu label ^Install CentOS Linux 7
menu default
kernel vmlinuz
append initrd=initrd.img ks=cdrom:/ks.cfg quiet
label check
menu label Test this ^media & install CentOS Linux 7
kernel vmlinuz
append initrd=initrd.img inst.stage2=hd:LABEL=CentOS\x207\x20x86_64 rd.live.check quiet
menu separator # insert an empty line
# utilities submenu
menu begin ^Troubleshooting
menu title Troubleshooting
label vesa
menu indent count 5
menu label Install CentOS Linux 7 in ^basic graphics mode
text help
Try this option out if you're having trouble installing
CentOS Linux 7.
endtext
kernel vmlinuz
append initrd=initrd.img inst.stage2=hd:LABEL=CentOS\x207\x20x86_64 xdriver=vesa nomodeset quiet
label rescue
menu indent count 5
menu label ^Rescue a CentOS Linux system
text help
If the system will not boot, this lets you access files
and edit config files to try to get it booting again.
endtext
kernel vmlinuz
append initrd=initrd.img inst.stage2=hd:LABEL=CentOS\x207\x20x86_64 rescue quiet
label memtest
menu label Run a ^memory test
text help
If your system is having issues, a problem with your
system's memory may be the cause. Use this utility to
see if the memory is working correctly.
endtext
kernel memtest
menu separator # insert an empty line
label local
menu label Boot from ^local drive
localboot 0xffff
menu separator # insert an empty line
menu separator # insert an empty line
label returntomain
menu label Return to ^main menu
menu exit
menu end
cat ks.cfg #以下是ks.cfg的内容
#platform=x86, AMD64, or Intel EM64T
#version=DEVEL
# Install OS instead of upgrade
install
# Keyboard layouts
keyboard 'us'# Reboot after installation
reboot
# Root password
rootpw --iscrypted $6$bzcFPd2HU1t8WiqW$OPm1BKzNNaIPL0HZqTYWzSHk.SMmEO2kWEvujOnza68sdcSlw9kjK1J9OPXmrg.phIcX2Vpo0vGdtkTCjKkmb/
#密码是redhat
# System timezone
timezone America/New_York
# System language
lang en_US
# Firewall configuration
firewall --disabled
# Network information
network --bootproto=dhcp --device=eth0
# System authorization information
auth --useshadow --passalgo=sha512
# Use CDROM installation media
cdrom
# Use text mode install
text
firstboot --disable
# SELinux configuration
selinux --disabled
# System bootloader configuration
bootloader --append="biosdevname=0" --location=mbr
# Clear the Master Boot Record
zerombr
# Partition clearing information
clearpart --all
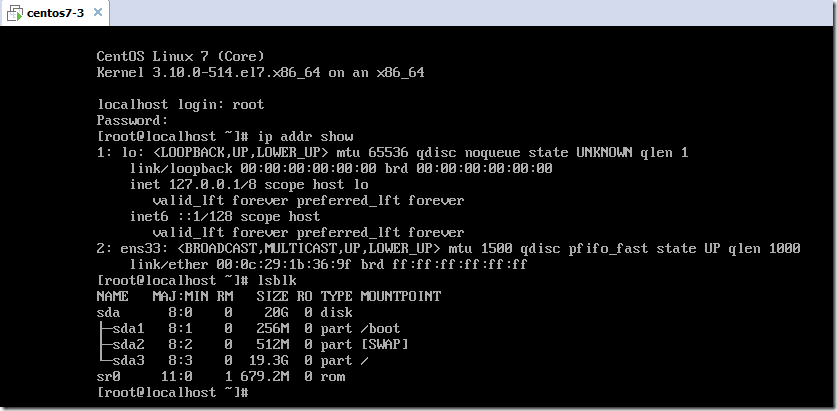
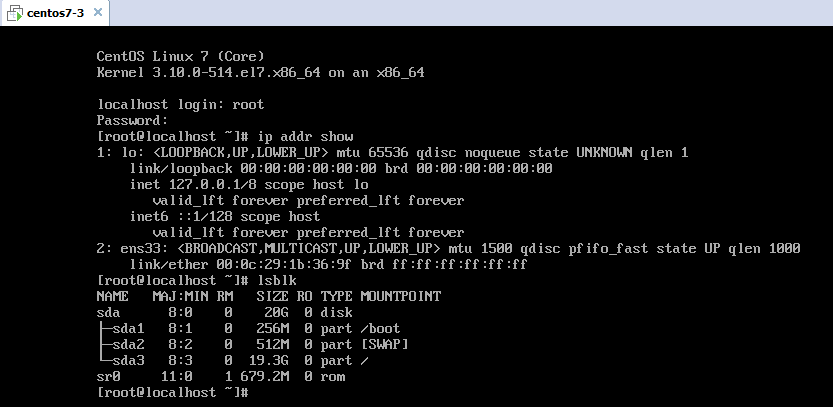
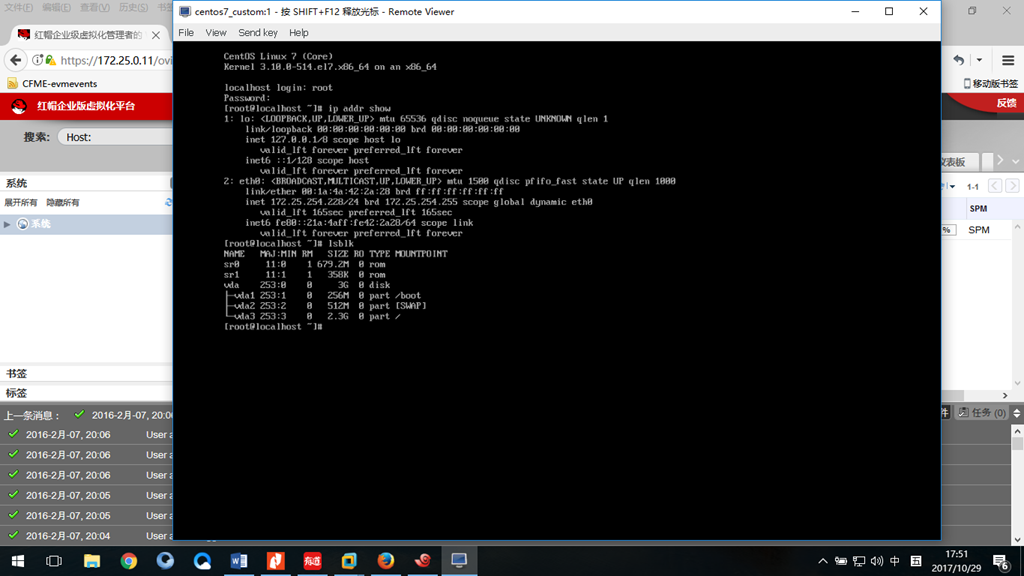
# Disk partitioning information
part swap --size=512
part /boot --size=256
part / --grow --size=2072
%post
echo "setterm -blank 0 -powersave off -powerdown 0 > /dev/tty1 < /dev/tty1" >> /etc/rc.d/rc.local
%end
%packages
@Core
libcap
openssh
openssh-clients
openssh-server
%end
# mkisofs -o new.iso -b isolinux/isolinux.bin -c isolinux/boot.cat -no-emul-boot -boot-load-size 4 -boot-info-table -R -J -v -T /root/hrr/ #制作定制光盘为启动盘,这里使用mkisofs来生成
#-o 指生成的iso文件名
#-b指定哪个文件为光盘光盘自引导启动的文件(目录内以.bin结尾的文件)
#-c将boot.cat文件的配置信息显示出来(目录内以.cat结尾的文件)
#-no-emul-boot不模仿boot这种引导格式(光盘内没有MBR不能进行boot格式的启动)
#-boot-load-size 4 指Set numbers of load sectors
#-boot-info-table 指Patch boot image with info table
#-R指-rational-rock
#-j指-joliet
#-v 显示进度
#-T 表示需要生成光盘的目录绝对路径
[root@foundation0 ~]# mkisofs -o new.iso -b isolinux/isolinux.bin -c isolinux/boot.cat -no-emul-boot -boot-load-size 4 -boot-info-table -R -J -v -T /root/hrr/
I: -input-charset not specified, using utf-8 (detected in locale settings)
genisoimage 1.1.11 (Linux)
Scanning /root/hrr/
Scanning /root/hrr/EFI
Scanning /root/hrr/EFI/BOOT
Scanning /root/hrr/EFI/BOOT/fonts
Excluded: /root/hrr/EFI/BOOT/fonts/TRANS.TBL
Excluded: /root/hrr/EFI/BOOT/TRANS.TBL
Excluded: /root/hrr/EFI/TRANS.TBL
Scanning /root/hrr/images
Scanning /root/hrr/images/pxeboot
Excluded: /root/hrr/images/pxeboot/TRANS.TBL
Excluded: /root/hrr/images/TRANS.TBL
Scanning /root/hrr/isolinux
Excluded by match: /root/hrr/isolinux/boot.cat
Excluded: /root/hrr/isolinux/TRANS.TBL
Scanning /root/hrr/LiveOS
Excluded: /root/hrr/LiveOS/TRANS.TBL
Scanning /root/hrr/Packages
Excluded: /root/hrr/Packages/TRANS.TBL
Scanning /root/hrr/repodata
Excluded: /root/hrr/repodata/TRANS.TBL
Excluded: /root/hrr/TRANS.TBL
Using RPM_G000.;1 for /RPM-GPG-KEY-CentOS-Testing-7 (RPM-GPG-KEY-CentOS-7)
Using SYSTE000.RPM;1 for /root/hrr/Packages/systemd-219-30.el7.x86_64.rpm (systemd-libs-219-30.el7.x86_64.rpm)
Using SYSTE001.RPM;1 for /root/hrr/Packages/systemd-libs-219-30.el7.x86_64.rpm (systemd-sysv-219-30.el7.x86_64.rpm)
Using SELIN000.RPM;1 for /root/hrr/Packages/selinux-policy-3.13.1-102.el7.noarch.rpm (selinux-policy-targeted-3.13.1-102.el7.noarch.rpm)
Using PYTHO000.RPM;1 for /root/hrr/Packages/python-backports-1.0-8.el7.x86_64.rpm (python-backports-ssl_match_hostname-3.4.0.2-4.el7.noarch.rpm)
Using PYTHO001.RPM;1 for /root/hrr/Packages/python-perf-3.10.0-514.el7.x86_64.rpm (python-pycurl-7.19.0-19.el7.x86_64.rpm)
Using PYTHO002.RPM;1 for /root/hrr/Packages/python-pycurl-7.19.0-19.el7.x86_64.rpm (python-pyudev-0.15-7.el7_2.1.noarch.rpm)
Using PYTHO003.RPM;1 for /root/hrr/Packages/python-setuptools-0.9.8-4.el7.noarch.rpm (python-slip-0.4.0-2.el7.noarch.rpm)
Using PYTHO004.RPM;1 for /root/hrr/Packages/python-slip-0.4.0-2.el7.noarch.rpm (python-slip-dbus-0.4.0-2.el7.noarch.rpm)
Using PLYMO000.RPM;1 for /root/hrr/Packages/plymouth-0.8.9-0.26.20140113.el7.centos.x86_64.rpm (plymouth-core-libs-0.8.9-0.26.20140113.el7.centos.x86_64.rpm)
Using PLYMO001.RPM;1 for /root/hrr/Packages/plymouth-core-libs-0.8.9-0.26.20140113.el7.centos.x86_64.rpm (plymouth-scripts-0.8.9-0.26.20140113.el7.centos.x86_64.rpm)
Using PCIUT000.RPM;1 for /root/hrr/Packages/pciutils-3.5.1-1.el7.x86_64.rpm (pciutils-libs-3.5.1-1.el7.x86_64.rpm)
Using P11_K000.RPM;1 for /root/hrr/Packages/p11-kit-0.20.7-3.el7.x86_64.rpm (p11-kit-trust-0.20.7-3.el7.x86_64.rpm)
Using OPENS000.RPM;1 for /root/hrr/Packages/openscap-1.2.10-2.el7.x86_64.rpm (openscap-scanner-1.2.10-2.el7.x86_64.rpm)
Using OPENS001.RPM;1 for /root/hrr/Packages/openssh-6.6.1p1-31.el7.x86_64.rpm (openssh-clients-6.6.1p1-31.el7.x86_64.rpm)
Using OPENS002.RPM;1 for /root/hrr/Packages/openssh-clients-6.6.1p1-31.el7.x86_64.rpm (openssh-server-6.6.1p1-31.el7.x86_64.rpm)
Using OPENS003.RPM;1 for /root/hrr/Packages/openssl-1.0.1e-60.el7.x86_64.rpm (openssl-libs-1.0.1e-60.el7.x86_64.rpm)
Using NSS_S000.RPM;1 for /root/hrr/Packages/nss-softokn-3.16.2.3-14.4.el7.x86_64.rpm (nss-softokn-freebl-3.16.2.3-14.4.el7.x86_64.rpm)
Using NETWO000.RPM;1 for /root/hrr/Packages/NetworkManager-1.4.0-12.el7.x86_64.rpm (NetworkManager-adsl-1.4.0-12.el7.x86_64.rpm)
Using NETWO001.RPM;1 for /root/hrr/Packages/NetworkManager-adsl-1.4.0-12.el7.x86_64.rpm (NetworkManager-bluetooth-1.4.0-12.el7.x86_64.rpm)
Using NETWO002.RPM;1 for /root/hrr/Packages/NetworkManager-bluetooth-1.4.0-12.el7.x86_64.rpm (NetworkManager-config-server-1.4.0-12.el7.x86_64.rpm)
Using NETWO003.RPM;1 for /root/hrr/Packages/NetworkManager-config-server-1.4.0-12.el7.x86_64.rpm (NetworkManager-glib-1.4.0-12.el7.x86_64.rpm)
Using NETWO004.RPM;1 for /root/hrr/Packages/NetworkManager-glib-1.4.0-12.el7.x86_64.rpm (NetworkManager-libnm-1.4.0-12.el7.x86_64.rpm)
Using NETWO005.RPM;1 for /root/hrr/Packages/NetworkManager-libnm-1.4.0-12.el7.x86_64.rpm (NetworkManager-team-1.4.0-12.el7.x86_64.rpm)
Using NETWO006.RPM;1 for /root/hrr/Packages/NetworkManager-team-1.4.0-12.el7.x86_64.rpm (NetworkManager-tui-1.4.0-12.el7.x86_64.rpm)
Using NETWO007.RPM;1 for /root/hrr/Packages/NetworkManager-tui-1.4.0-12.el7.x86_64.rpm (NetworkManager-wifi-1.4.0-12.el7.x86_64.rpm)
Using NETWO008.RPM;1 for /root/hrr/Packages/NetworkManager-wifi-1.4.0-12.el7.x86_64.rpm (NetworkManager-wwan-1.4.0-12.el7.x86_64.rpm)
Using NCURS000.RPM;1 for /root/hrr/Packages/ncurses-5.9-13.20130511.el7.x86_64.rpm (ncurses-base-5.9-13.20130511.el7.noarch.rpm)
Using NCURS001.RPM;1 for /root/hrr/Packages/ncurses-base-5.9-13.20130511.el7.noarch.rpm (ncurses-libs-5.9-13.20130511.el7.x86_64.rpm)
Using LIBSE000.RPM;1 for /root/hrr/Packages/libselinux-2.5-6.el7.x86_64.rpm (libselinux-python-2.5-6.el7.x86_64.rpm)
Using LIBSE001.RPM;1 for /root/hrr/Packages/libselinux-python-2.5-6.el7.x86_64.rpm (libselinux-utils-2.5-6.el7.x86_64.rpm)
Using KERNE000.RPM;1 for /root/hrr/Packages/kernel-tools-3.10.0-514.el7.x86_64.rpm (kernel-tools-libs-3.10.0-514.el7.x86_64.rpm)
Using IWL60000.RPM;1 for /root/hrr/Packages/iwl6000g2a-firmware-17.168.5.3-49.el7.noarch.rpm (iwl6000g2b-firmware-17.168.5.2-49.el7.noarch.rpm)
Using ISCSI000.RPM;1 for /root/hrr/Packages/iscsi-initiator-utils-6.2.0.873-35.el7.x86_64.rpm (iscsi-initiator-utils-iscsiuio-6.2.0.873-35.el7.x86_64.rpm)
Using GETTE000.RPM;1 for /root/hrr/Packages/gettext-0.18.2.1-4.el7.x86_64.rpm (gettext-libs-0.18.2.1-4.el7.x86_64.rpm)
Using FIREW000.RPM;1 for /root/hrr/Packages/firewalld-0.4.3.2-8.el7.noarch.rpm (firewalld-filesystem-0.4.3.2-8.el7.noarch.rpm)
Using FIPSC000.RPM;1 for /root/hrr/Packages/fipscheck-1.4.1-5.el7.x86_64.rpm (fipscheck-lib-1.4.1-5.el7.x86_64.rpm)
Using ELFUT000.RPM;1 for /root/hrr/Packages/elfutils-libelf-0.166-2.el7.x86_64.rpm (elfutils-libs-0.166-2.el7.x86_64.rpm)
Using E2FSP000.RPM;1 for /root/hrr/Packages/e2fsprogs-1.42.9-9.el7.x86_64.rpm (e2fsprogs-libs-1.42.9-9.el7.x86_64.rpm)
Using DEVIC000.RPM;1 for /root/hrr/Packages/device-mapper-1.02.135-1.el7.x86_64.rpm (device-mapper-event-1.02.135-1.el7.x86_64.rpm)
Using DEVIC001.RPM;1 for /root/hrr/Packages/device-mapper-event-1.02.135-1.el7.x86_64.rpm (device-mapper-event-libs-1.02.135-1.el7.x86_64.rpm)
Using DEVIC002.RPM;1 for /root/hrr/Packages/device-mapper-event-libs-1.02.135-1.el7.x86_64.rpm (device-mapper-libs-1.02.135-1.el7.x86_64.rpm)
Using DEVIC003.RPM;1 for /root/hrr/Packages/device-mapper-libs-1.02.135-1.el7.x86_64.rpm (device-mapper-multipath-0.4.9-99.el7.x86_64.rpm)
Using DEVIC004.RPM;1 for /root/hrr/Packages/device-mapper-multipath-0.4.9-99.el7.x86_64.rpm (device-mapper-multipath-libs-0.4.9-99.el7.x86_64.rpm)
Using DEVIC005.RPM;1 for /root/hrr/Packages/device-mapper-multipath-libs-0.4.9-99.el7.x86_64.rpm (device-mapper-persistent-data-0.6.3-1.el7.x86_64.rpm)
Using CRYPT000.RPM;1 for /root/hrr/Packages/cryptsetup-1.7.2-1.el7.x86_64.rpm (cryptsetup-libs-1.7.2-1.el7.x86_64.rpm)
Using CRACK000.RPM;1 for /root/hrr/Packages/cracklib-2.9.0-11.el7.x86_64.rpm (cracklib-dicts-2.9.0-11.el7.x86_64.rpm)
Writing: Initial Padblock Start Block 0
Done with: Initial Padblock Block(s) 16
Writing: Primary Volume Descriptor Start Block 16
Done with: Primary Volume Descriptor Block(s) 1
Writing: Eltorito Volume Descriptor Start Block 17
Size of boot image is 4 sectors -> No emulation
Done with: Eltorito Volume Descriptor Block(s) 1
Writing: Joliet Volume Descriptor Start Block 18
Done with: Joliet Volume Descriptor Block(s) 1
Writing: End Volume Descriptor Start Block 19
Done with: End Volume Descriptor Block(s) 1
Writing: Version block Start Block 20
Done with: Version block Block(s) 1
Writing: Path table Start Block 21
Done with: Path table Block(s) 4
Writing: Joliet path table Start Block 25
Done with: Joliet path table Block(s) 4
Writing: Directory tree Start Block 29
Done with: Directory tree Block(s) 39
Writing: Joliet directory tree Start Block 68
Done with: Joliet directory tree Block(s) 28
Writing: Directory tree cleanup Start Block 96
Done with: Directory tree cleanup Block(s) 0
Writing: Extension record Start Block 96
Done with: Extension record Block(s) 1
Writing: The File(s) Start Block 97
1.44% done, estimate finish Sun Feb 7 18:59:19 2016
2.88% done, estimate finish Sun Feb 7 18:59:19 2016
4.31% done, estimate finish Sun Feb 7 18:59:19 2016
5.75% done, estimate finish Sun Feb 7 18:59:19 2016
7.19% done, estimate finish Sun Feb 7 18:59:19 2016
8.63% done, estimate finish Sun Feb 7 18:59:19 2016
10.07% done, estimate finish Sun Feb 7 18:59:19 2016
11.50% done, estimate finish Sun Feb 7 18:59:27 2016
12.94% done, estimate finish Sun Feb 7 18:59:26 2016
14.38% done, estimate finish Sun Feb 7 18:59:25 2016
15.82% done, estimate finish Sun Feb 7 18:59:25 2016
17.26% done, estimate finish Sun Feb 7 18:59:24 2016
18.70% done, estimate finish Sun Feb 7 18:59:24 2016
20.13% done, estimate finish Sun Feb 7 18:59:23 2016
21.57% done, estimate finish Sun Feb 7 18:59:23 2016
23.01% done, estimate finish Sun Feb 7 18:59:23 2016
24.45% done, estimate finish Sun Feb 7 18:59:23 2016
25.88% done, estimate finish Sun Feb 7 18:59:22 2016
27.32% done, estimate finish Sun Feb 7 18:59:22 2016
28.76% done, estimate finish Sun Feb 7 18:59:22 2016
30.20% done, estimate finish Sun Feb 7 18:59:22 2016
31.63% done, estimate finish Sun Feb 7 18:59:25 2016
33.07% done, estimate finish Sun Feb 7 18:59:25 2016
34.51% done, estimate finish Sun Feb 7 18:59:24 2016
35.95% done, estimate finish Sun Feb 7 18:59:24 2016
37.38% done, estimate finish Sun Feb 7 18:59:24 2016
38.82% done, estimate finish Sun Feb 7 18:59:26 2016
40.26% done, estimate finish Sun Feb 7 18:59:26 2016
41.70% done, estimate finish Sun Feb 7 18:59:26 2016
43.14% done, estimate finish Sun Feb 7 18:59:25 2016
44.58% done, estimate finish Sun Feb 7 18:59:25 2016
46.01% done, estimate finish Sun Feb 7 18:59:25 2016
47.45% done, estimate finish Sun Feb 7 18:59:25 2016
48.89% done, estimate finish Sun Feb 7 18:59:25 2016
50.33% done, estimate finish Sun Feb 7 18:59:24 2016
51.76% done, estimate finish Sun Feb 7 18:59:26 2016
53.20% done, estimate finish Sun Feb 7 18:59:26 2016
54.64% done, estimate finish Sun Feb 7 18:59:26 2016
56.08% done, estimate finish Sun Feb 7 18:59:26 2016
57.51% done, estimate finish Sun Feb 7 18:59:25 2016
58.95% done, estimate finish Sun Feb 7 18:59:25 2016
60.39% done, estimate finish Sun Feb 7 18:59:25 2016
61.83% done, estimate finish Sun Feb 7 18:59:25 2016
63.27% done, estimate finish Sun Feb 7 18:59:25 2016
64.70% done, estimate finish Sun Feb 7 18:59:25 2016
66.14% done, estimate finish Sun Feb 7 18:59:26 2016
67.58% done, estimate finish Sun Feb 7 18:59:26 2016
69.01% done, estimate finish Sun Feb 7 18:59:26 2016
70.45% done, estimate finish Sun Feb 7 18:59:26 2016
71.89% done, estimate finish Sun Feb 7 18:59:25 2016
73.33% done, estimate finish Sun Feb 7 18:59:25 2016
74.77% done, estimate finish Sun Feb 7 18:59:25 2016
76.21% done, estimate finish Sun Feb 7 18:59:25 2016
77.64% done, estimate finish Sun Feb 7 18:59:25 2016
79.08% done, estimate finish Sun Feb 7 18:59:26 2016
80.52% done, estimate finish Sun Feb 7 18:59:26 2016
81.95% done, estimate finish Sun Feb 7 18:59:26 2016
83.40% done, estimate finish Sun Feb 7 18:59:26 2016
84.83% done, estimate finish Sun Feb 7 18:59:27 2016
86.27% done, estimate finish Sun Feb 7 18:59:27 2016
87.71% done, estimate finish Sun Feb 7 18:59:26 2016
89.15% done, estimate finish Sun Feb 7 18:59:26 2016
90.58% done, estimate finish Sun Feb 7 18:59:26 2016
92.02% done, estimate finish Sun Feb 7 18:59:26 2016
93.46% done, estimate finish Sun Feb 7 18:59:27 2016
94.89% done, estimate finish Sun Feb 7 18:59:27 2016
96.33% done, estimate finish Sun Feb 7 18:59:27 2016
97.77% done, estimate finish Sun Feb 7 18:59:27 2016
99.21% done, estimate finish Sun Feb 7 18:59:27 2016
Total translation table size: 97959
Total rockridge attributes bytes: 43580
Total directory bytes: 75776
Path table size(bytes): 140
Done with: The File(s) Block(s) 347512
Writing: Ending Padblock Start Block 347609
Done with: Ending Padblock Block(s) 150
Max brk space used 80000
347759 extents written (679 MB)
通过vmware测试:这里密码是1
default more是第一个

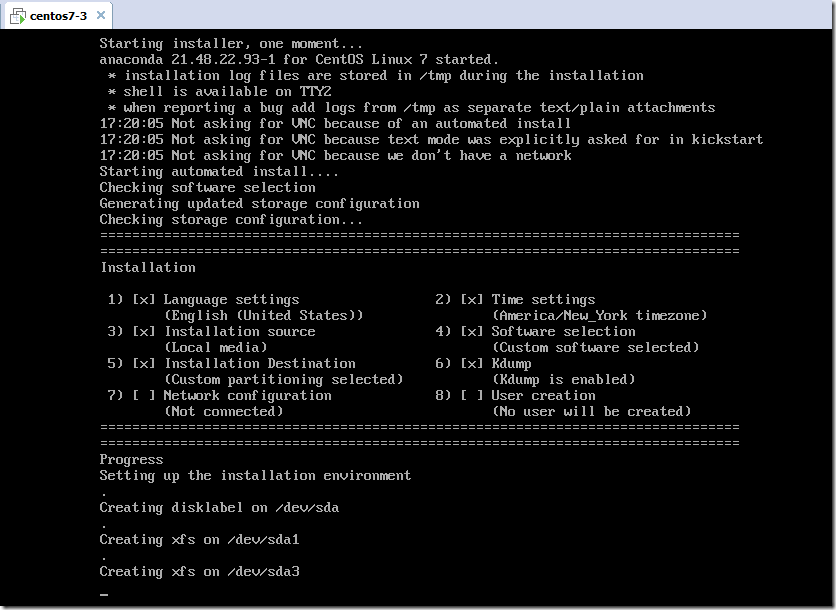
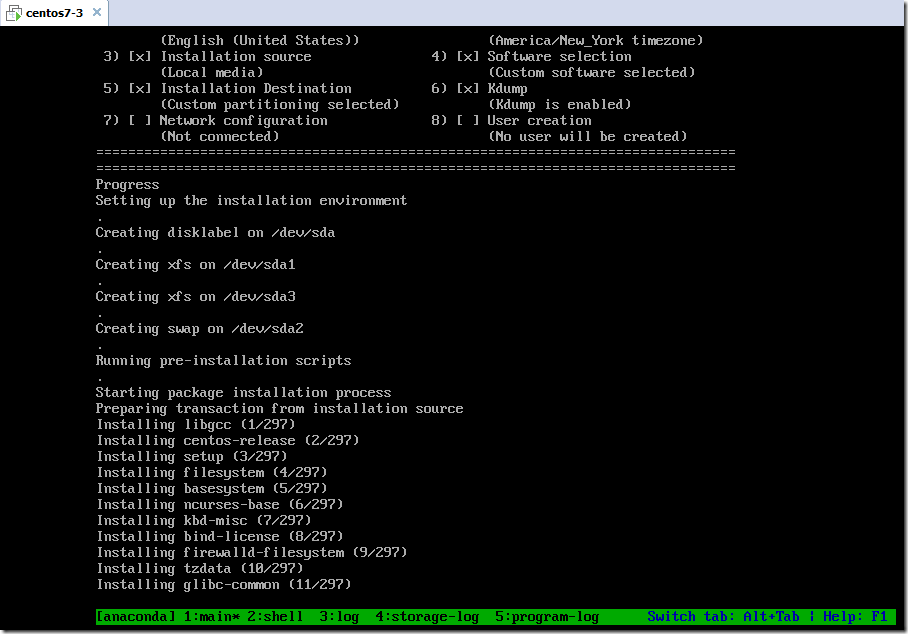
CFME安装:只选ISO方式,不选自定义的template否则虚拟机加载不到光盘。

按ALT+TAB可以切换不同的界面,第一个是安装,第二是命令行,第三是日志,第四是日志,第五是日志,第六又开始从第一循环。
3. 设置自定义模板
导航:infrastructure>PXE>customization template
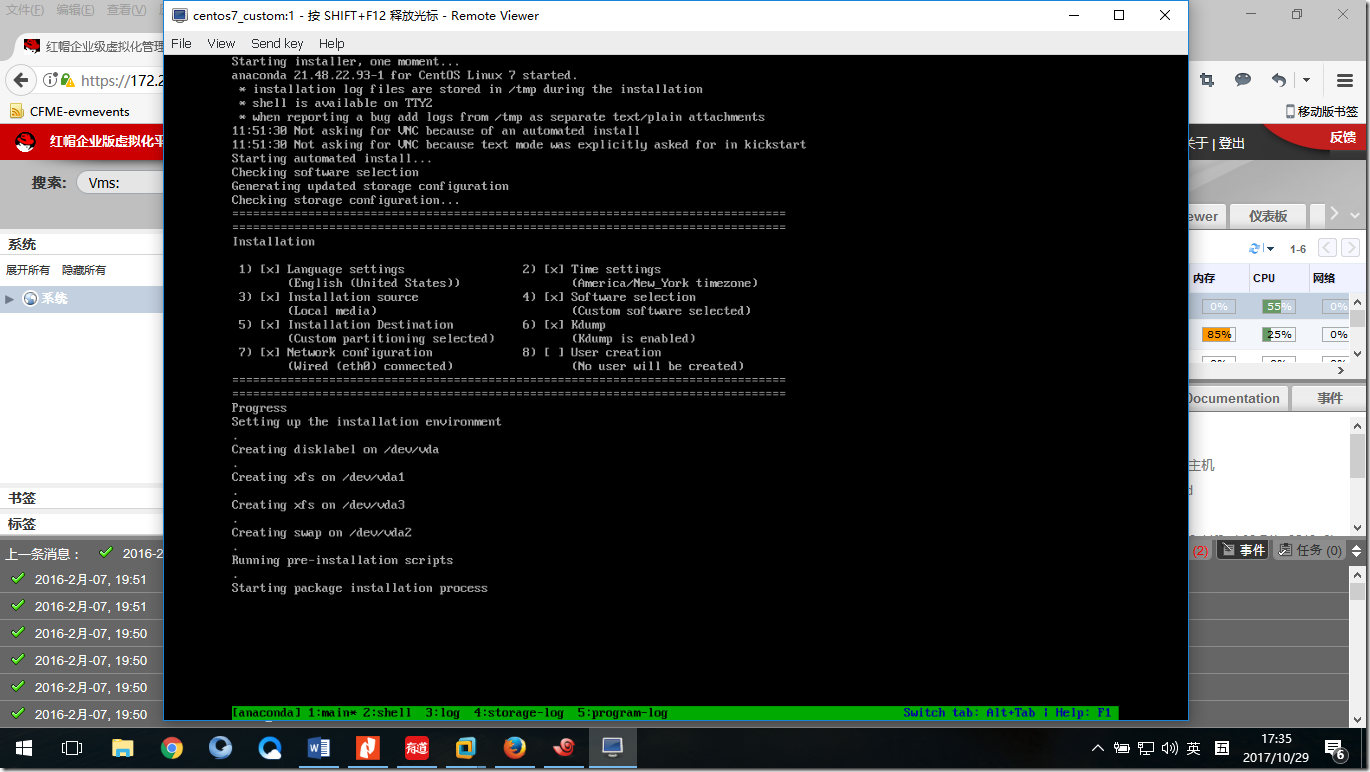
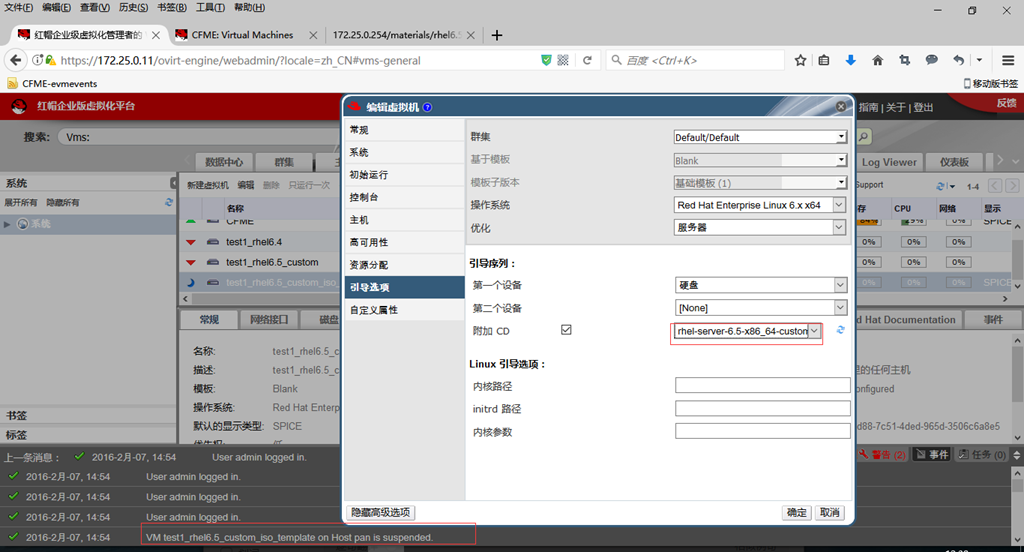
4. 通过自定义模板与ISO配置虚拟机
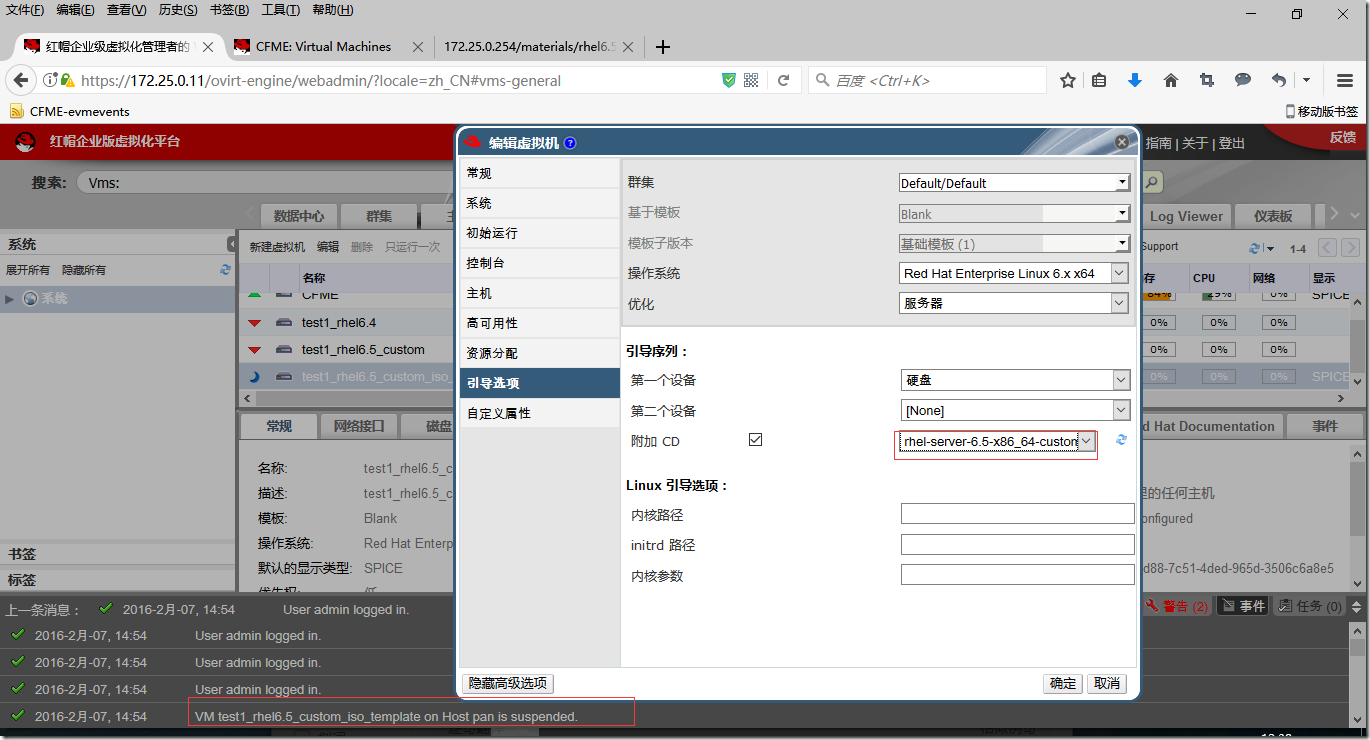
这里在创建虚拟机时,有把ISO选上的,但它没有加载到,需要人工来设置。
先在CFME暂停虚拟机,然后到RHEV平台把虚拟机关机并把光盘挂载上并run once.
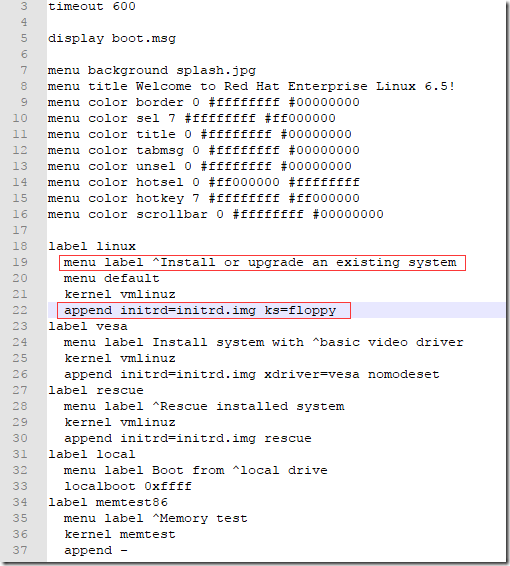
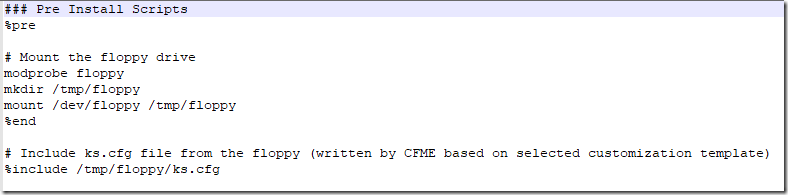
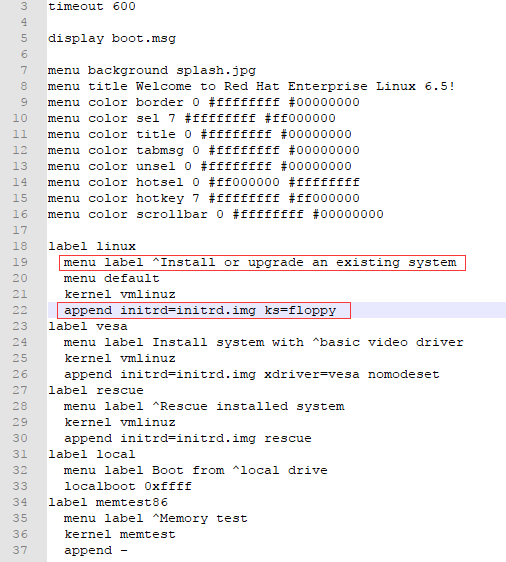
光盘中的isolinux.cfg的内容:
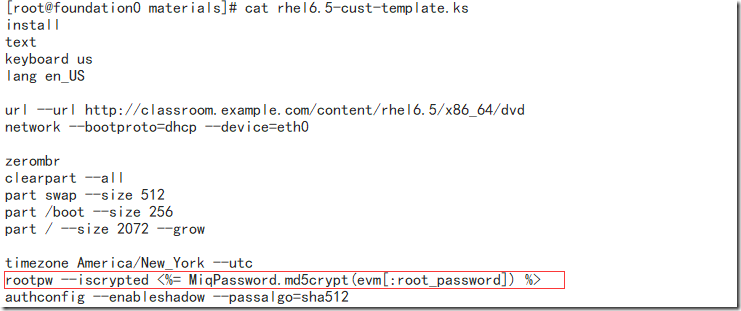
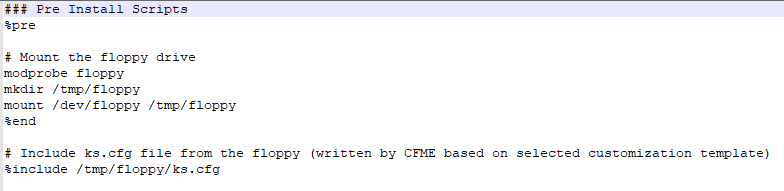
光盘中的ks文件的内容:
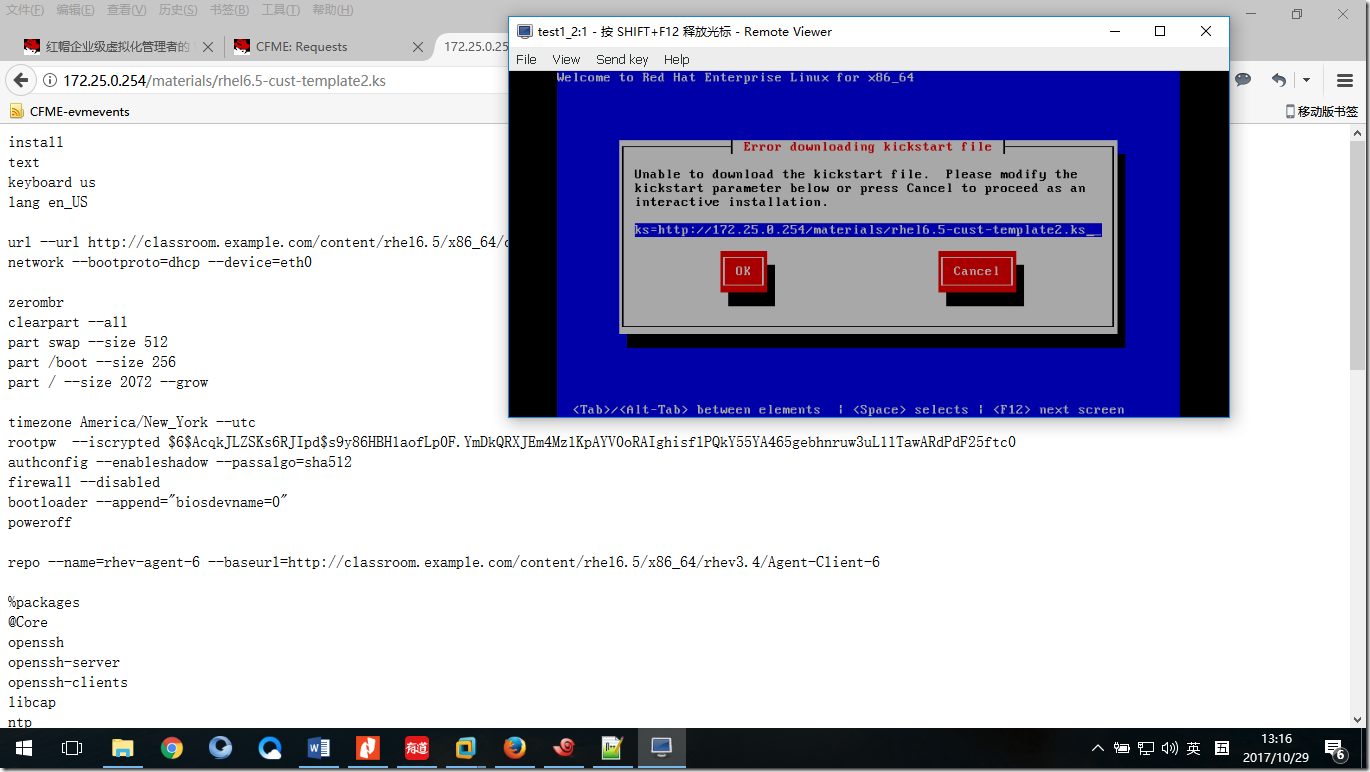
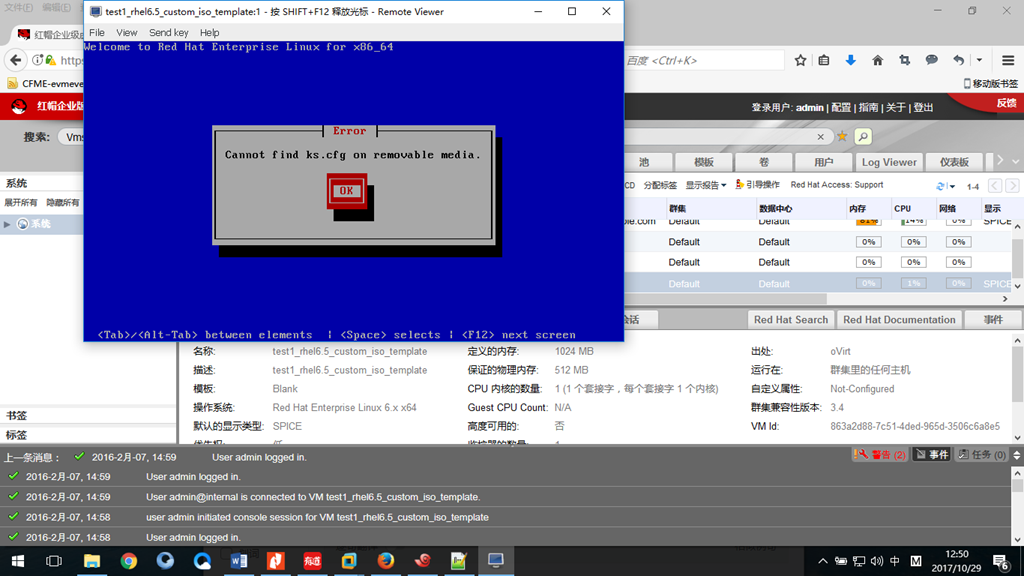
从这里得出:
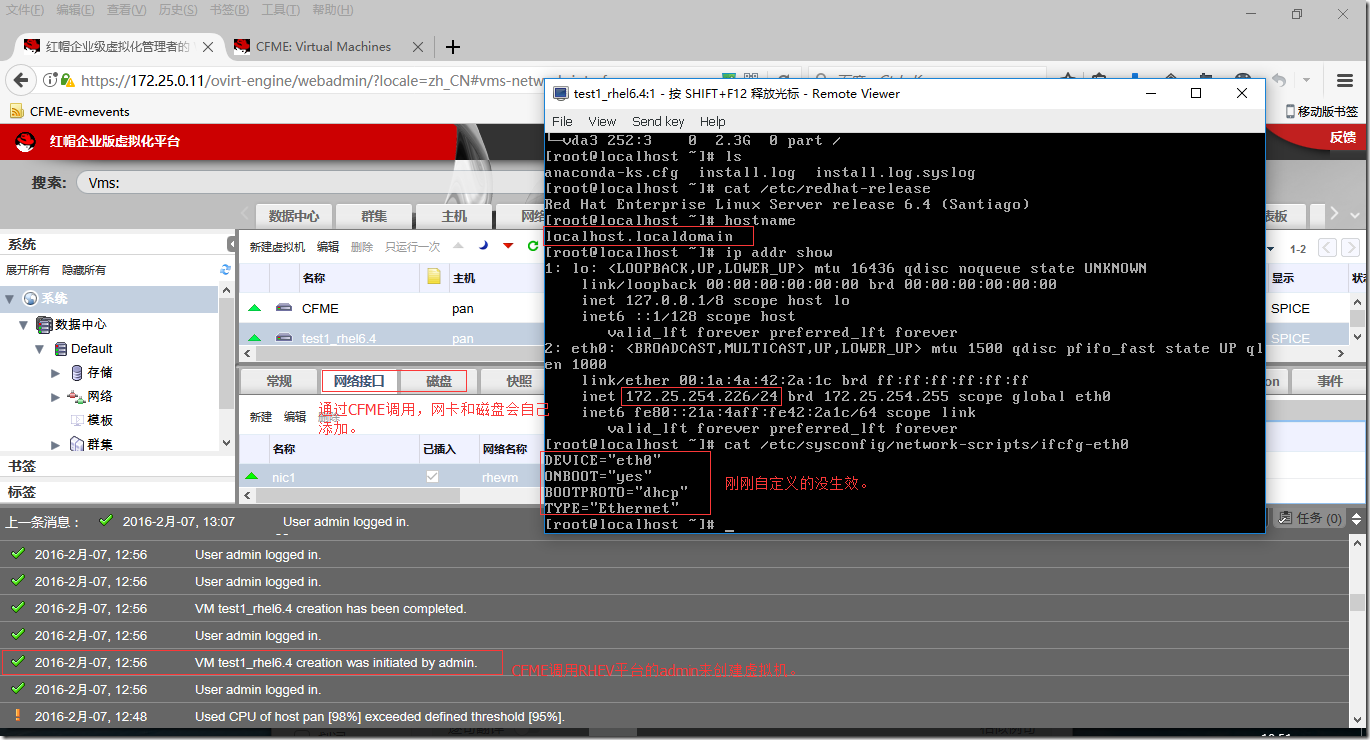
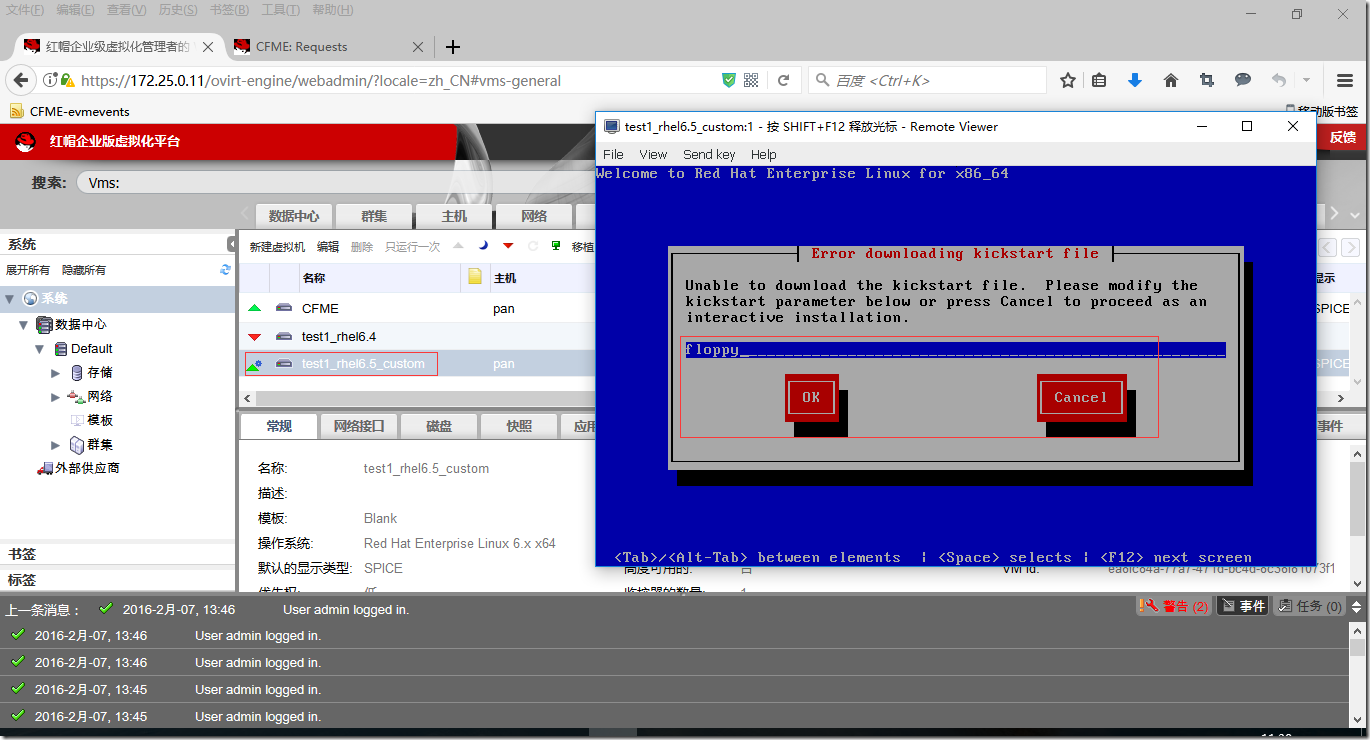
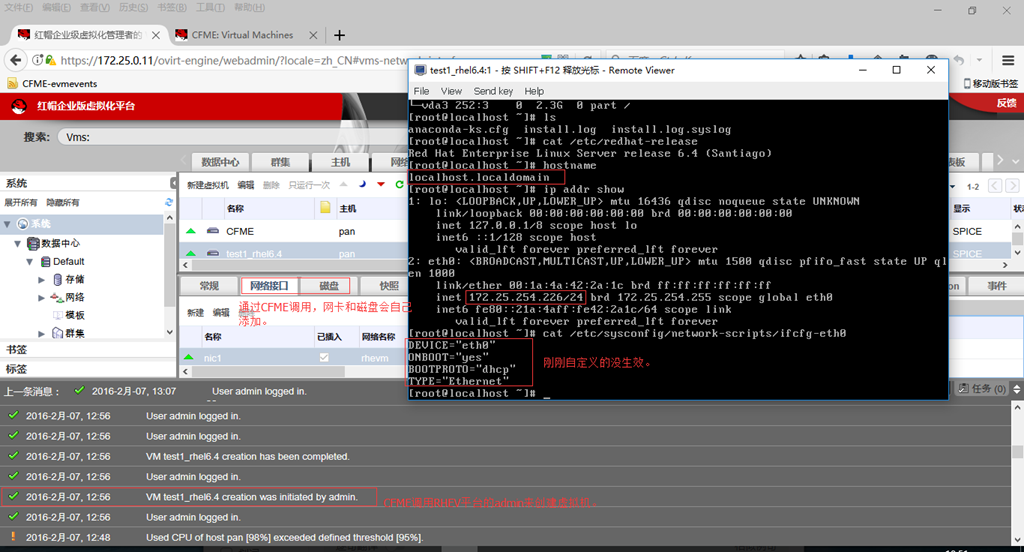
L红帽给的自定义光盘中的isolinux有写:ks文件在floppy中,但系统没找到ks文件。
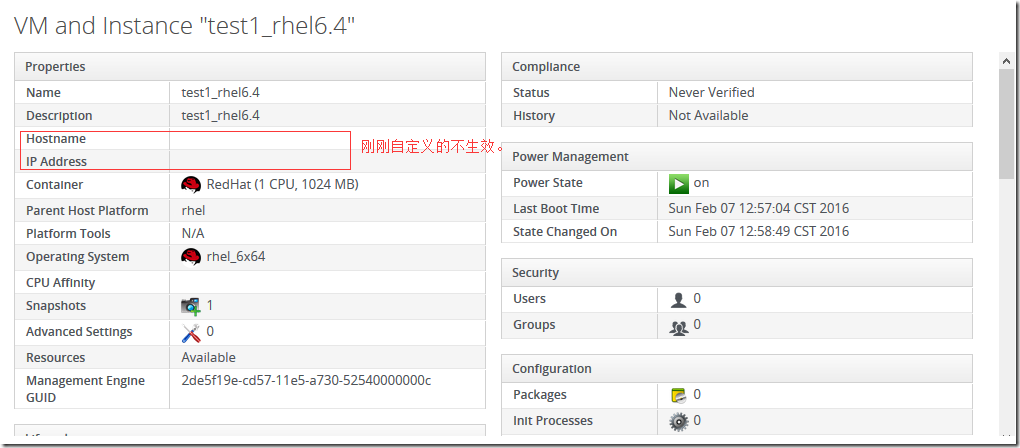
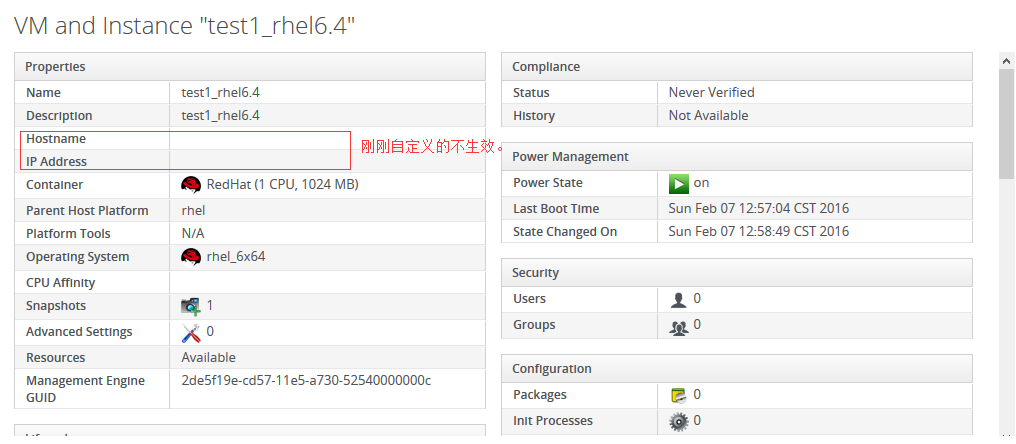
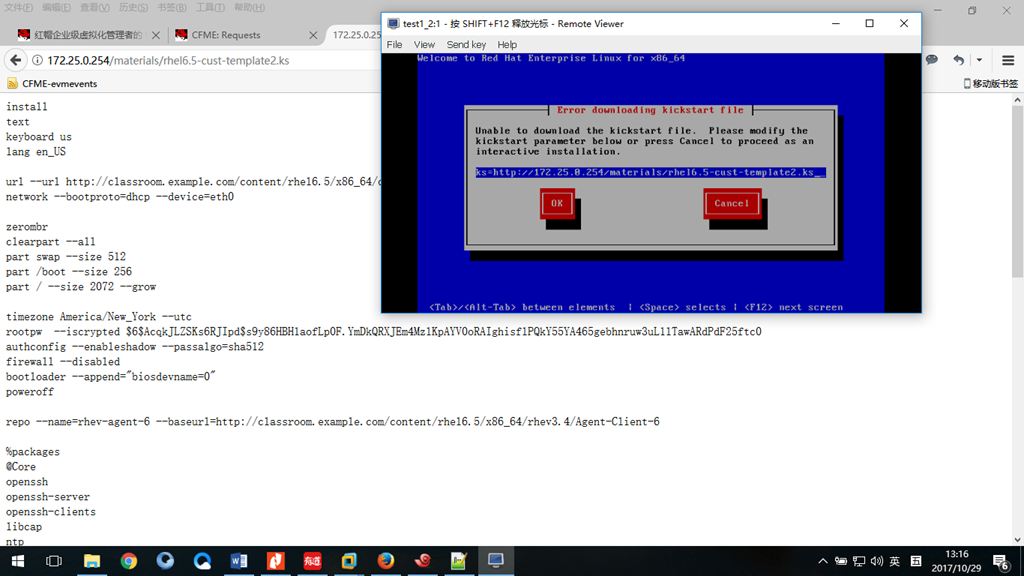
L然后在CFME定义的KS文件并没有生效,现在需要自己写classroom上的ks文件地址,但这又有问题来了,classroom中的ks文件中的passworld等是引用CFME的customize定义的变量,这里只是引用classroom的KS,于是这个KS文件需要自己修改密码,否则不知道root密码。
解决方法:
将其他地址的ks文件中的root加密代码复制到,我们需要引用的ks文件的root密码上,这样就知道root密码是啥了。(我这里复制的是rhevm中的.cfg文件,root密码是redhat)


实验1. 创建自定义模板
2. 通过ISO配置VM(customize那选custom template)
3. 监控配置VM信息/进度
4. 当cfme的监控进度为waiting时将vm暂停,到RHEV平台将VM关机,挂光盘给vm并设置为run once
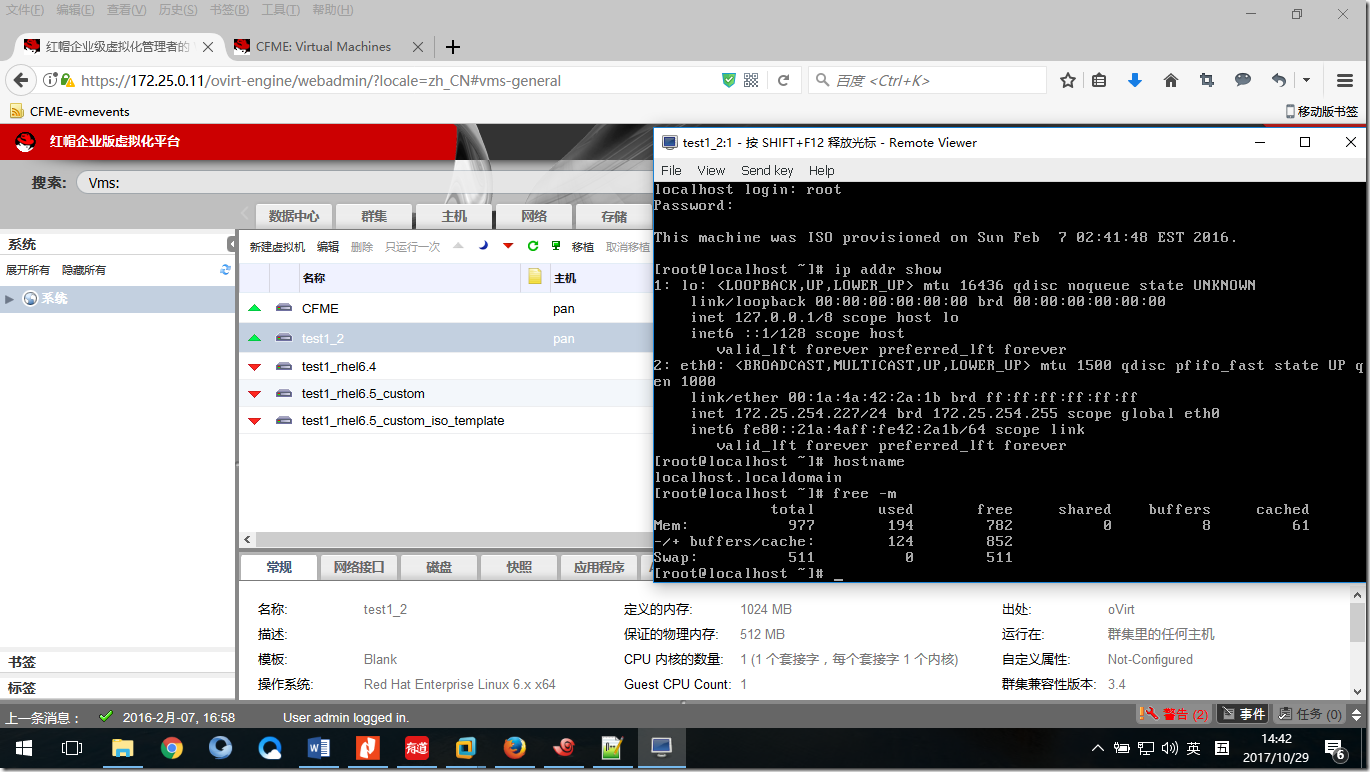
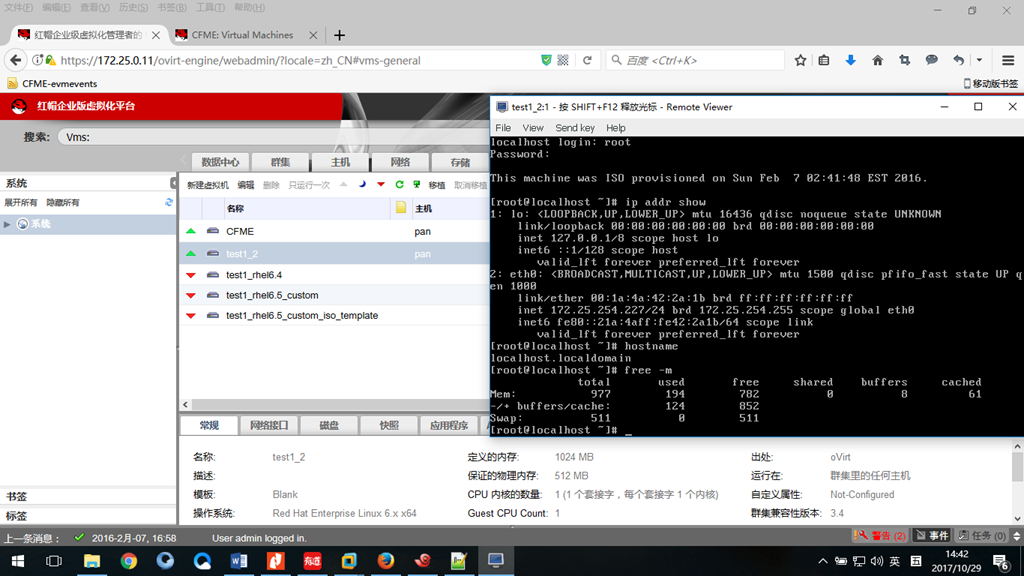
5. 检验VM是否配置成功
另一种配置虚拟机的方式是PXE,引导是通过网络来启动的,也就是引导盘不在RHEV平台,而是在一台远端PXE服务器上。
2. 什么是pex
PXE(preboot execute environment,预启动执行环境)是由Intel公司开发的最新技术,工作于Client/Server的网络模式,支持工作站通过网络从远端服务器下载映像,并由此支持通过网络启动操作系统,在启动过程中,终端要求服务器分配IP地址,再用TFTP(trivial file transfer protocol)或MTFTP(multicast trivial file transfer protocol)协议下载一个启动软件包到本机内存中执行,由这个启动软件包完成终端(客户端)基本软件设置,从而引导预先安装在服务器中的终端操作系统。PXE可以引导多种操作系统,如:Windows95/98/2000/windows2003/windows2008/winXP/win7/win8,linux系列系统等。
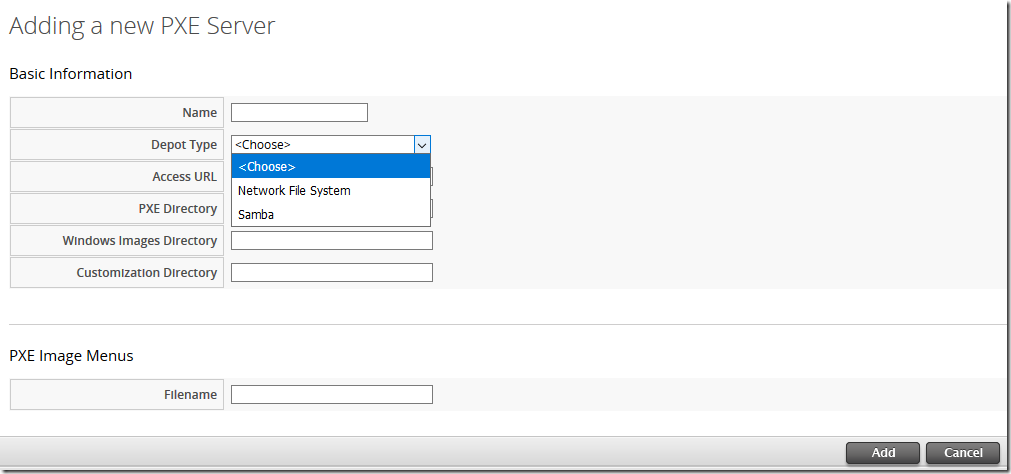
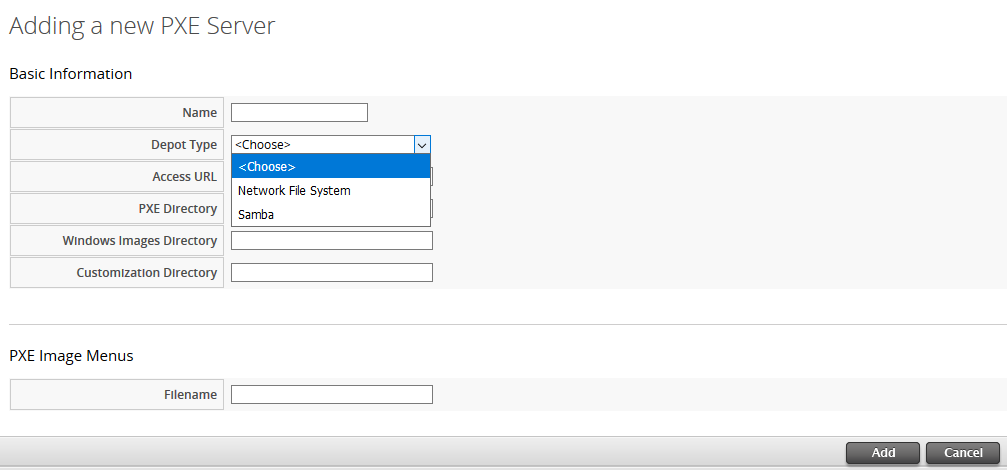
3. 在cfme配置PXE
导航:infrastructure>PXE>PXE server
CFME3.1 depot仓库支持的文件系统是samba/nfs
实验无
目录
Provisioning via Native Clone
理论
实验
Defining ISO Image Type
理论
实验
Provisioning via Customization Templates
理论
实验
Provisioning via PXE
理论
实验
4 provisioning virtual machines
第4章主要是讲如何在CFME创建虚拟机,主要有3种方式:native clone/iso/pxe。主要是2个web界面的内容:
infractructure>virtual machine/PXE创建虚拟机操作界面。
service>request创建虚拟机进度等信息。
Provisioning via Native Clone
理论1. 概述基础设施可以发布资源和管理它们的生命周期。
资源包含:虚拟机/存储空间/或者其它基础设施可管理的资源。
通过CFME配置虚拟机有三种方式:template(native clone)/ISO/PXE
2. 如何配置虚拟机?
配置虚拟机有8大选项
request:指虚拟机的管理员信息,例如邮箱,姓名等。
purpose:虚拟机属于哪个tag,例如一个catelogies可能是一个项目,然后tag是这个项目的标记,指虚拟机属于哪个项目。
catelog:虚拟机的基本信息,例如多少台虚拟机,虚拟机是通过哪种方式创建的(模板/ISO/PXE),虚拟机的名字等。
environment:指虚拟机创建在哪,例如哪个集群,运行在哪台主机,存放在哪个存储域上等。
hareware:指虚拟机的硬件信息,例如CPU个数,内存多大等。
network:虚拟机所在的网络。
customize:指定制虚拟机的密码,IP,DNS等。
schedule:指虚拟机在什么时候创建,什么时候开机等。

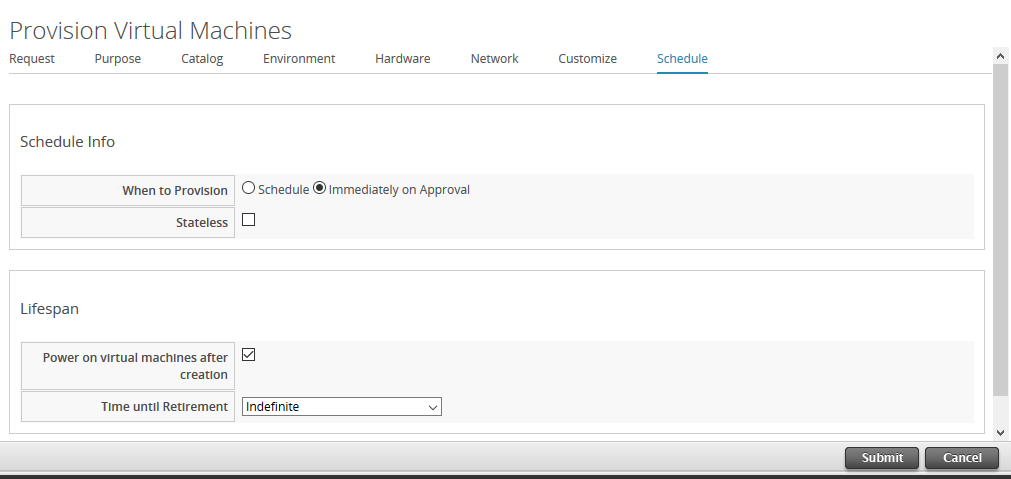
点提交后会自动跳转到services>request
实验1. 下载rhel的ova模板
2. 将rhel的ova导入到rhevm
3. 在RHEV平台创建rhev模板
4. 在CFME通过模板配置VM
5. 监控配置信息,配置进度等
6. 检验VM是否配置成功
Defining ISO Image Type
理论1. 概述另一种配置虚拟机的方式是ISO。
但通过官方的ISO需要手动安装,无法自动安装,这里您需要自定义isolinux中的ks文件,然后生成一个自定义的ISO,使其可以自动安装。
自定义ISO:
https://jingyan.baidu.com/article/c1a3101eef3ee6de656debb8.html
2. CFME如何配置ISO
首先需要配置ISO datastore。
导航:infrastructure>PXE>ISO datastore添加一个现有的provider(例如RHEV)中的iso。
添加完后需要点刷新”relationship”,才会出现RHEV平台中的ISO。
接着需要edit它的iso type,这里我选的rhel6。
iso type可以通过左边导航的上级选项”system image type”来添加。
3. 通过自定义ISO配置虚拟机
红帽给的自定义ISO有问题:卡在这里了
这个自定义ISO会自己创建一个3G的磁盘(和上面的template一样)。
这里使用的ISO是rhel-server-6.5-x86_64-custom.iso,其实这只一个引导盘,里面的KS文件没啥用。本单元主要是为下个单元做准备。
如果您需要通过自定义ISO配置虚拟机,也可以自己创建自定义的ISO与KS文件。
实验1. 下载自定义的ISO
2. 上传ISO到RHEV平台
3. 在CFME创建ISO datastore
4. 创建system image type
5. 将刚刚创建的system image type和ISO datastore中的ISO关联
Provisioning via Customization Templates
理论1. 概述在一些企业可能需要一个定制化的虚拟机。
这时您可以通过”自定义模板”来配置虚拟机:
windows:syspre file
linux: ks file
2. 制作自定义光盘
如何做一个定制化的iso,使系统自动根据我们预定义好的参数来安装系统呢?
这里需要用到ks文件,并在引导光盘时自动加载ks文件的效果。通过光盘引导系统时会加载光盘中isolinux中的isolinux.cfg,从而得到引导列表,那么可以在读取某个引导列表中的选项时自动读取ks文件,这里只需将ks文件的路径加到引导项中就可以实现自动安装。
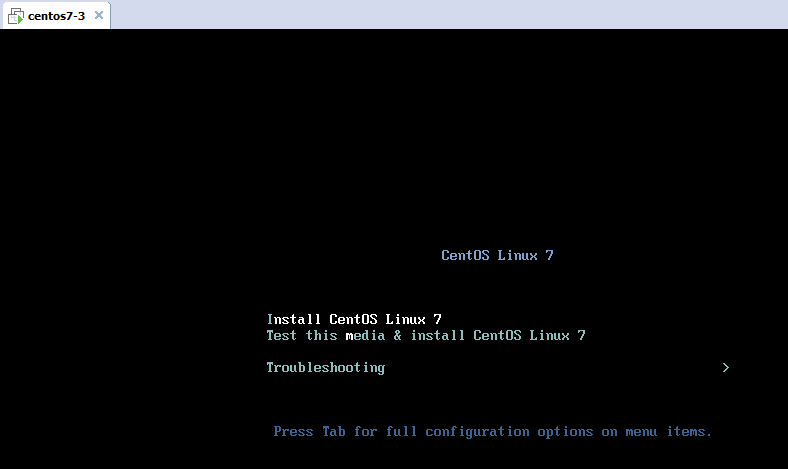
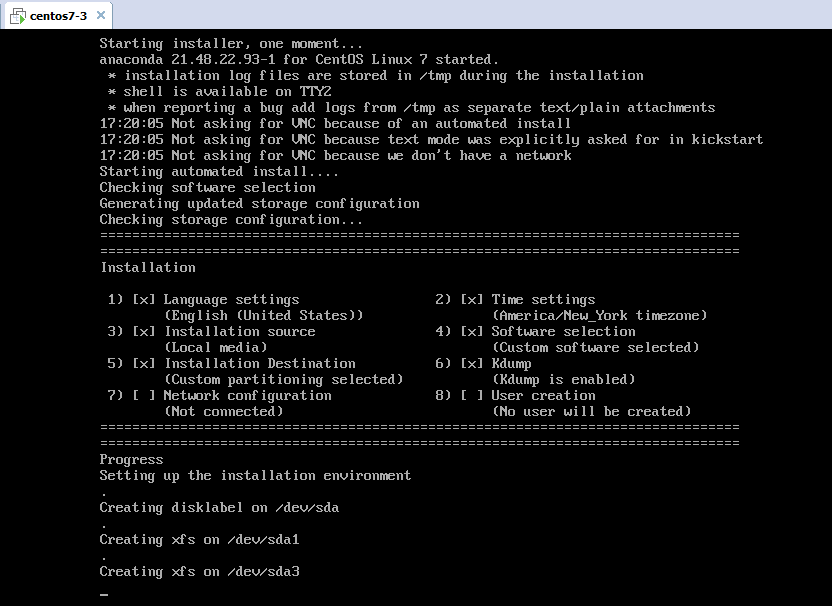
下面在F0安装kickstart工具,然后制作一个最小化安装的自定义centos7光盘,达到不用人为选择安装项,自动安装定制化系统的效果。
官方centos小最化的镜像:CentOS-7-x86_64-Minimal-1611.iso
步骤:
yum install -y system-config-kickstart #安装ks文件制作工具
system-config-kickstart #打开图形化的ks文件制作工具,制作好后将ks另存为ks.cfg
mkdir /mnt/iso #光盘的挂载目录
mount /dev/sr0 /mnt/iso/ #将光盘挂载
mkdir hrr #新建一个目录,用于放从光盘拷贝过来的文件
cp -arp /mnt/iso/* hrr/ #将光盘的文件全部拷贝到新目录中
vim isolinux.cfg #在isolinux.cfg中定义ks文件路径,这里ks.cfg放在hrr目录中
cat isolinux.cfg #以下是isolinux.cfg的内容
default vesamenu.c32
timeout 600
display boot.msg
# Clear the screen when exiting the menu, instead of leaving the menu displayed.
# For vesamenu, this means the graphical background is still displayed without
# the menu itself for as long as the screen remains in graphics mode.
menu clear
menu background splash.png
menu title CentOS Linux 7
menu vshift 8
menu rows 18
menu margin 8
#menu hidden
menu helpmsgrow 15
menu tabmsgrow 13
# Border Area
menu color border * #00000000 #00000000 none
# Selected item
menu color sel 0 #ffffffff #00000000 none
# Title bar
menu color title 0 #ff7ba3d0 #00000000 none
# Press [Tab] message
menu color tabmsg 0 #ff3a6496 #00000000 none
# Unselected menu item
menu color unsel 0 #84b8ffff #00000000 none
# Selected hotkey
menu color hotsel 0 #84b8ffff #00000000 none
# Unselected hotkey
menu color hotkey 0 #ffffffff #00000000 none
# Help text
menu color help 0 #ffffffff #00000000 none
# A scrollbar of some type? Not sure.
menu color scrollbar 0 #ffffffff #ff355594 none
# Timeout msg
menu color timeout 0 #ffffffff #00000000 none
menu color timeout_msg 0 #ffffffff #00000000 none
# Command prompt text
menu color cmdmark 0 #84b8ffff #00000000 none
menu color cmdline 0 #ffffffff #00000000 none
# Do not display the actual menu unless the user presses a key. All that is displayed is a timeout message.
menu tabmsg Press Tab for full configuration options on menu items.
menu separator # insert an empty line
menu separator # insert an empty line
label linux
menu label ^Install CentOS Linux 7
menu default
kernel vmlinuz
append initrd=initrd.img ks=cdrom:/ks.cfg quiet
label check
menu label Test this ^media & install CentOS Linux 7
kernel vmlinuz
append initrd=initrd.img inst.stage2=hd:LABEL=CentOS\x207\x20x86_64 rd.live.check quiet
menu separator # insert an empty line
# utilities submenu
menu begin ^Troubleshooting
menu title Troubleshooting
label vesa
menu indent count 5
menu label Install CentOS Linux 7 in ^basic graphics mode
text help
Try this option out if you're having trouble installing
CentOS Linux 7.
endtext
kernel vmlinuz
append initrd=initrd.img inst.stage2=hd:LABEL=CentOS\x207\x20x86_64 xdriver=vesa nomodeset quiet
label rescue
menu indent count 5
menu label ^Rescue a CentOS Linux system
text help
If the system will not boot, this lets you access files
and edit config files to try to get it booting again.
endtext
kernel vmlinuz
append initrd=initrd.img inst.stage2=hd:LABEL=CentOS\x207\x20x86_64 rescue quiet
label memtest
menu label Run a ^memory test
text help
If your system is having issues, a problem with your
system's memory may be the cause. Use this utility to
see if the memory is working correctly.
endtext
kernel memtest
menu separator # insert an empty line
label local
menu label Boot from ^local drive
localboot 0xffff
menu separator # insert an empty line
menu separator # insert an empty line
label returntomain
menu label Return to ^main menu
menu exit
menu end
cat ks.cfg #以下是ks.cfg的内容
#platform=x86, AMD64, or Intel EM64T
#version=DEVEL
# Install OS instead of upgrade
install
# Keyboard layouts
keyboard 'us'# Reboot after installation
reboot
# Root password
rootpw --iscrypted $6$bzcFPd2HU1t8WiqW$OPm1BKzNNaIPL0HZqTYWzSHk.SMmEO2kWEvujOnza68sdcSlw9kjK1J9OPXmrg.phIcX2Vpo0vGdtkTCjKkmb/
#密码是redhat
# System timezone
timezone America/New_York
# System language
lang en_US
# Firewall configuration
firewall --disabled
# Network information
network --bootproto=dhcp --device=eth0
# System authorization information
auth --useshadow --passalgo=sha512
# Use CDROM installation media
cdrom
# Use text mode install
text
firstboot --disable
# SELinux configuration
selinux --disabled
# System bootloader configuration
bootloader --append="biosdevname=0" --location=mbr
# Clear the Master Boot Record
zerombr
# Partition clearing information
clearpart --all
# Disk partitioning information
part swap --size=512
part /boot --size=256
part / --grow --size=2072
%post
echo "setterm -blank 0 -powersave off -powerdown 0 > /dev/tty1 < /dev/tty1" >> /etc/rc.d/rc.local
%end
%packages
@Core
libcap
openssh
openssh-clients
openssh-server
%end
# mkisofs -o new.iso -b isolinux/isolinux.bin -c isolinux/boot.cat -no-emul-boot -boot-load-size 4 -boot-info-table -R -J -v -T /root/hrr/ #制作定制光盘为启动盘,这里使用mkisofs来生成
#-o 指生成的iso文件名
#-b指定哪个文件为光盘光盘自引导启动的文件(目录内以.bin结尾的文件)
#-c将boot.cat文件的配置信息显示出来(目录内以.cat结尾的文件)
#-no-emul-boot不模仿boot这种引导格式(光盘内没有MBR不能进行boot格式的启动)
#-boot-load-size 4 指Set numbers of load sectors
#-boot-info-table 指Patch boot image with info table
#-R指-rational-rock
#-j指-joliet
#-v 显示进度
#-T 表示需要生成光盘的目录绝对路径
[root@foundation0 ~]# mkisofs -o new.iso -b isolinux/isolinux.bin -c isolinux/boot.cat -no-emul-boot -boot-load-size 4 -boot-info-table -R -J -v -T /root/hrr/
I: -input-charset not specified, using utf-8 (detected in locale settings)
genisoimage 1.1.11 (Linux)
Scanning /root/hrr/
Scanning /root/hrr/EFI
Scanning /root/hrr/EFI/BOOT
Scanning /root/hrr/EFI/BOOT/fonts
Excluded: /root/hrr/EFI/BOOT/fonts/TRANS.TBL
Excluded: /root/hrr/EFI/BOOT/TRANS.TBL
Excluded: /root/hrr/EFI/TRANS.TBL
Scanning /root/hrr/images
Scanning /root/hrr/images/pxeboot
Excluded: /root/hrr/images/pxeboot/TRANS.TBL
Excluded: /root/hrr/images/TRANS.TBL
Scanning /root/hrr/isolinux
Excluded by match: /root/hrr/isolinux/boot.cat
Excluded: /root/hrr/isolinux/TRANS.TBL
Scanning /root/hrr/LiveOS
Excluded: /root/hrr/LiveOS/TRANS.TBL
Scanning /root/hrr/Packages
Excluded: /root/hrr/Packages/TRANS.TBL
Scanning /root/hrr/repodata
Excluded: /root/hrr/repodata/TRANS.TBL
Excluded: /root/hrr/TRANS.TBL
Using RPM_G000.;1 for /RPM-GPG-KEY-CentOS-Testing-7 (RPM-GPG-KEY-CentOS-7)
Using SYSTE000.RPM;1 for /root/hrr/Packages/systemd-219-30.el7.x86_64.rpm (systemd-libs-219-30.el7.x86_64.rpm)
Using SYSTE001.RPM;1 for /root/hrr/Packages/systemd-libs-219-30.el7.x86_64.rpm (systemd-sysv-219-30.el7.x86_64.rpm)
Using SELIN000.RPM;1 for /root/hrr/Packages/selinux-policy-3.13.1-102.el7.noarch.rpm (selinux-policy-targeted-3.13.1-102.el7.noarch.rpm)
Using PYTHO000.RPM;1 for /root/hrr/Packages/python-backports-1.0-8.el7.x86_64.rpm (python-backports-ssl_match_hostname-3.4.0.2-4.el7.noarch.rpm)
Using PYTHO001.RPM;1 for /root/hrr/Packages/python-perf-3.10.0-514.el7.x86_64.rpm (python-pycurl-7.19.0-19.el7.x86_64.rpm)
Using PYTHO002.RPM;1 for /root/hrr/Packages/python-pycurl-7.19.0-19.el7.x86_64.rpm (python-pyudev-0.15-7.el7_2.1.noarch.rpm)
Using PYTHO003.RPM;1 for /root/hrr/Packages/python-setuptools-0.9.8-4.el7.noarch.rpm (python-slip-0.4.0-2.el7.noarch.rpm)
Using PYTHO004.RPM;1 for /root/hrr/Packages/python-slip-0.4.0-2.el7.noarch.rpm (python-slip-dbus-0.4.0-2.el7.noarch.rpm)
Using PLYMO000.RPM;1 for /root/hrr/Packages/plymouth-0.8.9-0.26.20140113.el7.centos.x86_64.rpm (plymouth-core-libs-0.8.9-0.26.20140113.el7.centos.x86_64.rpm)
Using PLYMO001.RPM;1 for /root/hrr/Packages/plymouth-core-libs-0.8.9-0.26.20140113.el7.centos.x86_64.rpm (plymouth-scripts-0.8.9-0.26.20140113.el7.centos.x86_64.rpm)
Using PCIUT000.RPM;1 for /root/hrr/Packages/pciutils-3.5.1-1.el7.x86_64.rpm (pciutils-libs-3.5.1-1.el7.x86_64.rpm)
Using P11_K000.RPM;1 for /root/hrr/Packages/p11-kit-0.20.7-3.el7.x86_64.rpm (p11-kit-trust-0.20.7-3.el7.x86_64.rpm)
Using OPENS000.RPM;1 for /root/hrr/Packages/openscap-1.2.10-2.el7.x86_64.rpm (openscap-scanner-1.2.10-2.el7.x86_64.rpm)
Using OPENS001.RPM;1 for /root/hrr/Packages/openssh-6.6.1p1-31.el7.x86_64.rpm (openssh-clients-6.6.1p1-31.el7.x86_64.rpm)
Using OPENS002.RPM;1 for /root/hrr/Packages/openssh-clients-6.6.1p1-31.el7.x86_64.rpm (openssh-server-6.6.1p1-31.el7.x86_64.rpm)
Using OPENS003.RPM;1 for /root/hrr/Packages/openssl-1.0.1e-60.el7.x86_64.rpm (openssl-libs-1.0.1e-60.el7.x86_64.rpm)
Using NSS_S000.RPM;1 for /root/hrr/Packages/nss-softokn-3.16.2.3-14.4.el7.x86_64.rpm (nss-softokn-freebl-3.16.2.3-14.4.el7.x86_64.rpm)
Using NETWO000.RPM;1 for /root/hrr/Packages/NetworkManager-1.4.0-12.el7.x86_64.rpm (NetworkManager-adsl-1.4.0-12.el7.x86_64.rpm)
Using NETWO001.RPM;1 for /root/hrr/Packages/NetworkManager-adsl-1.4.0-12.el7.x86_64.rpm (NetworkManager-bluetooth-1.4.0-12.el7.x86_64.rpm)
Using NETWO002.RPM;1 for /root/hrr/Packages/NetworkManager-bluetooth-1.4.0-12.el7.x86_64.rpm (NetworkManager-config-server-1.4.0-12.el7.x86_64.rpm)
Using NETWO003.RPM;1 for /root/hrr/Packages/NetworkManager-config-server-1.4.0-12.el7.x86_64.rpm (NetworkManager-glib-1.4.0-12.el7.x86_64.rpm)
Using NETWO004.RPM;1 for /root/hrr/Packages/NetworkManager-glib-1.4.0-12.el7.x86_64.rpm (NetworkManager-libnm-1.4.0-12.el7.x86_64.rpm)
Using NETWO005.RPM;1 for /root/hrr/Packages/NetworkManager-libnm-1.4.0-12.el7.x86_64.rpm (NetworkManager-team-1.4.0-12.el7.x86_64.rpm)
Using NETWO006.RPM;1 for /root/hrr/Packages/NetworkManager-team-1.4.0-12.el7.x86_64.rpm (NetworkManager-tui-1.4.0-12.el7.x86_64.rpm)
Using NETWO007.RPM;1 for /root/hrr/Packages/NetworkManager-tui-1.4.0-12.el7.x86_64.rpm (NetworkManager-wifi-1.4.0-12.el7.x86_64.rpm)
Using NETWO008.RPM;1 for /root/hrr/Packages/NetworkManager-wifi-1.4.0-12.el7.x86_64.rpm (NetworkManager-wwan-1.4.0-12.el7.x86_64.rpm)
Using NCURS000.RPM;1 for /root/hrr/Packages/ncurses-5.9-13.20130511.el7.x86_64.rpm (ncurses-base-5.9-13.20130511.el7.noarch.rpm)
Using NCURS001.RPM;1 for /root/hrr/Packages/ncurses-base-5.9-13.20130511.el7.noarch.rpm (ncurses-libs-5.9-13.20130511.el7.x86_64.rpm)
Using LIBSE000.RPM;1 for /root/hrr/Packages/libselinux-2.5-6.el7.x86_64.rpm (libselinux-python-2.5-6.el7.x86_64.rpm)
Using LIBSE001.RPM;1 for /root/hrr/Packages/libselinux-python-2.5-6.el7.x86_64.rpm (libselinux-utils-2.5-6.el7.x86_64.rpm)
Using KERNE000.RPM;1 for /root/hrr/Packages/kernel-tools-3.10.0-514.el7.x86_64.rpm (kernel-tools-libs-3.10.0-514.el7.x86_64.rpm)
Using IWL60000.RPM;1 for /root/hrr/Packages/iwl6000g2a-firmware-17.168.5.3-49.el7.noarch.rpm (iwl6000g2b-firmware-17.168.5.2-49.el7.noarch.rpm)
Using ISCSI000.RPM;1 for /root/hrr/Packages/iscsi-initiator-utils-6.2.0.873-35.el7.x86_64.rpm (iscsi-initiator-utils-iscsiuio-6.2.0.873-35.el7.x86_64.rpm)
Using GETTE000.RPM;1 for /root/hrr/Packages/gettext-0.18.2.1-4.el7.x86_64.rpm (gettext-libs-0.18.2.1-4.el7.x86_64.rpm)
Using FIREW000.RPM;1 for /root/hrr/Packages/firewalld-0.4.3.2-8.el7.noarch.rpm (firewalld-filesystem-0.4.3.2-8.el7.noarch.rpm)
Using FIPSC000.RPM;1 for /root/hrr/Packages/fipscheck-1.4.1-5.el7.x86_64.rpm (fipscheck-lib-1.4.1-5.el7.x86_64.rpm)
Using ELFUT000.RPM;1 for /root/hrr/Packages/elfutils-libelf-0.166-2.el7.x86_64.rpm (elfutils-libs-0.166-2.el7.x86_64.rpm)
Using E2FSP000.RPM;1 for /root/hrr/Packages/e2fsprogs-1.42.9-9.el7.x86_64.rpm (e2fsprogs-libs-1.42.9-9.el7.x86_64.rpm)
Using DEVIC000.RPM;1 for /root/hrr/Packages/device-mapper-1.02.135-1.el7.x86_64.rpm (device-mapper-event-1.02.135-1.el7.x86_64.rpm)
Using DEVIC001.RPM;1 for /root/hrr/Packages/device-mapper-event-1.02.135-1.el7.x86_64.rpm (device-mapper-event-libs-1.02.135-1.el7.x86_64.rpm)
Using DEVIC002.RPM;1 for /root/hrr/Packages/device-mapper-event-libs-1.02.135-1.el7.x86_64.rpm (device-mapper-libs-1.02.135-1.el7.x86_64.rpm)
Using DEVIC003.RPM;1 for /root/hrr/Packages/device-mapper-libs-1.02.135-1.el7.x86_64.rpm (device-mapper-multipath-0.4.9-99.el7.x86_64.rpm)
Using DEVIC004.RPM;1 for /root/hrr/Packages/device-mapper-multipath-0.4.9-99.el7.x86_64.rpm (device-mapper-multipath-libs-0.4.9-99.el7.x86_64.rpm)
Using DEVIC005.RPM;1 for /root/hrr/Packages/device-mapper-multipath-libs-0.4.9-99.el7.x86_64.rpm (device-mapper-persistent-data-0.6.3-1.el7.x86_64.rpm)
Using CRYPT000.RPM;1 for /root/hrr/Packages/cryptsetup-1.7.2-1.el7.x86_64.rpm (cryptsetup-libs-1.7.2-1.el7.x86_64.rpm)
Using CRACK000.RPM;1 for /root/hrr/Packages/cracklib-2.9.0-11.el7.x86_64.rpm (cracklib-dicts-2.9.0-11.el7.x86_64.rpm)
Writing: Initial Padblock Start Block 0
Done with: Initial Padblock Block(s) 16
Writing: Primary Volume Descriptor Start Block 16
Done with: Primary Volume Descriptor Block(s) 1
Writing: Eltorito Volume Descriptor Start Block 17
Size of boot image is 4 sectors -> No emulation
Done with: Eltorito Volume Descriptor Block(s) 1
Writing: Joliet Volume Descriptor Start Block 18
Done with: Joliet Volume Descriptor Block(s) 1
Writing: End Volume Descriptor Start Block 19
Done with: End Volume Descriptor Block(s) 1
Writing: Version block Start Block 20
Done with: Version block Block(s) 1
Writing: Path table Start Block 21
Done with: Path table Block(s) 4
Writing: Joliet path table Start Block 25
Done with: Joliet path table Block(s) 4
Writing: Directory tree Start Block 29
Done with: Directory tree Block(s) 39
Writing: Joliet directory tree Start Block 68
Done with: Joliet directory tree Block(s) 28
Writing: Directory tree cleanup Start Block 96
Done with: Directory tree cleanup Block(s) 0
Writing: Extension record Start Block 96
Done with: Extension record Block(s) 1
Writing: The File(s) Start Block 97
1.44% done, estimate finish Sun Feb 7 18:59:19 2016
2.88% done, estimate finish Sun Feb 7 18:59:19 2016
4.31% done, estimate finish Sun Feb 7 18:59:19 2016
5.75% done, estimate finish Sun Feb 7 18:59:19 2016
7.19% done, estimate finish Sun Feb 7 18:59:19 2016
8.63% done, estimate finish Sun Feb 7 18:59:19 2016
10.07% done, estimate finish Sun Feb 7 18:59:19 2016
11.50% done, estimate finish Sun Feb 7 18:59:27 2016
12.94% done, estimate finish Sun Feb 7 18:59:26 2016
14.38% done, estimate finish Sun Feb 7 18:59:25 2016
15.82% done, estimate finish Sun Feb 7 18:59:25 2016
17.26% done, estimate finish Sun Feb 7 18:59:24 2016
18.70% done, estimate finish Sun Feb 7 18:59:24 2016
20.13% done, estimate finish Sun Feb 7 18:59:23 2016
21.57% done, estimate finish Sun Feb 7 18:59:23 2016
23.01% done, estimate finish Sun Feb 7 18:59:23 2016
24.45% done, estimate finish Sun Feb 7 18:59:23 2016
25.88% done, estimate finish Sun Feb 7 18:59:22 2016
27.32% done, estimate finish Sun Feb 7 18:59:22 2016
28.76% done, estimate finish Sun Feb 7 18:59:22 2016
30.20% done, estimate finish Sun Feb 7 18:59:22 2016
31.63% done, estimate finish Sun Feb 7 18:59:25 2016
33.07% done, estimate finish Sun Feb 7 18:59:25 2016
34.51% done, estimate finish Sun Feb 7 18:59:24 2016
35.95% done, estimate finish Sun Feb 7 18:59:24 2016
37.38% done, estimate finish Sun Feb 7 18:59:24 2016
38.82% done, estimate finish Sun Feb 7 18:59:26 2016
40.26% done, estimate finish Sun Feb 7 18:59:26 2016
41.70% done, estimate finish Sun Feb 7 18:59:26 2016
43.14% done, estimate finish Sun Feb 7 18:59:25 2016
44.58% done, estimate finish Sun Feb 7 18:59:25 2016
46.01% done, estimate finish Sun Feb 7 18:59:25 2016
47.45% done, estimate finish Sun Feb 7 18:59:25 2016
48.89% done, estimate finish Sun Feb 7 18:59:25 2016
50.33% done, estimate finish Sun Feb 7 18:59:24 2016
51.76% done, estimate finish Sun Feb 7 18:59:26 2016
53.20% done, estimate finish Sun Feb 7 18:59:26 2016
54.64% done, estimate finish Sun Feb 7 18:59:26 2016
56.08% done, estimate finish Sun Feb 7 18:59:26 2016
57.51% done, estimate finish Sun Feb 7 18:59:25 2016
58.95% done, estimate finish Sun Feb 7 18:59:25 2016
60.39% done, estimate finish Sun Feb 7 18:59:25 2016
61.83% done, estimate finish Sun Feb 7 18:59:25 2016
63.27% done, estimate finish Sun Feb 7 18:59:25 2016
64.70% done, estimate finish Sun Feb 7 18:59:25 2016
66.14% done, estimate finish Sun Feb 7 18:59:26 2016
67.58% done, estimate finish Sun Feb 7 18:59:26 2016
69.01% done, estimate finish Sun Feb 7 18:59:26 2016
70.45% done, estimate finish Sun Feb 7 18:59:26 2016
71.89% done, estimate finish Sun Feb 7 18:59:25 2016
73.33% done, estimate finish Sun Feb 7 18:59:25 2016
74.77% done, estimate finish Sun Feb 7 18:59:25 2016
76.21% done, estimate finish Sun Feb 7 18:59:25 2016
77.64% done, estimate finish Sun Feb 7 18:59:25 2016
79.08% done, estimate finish Sun Feb 7 18:59:26 2016
80.52% done, estimate finish Sun Feb 7 18:59:26 2016
81.95% done, estimate finish Sun Feb 7 18:59:26 2016
83.40% done, estimate finish Sun Feb 7 18:59:26 2016
84.83% done, estimate finish Sun Feb 7 18:59:27 2016
86.27% done, estimate finish Sun Feb 7 18:59:27 2016
87.71% done, estimate finish Sun Feb 7 18:59:26 2016
89.15% done, estimate finish Sun Feb 7 18:59:26 2016
90.58% done, estimate finish Sun Feb 7 18:59:26 2016
92.02% done, estimate finish Sun Feb 7 18:59:26 2016
93.46% done, estimate finish Sun Feb 7 18:59:27 2016
94.89% done, estimate finish Sun Feb 7 18:59:27 2016
96.33% done, estimate finish Sun Feb 7 18:59:27 2016
97.77% done, estimate finish Sun Feb 7 18:59:27 2016
99.21% done, estimate finish Sun Feb 7 18:59:27 2016
Total translation table size: 97959
Total rockridge attributes bytes: 43580
Total directory bytes: 75776
Path table size(bytes): 140
Done with: The File(s) Block(s) 347512
Writing: Ending Padblock Start Block 347609
Done with: Ending Padblock Block(s) 150
Max brk space used 80000
347759 extents written (679 MB)
通过vmware测试:这里密码是1
default more是第一个

CFME安装:只选ISO方式,不选自定义的template否则虚拟机加载不到光盘。
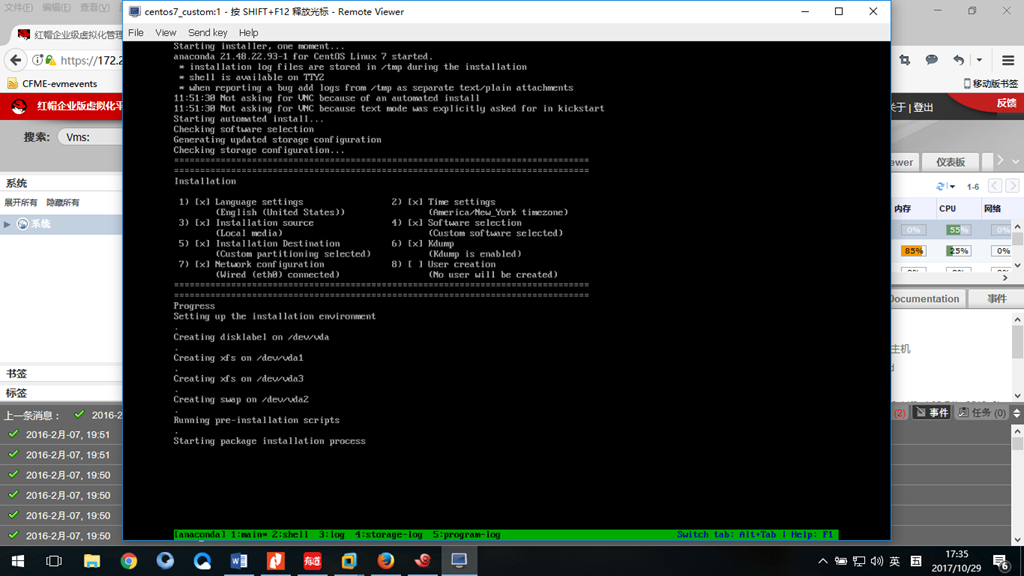
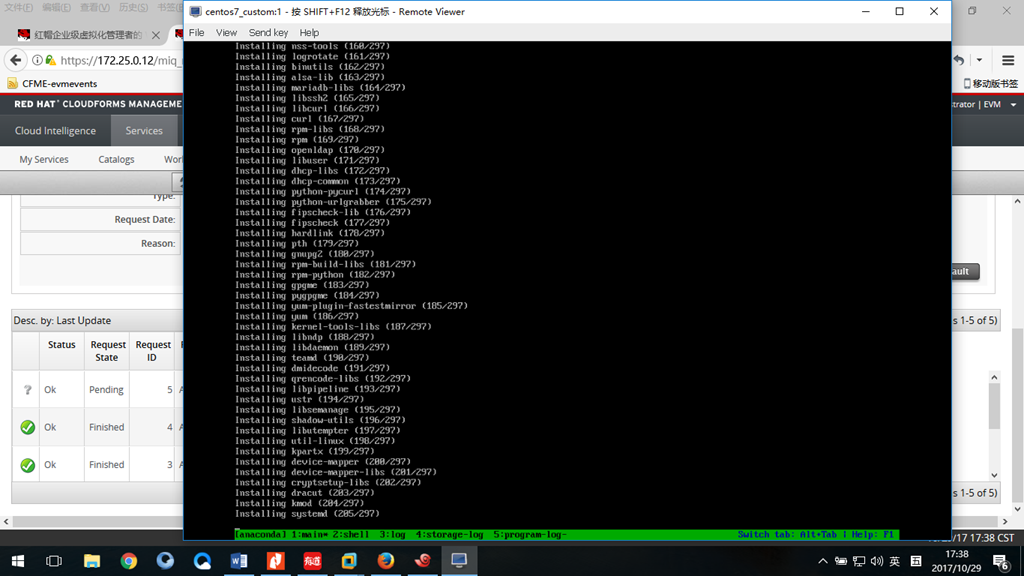
按ALT+TAB可以切换不同的界面,第一个是安装,第二是命令行,第三是日志,第四是日志,第五是日志,第六又开始从第一循环。
3. 设置自定义模板
导航:infrastructure>PXE>customization template
4. 通过自定义模板与ISO配置虚拟机
这里在创建虚拟机时,有把ISO选上的,但它没有加载到,需要人工来设置。
先在CFME暂停虚拟机,然后到RHEV平台把虚拟机关机并把光盘挂载上并run once.

光盘中的isolinux.cfg的内容:
光盘中的ks文件的内容:
从这里得出:
L红帽给的自定义光盘中的isolinux有写:ks文件在floppy中,但系统没找到ks文件。
L然后在CFME定义的KS文件并没有生效,现在需要自己写classroom上的ks文件地址,但这又有问题来了,classroom中的ks文件中的passworld等是引用CFME的customize定义的变量,这里只是引用classroom的KS,于是这个KS文件需要自己修改密码,否则不知道root密码。
解决方法:
将其他地址的ks文件中的root加密代码复制到,我们需要引用的ks文件的root密码上,这样就知道root密码是啥了。(我这里复制的是rhevm中的.cfg文件,root密码是redhat)


实验1. 创建自定义模板
2. 通过ISO配置VM(customize那选custom template)
3. 监控配置VM信息/进度
4. 当cfme的监控进度为waiting时将vm暂停,到RHEV平台将VM关机,挂光盘给vm并设置为run once
5. 检验VM是否配置成功
Provisioning via PXE
理论1. 概述另一种配置虚拟机的方式是PXE,引导是通过网络来启动的,也就是引导盘不在RHEV平台,而是在一台远端PXE服务器上。
2. 什么是pex
PXE(preboot execute environment,预启动执行环境)是由Intel公司开发的最新技术,工作于Client/Server的网络模式,支持工作站通过网络从远端服务器下载映像,并由此支持通过网络启动操作系统,在启动过程中,终端要求服务器分配IP地址,再用TFTP(trivial file transfer protocol)或MTFTP(multicast trivial file transfer protocol)协议下载一个启动软件包到本机内存中执行,由这个启动软件包完成终端(客户端)基本软件设置,从而引导预先安装在服务器中的终端操作系统。PXE可以引导多种操作系统,如:Windows95/98/2000/windows2003/windows2008/winXP/win7/win8,linux系列系统等。
3. 在cfme配置PXE
导航:infrastructure>PXE>PXE server
CFME3.1 depot仓库支持的文件系统是samba/nfs
实验无

相关文章推荐
- RHCA CL220 CloudForms 3.1 架构介绍
- RHCA CL220 CloudForms 3.1 安装
- RHCA CL220 CloudForms 3.1 配置
- redhat虚拟机配置网络
- apache虚拟机配置
- 虚拟机中CentOS配置静态网络
- 外部浏览器无法访问虚拟机里配置的rails环境问题,无法ip访问问题
- (老问题!!)VMware 虚拟机网络配置!!
- QEMU-KVM创建虚拟机自动指定IP的配置
- Ubuntu10.10下sendmail-dovecot配置(虚拟机)
- 虚拟机 CentOS 配置桥接方式
- Linux Nginx环境安装配置redmine3.1
- red hat6在虚拟机中安装后对防火墙 IP地址 selinux的配置
- 投机取巧配置VBox共享文件夹(主机Win虚拟机Tiny Core Linux)
- VMWare上配置Linux虚拟机的网卡
- vCenter6.0配置三:虚拟机迁移
- android学习_配置启动虚拟机
- 虚拟机centos系统,停机装第二块网卡,需要更改的配置
- visual studio 2013(2015)配置opencv 3.1,win10系统(x64)
- Win XP下虚拟机上Linux共享主机上网配置过程(Bridge)