React Native(七)——react-native-elements
2017-10-23 13:26
295 查看
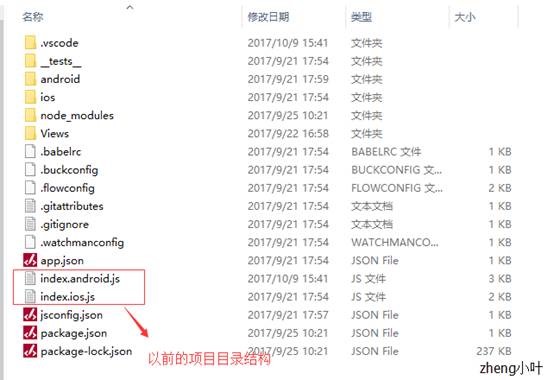
配合React native使用的UI库:https://react-native-training.github.io/react-native-elements/1. 新建项目:http://www.cnblogs.com/zhengyeye/p/7567509.html(不赘述了)2. 执行 react-native run-android 安装app在手机或者模拟机上;突然才发现RN版本升级后,项目目录结构变得更简洁了:
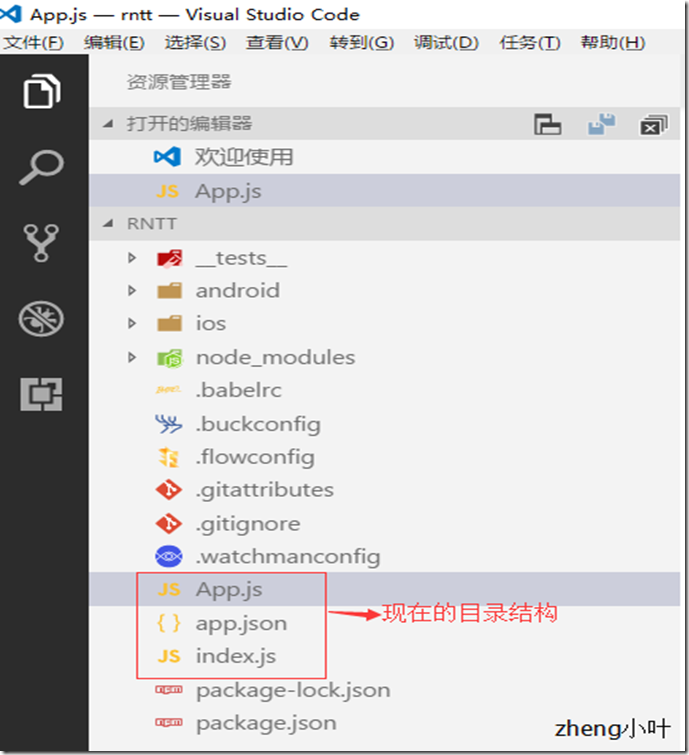

新版的为用户节省了很多工作,将整个逻辑代码合并在一个App.js中,省去了用户自己新建项目的必要。
1.button(按钮):
onPress:用法类似于RN中button的用法,这种也是定义一个函数;
限制头像大小:

新版的为用户节省了很多工作,将整个逻辑代码合并在一个App.js中,省去了用户自己新建项目的必要。
安装方法:
Step 1: Install react-native-vector-icons¶

npm i react-native-vector-icons --save &&

react-native link react-native-vector-icons

Step 2: Install react-native-elements¶

yarn add react-native-elements or

npm i react-native-elements --save
使用方法(使用什么组件,便引入其就可):
import { Button } from 'react-native-elements';部分组件——1.button(按钮):
onPress:用法类似于RN中button的用法,这种也是定义一个函数;
export default class App extends Component<{}> {
_onPress = () => {
alert('dianji');
};
render() {
return (
<View style={styles.container}>
<Button
raised
icon={{ name: 'home', size: 32 }}
buttonStyle={{ backgroundColor: 'red', borderRadius: 10 }}
textStyle={{ textAlign: 'center' }}
onPress={this._onPress}
title={`Welcome to\nReact Native Elements`}
/>
</View>
)
}
...
2.Avatar(头像):
限制头像大小:
small medium large xlarge
rounded:默认为false(矩形),定义头像的形状,为ture则为圆形;
若想在头像中自定义图片,则有两种方法:[code]...
icon={{name: 'rocket', color: 'orange'}}  //通过icon属性设置
...
...
source={{ uri: 'https://s3.amazonaws.com/uifaces/faces/twitter/ladylexy/128.jpg' }}//通过类似于<Image />的source属性来定义
...overlayContainerStyle:定义图片之外视图的颜色;
onPress:用法同button;
containerStyle:定义整个容器的外部样式,比如宽高怎样的;
3.Badge(徽章,类似于聊天中未读消息右上角的阅读数):
……
很多组件,还是需要慢慢了解的~~~

相关文章推荐
- React Native(五)——获取设备信息react-native-device-info
- [React Native混合开发]React Native for iOS之创建第一个案例
- [React Native混合开发]React Native for iOS之CSS和UI布局
- [React Native]react-native-scrollable-tab-view(入门篇)
- React native 常见错误:unable to resolve module react-native-scrollable-tab-view
- React native 的轮播图组件react-native-image-carousel的使用
- 利用 Create React Native App 快速创建 React Native 应用
- React Native开发之—— React Native将license修改为MIT意欲何为
- 在Android原生中嵌入React Native,进而React Native调用原生
- [React Native混合开发]React Native for iOS之布局实战
- [React Native]react-native-scrollable-tab-view(进阶篇)
- [React Native] change port when running react native
- react-native-elements/SwipeDeck android bug
- 【react native】the Haste package `react-native-vector-icons` was found.
- React Native(十五)——RN中的分享功能
- [React Native混合开发]React Native for iOS之布局实战(二)
- React Native开源封装AES,MD5加密模块(react-native-encryption-library)
- 利用 Create React Native App 快速创建 React Native 应用
- 【REACT NATIVE 系列教程之十一】插件的安装、使用与更新(示例:REACT-NATIVE-TAB-NAVIGATOR)