基于jdk1.7的hashmap
2017-10-16 10:12
471 查看
hashmap1.7是基于数组和链表实现的。
HashMap继承自AbstractMap,AbstractMap是Map接口的骨干实现,AbstractMap中实现了Map中最重要最常用和方法,这样HashMap继承AbstractMap就不需要实现Map的所有方法,让HashMap减少了大量的工作。
而在这里仍然实现Map结构,没有什么作用,应该是为了让map的层次结构更加清晰;
//初始化map的容量,在左移4位后得到16;

//最大的容量 1左移30

//加载因子系统,当到容量的0.75时扩容

hashmap在put时当容量达到一个阀值时(0.75)扩容,扩容的倍数是2倍。
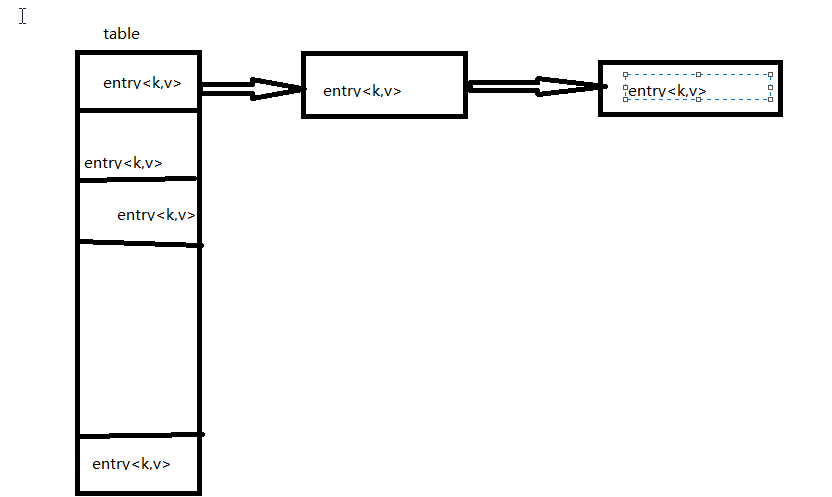
hashmap实现底层利用的数组,每一个entry<k,v>存储到数组之前都是利用K计算它的hashcode,然后存储到table【i】中,table是一个数组,是用来存储entry的,hashcode是用来寻找entry的。当hashcode重复的时候,它并不会覆盖原来的entry,它会先替换原先的entry,然后生成一个节点,指向原来的entry中的kv,所以每次覆盖后它只能获得新的值,旧的值并不会获得。


next就是为了指向原先的entry中值的;
hashmap中默认是可以使用null作为键值的;
下面是我自己实现的hashmap
--------------------------------------------------------------------------------------------
public interface DiyMap<K,V> {
/**
* Map双列集合 基本功能是 快速取 .
*
* @param k the k
* @param v the v
* @return the v
* @Description
*/
public V put(K k,V v);
/**
* 快速取 .
*
* @param k the k
* @return the v
* @Description
*/
public V get(K k);
/**
* 定义一个内部接口.
*
* @param <K> the key type
* @param <V> the value type
*/
public interface Entry<K,V>{
/**
* Gets the key.
*
* @return the key
*/
public K getKey();
/**
* Gets the value.
*
* @return the value
*/
public V getValue();
}
}
package com.test;
import java.util.ArrayList;
import java.util.List;
/*
了解hashmap中entry实体的结构
crc16算法
hashmap底层=数组+链表
通过hash算法带来的好处, 快存快取 / 数组在存的时候是需要遍历的
HashMap底层是怎么回事?
*/
public class DiyHashMap<K, V> implements DiyMap<K, V>{
//定义默认数组大小
private int defaultLenth=16;
//负载因子,扩容标准 useSize/数组长度>0.75扩容
private double defaultAddSizeFactor=0.75;
//使用数组位置的总数
private double useSize;
//定义Map 骨架之一数组
private Entry<K, V>[] table;
public DiyHashMap(int defaultLenth, double defaultAddSizeFactor) {
if(defaultLenth<0){
throw new IllegalArgumentException("数组长度为负数"+defaultLenth);
}
if(defaultAddSizeFactor<=0 || Double.isNaN(defaultAddSizeFactor)){
throw new IllegalArgumentException("扩容标准必须大于0的数字"+defaultLenth);
}
this.defaultLenth = defaultLenth;
this.defa
4000
ultAddSizeFactor = defaultAddSizeFactor;
table=new Entry[defaultLenth];
}
//快速存取 hash算法
public V put(K k, V v) {
if(useSize>defaultAddSizeFactor*defaultLenth){
//扩容
up2Size();
}
//通过key来计算出 存储的位置
int index=getIndex(k,table.length);
Entry<K, V> entry=table[index];
Entry<K, V> newEntry=new Entry<K, V>(k, v, null);
if(entry==null){
table[index]=newEntry;
useSize++;
}else{//维护数组相同位置队列
Entry<K, V> tmp;
while((tmp=table[index])!=null){
tmp=tmp.next;
}
tmp.next=newEntry;
}
return newEntry.getValue();
}
private int getIndex(K k, int length) {
//通常hashCode 取膜法
int m=length-1;
int index=hash(k.hashCode()) & m;
return index >= 0 ? index : -index;
}
//创建自己的hash算法,保证计算出的位置 在数组中均匀分布
private int hash(int hashCode) {
hashCode=hashCode^((hashCode>>>20)^(hashCode>>>12));
// return hashCode^((hashCode>>>7)^(hashCode>>>4));
return hashCode;
}
//扩容数组
private void up2Size() {
Entry<K, V>[] newTable=new Entry[defaultLenth*2];
//将原table中的entry重新,散列到新的table中
againHash(newTable);
}
//将原table中的entry重新,散列到新的table中
private void againHash(Entry<K, V>[] newTable) {
//数组里面对象 封装到list中,包括同一位置 有列表结构的都解析出来
List<Entry<K,V>> entryList=new ArrayList<Entry<K,V>>();
for(int i=0;i<table.length;i++){
if(table[i]==null){
continue;
}
findEntryByNext(table[i],entryList);
}
if(entryList.size()>0){
useSize=0;
defaultLenth=defaultLenth*2;
table=newTable;
for (Entry<K, V> entry : entryList) {
if(entry.next!=null){
entry.next=null;
}
put(entry.getKey(), entry.getValue());
}
}
}
private void findEntryByNext(Entry<K, V> entry, List<Entry<K, V>> entryList) {
if(entry!=null && entry.next!=null){
//这个entry对象已经形成链表结构
entryList.add(entry);
//递归 将链表中的entry实体 都一次封装到entryList链表中
findEntryByNext(entry.next, entryList);
}else{
entryList.add(entry);
}
}
//快取
public V get(K k) {
//通过key来计算出 存储的位置
int index=getIndex(k,table.length);
Entry<K, V> entry=table[index];
if(entry==null){
throw new NullPointerException();
}
return findValueByKey(k,entry);
}
private V findValueByKey(K k, Entry<K, V> entry) {
if(k == entry.getKey() || k.equals(entry.getKey())){
return entry.v;
}else if(entry.next!=null){
return findValueByKey(k,entry.next);
}
return null;
}
class Entry<K, V> implements DiyMap.Entry<K, V>{
K k;
V v;
//指向被this挤压下去的entry
Entry<K, V> next;
public Entry(K k, V v, Entry<K, V> next) {
this.k = k;
this.v = v;
this.next = next;
}
@Override
public K getKey() {
return k;
}
@Override
public V getValue() {
return v;
}
}
}
HashMap继承自AbstractMap,AbstractMap是Map接口的骨干实现,AbstractMap中实现了Map中最重要最常用和方法,这样HashMap继承AbstractMap就不需要实现Map的所有方法,让HashMap减少了大量的工作。
而在这里仍然实现Map结构,没有什么作用,应该是为了让map的层次结构更加清晰;
//初始化map的容量,在左移4位后得到16;
//最大的容量 1左移30
//加载因子系统,当到容量的0.75时扩容
hashmap在put时当容量达到一个阀值时(0.75)扩容,扩容的倍数是2倍。
数据结构
hashmap实现底层利用的数组,每一个entry<k,v>存储到数组之前都是利用K计算它的hashcode,然后存储到table【i】中,table是一个数组,是用来存储entry的,hashcode是用来寻找entry的。当hashcode重复的时候,它并不会覆盖原来的entry,它会先替换原先的entry,然后生成一个节点,指向原来的entry中的kv,所以每次覆盖后它只能获得新的值,旧的值并不会获得。
next就是为了指向原先的entry中值的;
hashmap中默认是可以使用null作为键值的;
下面是我自己实现的hashmap
--------------------------------------------------------------------------------------------
public interface DiyMap<K,V> {
/**
* Map双列集合 基本功能是 快速取 .
*
* @param k the k
* @param v the v
* @return the v
* @Description
*/
public V put(K k,V v);
/**
* 快速取 .
*
* @param k the k
* @return the v
* @Description
*/
public V get(K k);
/**
* 定义一个内部接口.
*
* @param <K> the key type
* @param <V> the value type
*/
public interface Entry<K,V>{
/**
* Gets the key.
*
* @return the key
*/
public K getKey();
/**
* Gets the value.
*
* @return the value
*/
public V getValue();
}
}
package com.test;
import java.util.ArrayList;
import java.util.List;
/*
了解hashmap中entry实体的结构
crc16算法
hashmap底层=数组+链表
通过hash算法带来的好处, 快存快取 / 数组在存的时候是需要遍历的
HashMap底层是怎么回事?
*/
public class DiyHashMap<K, V> implements DiyMap<K, V>{
//定义默认数组大小
private int defaultLenth=16;
//负载因子,扩容标准 useSize/数组长度>0.75扩容
private double defaultAddSizeFactor=0.75;
//使用数组位置的总数
private double useSize;
//定义Map 骨架之一数组
private Entry<K, V>[] table;
public DiyHashMap(int defaultLenth, double defaultAddSizeFactor) {
if(defaultLenth<0){
throw new IllegalArgumentException("数组长度为负数"+defaultLenth);
}
if(defaultAddSizeFactor<=0 || Double.isNaN(defaultAddSizeFactor)){
throw new IllegalArgumentException("扩容标准必须大于0的数字"+defaultLenth);
}
this.defaultLenth = defaultLenth;
this.defa
4000
ultAddSizeFactor = defaultAddSizeFactor;
table=new Entry[defaultLenth];
}
//快速存取 hash算法
public V put(K k, V v) {
if(useSize>defaultAddSizeFactor*defaultLenth){
//扩容
up2Size();
}
//通过key来计算出 存储的位置
int index=getIndex(k,table.length);
Entry<K, V> entry=table[index];
Entry<K, V> newEntry=new Entry<K, V>(k, v, null);
if(entry==null){
table[index]=newEntry;
useSize++;
}else{//维护数组相同位置队列
Entry<K, V> tmp;
while((tmp=table[index])!=null){
tmp=tmp.next;
}
tmp.next=newEntry;
}
return newEntry.getValue();
}
private int getIndex(K k, int length) {
//通常hashCode 取膜法
int m=length-1;
int index=hash(k.hashCode()) & m;
return index >= 0 ? index : -index;
}
//创建自己的hash算法,保证计算出的位置 在数组中均匀分布
private int hash(int hashCode) {
hashCode=hashCode^((hashCode>>>20)^(hashCode>>>12));
// return hashCode^((hashCode>>>7)^(hashCode>>>4));
return hashCode;
}
//扩容数组
private void up2Size() {
Entry<K, V>[] newTable=new Entry[defaultLenth*2];
//将原table中的entry重新,散列到新的table中
againHash(newTable);
}
//将原table中的entry重新,散列到新的table中
private void againHash(Entry<K, V>[] newTable) {
//数组里面对象 封装到list中,包括同一位置 有列表结构的都解析出来
List<Entry<K,V>> entryList=new ArrayList<Entry<K,V>>();
for(int i=0;i<table.length;i++){
if(table[i]==null){
continue;
}
findEntryByNext(table[i],entryList);
}
if(entryList.size()>0){
useSize=0;
defaultLenth=defaultLenth*2;
table=newTable;
for (Entry<K, V> entry : entryList) {
if(entry.next!=null){
entry.next=null;
}
put(entry.getKey(), entry.getValue());
}
}
}
private void findEntryByNext(Entry<K, V> entry, List<Entry<K, V>> entryList) {
if(entry!=null && entry.next!=null){
//这个entry对象已经形成链表结构
entryList.add(entry);
//递归 将链表中的entry实体 都一次封装到entryList链表中
findEntryByNext(entry.next, entryList);
}else{
entryList.add(entry);
}
}
//快取
public V get(K k) {
//通过key来计算出 存储的位置
int index=getIndex(k,table.length);
Entry<K, V> entry=table[index];
if(entry==null){
throw new NullPointerException();
}
return findValueByKey(k,entry);
}
private V findValueByKey(K k, Entry<K, V> entry) {
if(k == entry.getKey() || k.equals(entry.getKey())){
return entry.v;
}else if(entry.next!=null){
return findValueByKey(k,entry.next);
}
return null;
}
class Entry<K, V> implements DiyMap.Entry<K, V>{
K k;
V v;
//指向被this挤压下去的entry
Entry<K, V> next;
public Entry(K k, V v, Entry<K, V> next) {
this.k = k;
this.v = v;
this.next = next;
}
@Override
public K getKey() {
return k;
}
@Override
public V getValue() {
return v;
}
}
}

相关文章推荐
- 基于JDK1.7的HashMap源码阅读分析
- 基于HashSet的HashMap的简单实现
- HashMap源码分析(基于JDK1.6)
- 基于 HashMap的三种输出方法
- java集合框架中HashMap源码(基于JDK1.6)
- WeakHashMap源码探讨(基于JDK1.8)
- HashMap源码分析(基于JDK1.6)
- Java Collections Framework之HashMap源码分析(基于JDK1.6)
- 【JAVA秒会技术之ConcurrentHashMap】JDK1.7与JDK1.8源码区别
- JDK1.7版本中的HashMap
- HashMap源码分析(基于JDK1.6)
- HashMap源码分析(基于JDK1.6)
- Android版数据结构与算法(四):基于哈希表实现HashMap核心源码彻底分析
- HashMap源码分析(基于JDK1.6)
- 基于JDK1.8的HashMap分析
- jdk1.7和jdk1.8中hashmap区别
- 手写HashMap,HashMap底层原理(基于jdk1.7)
- HashMap源码分析(基于JDK1.6)
- HashMap源码分析 基于JDK1.6
- JDK源码分析(三)——HashMap 上(基于JDK7)