Spring Boot集成持久化Quartz定时任务管理和界面展示
2017-10-11 18:32
615 查看
前言
本文是对之前的一篇文章Spring+SpringMVC+mybatis+Quartz整合代码部分做的一个修改和补充, 其中最大的变化就是后台框架变成了SpringBoot。
本工程所用到的技术或工具有:
Spring Boot
Mybatis
Quartz
PageHelper
VueJS
ElementUI
MySql数据库
正文
配置
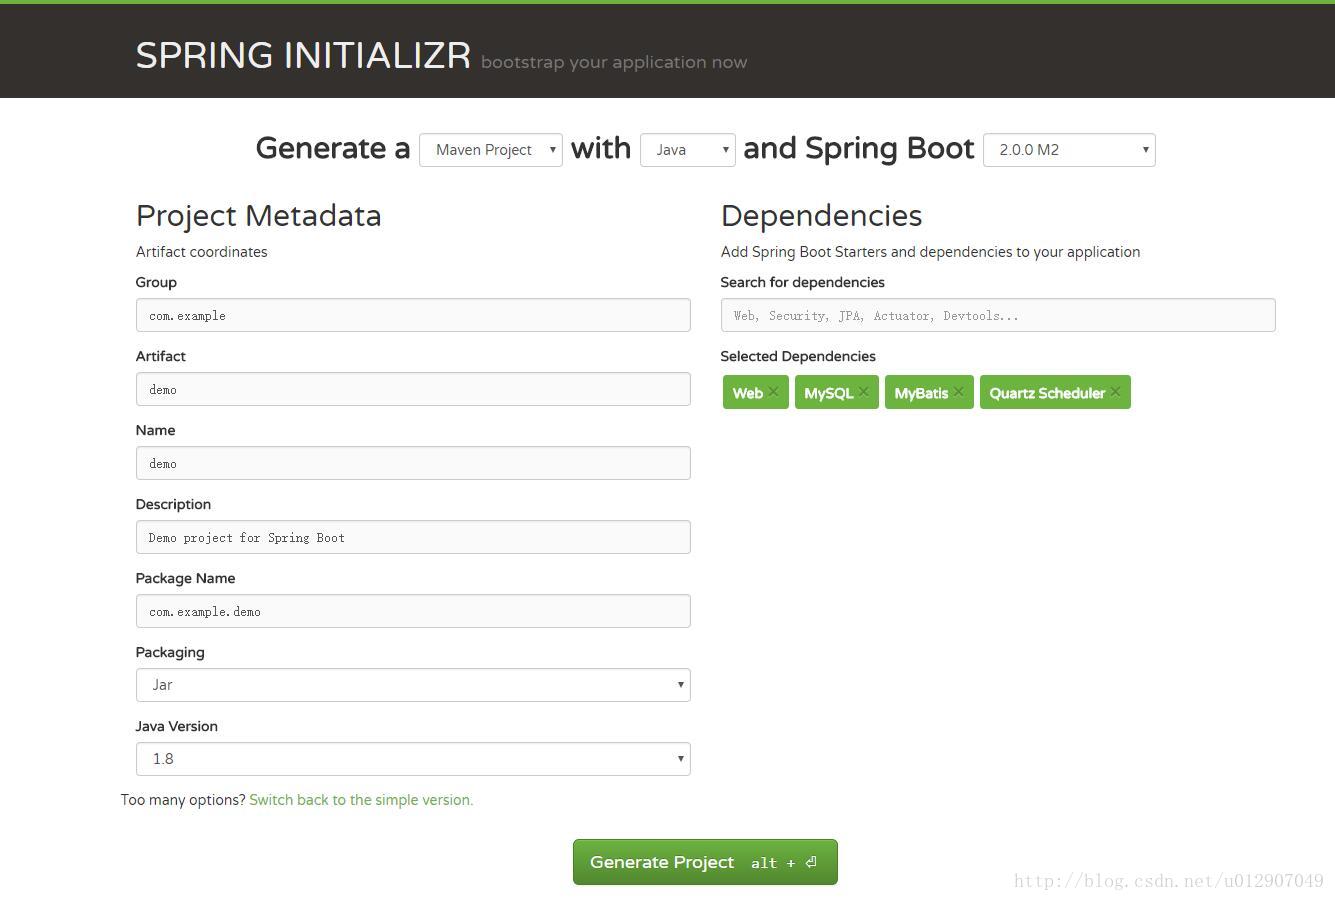
本例中仍然是使用mysql数据库作为Quartz任务持久化的存储载体。对于如何在Mysql数据库中建立表,在上一篇Spring+SpringMVC+mybatis+Quartz整合中已经有了详细的介绍。这里我们来看SpringBoot工程的建立方法。在Spring网站上有关于建立Spring Boot工程的脚手架,我们按如下图的方式设置,然后点击Generate Project即可。
接着我们在IDE中导入这个maven工程,然后可以看到src/main/resource下面有一个名字为application.properties的文件,里面的内容是空的。我们删除这个文件,然后在这个目录下新建一个名为application.yml的文件。这是配置Spring Boot工程的另一种方式,也是Spring Boot官方推荐的一种配置方式。我们在新建的这个yml文件中,加入如下代码
spring:
datasource:
url: jdbc:mysql://190.0.1.88:3306/hello_test?useUnicode=true
username: root
password: root
driver-class-name: com.mysql.jdbc.Driver

mybatis:
mapper-locations:
- classpath:com/example/demo/mapper/*.xml
type-aliases-package: com.example.demo.entity
1
2
3
4
5
6
7
8
9
10
11
上面的代码是对数据库和mybatis的一些配置。
接着我们在当前目录下再新建一个名为quartz.properties的文件。这是对Quartz的配置文件。加入如下代码:
# 固定前缀org.quartz
# 主要分为scheduler、threadPool、jobStore、plugin等部分
#
#
org.quartz.scheduler.instanceName = DefaultQuartzScheduler
org.quartz.scheduler.rmi.export = false
org.quartz.scheduler.rmi.proxy = false
org.quartz.scheduler.wrapJobExecutionInUserTransaction = false

# 实例化ThreadPool时,使用的线程类为SimpleThreadPool
org.quartz.threadPool.class = org.quartz.simpl.SimpleThreadPool

# threadCount和threadPriority将以setter的形式注入ThreadPool实例
# 并发个数
org.quartz.threadPool.threadCount = 5
# 优先级
org.quartz.threadPool.threadPriority = 5
org.quartz.threadPool.threadsInheritContextClassLoaderOfInitializingThread = true

org.quartz.jobStore.misfireThreshold = 5000

# 默认存储在内存中
#org.quartz.jobStore.class = org.quartz.simpl.RAMJobStore

#持久化
org.quartz.jobStore.class = org.quartz.impl.jdbcjobstore.JobStoreTX

org.quartz.jobStore.tablePrefix = QRTZ_

org.quartz.jobStore.dataSource = qzDS

org.quartz.dataSource.qzDS.driver = com.mysql.jdbc.Driver

org.quartz.dataSource.qzDS.URL = jdbc:mysql://190.0.1.88:3306/hello_test?useUnicode=true&characterEncoding=UTF-8

org.quartz.dataSource.qzDS.user = root

org.quartz.dataSource.qzDS.password = root

org.quartz.dataSource.qzDS.maxConnections = 10
1
2
3
4
5
6
7
8
9
10
11
12
13
14
15
16
17
18
19
20
21
22
23
24
25
26
27
28
29
30
31
32
33
34
35
36
37
38
39
40
可以看出和上一篇文章的配置文件完成相同。接着我们在com.example.demo下新建一个名为SchedulerConfig.java的文件。在这个文件里,对刚才我们新建的quartz.properties文件进行读取。
package com.example.demo;

import java.io.IOException;
import java.util.Properties;

import javax.sql.DataSource;

import org.quartz.ee.servlet.QuartzInitializerListener;
import org.springframework.beans.factory.config.PropertiesFactoryBean;
import org.springframework.context.annotation.Bean;
import org.springframework.context.annotation.Configuration;
import org.springframework.core.io.ClassPathResource;
import org.springframework.scheduling.quartz.SchedulerFactoryBean;

@Configuration
public class SchedulerConfig {

@Bean
public SchedulerFactoryBean schedulerFactoryBean(DataSource dataSource) throws IOException {
SchedulerFactoryBean factory = new SchedulerFactoryBean();
factory.setQuartzProperties(quartzProperties());
return factory;
}

@Bean
public Properties quartzProperties() throws IOException {
PropertiesFactoryBean propertiesFactoryBean = new PropertiesFactoryBean();
propertiesFactoryBean.setLocation(new ClassPathResource("/quartz.properties"));
return propertiesFactoryBean.getObject();
}

@Bean
public QuartzInitializerListener executorListener() {
return new QuartzInitializerListener();
}

}12
3
4
5
6
7
8
9
10
11
12
13
14
15
16
17
18
19
20
21
22
23
24
25
26
27
28
29
30
31
32
33
34
35
36
37
38
注意最下方的QuartzInitializerListener。在SpringMVC中,我们在配置Quartz的时候,要在web.xml中加入如下配置:
<listener>
<listener-class>
org.quartz.ee.servlet.QuartzInitializerListener
</listener-class>
</listener>
1
2
3
4
5
这个监听器可以监听到工程的启动,在工程停止再启动时可以让已有的定时任务继续进行。由于我们目前的工程是Spring Boot,没有web.xml的配置方式,所以我们在上文的SchedulerConfig类中直接注入了这个Bean。
实现
先来看Job类。首先设置一个BaseJob接口,用来继承Job类:package com.example.demo.job;
import org.quartz.Job;
import org.quartz.JobExecutionContext;
import org.quartz.JobExecutionException;
public interface BaseJob extends Job{
public void execute(JobExecutionContext context) throws JobExecutionException;
}12
3
4
5
6
7
8
9
然后两个Job类用来实现BaseJob类:
HelloJob
package com.example.demo.job;

import java.util.Date;
import org.slf4j.Logger;
import org.slf4j.LoggerFactory;
import org.quartz.JobExecutionContext;
import org.quartz.JobExecutionException;

public class HelloJob implements BaseJob {

private static Logger _log = LoggerFactory.getLogger(HelloJob.class);

public HelloJob() {

}

public void execute(JobExecutionContext context)
throws JobExecutionException {
_log.error("Hello Job执行时间: " + new Date());

}
}12
3
4
5
6
7
8
9
10
11
12
13
14
15
16
17
18
19
20
21
22
NewJob
package com.example.demo.job;

import java.util.Date;
import org.slf4j.Logger;
import org.slf4j.LoggerFactory;
import org.quartz.JobExecutionContext;
import org.quartz.JobExecutionException;

public class NewJob implements BaseJob {

private static Logger _log = LoggerFactory.getLogger(NewJob.class);

public NewJob() {

}

public void execute(JobExecutionContext context)
throws JobExecutionException {
_log.error("New Job执行时间: " + new Date());

}
}12
3
4
5
6
7
8
9
10
11
12
13
14
15
16
17
18
19
20
21
22
至于这样做的目的,我们可以先看一下Controller
package com.example.demo.controller;

import java.util.HashMap;
import java.util.Map;

import org.quartz.CronScheduleBuilder;
import org.quartz.CronTrigger;
import org.quartz.JobBuilder;
import org.quartz.JobDetail;
import org.quartz.JobKey;
import org.quartz.Scheduler;
import org.quartz.SchedulerException;
import org.quartz.SchedulerFactory;
import org.quartz.TriggerBuilder;
import org.quartz.TriggerKey;
import org.quartz.impl.StdSchedulerFactory;
import org.slf4j.Logger;
import org.slf4j.LoggerFactory;
import org.springframework.beans.factory.annotation.Autowired;
import org.springframework.web.bind.annotation.GetMapping;
import org.springframework.web.bind.annotation.PostMapping;
import org.springframework.web.bind.annotation.RequestMapping;
import org.springframework.web.bind.annotation.RequestParam;
import org.springframework.web.bind.annotation.RestController;

import com.example.demo.entity.JobAndTrigger;
import com.example.demo.job.BaseJob;
import com.example.demo.service.IJobAndTriggerService;
import com.github.pagehelper.PageInfo;

@RestController
@RequestMapping(value="/job")
public class JobController
{
@Autowired
private IJobAndTriggerService iJobAndTriggerService;

private static Logger log = LoggerFactory.getLogger(JobController.class);

@PostMapping(value="/addjob")
public void addjob(@RequestParam(value="jobClassName")String jobClassName,
@RequestParam(value="jobGroupName")String jobGroupName,
@RequestParam(value="cronExpression")String cronExpression) throws Exception
{
addJob(jobClassName, jobGroupName, cronExpression);
}

public static void addJob(String jobClassName, String jobGroupName, String cronExpression)throws Exception{

// 通过SchedulerFactory获取一个调度器实例
SchedulerFactory sf = new StdSchedulerFactory();

Scheduler sched = sf.getScheduler();

// 启动调度器
sched.start();

//构建job信息
JobDetail jobDetail = JobBuilder.newJob(getClass(jobClassName).getClass()).withIdentity(jobClassName, jobGroupName).build();

//表达式调度构建器(即任务执行的时间)
CronScheduleBuilder scheduleBuilder = CronScheduleBuilder.cronSchedule(cronExpression);

//按新的cronExpression表达式构建一个新的trigger
CronTrigger trigger = TriggerBuilder.newTrigger().withIdentity(jobClassName, jobGroupName)
.withSchedule(scheduleBuilder).build();

try {
sched.scheduleJob(jobDetail, trigger);

} catch (SchedulerException e) {
System.out.println("创建定时任务失败"+e);
throw new Exception("创建定时任务失败");
}
}

@PostMapping(value="/pausejob")
public void pausejob(@RequestParam(value="jobClassName")String jobClassName, @RequestParam(value="jobGroupName")String jobGroupName) throws Exception
{
jobPause(jobClassName, jobGroupName);
}

public static void jobPause(String jobClassName, String jobGroupName) throws Exception
{
// 通过SchedulerFactory获取一个调度器实例
SchedulerFactory sf = new StdSchedulerFactory();
Scheduler sched = sf.getScheduler();
sched.pauseJob(JobKey.jobKey(jobClassName, jobGroupName));
}

@PostMapping(value="/resumejob")
public void resumejob(@RequestParam(value="jobClassName")String jobClassName, @RequestParam(value="jobGroupName")String jobGroupName) throws Exception
{
jobresume(jobClassName, jobGroupName);
}

public static void jobresume(String jobClassName, String jobGroupName) throws Exception
{
// 通过SchedulerFactory获取一个调度器实例
SchedulerFactory sf = new StdSchedulerFactory();
Scheduler sched = sf.getScheduler();
sched.resumeJob(JobKey.jobKey(jobClassName, jobGroupName));
}

@PostMapping(value="/reschedulejob")
public void rescheduleJob(@RequestParam(value="jobClassName")String jobClassName,
@RequestParam(value="jobGroupName")String jobGroupName,
@RequestParam(value="cronExpression")String cronExpression) throws Exception
{
jobreschedule(jobClassName, jobGroupName, cronExpression);
}

public static void jobreschedule(String jobClassName, String jobGroupName, String cronExpression) throws Exception
{
try {
SchedulerFactory schedulerFactory = new StdSchedulerFactory();
Scheduler scheduler = schedulerFactory.getScheduler();
TriggerKey triggerKey = TriggerKey.triggerKey(jobClassName, jobGroupName);
// 表达式调度构建器
CronScheduleBuilder scheduleBuilder = CronScheduleBuilder.cronSchedule(cronExpression);

CronTrigger trigger = (CronTrigger) scheduler.getTrigger(triggerKey);

// 按新的cronExpression表达式重新构建trigger
trigger = trigger.getTriggerBuilder().withIdentity(triggerKey).withSchedule(scheduleBuilder).build();

// 按新的trigger重新设置job执行
scheduler.rescheduleJob(triggerKey, trigger);
} catch (SchedulerException e) {
System.out.println("更新定时任务失败"+e);
throw new Exception("更新定时任务失败");
}
}

@PostMapping(value="/deletejob")
public void deletejob(@RequestParam(value="jobClassName")String jobClassName, @RequestParam(value="jobGroupName")String jobGroupName) throws Exception
{
jobdelete(jobClassName, jobGroupName);
}

public static void jobdelete(String jobClassName, String jobGroupName) throws Exception
{
// 通过SchedulerFactory获取一个调度器实例
SchedulerFactory sf = new StdSchedulerFactory();
Scheduler sched = sf.getScheduler();
sched.pauseTrigger(TriggerKey.triggerKey(jobClassName, jobGroupName));
sched.unscheduleJob(TriggerKey.triggerKey(jobClassName, jobGroupName));
sched.deleteJob(JobKey.jobKey(jobClassName, jobGroupName));
}

@GetMapping(value="/queryjob")
public Map<String, Object> queryjob(@RequestParam(value="pageNum")Integer pageNum, @RequestParam(value="pageSize")Integer pageSize)
{
PageInfo<JobAndTrigger> jobAndTrigger = iJobAndTriggerService.getJobAndTriggerDetails(pageNum, pageSize);
Map<String, Object> map = new HashMap<String, Object>();
map.put("JobAndTrigger", jobAndTrigger);
map.put("number", jobAndTrigger.getTotal());
return map;
}

public static BaseJob getClass(String classname) throws Exception
{
Class<?> class1 = Class.forName(classname);
return (BaseJob)class1.newInstance();
}

}12
3
4
5
6
7
8
9
10
11
12
13
14
15
16
17
18
19
20
21
22
23
24
25
26
27
28
29
30
31
32
33
34
35
36
37
38
39
40
41
42
43
44
45
46
47
48
49
50
51
52
53
54
55
56
57
58
59
60
61
62
63
64
65
66
67
68
69
70
71
72
73
74
75
76
77
78
79
80
81
82
83
84
85
86
87
88
89
90
91
92
93
94
95
96
97
98
99
100
101
102
103
104
105
106
107
108
109
110
111
112
113
114
115
116
117
118
119
120
121
122
123
124
125
126
127
128
129
130
131
132
133
134
135
136
137
138
139
140
141
142
143
144
145
146
147
148
149
150
151
152
153
154
155
156
157
158
159
160
161
162
163
164
165
166
167
168
169
170
171
172
173
174
175
176
注意最下面的这个方法,根据类名称,通过反射得到该类,然后创建一个BaseJob的实例。由于NewJob和HelloJob都实现了BaseJob,所以这里不需要我们手动去判断。这里涉及到了一些java多态调用的机制,篇幅原因不多做解释。
其他的部分,例如service层,dao层以及mapper,与上一篇文章几乎完全相同。我们可以看一下现在的工程结构:
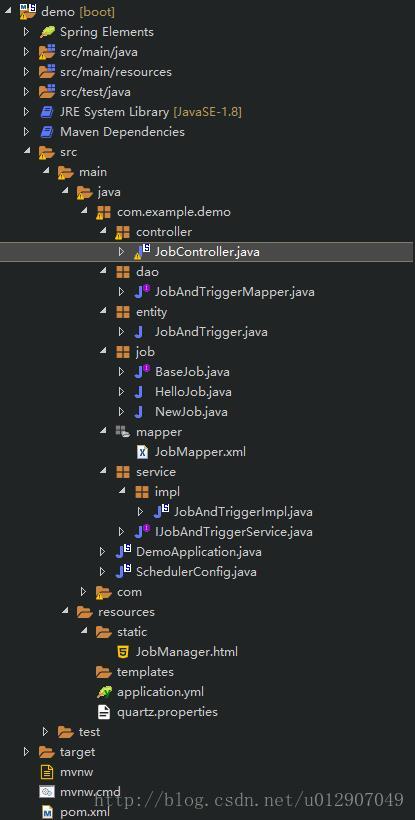
我们可以看到static下的JobManager.html,这个是前端的一个简单的管理页面。Spring Boot的web工程中,静态页面可以放在static目录下。这里贴一下代码,与之前几乎没区别:
<!DOCTYPE html>
<html>
<head>
<meta charset="UTF-8">
<title>QuartzDemo</title>
<link rel="stylesheet" href="https://unpkg.com/element-ui/lib/theme-default/index.css">
<script src="https://unpkg.com/vue/dist/vue.js"></script>
<script src="http://cdn.bootcss.com/vue-resource/1.3.4/vue-resource.js"></script>
<script src="https://unpkg.com/element-ui/lib/index.js"></script>

<style>
#top {
background:#20A0FF;
padding:5px;
overflow:hidden
}
</style>

</head>
<body>
<div id="test">

<div id="top">
<el-button type="text" @click="search" style="color:white">查询</el-button>
<el-button type="text" @click="handleadd" style="color:white">添加</el-button>
</span>
</div>

<br/>

<div style="margin-top:15px">

<el-table
ref="testTable"
:data="tableData"
style="width:100%"
border
>
<el-table-column
prop="job_NAME"
label="任务名称"
sortable
show-overflow-tooltip>
</el-table-column>

<el-table-column
prop="job_GROUP"
label="任务所在组"
sortable>
</el-table-column>

<el-table-column
prop="job_CLASS_NAME"
label="任务类名"
sortable>
</el-table-column>

<el-table-column
prop="trigger_NAME"
label="触发器名称"
sortable>
</el-table-column>

<el-table-column
prop="trigger_GROUP"
label="触发器所在组"
sortable>
</el-table-column>

<el-table-column
prop="cron_EXPRESSION"
label="表达式"
sortable>
</el-table-column>

<el-table-column
prop="time_ZONE_ID"
label="时区"
sortable>
</el-table-column>

<el-table-column label="操作" width="300">
<template scope="scope">
<el-button
size="small"
type="warning"
@click="handlePause(scope.$index, scope.row)">暂停</el-button>

<el-button
size="small"
type="info"
@click="handleResume(scope.$index, scope.row)">恢复</el-button>

<el-button
size="small"
type="danger"
@click="handleDelete(scope.$index, scope.row)">删除</el-button>

<el-button
size="small"
type="success"
@click="handleUpdate(scope.$index, scope.row)">修改</el-button>
</template>
</el-table-column>
</el-table>

<div align="center">
<el-pagination
@size-change="handleSizeChange"
@current-change="handleCurrentChange"
:current-page="currentPage"
:page-sizes="[10, 20, 30, 40]"
:page-size="pagesize"
layout="total, sizes, prev, pager, next, jumper"
:total="totalCount">
</el-pagination>
</div>
</div>

<el-dialog title="添加任务" v-model="dialogFormVisible">
<el-form :model="form">
<el-form-item label="任务名称" label-width="120px" style="width:35%">
<el-input v-model="form.jobName" auto-complete="off"></el-input>
</el-form-item>
<el-form-item label="任务分组" label-width="120px" style="width:35%">
<el-input v-model="form.jobGroup" auto-complete="off"></el-input>
</el-form-item>
<el-form-item label="表达式" label-width="120px" style="width:35%">
<el-input v-model="form.cronExpression" auto-complete="off"></el-input>
</el-form-item>
</el-form>
<div slot="footer" class="dialog-footer">
<el-button @click="dialogFormVisible = false">取 消</el-button>
<el-button type="primary" @click="add">确 定</el-button>
</div>
</el-dialog>

<el-dialog title="修改任务" v-model="updateFormVisible">
<el-form :model="updateform">
<el-form-item label="表达式" label-width="120px" style="width:35%">
<el-input v-model="updateform.cronExpression" auto-complete="off"></el-input>
</el-form-item>
</el-form>
<div slot="footer" class="dialog-footer">
<el-button @click="updateFormVisible = false">取 消</el-button>
<el-button type="primary" @click="update">确 定</el-button>
</div>
</el-dialog>

</div>

<footer align="center">
<p>© Quartz 任务管理</p>
</footer>

<script>
var vue = new Vue({
el:"#test",
data: {
//表格当前页数据
tableData: [],

//请求的URL
url:'job/queryjob',

//默认每页数据量
pagesize: 10,

//当前页码
currentPage: 1,

//查询的页码
start: 1,

//默认数据总数
totalCount: 1000,

//添加对话框默认可见性
dialogFormVisible: false,

//修改对话框默认可见性
updateFormVisible: false,

//提交的表单
form: {
jobName: '',
jobGroup: '',
cronExpression: '',
},

updateform: {
jobName: '',
jobGroup: '',
cronExpression: '',
},
},

methods: {

//从服务器读取数据
loadData: function(pageNum, pageSize){
this.$http.get('job/queryjob?' + 'pageNum=' +  pageNum + '&pageSize=' + pageSize).then(function(res){
console.log(res)
this.tableData = res.body.JobAndTrigger.list;
this.totalCount = res.body.number;
},function(){
console.log('failed');
});
},

//单行删除
handleDelete: function(index, row) {
this.$http.post('job/deletejob',{"jobClassName":row.job_NAME,"jobGroupName":row.job_GROUP},{emulateJSON: true}).then(function(res){
this.loadData( this.currentPage, this.pagesize);
},function(){
console.log('failed');
});
},

//暂停任务
handlePause: function(index, row){
this.$http.post('job/pausejob',{"jobClassName":row.job_NAME,"jobGroupName":row.job_GROUP},{emulateJSON: true}).then(function(res){
this.loadData( this.currentPage, this.pagesize);
},function(){
console.log('failed');
});
},

//恢复任务
handleResume: function(index, row){
this.$http.post('job/resumejob',{"jobClassName":row.job_NAME,"jobGroupName":row.job_GROUP},{emulateJSON: true}).then(function(res){
this.loadData( this.currentPage, this.pagesize);
},function(){
console.log('failed');
});
},

//搜索
search: function(){
this.loadData(this.currentPage, this.pagesize);
},

//弹出对话框
handleadd: function(){
this.dialogFormVisible = true;
},

//添加
add: function(){
this.$http.post('job/addjob',{"jobClassName":this.form.jobName,"jobGroupName":this.form.jobGroup,"cronExpression":this.form.cronExpression},{emulateJSON: true}).then(function(res){
this.loadData(this.currentPage, this.pagesize);
this.dialogFormVisible = false;
},function(){
console.log('failed');
});
},

//更新
handleUpdate: function(index, row){
console.log(row)
this.updateFormVisible = true;
this.updateform.jobName = row.job_CLASS_NAME;
this.updateform.jobGroup = row.job_GROUP;
},

//更新任务
update: function(){
this.$http.post
('job/reschedulejob',
{"jobClassName":this.updateform.jobName,
"jobGroupName":this.updateform.jobGroup,
"cronExpression":this.updateform.cronExpression
},{emulateJSON: true}
).then(function(res){
this.loadData(this.currentPage, this.pagesize);
this.updateFormVisible = false;
},function(){
console.log('failed');
});

},

//每页显示数据量变更
handleSizeChange: function(val) {
this.pagesize = val;
this.loadData(this.currentPage, this.pagesize);
},

//页码变更
handleCurrentChange: function(val) {
this.currentPage = val;
this.loadData(this.currentPage, this.pagesize);
},

},

});

//载入数据
vue.loadData(vue.currentPage, vue.pagesize);
</script>

</body>
</html>12
3
4
5
6
7
8
9
10
11
12
13
14
15
16
17
18
19
20
21
22
23
24
25
26
27
28
29
30
31
32
33
34
35
36
37
38
39
40
41
42
43
44
45
46
47
48
49
50
51
52
53
54
55
56
57
58
59
60
61
62
63
64
65
66
67
68
69
70
71
72
73
74
75
76
77
78
79
80
81
82
83
84
85
86
87
88
89
90
91
92
93
94
95
96
97
98
99
100
101
102
103
104
105
106
107
108
109
110
111
112
113
114
115
116
117
118
119
120
121
122
123
124
125
126
127
128
129
130
131
132
133
134
135
136
137
138
139
140
141
142
143
144
145
146
147
148
149
150
151
152
153
154
155
156
157
158
159
160
161
162
163
164
165
166
167
168
169
170
171
172
173
174
175
176
177
178
179
180
181
182
183
184
185
186
187
188
189
190
191
192
193
194
195
196
197
198
199
200
201
202
203
204
205
206
207
208
209
210
211
212
213
214
215
216
217
218
219
220
221
222
223
224
225
226
227
228
229
230
231
232
233
234
235
236
237
238
239
240
241
242
243
244
245
246
247
248
249
250
251
252
253
254
255
256
257
258
259
260
261
262
263
264
265
266
267
268
269
270
271
272
273
274
275
276
277
278
279
280
281
282
283
284
285
286
287
288
289
290
291
292
293
294
295
296
297
298
299
300
301
302
303
304
305
唯一的区别是这里所用到的所有vue插件和ElementUI插件都是通过CDN方式引入,方便读者下载之后直接运行。需要注意的是,在添加新的任务的时候,填写任务名称时一定要把这个Job类的完整路径输入进来。例如
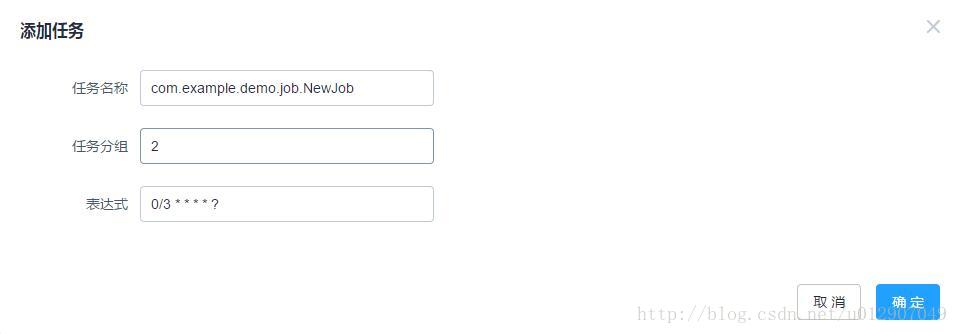
否则会报找不到该类的错误。对于Cron表达式,可以去在线Cron表达式生成器根据自己的需求自动生成。程序的截图如下

这两个任务执行的log:
2017-06-27 17:23:56.194 ERROR 9972 --- [eduler_Worker-3] com.example.demo.job.HelloJob: Hello Job执行时间: Tue Jun 27 17:23:56 CST 2017
2017-06-27 17:23:57.042 ERROR 9972 --- [eduler_Worker-4] com.example.demo.job.NewJob: New Job执行时间: Tue Jun 27 17:23:57 CST 2017
2017-06-27 17:23:58.051 ERROR 9972 --- [eduler_Worker-5] com.example.demo.job.HelloJob: Hello Job执行时间: Tue Jun 27 17:23:58 CST 2017
2017-06-27 17:24:00.070 ERROR 9972 --- [eduler_Worker-1] com.example.demo.job.NewJob: New Job执行时间: Tue Jun 27 17:24:00 CST 2017
2017-06-27 17:24:00.144 ERROR 9972 --- [eduler_Worker-2] com.example.demo.job.HelloJob: Hello Job执行时间: Tue Jun 27 17:24:00 CST 2017
2017-06-27 17:24:02.099 ERROR 9972 --- [eduler_Worker-3] com.example.demo.job.HelloJob: Hello Job执行时间: Tue Jun 27 17:24:02 CST 2017
2017-06-27 17:24:03.329 ERROR 9972 --- [eduler_Worker-4] com.example.demo.job.NewJob: New Job执行时间: Tue Jun 27 17:24:03 CST 2017
1
2
3
4
5
6
7
工程地址
这个工程已上传至我的github。如果你按上一篇文章的方法已经在mysql数据库中用脚本建立了数据表,那么下载这个工程之后只需要把application.yml和quartz.properties中对数据库连接的配置修改成你自己的数据库配置即可。
运行方法
Spring Boot工程已经集成了服务器。右键点击DemoApplication.java -> Run As -> Java Application即可运行工程。默认端口为8080,启动后在浏览器地址栏输入http://localhost:8080/JobManager.html就可以看到效果。

相关文章推荐
- Spring Boot集成持久化Quartz定时任务管理和界面展示
- Spring Boot集成持久化Quartz定时任务管理和界面展示
- Spring Boot集成持久化Quartz定时任务管理和界面展示
- Spring Boot集成持久化Quartz定时任务管理和界面展示(转)
- Spring Boot集成持久化Quartz定时任务管理和界面展示
- Spring Boot与Quartz集成实现分布式定时任务集群
- Asp.Net Core 使用Quartz基于界面画接口管理做定时任务
- spring boot 集成quartz 2.0 实现前端动态配置(获取spring上下文)的两种方式,启动数据库中已开启定时任务
- quartz定时任务与SpringMVC集成-自动注入管理bean
- SpringBoot学习-持久化Quartz定时任务管理
- 关于学习SpringMvc整合QuartZ定时管理任务的持久化管理
- ssh中使用spring的集成quartz 编写定时任务
- Spring集成Quartz定时任务框架介绍和Cron表达式详解
- Spring集成Quartz定时任务框架介绍和Cron表达式详解
- 【springboot】 springboot集成quartz实现定时任务
- spring mvc quartz 实现动态定时任务管理
- Quartz将定时任务持久化到数据库
- Spring集成Quartz定时任务的一些问题
- 在项目中集成定时任务--->Quartz
- Quartz+Spring Boot实现动态管理定时任务