无盘启动esxi物理主机及加载配置
2017-09-25 09:21
323 查看
Auto Deploy esxi Host首先安装VMwarevCenter Server服务器,同时在服务器上安装VMware vSphere PowerCLI 和Tftpd(tftp服务器)---安装就不详说了Vcenter服务器端配置
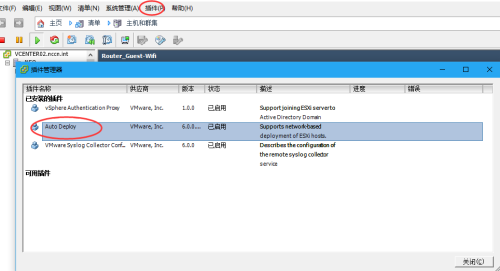
vSphere Client登陆Vcenter服务器,在插件里启用autoDeploy功能
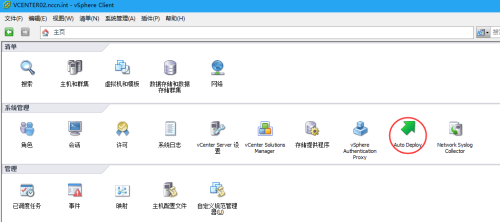
进入主页,选择Auto Deploy
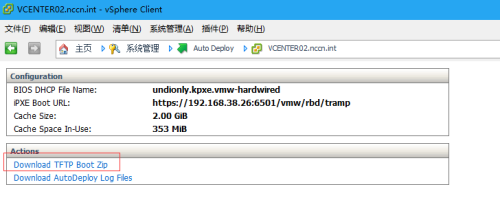
Download TFTP boot Zip,把下载的文件解压,存放在Vcenter服务器的tftp服务的主目录下
为Auto Deploy准备ESXi映像软件库.
(1) 从 VMware 网站下载包含映像配置文件的ESXi 5.0 Offline Bundle zip文件:
VMware-ESXi-5.0.0-469512-depot.zip,将其存放在vCenter服务器上磁盘分区C的根目录下
(2)打开vSphere PowerCLI命令行窗口,依次运行如下cmdlet:
设置执行策略为不限制类型 Set-ExecutionPolicy unrestricted 将映像配置文件分配给主机
连接到vCenter Server:
Connect-VIServer -Server vcenter02.nccn.int -User nccn\windy.ma -Passwordxxxxxx
添加ESXi 5.0 Blundle zip 文件:
Add-EsxSoftwareDepot c:\VMware-ESXi-5.5.0-1331820-depot.zip
然后使用Get-EsxImageProfile 检查库的内容.如下图15所示ZIP文件已经被添加到库中:
使用Auto Deploy置备主机.
(1)继续在vSphere PowerShell 命令行下运行以下 cmdlet,使用映像配置文件ESXi-5.5.0-1331820-standard创建规则:
New-DeployRule -Name "NEO_Rule"-Item "ESXi-5.5.0-1331820-standard" –AllHosts
(2)将新规则添加到活动规则集,以使该规则可用于 Auto Deploy 服务器:
Add-DeployRule -DeployRule"NEO_Rule"
DHCP服务器端配置
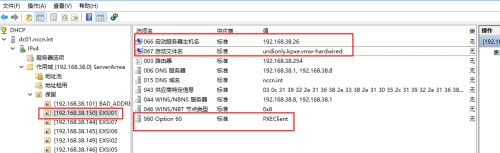
在dhcp配置里把用exsi01主机的MAC地址绑定IP为:192.168.38.150,在项选:66、67、60配置如下图(其中66项IP为: tftp服务器也就是vcenter服务器的IP)
esxi主机配置
1、exsi01主机开始启动,将会先从DHPC获取IP,再从tftp服务器下载VMware-ESXi-5.5.0-1331820-depot再加载到内存中启动,启动成功后会自动加入vcenter服务器
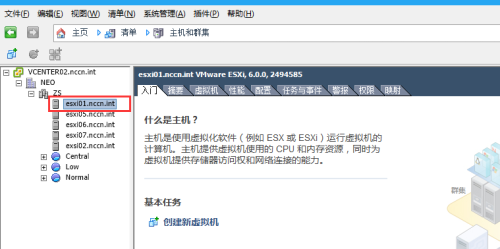
2、至此,在vsphere client配置esxi01 主机,如:存储器、网络、DNS、加域等等
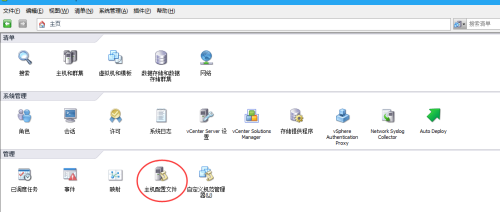
然后进入主页,主机配置文件
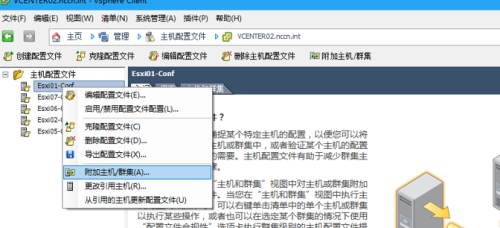
创建一个配置文件--选择从现有主机中创建配置文件,保存名为esxi01-conf

在配置文件上右击,选择附加主机/群集,附加给esxi01
返回vcenter服务器
连接到vCenter Server:Connect-VIServer -Server vcenter02.nccn.int-User nccn\windy.ma -Password xxxxxx将主机配置文件分配给主机 Get-VMhostProfile
在 PowerCLI 提示符处,定义一个规则,将具有某些属性(例如 IP 地址范围)的主机分配给主机配置文件。
New-DeployRule -Name"Esxi01-Conf_Rule" -Item Esxi01-Conf -Pattern"ipv4=192.168.38.150"
将规则添加到规则集。Get-deployrule Get-deployruleset Set-DeployRuleset Remove-DeployRule-delete
Add-DeployRule Esxi01-Conf_Rule
将主机分配给文件夹或群集 也可以在使用Get-Folder、Get-Cluster 或 Get-Datacenter
New-DeployRule -Name "NEOCluster"-Item "HA-DRS" -Pattern "ipv4=192.168.38.1-192.168.38.253"
此示例按名称在文件夹中传递。也可以在使用 Get-Folder、Get-Cluster 或 Get-Datacenter cmdlet 检索的文件夹、群集或数据中心对象中传递。
将规则添加到规则集。
Add-DeployRule NEOCluster
在esxi01主机上操作如下命令:
1. Configure each ESXi Host to use anetwork coredump collector
esxcli system coredump network set--interface-name vmk0 --server-ipv4 192.168.38.26 --server-port 6500
esxcli system coredump network set --enabletrue
esxcli system coredump network check
esxcli system coredump network get
2. Disable and delete the currentlyconfigured coredump file
esxcli system coredump file set --enable false
esxcli system coredump file remove --force
3. Disable VMkernel.Boot.autoCreateDumpFile
This is an Advanced Setting on the ESXiHost (Configuration > Software > Advanced Settings )
VMKernel---VMkernel.Boot.autoCreateDumpFile
4.
esxcli system syslog config set--loghost=tcp://192.168.38.26:514
esxcli system syslog reload
此配置文档是事后补的,可能否其中有遗失的过程,如有问题请留言
vSphere Client登陆Vcenter服务器,在插件里启用autoDeploy功能
进入主页,选择Auto Deploy
Download TFTP boot Zip,把下载的文件解压,存放在Vcenter服务器的tftp服务的主目录下
为Auto Deploy准备ESXi映像软件库.
(1) 从 VMware 网站下载包含映像配置文件的ESXi 5.0 Offline Bundle zip文件:
VMware-ESXi-5.0.0-469512-depot.zip,将其存放在vCenter服务器上磁盘分区C的根目录下
(2)打开vSphere PowerCLI命令行窗口,依次运行如下cmdlet:
设置执行策略为不限制类型 Set-ExecutionPolicy unrestricted 将映像配置文件分配给主机
连接到vCenter Server:
Connect-VIServer -Server vcenter02.nccn.int -User nccn\windy.ma -Passwordxxxxxx
添加ESXi 5.0 Blundle zip 文件:
Add-EsxSoftwareDepot c:\VMware-ESXi-5.5.0-1331820-depot.zip
然后使用Get-EsxImageProfile 检查库的内容.如下图15所示ZIP文件已经被添加到库中:
使用Auto Deploy置备主机.
(1)继续在vSphere PowerShell 命令行下运行以下 cmdlet,使用映像配置文件ESXi-5.5.0-1331820-standard创建规则:
New-DeployRule -Name "NEO_Rule"-Item "ESXi-5.5.0-1331820-standard" –AllHosts
(2)将新规则添加到活动规则集,以使该规则可用于 Auto Deploy 服务器:
Add-DeployRule -DeployRule"NEO_Rule"
DHCP服务器端配置
在dhcp配置里把用exsi01主机的MAC地址绑定IP为:192.168.38.150,在项选:66、67、60配置如下图(其中66项IP为: tftp服务器也就是vcenter服务器的IP)
esxi主机配置
1、exsi01主机开始启动,将会先从DHPC获取IP,再从tftp服务器下载VMware-ESXi-5.5.0-1331820-depot再加载到内存中启动,启动成功后会自动加入vcenter服务器
2、至此,在vsphere client配置esxi01 主机,如:存储器、网络、DNS、加域等等
然后进入主页,主机配置文件
创建一个配置文件--选择从现有主机中创建配置文件,保存名为esxi01-conf
在配置文件上右击,选择附加主机/群集,附加给esxi01
返回vcenter服务器
连接到vCenter Server:Connect-VIServer -Server vcenter02.nccn.int-User nccn\windy.ma -Password xxxxxx将主机配置文件分配给主机 Get-VMhostProfile
在 PowerCLI 提示符处,定义一个规则,将具有某些属性(例如 IP 地址范围)的主机分配给主机配置文件。
New-DeployRule -Name"Esxi01-Conf_Rule" -Item Esxi01-Conf -Pattern"ipv4=192.168.38.150"
将规则添加到规则集。Get-deployrule Get-deployruleset Set-DeployRuleset Remove-DeployRule-delete
Add-DeployRule Esxi01-Conf_Rule
将主机分配给文件夹或群集 也可以在使用Get-Folder、Get-Cluster 或 Get-Datacenter
New-DeployRule -Name "NEOCluster"-Item "HA-DRS" -Pattern "ipv4=192.168.38.1-192.168.38.253"
此示例按名称在文件夹中传递。也可以在使用 Get-Folder、Get-Cluster 或 Get-Datacenter cmdlet 检索的文件夹、群集或数据中心对象中传递。
将规则添加到规则集。
Add-DeployRule NEOCluster
在esxi01主机上操作如下命令:
1. Configure each ESXi Host to use anetwork coredump collector
esxcli system coredump network set--interface-name vmk0 --server-ipv4 192.168.38.26 --server-port 6500
esxcli system coredump network set --enabletrue
esxcli system coredump network check
esxcli system coredump network get
2. Disable and delete the currentlyconfigured coredump file
esxcli system coredump file set --enable false
esxcli system coredump file remove --force
3. Disable VMkernel.Boot.autoCreateDumpFile
This is an Advanced Setting on the ESXiHost (Configuration > Software > Advanced Settings )
VMKernel---VMkernel.Boot.autoCreateDumpFile
4.
esxcli system syslog config set--loghost=tcp://192.168.38.26:514
esxcli system syslog reload
此配置文档是事后补的,可能否其中有遗失的过程,如有问题请留言

相关文章推荐
- mini2440无盘启动-------配置支持NFS的服务器—1
- 关于TOMCat虚拟主机配置后工程启动几次的问题
- nginx启动、重启、重新加载配置文件和平滑升级
- vSphere Client配置ESXi主机日志
- 监听总结之解析问题二:由sqlnet.ora文件寻到EZCONNECT适配器程序来解析主机名为主机上的多个ip地址(*) 以及 tnsping是用来测试某个配置的监听程序是否启动
- 实验环境安装及配置(六)——为ESXI主机添加存储并配置vSwitch
- 远程拷贝、查看端口、vim常见快捷键、查找替换命令、grep命令、查看存储空间的命令、chkconfig命令、系统自动启动级别、主机名配置、IP地址配置、域名映射、防火墙设置
- Selenium启动Chrome时,加载用户配置文件
- mini2440无盘启动------配置支持NFS的内核-----2
- tomcat6配置java项目启动动态加载配置文件
- RIDE使用ff_profile_dir来加载你的配置文件(启动浏览器时加载第三方插件)
- Linux主机下配置Oracle 10G自动启动过程
- 实验环境安装及配置(六)——为ESXI主机添加存储并配置vSwitch
- Dubbo框架初探【用Spring配置声明暴露服务(可以使用multicast广播注册中心暴露服务地址或者使用zookeeper注册中心暴露服务地址)、加载Spring配置,启动服务】
- nginx 启动,停止和重新加载配置
- Web容器启动时加载Spring的配置
- Selenium启动Chrome时,加载用户配置文件
- Linux 配置文件 启动文件rc.local、/etc/bash.bashrc、~/bashrc、/etc/profile、~/.profile加载顺序
- VMware ESXi HA配置,主机前面出现感叹号
- nginx启动配置加载性能分析(一)-作为http服务器