高并发环境下生成订单唯一流水号方法:SnowFlake
2017-09-24 00:00
357 查看
摘要: 高并发环境下生成订单唯一流水号方法:SnowFlake
来自:高并发环境下生成订单唯一流水号方法:SnowFlake
业务需求:
订单号不能重复
订单号没有规则,即编码规则不能加入任何和公司运营相关的数据,外部人员无法通过订单ID猜测到订单量。不能被遍历。
订单号长度固定,且不能太长
易读,易沟通,不要出现数字字母换乱现象
生成耗时
关于订单号的生成,一些比较简单的方案:
1、数据库自增长ID
优势:无需编码
缺陷:
大表不能做水平分表,否则插入删除时容易出现问题
高并发下插入数据需要加入事务机制
在业务操作父、子表(关联表)插入时,先要插入父表,再插入子表
2、时间戳+随机数
优势:编码简单
缺陷:随机数存在重复问题,即使在相同的时间戳下。每次插入数据库前需要校验下是否已经存在相同的数值。
3、时间戳+会员ID
优势:同一时间,一个用户不会存在两张订单
缺陷:会员ID也会透露运营数据,鸡生蛋,蛋生鸡的问题
4、GUID/UUID
优势:简单
劣势:用户不友好,索引关联效率较低。
今天要分享的方案:来自twitter的SnowFlake
Twitter-Snowflake算法产生的背景相当简单,为了满足Twitter每秒上万条消息的请求,每条消息都必须分配一条唯一的id,这些id还需要一些大致的顺序(方便客户端排序),并且在分布式系统中不同机器产生的id必须不同.Snowflake算法核心把时间戳,工作机器id,序列号(毫秒级时间41位+机器ID 10位+毫秒内序列12位)组合在一起。
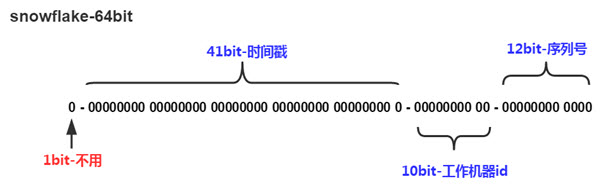
在上面的字符串中,第一位为未使用(实际上也可作为long的符号位),接下来的41位为毫秒级时间,然后5位datacenter标识位,5位机器ID(并不算标识符,实际是为线程标识),然后12位该毫秒内的当前毫秒内的计数,加起来刚好64位,为一个Long型。
除了最高位bit标记为不可用以外,其余三组bit占位均可浮动,看具体的业务需求而定。默认情况下41bit的时间戳可以支持该算法使用到2082年,10bit的工作机器id可以支持1023台机器,序列号支持1毫秒产生4095个自增序列id。下文会具体分析。
Snowflake – 时间戳
这里时间戳的细度是毫秒级,具体代码如下,建议使用64位linux系统机器,因为有vdso,gettimeofday()在用户态就可以完成操作,减少了进入内核态的损耗。
默认情况下有41个bit可以供使用,那么一共有T(1llu << 41)毫秒供你使用分配,年份 = T / (3600 * 24 * 365 * 1000) = 69.7年。如果你只给时间戳分配39个bit使用,那么根据同样的算法最后年份 = 17.4年。
Snowflake – 工作机器id
严格意义上来说这个bit段的使用可以是进程级,机器级的话你可以使用MAC地址来唯一标示工作机器,工作进程级可以使用IP+Path来区分工作进程。如果工作机器比较少,可以使用配置文件来设置这个id是一个不错的选择,如果机器过多配置文件的维护是一个灾难性的事情。
这里的解决方案是需要一个工作id分配的进程,可以使用自己编写一个简单进程来记录分配id,或者利用Mysql auto_increment机制也可以达到效果。
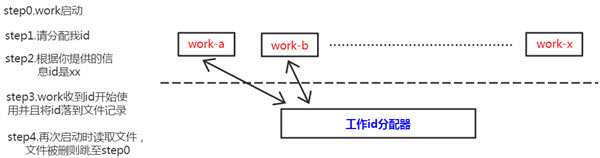
工作进程与工作id分配器只是在工作进程启动的时候交互一次,然后工作进程可以自行将分配的id数据落文件,下一次启动直接读取文件里的id使用。这个工作机器id的bit段也可以进一步拆分,比如用前5个bit标记进程id,后5个bit标记线程id之类:D
Snowflake – 序列号
序列号就是一系列的自增id(多线程建议使用atomic),为了处理在同一毫秒内需要给多条消息分配id,若同一毫秒把序列号用完了,则“等待至下一毫秒”。
总体来说,是一个很高效很方便的GUID产生算法,一个int64_t字段就可以胜任,不像现在主流128bit的GUID算法,即使无法保证严格的id序列性,但是对于特定的业务,比如用做游戏服务器端的GUID产生会很方便。另外,在多线程的环境下,序列号使用atomic可以在代码实现上有效减少锁的密度。
该项目地址为:https://github.com/twitter/snowflake 是用Scala实现的。核心代码:
由UC实现的JAVA版本代码(略有修改)
来源:https://github.com/sumory/uc/blob/master/src/com/sumory/uc/id/IdWorker.java
Go语言版本:https://github.com/sumory/idgen
Python语言版本:https://github.com/erans/pysnowflake
来自:高并发环境下生成订单唯一流水号方法:SnowFlake
业务需求:
订单号不能重复
订单号没有规则,即编码规则不能加入任何和公司运营相关的数据,外部人员无法通过订单ID猜测到订单量。不能被遍历。
订单号长度固定,且不能太长
易读,易沟通,不要出现数字字母换乱现象
生成耗时
关于订单号的生成,一些比较简单的方案:
1、数据库自增长ID
优势:无需编码
缺陷:
大表不能做水平分表,否则插入删除时容易出现问题
高并发下插入数据需要加入事务机制
在业务操作父、子表(关联表)插入时,先要插入父表,再插入子表
2、时间戳+随机数
优势:编码简单
缺陷:随机数存在重复问题,即使在相同的时间戳下。每次插入数据库前需要校验下是否已经存在相同的数值。
3、时间戳+会员ID
优势:同一时间,一个用户不会存在两张订单
缺陷:会员ID也会透露运营数据,鸡生蛋,蛋生鸡的问题
4、GUID/UUID
优势:简单
劣势:用户不友好,索引关联效率较低。
今天要分享的方案:来自twitter的SnowFlake
Twitter-Snowflake算法产生的背景相当简单,为了满足Twitter每秒上万条消息的请求,每条消息都必须分配一条唯一的id,这些id还需要一些大致的顺序(方便客户端排序),并且在分布式系统中不同机器产生的id必须不同.Snowflake算法核心把时间戳,工作机器id,序列号(毫秒级时间41位+机器ID 10位+毫秒内序列12位)组合在一起。
在上面的字符串中,第一位为未使用(实际上也可作为long的符号位),接下来的41位为毫秒级时间,然后5位datacenter标识位,5位机器ID(并不算标识符,实际是为线程标识),然后12位该毫秒内的当前毫秒内的计数,加起来刚好64位,为一个Long型。
除了最高位bit标记为不可用以外,其余三组bit占位均可浮动,看具体的业务需求而定。默认情况下41bit的时间戳可以支持该算法使用到2082年,10bit的工作机器id可以支持1023台机器,序列号支持1毫秒产生4095个自增序列id。下文会具体分析。
Snowflake – 时间戳
这里时间戳的细度是毫秒级,具体代码如下,建议使用64位linux系统机器,因为有vdso,gettimeofday()在用户态就可以完成操作,减少了进入内核态的损耗。
uint64_t generateStamp()
{
timeval tv;
gettimeofday(&tv, 0);
return (uint64_t)tv.tv_sec * 1000 + (uint64_t)tv.tv_usec / 1000;
}
默认情况下有41个bit可以供使用,那么一共有T(1llu << 41)毫秒供你使用分配,年份 = T / (3600 * 24 * 365 * 1000) = 69.7年。如果你只给时间戳分配39个bit使用,那么根据同样的算法最后年份 = 17.4年。
Snowflake – 工作机器id
严格意义上来说这个bit段的使用可以是进程级,机器级的话你可以使用MAC地址来唯一标示工作机器,工作进程级可以使用IP+Path来区分工作进程。如果工作机器比较少,可以使用配置文件来设置这个id是一个不错的选择,如果机器过多配置文件的维护是一个灾难性的事情。
这里的解决方案是需要一个工作id分配的进程,可以使用自己编写一个简单进程来记录分配id,或者利用Mysql auto_increment机制也可以达到效果。
工作进程与工作id分配器只是在工作进程启动的时候交互一次,然后工作进程可以自行将分配的id数据落文件,下一次启动直接读取文件里的id使用。这个工作机器id的bit段也可以进一步拆分,比如用前5个bit标记进程id,后5个bit标记线程id之类:D
Snowflake – 序列号
序列号就是一系列的自增id(多线程建议使用atomic),为了处理在同一毫秒内需要给多条消息分配id,若同一毫秒把序列号用完了,则“等待至下一毫秒”。
uint64_t waitNextMs(uint64_t lastStamp)
{
uint64_t cur = 0;
do {
cur = generateStamp();
} while (cur <= lastStamp);
return cur;
}
总体来说,是一个很高效很方便的GUID产生算法,一个int64_t字段就可以胜任,不像现在主流128bit的GUID算法,即使无法保证严格的id序列性,但是对于特定的业务,比如用做游戏服务器端的GUID产生会很方便。另外,在多线程的环境下,序列号使用atomic可以在代码实现上有效减少锁的密度。
该项目地址为:https://github.com/twitter/snowflake 是用Scala实现的。核心代码:
/** Copyright 2010-2012 Twitter, Inc.*/
package com.twitter.service.snowflake

import com.twitter.ostrich.stats.Stats
import com.twitter.service.snowflake.gen._
import java.util.Random
import com.twitter.logging.Logger

/**
* An object that generates IDs.
* This is broken into a separate class in case
* we ever want to support multiple worker threads
* per process
*/
class IdWorker(val workerId: Long, val datacenterId: Long, private val reporter: Reporter, var sequence: Long = 0L)
extends Snowflake.Iface {
private[this] def genCounter(agent: String) = {
Stats.incr("ids_generated")
Stats.incr("ids_generated_%s".format(agent))
}
private[this] val exceptionCounter = Stats.getCounter("exceptions")
private[this] val log = Logger.get
private[this] val rand = new Random

val twepoch = 1288834974657L

private[this] val workerIdBits = 5L
private[this] val datacenterIdBits = 5L
private[this] val maxWorkerId = -1L ^ (-1L << workerIdBits)
private[this] val maxDatacenterId = -1L ^ (-1L << datacenterIdBits)
private[this] val sequenceBits = 12L

private[this] val workerIdShift = sequenceBits
private[this] val datacenterIdShift = sequenceBits + workerIdBits
private[this] val timestampLeftShift = sequenceBits + workerIdBits + datacenterIdBits
private[this] val sequenceMask = -1L ^ (-1L << sequenceBits)

private[this] var lastTimestamp = -1L

// sanity check for workerId
if (workerId > maxWorkerId || workerId < 0) {
exceptionCounter.incr(1)
throw new IllegalArgumentException("worker Id can't be greater than %d or less than 0".format(maxWorkerId))
}

if (datacenterId > maxDatacenterId || datacenterId < 0) {
exceptionCounter.incr(1)
throw new IllegalArgumentException("datacenter Id can't be greater than %d or less than 0".format(maxDatacenterId))
}

log.info("worker starting. timestamp left shift %d, datacenter id bits %d, worker id bits %d, sequence bits %d, workerid %d",
timestampLeftShift, datacenterIdBits, workerIdBits, sequenceBits, workerId)

def get_id(useragent: String): Long = {
if (!validUseragent(useragent)) {
exceptionCounter.incr(1)
throw new InvalidUserAgentError
}

val id = nextId()
genCounter(useragent)

reporter.report(new AuditLogEntry(id, useragent, rand.nextLong))
id
}

def get_worker_id(): Long = workerId
def get_datacenter_id(): Long = datacenterId
def get_timestamp() = System.currentTimeMillis

protected[snowflake] def nextId(): Long = synchronized {
var timestamp = timeGen()

if (timestamp < lastTimestamp) {
exceptionCounter.incr(1)
log.error("clock is moving backwards.  Rejecting requests until %d.", lastTimestamp);
throw new InvalidSystemClock("Clock moved backwards.  Refusing to generate id for %d milliseconds".format(
lastTimestamp - timestamp))
}

if (lastTimestamp == timestamp) {
sequence = (sequence + 1) & sequenceMask
if (sequence == 0) {
timestamp = tilNextMillis(lastTimestamp)
}
} else {
sequence = 0
}

lastTimestamp = timestamp
((timestamp - twepoch) << timestampLeftShift) |
(datacenterId << datacenterIdShift) |
(workerId << workerIdShift) |
sequence
}

protected def tilNextMillis(lastTimestamp: Long): Long = {
var timestamp = timeGen()
while (timestamp <= lastTimestamp) {
timestamp = timeGen()
}
timestamp
}

protected def timeGen(): Long = System.currentTimeMillis()

val AgentParser = """([a-zA-Z][a-zA-Z\-0-9]*)""".r

def validUseragent(useragent: String): Boolean = useragent match {
case AgentParser(_) => true
case _ => false
}
}
由UC实现的JAVA版本代码(略有修改)
来源:https://github.com/sumory/uc/blob/master/src/com/sumory/uc/id/IdWorker.java
package com.sumory.uc.id;

import java.math.BigInteger;

import org.slf4j.Logger;
import org.slf4j.LoggerFactory;

/**
* 42位的时间前缀+10位的节点标识+12位的sequence避免并发的数字(12位不够用时强制得到新的时间前缀)
* <p>
* <b>对系统时间的依赖性非常强,需要关闭ntp的时间同步功能,或者当检测到ntp时间调整后,拒绝分配id。
*
* @author sumory.wu
* @date 2012-2-26 下午6:40:28
*/
public class IdWorker {
private final static Logger logger = LoggerFactory.getLogger(IdWorker.class);

private final long workerId;
private final long snsEpoch = 1330328109047L;// 起始标记点,作为基准
private long sequence = 0L;// 0,并发控制
private final long workerIdBits = 10L;// 只允许workid的范围为:0-1023
private final long maxWorkerId = -1L ^ -1L << this.workerIdBits;// 1023,1111111111,10位
private final long sequenceBits = 12L;// sequence值控制在0-4095

private final long workerIdShift = this.sequenceBits;// 12
private final long timestampLeftShift = this.sequenceBits + this.workerIdBits;// 22
private final long sequenceMask = -1L ^ -1L << this.sequenceBits;// 4095,111111111111,12位

private long lastTimestamp = -1L;

public IdWorker(long workerId) {
super();
if (workerId > this.maxWorkerId || workerId < 0) {// workid < 1024[10位:2的10次方]
throw new IllegalArgumentException(String.format("worker Id can't be greater than %d or less than 0", this.maxWorkerId));
}
this.workerId = workerId;
}

public synchronized long nextId() throws Exception {
long timestamp = this.timeGen();
if (this.lastTimestamp == timestamp) {// 如果上一个timestamp与新产生的相等,则sequence加一(0-4095循环),下次再使用时sequence是新值
//System.out.println("lastTimeStamp:" + lastTimestamp);
this.sequence = this.sequence + 1 & this.sequenceMask;
if (this.sequence == 0) {
timestamp = this.tilNextMillis(this.lastTimestamp);// 重新生成timestamp
}
}
else {
this.sequence = 0;
}
if (timestamp < this.lastTimestamp) {
logger.error(String.format("Clock moved backwards.Refusing to generate id for %d milliseconds", (this.lastTimestamp - timestamp)));
throw new Exception(String.format("Clock moved backwards.Refusing to generate id for %d milliseconds", (this.lastTimestamp - timestamp)));
}

this.lastTimestamp = timestamp;
// 生成的timestamp
return timestamp - this.snsEpoch << this.timestampLeftShift | this.workerId << this.workerIdShift | this.sequence;
}

/**
* 保证返回的毫秒数在参数之后
*
* @param lastTimestamp
* @return
*/
private long tilNextMillis(long lastTimestamp) {
long timestamp = this.timeGen();
while (timestamp <= lastTimestamp) {
timestamp = this.timeGen();
}
return timestamp;
}

/**
* 获得系统当前毫秒数
*
* @return
*/
private long timeGen() {
return System.currentTimeMillis();
}

public static void main(String[] args) throws Exception {
IdWorker iw1 = new IdWorker(1);
IdWorker iw2 = new IdWorker(2);
IdWorker iw3 = new IdWorker(3);

// System.out.println(iw1.maxWorkerId);
// System.out.println(iw1.sequenceMask);

System.out.println("---------------------------");

long workerId = 1L;
long twepoch = 1330328109047L;
long sequence = 0L;// 0
long workerIdBits = 10L;
long maxWorkerId = -1L ^ -1L << workerIdBits;// 1023,1111111111,10位
long sequenceBits = 12L;

long workerIdShift = sequenceBits;// 12
long timestampLeftShift = sequenceBits + workerIdBits;// 22
long sequenceMask = -1L ^ -1L << sequenceBits;// 4095,111111111111,12位

long ct = System.currentTimeMillis();// 1330328109047L;//
System.out.println(ct);

System.out.println(ct - twepoch);
System.out.println(ct - twepoch << timestampLeftShift);// 左移22位:*2的22次方
System.out.println(workerId << workerIdShift);// 左移12位:*2的12次方
System.out.println("哈哈");
System.out.println(ct - twepoch << timestampLeftShift | workerId << workerIdShift);
long result = ct - twepoch << timestampLeftShift | workerId << workerIdShift | sequence;// 取时间的低40位 | (小于1024:只有12位)的低12位 | 计算的sequence
System.out.println(result);

System.out.println("---------------");
for (int i = 0; i < 10; i++) {
System.out.println(iw1.nextId());
}

Long t1 = 66708908575965184l;
Long t2 = 66712718304231424l;
Long t3 = 66715908575739904l;
Long t4 = 66717361423925248l;
System.out.println(Long.toBinaryString(t1));
System.out.println(Long.toBinaryString(t2));
System.out.println(Long.toBinaryString(t3));
System.out.println(Long.toBinaryString(t4));
//1110110011111111011001100001111100 0001100100 000000000000
//1110110100000010110111010010010010 0001100100 000000000000
//1110110100000101110000111110111110 0001100100 000000000000
//1110110100000111000101100011010000 0001100100 000000000000
System.out.println(Long.toBinaryString(66706920114753536l));
//1110110011111101100101110010010110 0000000001 000000000000

String a = "0001100100";//输入数值
BigInteger src = new BigInteger(a, 2);//转换为BigInteger类型
System.out.println(src.toString());//转换为2进制并输出结果

}
}Go语言版本:https://github.com/sumory/idgen
Python语言版本:https://github.com/erans/pysnowflake

相关文章推荐
- 高并发环境下生成订单唯一流水号方法:SnowFlake
- 高并发环境下生成订单唯一流水号方法:SnowFlake
- 高并发下生成订单唯一流水号的方法
- 高并发下生成订单唯一流水号的方法
- 高并发环境下生成唯一流水号
- 流水号生成方法——按照时间格式生成的有序唯一编码(支持并发)
- 高并发分布式环境中获取全局唯一ID[分布式数据库全局唯一主键生成]
- 全局唯一订单号生成方法(参考snowflake)
- 两种方法利用Java生成唯一ID,取当前时间与字母随机组合,并发少的情况足以胜任
- Oracle procedure递归方法生成有规律唯一不重复且连续的流水号(处理字母数字)
- 高并发、分布式交易场景下唯一ID生成方法
- 高并发分布式环境中获取全局唯一ID[分布式数据库全局唯一主键生成]
- 全局唯一订单号生成方法(参考snowflake)
- Java集群环境下全局唯一流水ID生成方法之一
- 全局唯一订单号生成方法(参考snowflake)
- 高并发订单操作处理方法
- 分布式系统中唯一 ID 的生成方法
- vs2005 vc++ 生成非托管的 不需要.net运行环境的exe程序方法
- 如何在高并发分布式系统中生成全局唯一Id