Android Studio 从零开始创建Kotlin项目
2017-09-21 11:43
148 查看
新项目,我基于Kotlin开发,我选择的是Android Studio的最新版本:

与2.X相比较,这版本继承了Kotlin插件,无需自行安装:

具体步骤:
1.点击File-> New -> New Project 开始创建项目

2. 填写配置创建项目
1)在弹窗的Application Name处填写你的应用名称(项目名称)
2)点击Package name 右侧【Edit】按钮可以编辑包名
注意,由于某些原因,请不要勾选Include Kotlin Support,之后,我们手动添加Kotlin支持,否则初始化会很慢。

3.然后点击NEXT开始选择SDK版本,Minimun SDK 我们选择4.4,按照官方数据,目前可以兼容80%设备,此处根据你的实际需求去选择版本,
查看每个版本覆盖,可以点击Help Me Choose.

4.点击NEXT进入首个Activity创建页面,这里省略不截图了, 按照你的实际需求选择就可以。我选择的是Basic Activity,点击Next,开始配置Activity的相关信息。
5.进入下面页面默认的是MainActivity,你可以修改名字来自定义Activity的类名:

全部配置之后,选择点击FInish完成创建。
6.此处会报异常如下图所示:

如果出现这个异常,说明你使用的Gradle 的Build Tool 是测试版本,且太老了,你需要更新版本。
但是问题来了。
maven { url 'https://maven.google.com' }
上面这个maven仓库,我们是无法访问的,也就是说最新版本是无法get到的,那么如何解决呢?
我的解决方案是删除maven 仓库的配置,直接从https://jcenter.bintray.com/下载android 的 gradle build tools.
网址为:
https://jcenter.bintray.com/com/android/tools/build/gradle/
但是很不幸,这个上面的build tool最高版本只到了2.5.0-alpha-preview-02
我此处选用的是2.3.3版本。
7.按照上面配置之后,需要重新启动一下Android Studio,此时你会发现编译通过了。

8.我们开始添加Kotlin 支持:
除了kotlin 的支持之外,我们还需要添加一个kotlin的官方福利,kotlin-android-extensions, 通过这个插件我们可以不用再写讨厌的findViewById了,而直接通过控件的ID就能拿到这个控件了(我以后的文章会介绍到。)
添加这个插件第一步在projecet的build.gradle中声明:
classpath "org.jetbrains.kotlin:kotlin-gradle-plugin:$kotlin_version"
注意版本号,我们选择的是引用变量的形式,所以我们需要定义一个版本变量:
ext.kotlin_version = '1.1.2-4'

然后我们再到Module的build.gradle添加引用:
apply plugin: 'kotlin-android'
apply plugin: 'kotlin-android-extensions'

9.点击Tools --> Android --> Sync Project With Files 来构建项目
10.项目完成刷新之后我们需要将之前创建的WelcomeActivity.java类转成kotlin类,此处不用手动重写,选中WelcomeActivity.java,然后点击ctrl+alt+shift+k快捷键直接将java转成kotlin类。
11. 分享一下kotlin的Activity 类和布局文件:
package com.erpkot
import android.os.Bundle
import android.support.v7.app.AppCompatActivity
import kotlinx.android.synthetic.main.activity_welcome.*
class WelcomeActivity : AppCompatActivity() {
override fun onCreate(savedInstanceState: Bundle?) {
super.onCreate(savedInstanceState)
setContentView(R.layout.activity_welcome)
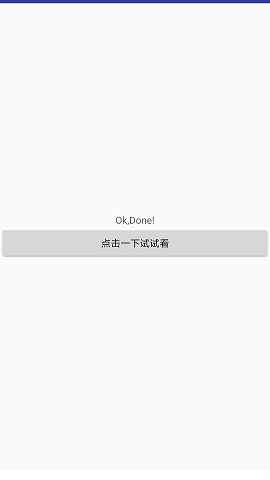
example_button.setOnClickListener {
example_tv.text = "Ok,Done!"
}
}
}
此处我们并没有写任何的findViewById,而Kotlin 通过插件自动帮我们完成了view绑定,运行效果如下:
两个build.gradle的完整配置如下:
APP:
PROJECT:
与2.X相比较,这版本继承了Kotlin插件,无需自行安装:
具体步骤:
1.点击File-> New -> New Project 开始创建项目
2. 填写配置创建项目
1)在弹窗的Application Name处填写你的应用名称(项目名称)
2)点击Package name 右侧【Edit】按钮可以编辑包名
注意,由于某些原因,请不要勾选Include Kotlin Support,之后,我们手动添加Kotlin支持,否则初始化会很慢。
3.然后点击NEXT开始选择SDK版本,Minimun SDK 我们选择4.4,按照官方数据,目前可以兼容80%设备,此处根据你的实际需求去选择版本,
查看每个版本覆盖,可以点击Help Me Choose.
4.点击NEXT进入首个Activity创建页面,这里省略不截图了, 按照你的实际需求选择就可以。我选择的是Basic Activity,点击Next,开始配置Activity的相关信息。
5.进入下面页面默认的是MainActivity,你可以修改名字来自定义Activity的类名:
全部配置之后,选择点击FInish完成创建。
6.此处会报异常如下图所示:
如果出现这个异常,说明你使用的Gradle 的Build Tool 是测试版本,且太老了,你需要更新版本。
但是问题来了。
maven { url 'https://maven.google.com' }
上面这个maven仓库,我们是无法访问的,也就是说最新版本是无法get到的,那么如何解决呢?
我的解决方案是删除maven 仓库的配置,直接从https://jcenter.bintray.com/下载android 的 gradle build tools.
网址为:
https://jcenter.bintray.com/com/android/tools/build/gradle/
但是很不幸,这个上面的build tool最高版本只到了2.5.0-alpha-preview-02
我此处选用的是2.3.3版本。
7.按照上面配置之后,需要重新启动一下Android Studio,此时你会发现编译通过了。
8.我们开始添加Kotlin 支持:
除了kotlin 的支持之外,我们还需要添加一个kotlin的官方福利,kotlin-android-extensions, 通过这个插件我们可以不用再写讨厌的findViewById了,而直接通过控件的ID就能拿到这个控件了(我以后的文章会介绍到。)
添加这个插件第一步在projecet的build.gradle中声明:
classpath "org.jetbrains.kotlin:kotlin-gradle-plugin:$kotlin_version"
注意版本号,我们选择的是引用变量的形式,所以我们需要定义一个版本变量:
ext.kotlin_version = '1.1.2-4'
然后我们再到Module的build.gradle添加引用:
apply plugin: 'kotlin-android'
apply plugin: 'kotlin-android-extensions'
9.点击Tools --> Android --> Sync Project With Files 来构建项目
10.项目完成刷新之后我们需要将之前创建的WelcomeActivity.java类转成kotlin类,此处不用手动重写,选中WelcomeActivity.java,然后点击ctrl+alt+shift+k快捷键直接将java转成kotlin类。
11. 分享一下kotlin的Activity 类和布局文件:
package com.erpkot
import android.os.Bundle
import android.support.v7.app.AppCompatActivity
import kotlinx.android.synthetic.main.activity_welcome.*
class WelcomeActivity : AppCompatActivity() {
override fun onCreate(savedInstanceState: Bundle?) {
super.onCreate(savedInstanceState)
setContentView(R.layout.activity_welcome)
example_button.setOnClickListener {
example_tv.text = "Ok,Done!"
}
}
}
<?xml version="1.0" encoding="utf-8"?>
<LinearLayout
xmlns:android="http://schemas.android.com/apk/res/android"
android:layout_width="match_parent"
android:layout_height="match_parent"
android:gravity="center"
android:orientation="vertical">
<TextView
android:id="@+id/example_tv"
android:layout_width="match_parent"
android:layout_height="wrap_content"
android:gravity="center"
android:text="Kotlin 小例子"/>
<Button
android:id="@+id/example_button"
android:layout_width="match_parent"
android:layout_height="wrap_content"
android:text="点击一下试试看"/>
</LinearLayout>
此处我们并没有写任何的findViewById,而Kotlin 通过插件自动帮我们完成了view绑定,运行效果如下:
两个build.gradle的完整配置如下:
APP:
apply plugin: 'com.android.application'
apply plugin: 'kotlin-android'
apply plugin: 'kotlin-android-extensions'

android {
compileSdkVersion 25
buildToolsVersion "25.0.3"
defaultConfig {
applicationId "com.erpkot"
minSdkVersion 19
targetSdkVersion 25
versionCode 1
versionName "1.0"
testInstrumentationRunner "android.support.test.runner.AndroidJUnitRunner"
}
buildTypes {
release {
minifyEnabled false
proguardFiles getDefaultProguardFile('proguard-android.txt'), 'proguard-rules.pro'
}
}
}

dependencies {
compile fileTree(dir: 'libs', include: ['*.jar'])
androidTestCompile('com.android.support.test.espresso:espresso-core:2.2.2', {
exclude group: 'com.android.support', module: 'support-annotations'
})
compile 'com.android.support:appcompat-v7:25.3.1'
testCompile 'junit:junit:4.12'
compile 'com.android.support.constraint:constraint-layout:1.0.0-alpha7'
compile 'com.android.support:design:25.3.1'
}
PROJECT:
// Top-level build file where you can add configuration options common to all sub-projects/modules.

buildscript {
ext.kotlin_version = '1.1.2-4'
repositories {
jcenter()
}
dependencies {
classpath 'com.android.tools.build:gradle:2.3.3'
classpath "org.jetbrains.kotlin:kotlin-gradle-plugin:$kotlin_version"
// NOTE: Do not place your application dependencies here; they belong
// in the individual module build.gradle files
}
}

allprojects {
repositories {
jcenter()
}
}

task clean(type: Delete) {
delete rootProject.buildDir
}

相关文章推荐
- Android Studio 创建kotlin项目
- 用Android studio创建Cocos2d-x 3.X项目
- Android Studio在创建项目是一直处于building “project name”gradle project info的解决办法
- Android Studio 更新后创建新项目不能运行原因
- Android Studio创建项目
- android studio 创建安卓项目时 报R文件找不到错误 可能源于布局xml文件包含错误
- Android Studio创建新项目一直处于building状态的解决方法
- Android Studio项目中常见的需要自行创建的资源文件夹的位置(assets、raw、menu、anim等)
- Android Studio创建项目
- Android Studio创建库项目及引用
- 折腾Android studio 新创建项目无法下载gradle 问题
- Android Studio在创建/导入项目的时候,一直处于building “XXX”gradle project info的解决办法
- Android Studio创建项目
- Android studio下将项目代码上传至github包括更新,同步,创建依赖
- 从零开始写javaweb框架笔记1-使用IDEA创建Maven项目
- 使用IntelliJ IDEA创建Kotlin项目
- 解决方法:Mac Android studio 创建项目是下载gradle一直不返回
- ndk系列——使用新版Android Studio创建ndk项目
- Android studio下将项目代码上传至github包括更新,同步,创建依赖
- Android从0到完整项目(1)使用Android studio 创建项目详解