架构师入门笔记九 初识IO NIO AIO
2017-09-15 14:52
399 查看
架构师入门笔记九 初识IO NIO AIO
在学习netty之前,我们要对Socket网络编程有一定的了解。这里先来了解一下 IO(BIO),NIO,AIO(NIO2.0)这几种通信的特点以及其演变的过程。
Socket 又称“套接字”,应用程序通常通过“套接字”向网络发出请求或者应答网络请求(网络编程的基本模型是C/S模型,即两个进程间的通信)。
套接字之间的连接过程可以分四个步骤:服务器监听,客户端请求服务器,服务器确认,客户端确认,进行通信。
1. 服务器监听:服务器端套接字并不会定位具体的客户端套接字,而是处于等待连接的状态,实时监控网络状态。
2. 客户端请求:客户端的套接字提出连接请求,要连接的目标是服务器端的套接字。为此,客户端的套接字必须首先描述它要连接的服务器的套接字,指出服务器套接字的地址和端口号,然后向服务器套接字提出连接请求。
3. 服务器端连接确认:是指当服务器端套接字监听(接收)到客户端套接字的连接请求,它就响应客户端套接字的请求,建立一个新的线程,把服务端套接字的描述发给客户端。一个客户端对应一个线程
4. 客户端连接确认:一旦客户端确认了此描述,连接就建立好了。双方开始通信。而服务器端套接字继续处于监听状态,继续接收其他客户端套接字的连接请求。

Client端:IP地址是本地IP,端口号和Server端代码端口号保持一致。通过输出流向服务端发送数据,这里是传输一个字符串数据,然后通过输入流获取服务端返回的数据。
Server端处理消息线程:负责处理Client请求,这里只做简单的字符串数据返回。
先启动Server端,然后再启动Client端,查看打印日志。
伪异步IO编程代码打印结果:
1)缓冲区Buffer:它是NIO与BIO的一个重要区别。BIO是将数据直接写入或读取到Stream对象中。而NIO的数据操作都是在缓冲区中进行的。而缓冲区实际上是一个数组
Buffer最常见的类型是ByteBuffer,另外还有CharBuffer,ShortBuffer,IntBuffer,LongBuffer,FloatBuffer,DoubleBuffer。常用方法在文章后面会介绍
2)通道Channel:可以理解为水管,是一个通道。和流不同,通道是双向的。NIO可以通过Channel进行数据的读,写和同时读写操作。
通道分为两大类:一类是网络读写(SelectableChannel),一类是用于文件操作(FileChannel),我们使用的SocketChannel和ServerSocketChannel都是SelectableChannel的子类。
3)多路复用器Selector:它是NIO编程的基础,非常重要。多路复用器提供选择已经就绪的任务的能力。简单说,就是Selector会不断地轮询注册在其上的通道(Channel),如果某个通道处于就绪状态(就绪状态:通道发送了读写操作),会被Selector轮询出来,然后通过SelectionKey可以取得就绪的Channel集合,从而进行后续的IO操作。
服务器端只要提供一个线程负责Selector的轮询,就可以接入成千上万个客户端,这就是JDK NIO库的巨大进步。

先运行MyServer类,再运行MyClient类,然后在控制台上键盘输入回车,会发现MyServer的Console控制台有打印信息。
它的主要方法是AsynchronousServerSocketChannel 和 AsynchronousSocketChannel。
方法的命名很耿直。
从BIO的 ServerSocket和Socket,
到NIO的 ServerSocketChannel和SocketChannel,
到AIO的 AsynchronousServerSocketChannel 和 AsynchronousSocketChannel。
ByteBuffer常用方法详解
NIO边看边记 之 selector选择器(六)
以上便是BIO,NIO,AIO相关笔记,虽然实际开发中很少使用,但面试的时候经常遇到(笔者就被问过多次),下一章开始学习Netty。
在学习netty之前,我们要对Socket网络编程有一定的了解。这里先来了解一下 IO(BIO),NIO,AIO(NIO2.0)这几种通信的特点以及其演变的过程。
1 IO(BIO)
1.1 基础理论
IO(input/output)又称BIO(block-IO),BIO通信模型是同步阻塞的通信模式。Socket 又称“套接字”,应用程序通常通过“套接字”向网络发出请求或者应答网络请求(网络编程的基本模型是C/S模型,即两个进程间的通信)。
套接字之间的连接过程可以分四个步骤:服务器监听,客户端请求服务器,服务器确认,客户端确认,进行通信。
1. 服务器监听:服务器端套接字并不会定位具体的客户端套接字,而是处于等待连接的状态,实时监控网络状态。
2. 客户端请求:客户端的套接字提出连接请求,要连接的目标是服务器端的套接字。为此,客户端的套接字必须首先描述它要连接的服务器的套接字,指出服务器套接字的地址和端口号,然后向服务器套接字提出连接请求。
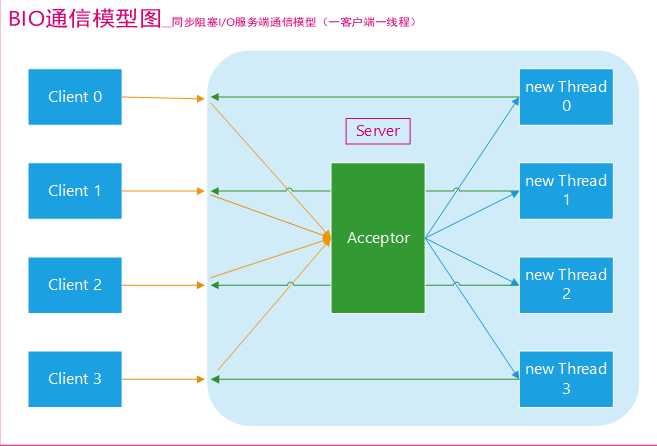
3. 服务器端连接确认:是指当服务器端套接字监听(接收)到客户端套接字的连接请求,它就响应客户端套接字的请求,建立一个新的线程,把服务端套接字的描述发给客户端。一个客户端对应一个线程
4. 客户端连接确认:一旦客户端确认了此描述,连接就建立好了。双方开始通信。而服务器端套接字继续处于监听状态,继续接收其他客户端套接字的连接请求。
1.2 BIO模型图(图片来源网络)

1.3 代码事例
Server端:ServerSocket通过绑定IP,启动监听端口。若一直没有接收到请求,程序会一直阻塞在accept方法。当确认客户端请求后,会新增线程去处理Socket,这也就是上面所说的套接字之间的连接过程。import java.io.IOException;
import java.net.ServerSocket;
import java.net.Socket;
import java.util.concurrent.ArrayBlockingQueue;
import java.util.concurrent.ThreadPoolExecutor;
import java.util.concurrent.TimeUnit;
public class MyServer {
private static final int PORT = 9999; // 服务器对外的端口号
public static void main(String[] args) {
ServerSocket server = null;
Socket socket = null;
ThreadPoolExecutor executor = null;
try {
server = new ServerSocket(PORT); // ServerSocket 绑定IP地址,启动监听端口
System.out.println("服务器启动.........");
/*--------------传统的新增线程处理----------------
while (true) {
// 服务器监听:阻塞,等待Client请求
socket = server.accept();
System.out.println("服务器确认请求 : " + socket);
// 服务器连接确认:确认Client请求后,创建线程执行任务
new Thread(new MyServerHandler(socket)).start();
}
*/
/*--------------通过线程池处理缓解高并发给程序带来的压力(伪异步IO编程)----------------*/
executor = new ThreadPoolExecutor(10, 100, 1000, TimeUnit.SECONDS, new ArrayBlockingQueue<Runnable>(50));
while (true) {
socket = server.accept();
System.out.println("多线程,服务器确认请求 : " + socket);
MyServerHandler myServerHandler = new MyServerHandler(socket);
executor.execute(myServerHandler);
}
} catch (IOException e) {
e.printStackTrace();
} finally {
try {
if (null != socket) {
// socket.close(); 不能关哦
}
if (null != server) {
server.close();
server = null;
System.out.println("服务器关闭了!!!!");
}
executor.shutdown();
} catch (IOException e) {
e.printStackTrace();
}
}
}
}Client端:IP地址是本地IP,端口号和Server端代码端口号保持一致。通过输出流向服务端发送数据,这里是传输一个字符串数据,然后通过输入流获取服务端返回的数据。
import java.io.BufferedReader;
import java.io.IOException;
import java.io.InputStreamReader;
import java.io.PrintWriter;
import java.net.Socket;

public class MyClient {

private static int PORT = 9999;
private static String IP_ADDRESS = "127.0.0.1";

public static void main(String[] args) {
// 模拟10个客户端发送请求
for (int i = 0; i < 10; i++) {
clientReq(i);
}
}

private static void clientReq(int i) {
Socket socket = null;
BufferedReader reader = null;
PrintWriter writer = null;
try {
socket = new Socket(IP_ADDRESS, PORT); // Socket 发起连接操作。连接成功后,双方通过输入和输出流进行同步阻塞式通信
reader = new BufferedReader(new InputStreamReader(socket.getInputStream())); // 获取返回内容
writer = new PrintWriter(socket.getOutputStream(), true);
writer.println(i + " ----->向服务器端发送数据----->"); // 向服务器端发送数据
System.out.println(i + " 向服务器端发送数据完毕,等待服务端返回数据 ... ... ...");
System.out.println(i + " 客户端打印返回数据 : " + reader.readLine());
} catch (Exception e) {
e.printStackTrace();
} finally {
try {
if (null != reader) {
reader.close();
}
if (null != socket) {
socket.close();
socket = null;
}
} catch (IOException e) {
e.printStackTrace();
}
}
}

}
Server端处理消息线程:负责处理Client请求,这里只做简单的字符串数据返回。
import java.io.BufferedReader;
import java.io.IOException;
import java.io.InputStreamReader;
import java.io.PrintWriter;
import java.net.Socket;

public class MyServerHandler implements Runnable{

private Socket socket;

public MyServerHandler(Socket socket) {
this.socket = socket;
}

@Override
public void run() {
BufferedReader reader = null;
PrintWriter writer = null;
try {
reader = new BufferedReader(new InputStreamReader(this.socket.getInputStream()));
writer = new PrintWriter(this.socket.getOutputStream(), true);
//			System.out.println("打印客户端传来的数据 : " + reader.readLine());  加了这行代码,会导致程序无法进行
String body = null;
while (true) {
body = reader.readLine(); // 若客户端用的是 writer.print() 传值,那readerLine() 是不能获取值,细节
if (null == body) {
break;
}
System.out.println("服务端接收参数 : " + body);
writer.println("<-----服务器端返回数据给客户端!<-----");
}
} catch (IOException e) {
e.printStackTrace();
} finally {
if (null != writer) {
writer.close();
}
try {
if (null != reader) {
reader.close();
}
if (null != this.socket) {
this.socket.close();
this.socket = null;
}
} catch (IOException e) {
e.printStackTrace();
}
}
}

}
先启动Server端,然后再启动Client端,查看打印日志。
伪异步IO编程代码打印结果:
服务器启动.........
多线程,服务器确认请求 : Socket[addr=/127.0.0.1,port=64417,localport=9999]
服务端接收参数 : 0 ----->向服务器端发送数据----->
多线程,服务器确认请求 : Socket[addr=/127.0.0.1,port=64418,localport=9999]
服务端接收参数 : 1 ----->向服务器端发送数据----->
多线程,服务器确认请求 : Socket[addr=/127.0.0.1,port=64419,localport=9999]
服务端接收参数 : 2 ----->向服务器端发送数据----->
多线程,服务器确认请求 : Socket[addr=/127.0.0.1,port=64420,localport=9999]
服务端接收参数 : 3 ----->向服务器端发送数据----->
多线程,服务器确认请求 : Socket[addr=/127.0.0.1,port=64421,localport=9999]
服务端接收参数 : 4 ----->向服务器端发送数据----->
多线程,服务器确认请求 : Socket[addr=/127.0.0.1,port=64422,localport=9999]
服务端接收参数 : 5 ----->向服务器端发送数据----->
多线程,服务器确认请求 : Socket[addr=/127.0.0.1,port=64423,localport=9999]
服务端接收参数 : 6 ----->向服务器端发送数据----->
多线程,服务器确认请求 : Socket[addr=/127.0.0.1,port=64424,localport=9999]
服务端接收参数 : 7 ----->向服务器端发送数据----->
多线程,服务器确认请求 : Socket[addr=/127.0.0.1,port=64425,localport=9999]
服务端接收参数 : 8 ----->向服务器端发送数据----->
多线程,服务器确认请求 : Socket[addr=/127.0.0.1,port=64426,localport=9999]
服务端接收参数 : 9 ----->向服务器端发送数据----->
0 向服务器端发送数据完毕,等待服务端返回数据 ... ...
0 客户端 : <-----服务器端返回数据给客户端!<-----
1 向服务器端发送数据完毕,等待服务端返回数据 ... ...
1 客户端 : <-----服务器端返回数据给客户端!<-----
2 向服务器端发送数据完毕,等待服务端返回数据 ... ...
2 客户端 : <-----服务器端返回数据给客户端!<-----
3 向服务器端发送数据完毕,等待服务端返回数据 ... ...
3 客户端 : <-----服务器端返回数据给客户端!<-----
4 向服务器端发送数据完毕,等待服务端返回数据 ... ...
4 客户端 : <-----服务器端返回数据给客户端!<-----
5 向服务器端发送数据完毕,等待服务端返回数据 ... ...
5 客户端 : <-----服务器端返回数据给客户端!<-----
6 向服务器端发送数据完毕,等待服务端返回数据 ... ...
6 客户端 : <-----服务器端返回数据给客户端!<-----
7 向服务器端发送数据完毕,等待服务端返回数据 ... ...
7 客户端 : <-----服务器端返回数据给客户端!<-----
8 向服务器端发送数据完毕,等待服务端返回数据 ... ...
8 客户端 : <-----服务器端返回数据给客户端!<-----
9 向服务器端发送数据完毕,等待服务端返回数据 ... ...
9 客户端 : <-----服务器端返回数据给客户端!<-----
1.4 BIO总结
采用BIO通信模型的服务端,通常由一个独立的Acceptor线程负责监听客户端的连接,当它接收到客户端连接请求之后,会为每个客户端创建一个新的线程进行链路处理(链路:从一个节点到相邻节点的一段物理线路,而中间没有任何其他的交换节点)。当线程处理完成后,服务端会通过输出流返回给客户端,然后线程销毁。即典型的一请求一应答通信模型。其缺点是:当客户端高并发请求,服务端不停的新建销毁线程,会增大服务器的压力。严重可能会导致服务器挂掉。后来采用线程池的方式减轻服务器的压力(这种方式被称之为:伪异步IO通信)。2 NIO
2.1 基础理论
NIO也称New IO(官方叫法) 或者是 Non-Block IO(民间叫法)相对于传统的IO编程,NIO多出了几个概念1)缓冲区Buffer:它是NIO与BIO的一个重要区别。BIO是将数据直接写入或读取到Stream对象中。而NIO的数据操作都是在缓冲区中进行的。而缓冲区实际上是一个数组
Buffer最常见的类型是ByteBuffer,另外还有CharBuffer,ShortBuffer,IntBuffer,LongBuffer,FloatBuffer,DoubleBuffer。常用方法在文章后面会介绍
2)通道Channel:可以理解为水管,是一个通道。和流不同,通道是双向的。NIO可以通过Channel进行数据的读,写和同时读写操作。
通道分为两大类:一类是网络读写(SelectableChannel),一类是用于文件操作(FileChannel),我们使用的SocketChannel和ServerSocketChannel都是SelectableChannel的子类。
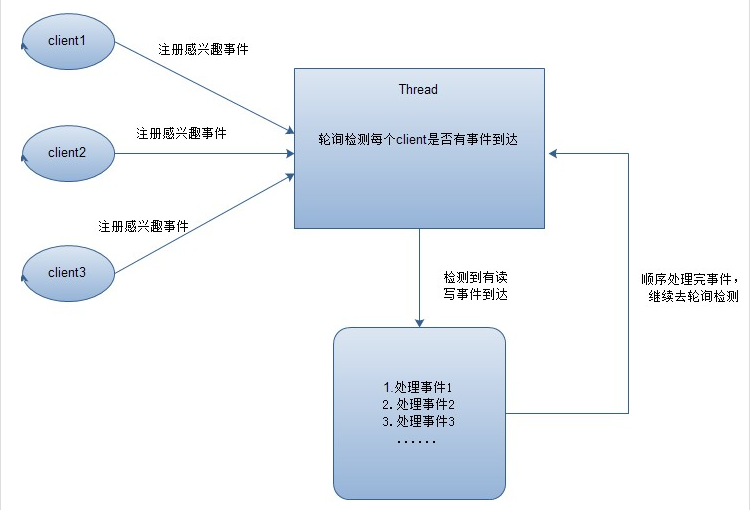
3)多路复用器Selector:它是NIO编程的基础,非常重要。多路复用器提供选择已经就绪的任务的能力。简单说,就是Selector会不断地轮询注册在其上的通道(Channel),如果某个通道处于就绪状态(就绪状态:通道发送了读写操作),会被Selector轮询出来,然后通过SelectionKey可以取得就绪的Channel集合,从而进行后续的IO操作。
服务器端只要提供一个线程负责Selector的轮询,就可以接入成千上万个客户端,这就是JDK NIO库的巨大进步。
2.2 NIO模型图
(图片来源网络)多个客户端在多路复用器上注册,通过一个线程不停的轮询,将就绪状态的事件选择出来处理掉。
2.3 代码事例
Server端代码:import java.io.IOException;
import java.net.InetSocketAddress;
import java.nio.ByteBuffer;
import java.nio.channels.SelectionKey;
import java.nio.channels.Selector;
import java.nio.channels.ServerSocketChannel;
import java.nio.channels.SocketChannel;
import java.util.Iterator;
public class MyServer implements Runnable{
private final int BUFFER_SIZE = 1024; // 缓冲区大小
private final int PORT = 8888; // 监听的端口
// 多路复用器,NIO编程的基础,负责管理通道Channel
private Selector selector;
// 缓冲区Buffer,和传统的BIO的一个重要区别(NIO读写数据是在缓冲区中进行,而BIO是通过流的形式)
private ByteBuffer readBuffer = ByteBuffer.allocate(BUFFER_SIZE);
public MyServer() {
startServer();
}
private void startServer() {
try {
// 1.开启多路复用器
selector = Selector.open();
// 2.打开服务器通道(网络读写通道)
ServerSocketChannel channel = ServerSocketChannel.open();
// 3.设置服务器通道为非阻塞模式,true为阻塞,false为非阻塞
channel.configureBlocking(false);
// 4.绑定端口
channel.socket().bind(new InetSocketAddress(PORT));
// 5.把通道注册到多路复用器上,并监听阻塞事件
/**
* SelectionKey.OP_READ表示关注读数据就绪事件
* SelectionKey.OP_WRITE表示关注写数据就绪事件
* SelectionKey.OP_CONNECT表示关注socket channel的连接完成事件
* SelectionKey.OP_ACCEPT表示关注server-socket channel的accept事件
*/
channel.register(selector, SelectionKey.OP_ACCEPT);
System.out.println("Server start, port :" + PORT);
} catch (IOException e) {
e.printStackTrace();
}
}
// 需要一个线程负责Selector的轮询
@Override
public void run() {
while (true) {
try {
/**
* a.select() 阻塞到至少有一个通道在你注册的事件上就绪
* b.select(long timeOut) 阻塞到至少有一个通道在你注册的事件上就绪或者超时timeOut
* c.selectNow() 立即返回。如果没有就绪的通道则返回0
* select方法的返回值表示就绪通道的个数。
*/
// 1.多路复用器监听阻塞
selector.select();
// 2.多路复用器已经选择的结果集
Iterator<SelectionKey> selectionKeys = selector.selectedKeys().iterator();
// 3.不停的轮询
while (selectionKeys.hasNext()) {
// 4.获取一个选中的key
SelectionKey key = selectionKeys.next();
// 5.获取后便将其从容器中移除
selectionKeys.remove();
// 6.只获取有效的key
if (!key.isValid()){
continue;
}
// 阻塞状态处理
if (key.isAcceptable()){
accept(key);
}
// 可读状态处理
if (key.isReadable()){
read(key);
}
}
} catch (IOException e) {
e.printStackTrace();
}
}
}
// 设置阻塞,等待Client请求。在传统IO编程中,用的是ServerSocket和Socket。在NIO中采用的ServerSocketChannel和SocketChannel
private void accept(SelectionKey selectionKey) {
try {
// 1.获取通道服务
ServerSocketChannel serverSocketChannel = (ServerSocketChannel) selectionKey.channel();
// 2.执行阻塞方法
SocketChannel socketChannel = serverSocketChannel.accept();
// 3.设置服务器通道为非阻塞模式,true为阻塞,false为非阻塞
socketChannel.configureBlocking(false);
// 4.把通道注册到多路复用器上,并设置读取标识
socketChannel.register(selector, SelectionKey.OP_READ);
} catch (IOException e) {
e.printStackTrace();
}
}
private void read(SelectionKey selectionKey) {
try {
// 1.清空缓冲区数据
readBuffer.clear();
// 2.获取在多路复用器上注册的通道
SocketChannel socketChannel = (SocketChannel) selectionKey.channel();
// 3.读取数据,返回
int count = socketChannel.read(readBuffer);
// 4.返回内容为-1 表示没有数据
if (-1 == count) {
selectionKey.channel().close();
selectionKey.cancel();
return ;
}
// 5.有数据则在读取数据前进行复位操作
readBuffer.flip();
// 6.根据缓冲区大小创建一个相应大小的bytes数组,用来获取值
byte[] bytes = new byte[readBuffer.remaining()];
// 7.接收缓冲区数据
readBuffer.get(bytes);
// 8.打印获取到的数据
System.out.println("Server : " + new String(bytes)); // 不能用bytes.toString()
} catch (IOException e) {
e.printStackTrace();
}
}
public static void main(String[] args) {
new Thread(new MyServer()).start();
}
}Client端:import java.io.IOException;
import java.net.InetSocketAddress;
import java.nio.ByteBuffer;
import java.nio.channels.SocketChannel;
public class MyClient {
private final static int PORT = 8888;
private final static int BUFFER_SIZE = 1024;
private final static String IP_ADDRESS = "127.0.0.1";
// 从代码中可以看出,和传统的IO编程很像,很大的区别在于数据是写入缓冲区
public static void main(String[] args) {
// 1.创建连接地址
InetSocketAddress inetSocketAddress = new InetSocketAddress(IP_ADDRESS, PORT);
// 2.声明一个连接通道
SocketChannel socketChannel = null;
// 3.创建一个缓冲区
ByteBuffer byteBuffer = ByteBuffer.allocate(BUFFER_SIZE);
try {
// 4.打开通道
socketChannel = SocketChannel.open();
// 5.连接服务器
socketChannel.connect(inetSocketAddress);
while(true){
// 6.定义一个字节数组,然后使用系统录入功能:
byte[] bytes = new byte[BUFFER_SIZE];
// 7.键盘输入数据
System.in.read(bytes);
// 8.把数据放到缓冲区中
byteBuffer.put(bytes);
// 9.对缓冲区进行复位
byteBuffer.flip();
// 10.写出数据
socketChannel.write(byteBuffer);
// 11.清空缓冲区数据
byteBuffer.clear();
}
} catch (IOException e) {
e.printStackTrace();
} finally {
if (null != socketChannel) {
try {
socketChannel.close();
} catch (IOException e) {
e.printStackTrace();
}
}
}
}
}以上代码只做了客户端传输数据给服务端,并没有服务端应答数据给客户端的代码。原因是:其一,后者代码逻辑和前者相似,若加上则会增大代码的理解难度。其二,NIO编程实际开发中很少用(但面试的时候经常问),更多是使用现有的框架(Netty)去完成的。先运行MyServer类,再运行MyClient类,然后在控制台上键盘输入回车,会发现MyServer的Console控制台有打印信息。
2.4 NIO总结
NIO的本质就是为了避免原始的TCP建立连接使用三次握手的操作(百度百科对三次握手的说明),减少连接的开销。3 AIO(NIO2.0)
3.1 基础理论
AIO 也叫NIO2.0, 在NIO的基础上引入了新的异步通道的概念,并提供了异步文件通道和异步套接字通道的实现。从而在真正意义上实现了异步非阻塞。上面学习的NIO只是非阻塞而并非异步。而AIO它不需要通过多路复用器对注册的通道进行轮询操作即可实现异步读写,从而简化了NIO编程模型。(心里是不是有千万只草泥马奔腾而过,刚看懂NIO的多路复用器,结果AIO不用啦。其实了解NIO后会更容易理解AIO)它的主要方法是AsynchronousServerSocketChannel 和 AsynchronousSocketChannel。
方法的命名很耿直。
从BIO的 ServerSocket和Socket,
到NIO的 ServerSocketChannel和SocketChannel,
到AIO的 AsynchronousServerSocketChannel 和 AsynchronousSocketChannel。
3.2 代码事例
Server端:import java.net.InetSocketAddress;
import java.nio.channels.AsynchronousChannelGroup;
import java.nio.channels.AsynchronousServerSocketChannel;
import java.util.concurrent.ExecutorService;
import java.util.concurrent.Executors;
public class MyServer {
// 线程池
private ExecutorService executorService;
// 线程组
private AsynchronousChannelGroup threadGroup;
// 服务器通道
public AsynchronousServerSocketChannel asynServerSocketChannel;
public void start(int port){
try {
// 1.创建一个缓存池
executorService = Executors.newCachedThreadPool();
// 2.创建线程组
threadGroup = AsynchronousChannelGroup.withCachedThreadPool(executorService, 1);
// 3.创建服务器通道
asynServerSocketChannel = AsynchronousServerSocketChannel.open(threadGroup);
// 4.进行绑定
asynServerSocketChannel.bind(new InetSocketAddress(port));
System.out.println("server start , port : " + port);
// 5.进行阻塞
asynServerSocketChannel.accept(this, new MyServerCompletionHandler());
//一直阻塞 不让服务器停止,真实环境是在tomcat下运行,所以不需要这行代码
Thread.sleep(Integer.MAX_VALUE);
} catch (Exception e) {
e.printStackTrace();
}
}
public static void main(String[] args) {
MyServer server = new MyServer();
server.start(7777);
}
}Client端:import java.net.InetSocketAddress;
import java.nio.ByteBuffer;
import java.nio.channels.AsynchronousSocketChannel;
public class MyClient implements Runnable{
private AsynchronousSocketChannel asynSocketChannel ;
public MyClient() throws Exception {
// 打开通道
asynSocketChannel = AsynchronousSocketChannel.open();
}
public void connect(){
// 创建连接 和NIO一样
asynSocketChannel.connect(new InetSocketAddress("127.0.0.1", 7777));
}
public void write(String request){
try {
asynSocketChannel.write(ByteBuffer.wrap(request.getBytes())).get();
ByteBuffer byteBuffer = ByteBuffer.allocate(1024);
asynSocketChannel.read(byteBuffer).get();
byteBuffer.flip();
byte[] respByte = new byte[byteBuffer.remaining()];
byteBuffer.get(respByte); // 将缓冲区的数据放入到 byte数组中
System.out.println(new String(respByte,"utf-8").trim());
} catch (Exception e) {
e.printStackTrace();
}
}
@Override
public void run() {
while(true){
}
}
// 模拟三个客户端请求
public static void main(String[] args) throws Exception {
MyClient myClient1 = new MyClient();
myClient1.connect();
MyClient myClient2 = new MyClient();
myClient2.connect();
MyClient myClient3 = new MyClient();
myClient3.connect();
new Thread(myClient1, "myClient1").start();
new Thread(myClient2, "myClient2").start();
new Thread(myClient3, "myClient3").start();
Thread.sleep(1000);
myClient1.write("myClient1 BIO");
myClient2.write("myClient2 NIO");
myClient3.write("myClient3 AIO");
}
}ServerHandler:import java.nio.ByteBuffer;
import java.nio.channels.AsynchronousSocketChannel;
import java.nio.channels.CompletionHandler;
import java.util.concurrent.ExecutionException;
public class MyServerCompletionHandler implements CompletionHandler<AsynchronousSocketChannel, MyServer> {
private final int BUFFER_SIZE = 1024;
@Override
public void completed(AsynchronousSocketChannel asynSocketChannel, MyServer attachment) {
//当有下一个客户端接入的时候 直接调用Server的accept方法,这样反复执行下去,保证多个客户端都可以阻塞
attachment.asynServerSocketChannel.accept(attachment, this);
read(asynSocketChannel);
}
private void read(final AsynchronousSocketChannel asynSocketChannel) {
//读取数据
ByteBuffer byteBuffer = ByteBuffer.allocate(BUFFER_SIZE);
asynSocketChannel.read(byteBuffer, byteBuffer, new CompletionHandler<Integer, ByteBuffer>() {
@Override
public void completed(Integer resultSize, ByteBuffer attachment) {
//进行读取之后,重置标识位
attachment.flip();
//获得读取的字节数
System.out.println("Server -> " + "收到客户端的数据长度为:" + resultSize);
//获取读取的数据
String resultData = new String(attachment.array()).trim();
System.out.println("Server -> " + "收到客户端的数据信息为:" + resultData);
String response = "服务器响应, 收到了客户端发来的数据: " + resultData;
write(asynSocketChannel, response);
}
@Override
public void failed(Throwable exc, ByteBuffer attachment) {
exc.printStackTrace();
}
});
}
private void write(AsynchronousSocketChannel asynSocketChannel, String response) {
try {
// 把数据写入到缓冲区中
ByteBuffer buf = ByteBuffer.allocate(BUFFER_SIZE);
buf.put(response.getBytes());
buf.flip();
// 在从缓冲区写入到通道中
asynSocketChannel.write(buf).get();
} catch (InterruptedException e) {
e.printStackTrace();
} catch (ExecutionException e) {
e.printStackTrace();
}
}
@Override
public void failed(Throwable exc, MyServer attachment) {
exc.printStackTrace();
}
}打印结果:server start , port : 7777 Server -> 收到客户端的数据长度为:13 Server -> 收到客户端的数据信息为:myClient1 BIO Server -> 收到客户端的数据长度为:13 Server -> 收到客户端的数据信息为:myClient2 NIO Server -> 收到客户端的数据长度为:13 Server -> 收到客户端的数据信息为:myClient3 AIO
服务器响应, 收到了客户端发来的数据: myClient1 BIO
服务器响应, 收到了客户端发来的数据: myClient2 NIO
服务器响应, 收到了客户端发来的数据: myClient3 AIO
4 Buffer常用方法
取值前先复位,position位置很重要。import java.nio.IntBuffer;
public class TestBuffer {
public static void main(String[] args) {
// 1 基本操作
//创建指定长度的缓冲区
IntBuffer buf = IntBuffer.allocate(10);
buf.clear();// 每次执行清空一下
buf.put(13);// position位置:0 - > 1 位置,下一个要被读或写的元素的索引,每次读写缓冲区数据时都会改变改值,为下次读写作准备
buf.put(21);// position位置:1 - > 2
buf.put(35);// position位置:2 - > 3
System.out.println("不使用flip复位:" + buf);
System.out.println(buf.get()); // 相对读,从position位置读取一个byte,并将position+1,为下次读写作准备 3 - > 4
System.out.println(buf.get()); // 4 - > 5
System.out.println(buf.get()); // 5 - > 6
//把位置复位为0,也就是position位置:3 - > 0
buf.flip();
System.out.println("使用flip复位:" + buf);
System.out.println(buf.get());
System.out.println(buf.get());
System.out.println(buf.get());
System.out.println("获取下标为1的元素:" + buf.get(1) + "\t get(index)方法,position位置不改变:" + buf.position());
buf.put(1, 4);
System.out.println("获取下标为1的元素:" + buf.get(1) + "\t put(index, change)方法,position位置不变:" + buf);
System.out.println("\n=============================================\n");
/*
// 2 wrap方法使用
// wrap方法会包裹一个数组: 一般这种用法不会先初始化缓存对象的长度,因为没有意义,最后还会被wrap所包裹的数组覆盖掉。
// 并且wrap方法修改缓冲区对象的时候,数组本身也会跟着发生变化。
int[] arr = new int[]{1,2,5};
IntBuffer buf1 = IntBuffer.wrap(arr);
System.out.println(buf1);
IntBuffer buf2 = IntBuffer.wrap(arr, 0 , 2);
//这样使用表示容量为数组arr的长度,但是可操作的元素只有实际进入缓存区的元素长度
System.out.println(buf2);
*/
// 3 其他方法
IntBuffer buf1 = IntBuffer.allocate(10);
int[] arr = new int[]{1,2,5};
buf1.put(arr);
System.out.println(buf1);
//一种复制方法
IntBuffer buf3 = buf1.duplicate();
System.out.println(buf3);
//设置buf1的位置属性
buf1.flip();
System.out.println(buf1);
System.out.println("可读数据为:" + buf1.remaining());
int[] arr2 = new int[buf1.remaining()];
//将缓冲区数据放入arr2数组中去
buf1.get(arr2);
for(int i : arr2){
System.out.print(Integer.toString(i) + ",");
}
}
}5 优质博客
Java 网络IO编程总结(BIO、NIO、AIO均含完整实例代码)ByteBuffer常用方法详解
NIO边看边记 之 selector选择器(六)
以上便是BIO,NIO,AIO相关笔记,虽然实际开发中很少使用,但面试的时候经常遇到(笔者就被问过多次),下一章开始学习Netty。
相关文章推荐
- 架构师入门笔记六 初识线程安全锁
- 架构师入门笔记三 初识Queue队列
- 架构师入门笔记五 初识线程池
- 架构师入门笔记二 初识java容器
- 架构师入门笔记一 初识线程关键字
- 架构师入门笔记四 初识多线程设计模式
- NIO通讯框架之阿堂教程:Mina学习笔记-入门篇(一)
- NIO,BIO,AIO,JAVA通讯编程学习笔记
- Java高并发程序设计笔记10之NIO和AIO
- Python爬虫(入门+进阶)学习笔记 1-2 初识Python爬虫
- Netty 权威指南笔记(一):网络 I/O 模型和 Java NIO 入门
- Netty权威指南 第2版学习笔记2——NIO入门
- Linux学习笔记一 ---- Linux基础知识认知以及初识Linux下C编程入门
- JSON学习笔记一:JSON入门,JSON初识
- Java学习笔记--初识NIO
- Java NIO笔记(第一弹:初识NIO)
- NIO,BIO,AIO,JAVA通讯编程学习笔记3
- 韩顺平_php从入门到精通_视频教程_第11讲_初识css_类选择器_id选择器_html选择器_学习笔记_源代码图解_PPT文档整理
- 一、HIVE 初识入门笔记
- 架构师入门笔记八 并发框架Disruptor场景应用
