android 自动换行的线性布局
2017-09-14 16:42
543 查看
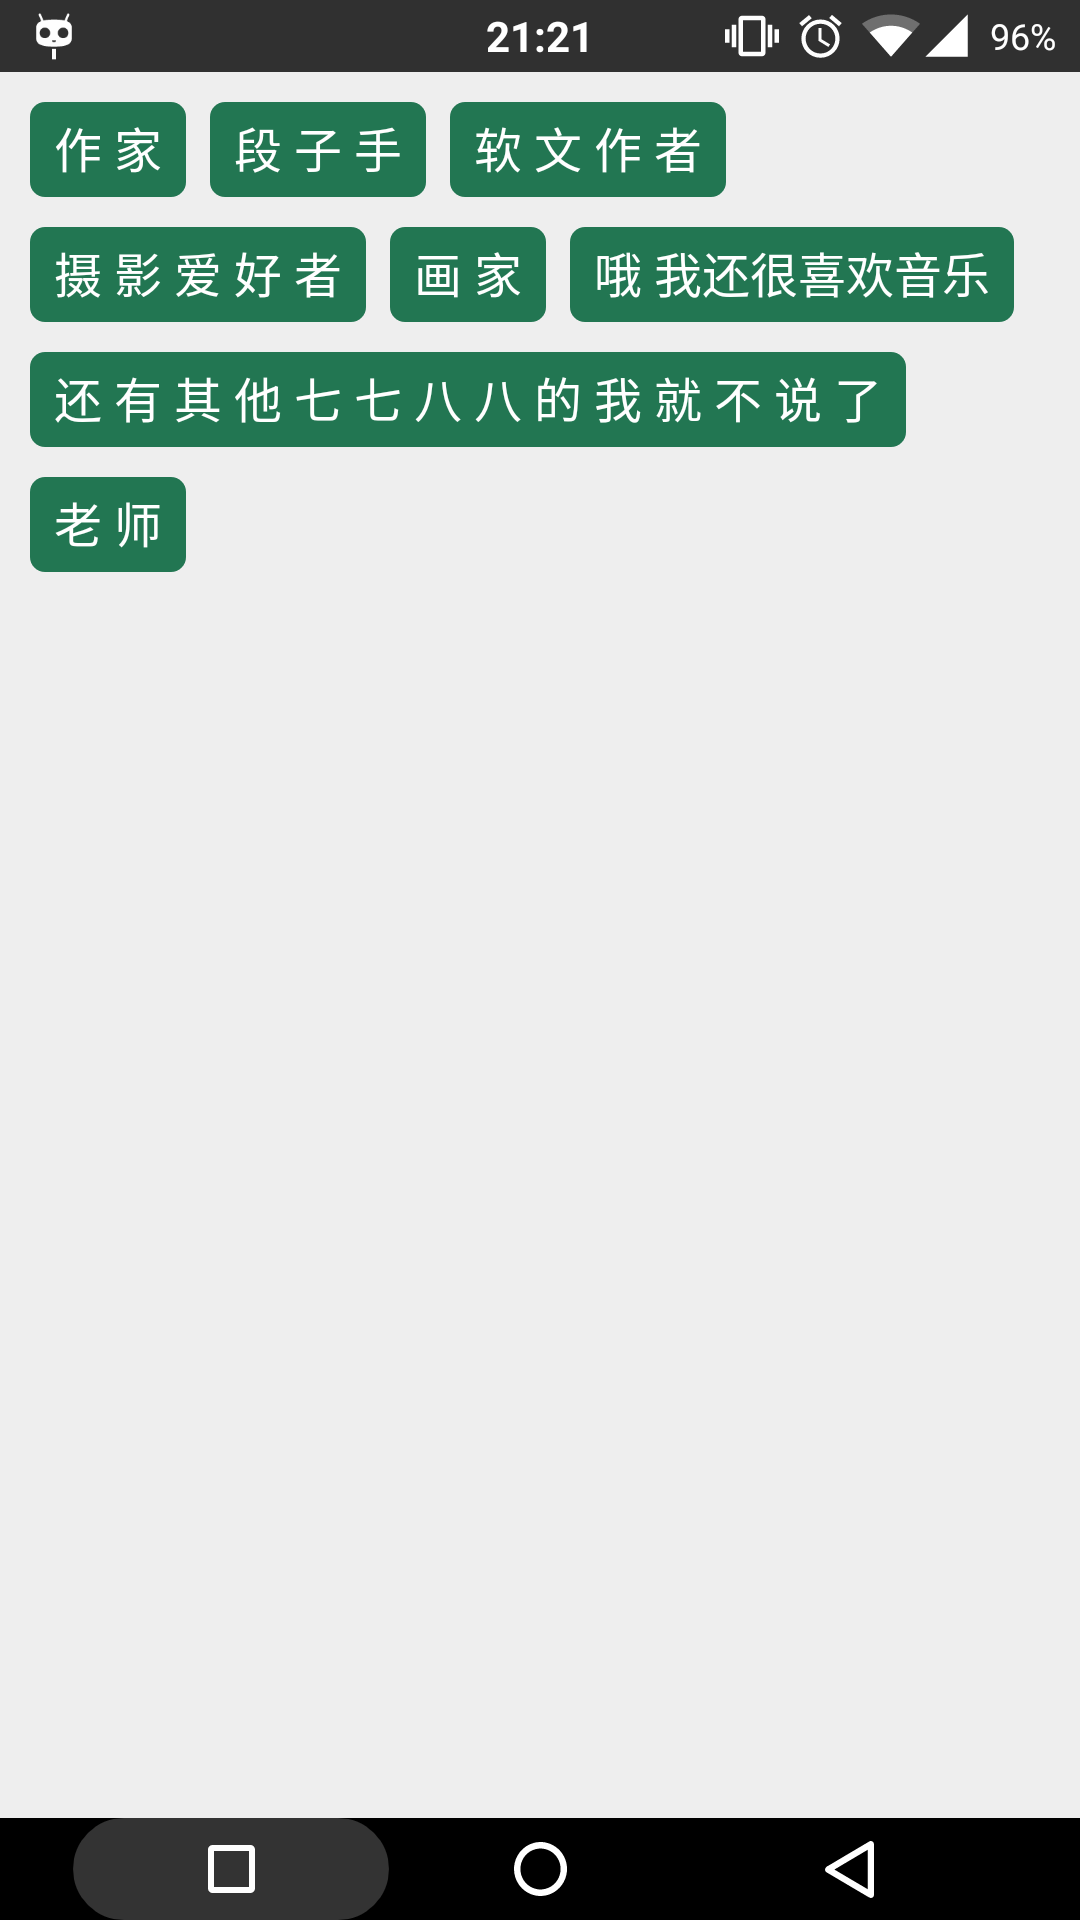
在项目中,有时候会有“横向排列,排满后自动换行”的需求(比如下图),要是子view是定长的就没什么好说的了,但如果是变长的话呢?这篇博客会帮你应对这种需求。
新建水平线性布局(我们称为行布局)
计算待放入的view的宽度和行布局的剩下宽度
判断是否可以放入
(1). 若view的宽度小于等于剩余宽度,放入,到第三步;
(2). 若view的宽度大于剩余宽度,添加行布局到父布局,到第二步。
1. 子view的宽度要加上间隔;
2. 若是子view的宽度大于行布局的宽度,不考虑对子view进入换行,直接放入;
接下来看代码,注释已经很详细,就不累赘了。
1. activity的布局
<?xml version="1.0" encoding="utf-8"?>
<FrameLayout
xmlns:android="http://schemas.android.com/apk/res/android"
android:layout_width="match_parent"
android:layout_height="match_parent"
android:background="#eee"
>
<LinearLayout
android:id="@+id/ll_parent"
android:layout_width="match_parent"
android:layout_height="wrap_content"
android:orientation="vertical"
android:layout_marginLeft="10dp"
android:layout_marginRight="10dp"
/>
</FrameLayout>
2. 子view
<?xml version="1.0" encoding="utf-8"?>
<TextView xmlns:android="http://schemas.android.com/apk/res/android"
android:layout_width="match_parent"
android:layout_height="match_parent"
android:textSize="16sp"
android:textColor="@android:color/white"
android:gravity="center"
android:paddingTop="5dp"
android:paddingBottom="5dp"
android:paddingLeft="8dp"
android:paddingRight="8dp"
android:background="@drawable/tv_bg"
/>
3. 子view的背景
<?xml version="1.0" encoding="utf-8"?>
<shape xmlns:android="http://schemas.android.com/apk/res/android">
<corners android:radius="5dp"/>
<solid android:color="#227652"/>
</shape>
4. activity代码
public class MainActivity extends AppCompatActivity {
@Override
protected void onCreate(Bundle savedInstanceState) {
super.onCreate(savedInstanceState);
setContentView(R.layout.activity_main);
initData();
ll_parent = (LinearLayout) findViewById(R.id.ll_parent);
initAutoLL();
}
// 数据
ArrayList<String> datas = new ArrayList<>();
// 初始化数据
private void initData() {
datas.add("作 家");
datas.add("段 子 手");
datas.add("软 文 作 者");
datas.add("摄 影 爱 好 者");
datas.add("画 家");
datas.add("哦 我还很喜欢音乐");
datas.add("还 有 其 他 七 七 八 八 的 我 就 不 说 了");
datas.add("老 师");
}
// 最外层的竖直线性布局
private LinearLayout ll_parent;
// 绘制自动换行的线性布局
private void initAutoLL() {
// 每一行的布局,初始化第一行布局
LinearLayout rowLL = new LinearLayout(this);
LinearLayout.LayoutParams rowLP =
new LinearLayout.LayoutParams(ViewGroup.LayoutParams.MATCH_PARENT,
ViewGroup.LayoutParams.WRAP_CONTENT);
float rowMargin = dipToPx(10);
rowLP.setMargins(0, (int) rowMargin, 0, 0);
rowLL.setLayoutParams(rowLP);
boolean isNewLayout = false;
float maxWidth = getScreenWidth() - dipToPx(30);
// 剩下的宽度
float elseWidth = maxWidth;
LinearLayout.LayoutParams textViewLP =
new LinearLayout.LayoutParams(ViewGroup.LayoutParams.WRAP_CONTENT,
ViewGroup.LayoutParams.WRAP_CONTENT);
textViewLP.setMargins((int) dipToPx(8), 0, 0, 0);
for (int i = 0; i < datas.size(); i++) {
// 若当前为新起的一行,先添加旧的那行
// 然后重新创建布局对象,设置参数,将isNewLayout判断重置为false
if (isNewLayout) {
ll_parent.addView(rowLL);
rowLL = new LinearLayout(this);
rowLL.setLayoutParams(rowLP);
isNewLayout = false;
}
// 计算是否需要换行
TextView textView = (TextView) getLayoutInflater().inflate(R.layout.textview, null);
textView.setText(datas.get(i));
textView.measure(0, 0);
// 若是一整行都放不下这个文本框,添加旧的那行,新起一行添加这个文本框
if (maxWidth < textView.getMeasuredWidth()) {
ll_parent.addView(rowLL);
rowLL = new LinearLayout(this);
rowLL.setLayoutParams(rowLP);
rowLL.addView(textView);
isNewLayout = true;
continue;
}
// 若是剩下的宽度小于文本框的宽度(放不下了)
// 添加旧的那行,新起一行,但是i要-1,因为当前的文本框还未添加
if (elseWidth < textView.getMeasuredWidth()) {
isNewLayout = true;
i--;
// 重置剩余宽度
elseWidth = maxWidth;
continue;
} else {
// 剩余宽度减去文本框的宽度+间隔=新的剩余宽度
elseWidth -= textView.getMeasuredWidth() + dipToPx(8);
if (rowLL.getChildCount() == 0) {
rowLL.addView(textView);
} else {
textView.setLayoutParams(textViewLP);
rowLL.addView(textView);
}
}
}
// 添加最后一行,但要防止重复添加
ll_parent.removeView(rowLL);
ll_parent.addView(rowLL);
}
// dp转px
private float dipToPx(int dipValue) {
return TypedValue.applyDimension(TypedValue.COMPLEX_UNIT_DIP,
dipValue,
this.getResources().getDisplayMetrics());
}
// 获得评论宽度
private float getScreenWidth() {
return this.getResources().getDisplayMetrics().widthPixels;
}
}
其中主要代码在initAutoLL函数内部,运行后便可看到文章开头处的效果图
基本思路
最外层一层竖直线性布局(我们称为父布局)新建水平线性布局(我们称为行布局)
计算待放入的view的宽度和行布局的剩下宽度
判断是否可以放入
(1). 若view的宽度小于等于剩余宽度,放入,到第三步;
(2). 若view的宽度大于剩余宽度,添加行布局到父布局,到第二步。
注意
这里要注意几点:1. 子view的宽度要加上间隔;
2. 若是子view的宽度大于行布局的宽度,不考虑对子view进入换行,直接放入;
接下来看代码,注释已经很详细,就不累赘了。
1. activity的布局
<?xml version="1.0" encoding="utf-8"?>
<FrameLayout
xmlns:android="http://schemas.android.com/apk/res/android"
android:layout_width="match_parent"
android:layout_height="match_parent"
android:background="#eee"
>
<LinearLayout
android:id="@+id/ll_parent"
android:layout_width="match_parent"
android:layout_height="wrap_content"
android:orientation="vertical"
android:layout_marginLeft="10dp"
android:layout_marginRight="10dp"
/>
</FrameLayout>
2. 子view
<?xml version="1.0" encoding="utf-8"?>
<TextView xmlns:android="http://schemas.android.com/apk/res/android"
android:layout_width="match_parent"
android:layout_height="match_parent"
android:textSize="16sp"
android:textColor="@android:color/white"
android:gravity="center"
android:paddingTop="5dp"
android:paddingBottom="5dp"
android:paddingLeft="8dp"
android:paddingRight="8dp"
android:background="@drawable/tv_bg"
/>
3. 子view的背景
<?xml version="1.0" encoding="utf-8"?>
<shape xmlns:android="http://schemas.android.com/apk/res/android">
<corners android:radius="5dp"/>
<solid android:color="#227652"/>
</shape>
4. activity代码
public class MainActivity extends AppCompatActivity {
@Override
protected void onCreate(Bundle savedInstanceState) {
super.onCreate(savedInstanceState);
setContentView(R.layout.activity_main);
initData();
ll_parent = (LinearLayout) findViewById(R.id.ll_parent);
initAutoLL();
}
// 数据
ArrayList<String> datas = new ArrayList<>();
// 初始化数据
private void initData() {
datas.add("作 家");
datas.add("段 子 手");
datas.add("软 文 作 者");
datas.add("摄 影 爱 好 者");
datas.add("画 家");
datas.add("哦 我还很喜欢音乐");
datas.add("还 有 其 他 七 七 八 八 的 我 就 不 说 了");
datas.add("老 师");
}
// 最外层的竖直线性布局
private LinearLayout ll_parent;
// 绘制自动换行的线性布局
private void initAutoLL() {
// 每一行的布局,初始化第一行布局
LinearLayout rowLL = new LinearLayout(this);
LinearLayout.LayoutParams rowLP =
new LinearLayout.LayoutParams(ViewGroup.LayoutParams.MATCH_PARENT,
ViewGroup.LayoutParams.WRAP_CONTENT);
float rowMargin = dipToPx(10);
rowLP.setMargins(0, (int) rowMargin, 0, 0);
rowLL.setLayoutParams(rowLP);
boolean isNewLayout = false;
float maxWidth = getScreenWidth() - dipToPx(30);
// 剩下的宽度
float elseWidth = maxWidth;
LinearLayout.LayoutParams textViewLP =
new LinearLayout.LayoutParams(ViewGroup.LayoutParams.WRAP_CONTENT,
ViewGroup.LayoutParams.WRAP_CONTENT);
textViewLP.setMargins((int) dipToPx(8), 0, 0, 0);
for (int i = 0; i < datas.size(); i++) {
// 若当前为新起的一行,先添加旧的那行
// 然后重新创建布局对象,设置参数,将isNewLayout判断重置为false
if (isNewLayout) {
ll_parent.addView(rowLL);
rowLL = new LinearLayout(this);
rowLL.setLayoutParams(rowLP);
isNewLayout = false;
}
// 计算是否需要换行
TextView textView = (TextView) getLayoutInflater().inflate(R.layout.textview, null);
textView.setText(datas.get(i));
textView.measure(0, 0);
// 若是一整行都放不下这个文本框,添加旧的那行,新起一行添加这个文本框
if (maxWidth < textView.getMeasuredWidth()) {
ll_parent.addView(rowLL);
rowLL = new LinearLayout(this);
rowLL.setLayoutParams(rowLP);
rowLL.addView(textView);
isNewLayout = true;
continue;
}
// 若是剩下的宽度小于文本框的宽度(放不下了)
// 添加旧的那行,新起一行,但是i要-1,因为当前的文本框还未添加
if (elseWidth < textView.getMeasuredWidth()) {
isNewLayout = true;
i--;
// 重置剩余宽度
elseWidth = maxWidth;
continue;
} else {
// 剩余宽度减去文本框的宽度+间隔=新的剩余宽度
elseWidth -= textView.getMeasuredWidth() + dipToPx(8);
if (rowLL.getChildCount() == 0) {
rowLL.addView(textView);
} else {
textView.setLayoutParams(textViewLP);
rowLL.addView(textView);
}
}
}
// 添加最后一行,但要防止重复添加
ll_parent.removeView(rowLL);
ll_parent.addView(rowLL);
}
// dp转px
private float dipToPx(int dipValue) {
return TypedValue.applyDimension(TypedValue.COMPLEX_UNIT_DIP,
dipValue,
this.getResources().getDisplayMetrics());
}
// 获得评论宽度
private float getScreenWidth() {
return this.getResources().getDisplayMetrics().widthPixels;
}
}
其中主要代码在initAutoLL函数内部,运行后便可看到文章开头处的效果图

相关文章推荐
- android 自动换行的线性布局
- android之自定义ViewGroup和自动换行的布局的实现
- android之自定义ViewGroup和自动换行的布局的实现
- Android自定义流式布局/自动换行布局
- android之自定义ViewGroup和自动换行的布局的实现
- android之自定义ViewGroup和自动换行的布局的实现
- 自定义自动换行的线性布局linearLayout
- android 自动换行的流式布局
- android之自定义ViewGroup和自动换行的布局的实现
- android 流布局(根据内容宽度自动换行的布局)
- android之自定义ViewGroup和自动换行的布局的实现
- android之自定义ViewGroup和自动换行的布局的实现
- Android 流式布局之自动换行
- android之自定义ViewGroup和自动换行的布局的实现
- android之自定义ViewGroup和自动换行的布局的实现
- android之自定义ViewGroup和自动换行的布局的实现
- android之自定义ViewGroup和自动换行的布局的实现
- android之自定义ViewGroup和自动换行的布局的实现
- Android自定义ViewGroup自动换行实现滑动任意布局及事件处理效果
- android app开发之仿qq个人标签,自动换行的布局