zabbix 安装(yum)
2017-09-12 17:40
281 查看
环境:
系统版本:CentOS Linux release 7.3.1611 (Core)_X86_64
软件版本:zabbix 3.4.1-1.el7
安装方式:
Source code:源码包,需要编译程序:编译好的程序包;
rpm:
epel repository
zabbix repository
ded
官方长期维护版本:
2.2;2.4;3.0(带LTS标志)
rpm安装
安装环境要求:Apache 1.3.12 or later
PHP 5.4.0 or later
具体看官方文档 :
https://www.zabbix.com/documentation/3.4/manual/installation/requirements
linux的基础优化必须要做,时间同步、防火墙配置、selinux配置等。
安装erel源:
# rpm -ivh http://mirrors.aliyun.com/epel/epel-release-latest-7.noarch.rpm
安装zabbix-3.4-1.el7的yum源:
# rpm -ivh http://repo.zabbix.com/zabbix/3.4/rhel/7/x86_64/zabbix-release-3.4-1.el7.centos.noarch.rpm # rpm -q zabbix-release
zabbix-release-3.4-1.el7.centos.noarch
# rpm -ql zabbix-release
/etc/pki/rpm-gpg/RPM-GPG-KEY-ZABBIX
/etc/pki/rpm-gpg/RPM-GPG-KEY-ZABBIX-A14FE591
/etc/yum.repos.d/zabbix.repo
/usr/share/doc/zabbix-release-3.4
/usr/share/doc/zabbix-release-3.4/GPL
# yum repolist
已加载插件:fastestmirror
Loading mirror speeds from cached hostfile
* base: mirrors.aliyun.com
* epel: mirrors.aliyun.com
* extras: mirrors.aliyun.com
* updates: mirrors.aliyun.com
源标识 源名称 状态
!base/7/x86_64 CentOS-7 - Base - mirrors.aliyun.com 9,363
!epel/x86_64 Extra Packages for Enterprise Linux 7 - x86_64 11,896
!extras/7/x86_64 CentOS-7 - Extras - mirrors.aliyun.com 451
!updates/7/x86_64 CentOS-7 - Updates - mirrors.aliyun.com 2,146
!zabbix/x86_64 Zabbix Official Repository - x86_64 28
!zabbix-non-supported/x86_64 Zabbix Official Repository non-supported - x86_64 4
repolist: 23,888
CentOS 6:安装zabbix2.* CentOS 6 安装zabbix3.* 需单独安装安装httpd和php>5.4; CentOS 7:安装zabbix3.*
安装zabbix DB:
参考:https://www.zabbix.com/documentation/3.4/manual/appendix/install/db_scripts# yum install mariadb-server # cp /usr/share/mysql/my-medium.cnf /etc/my.cnf # vim /etc/my.cnf # 然后在[mysqld]下增加如下后保存 [mysqld] character-set-server = utf8 collation-server = utf8_general_ci innodb_file_per_table = 1 # systemctl start mariadb.service # ss -tnl | grep 3306 LISTEN 0 50 *:3306 *:* # mysql -uroot -p # mysql> create database zabbix character set utf8 collate utf8_bin; # mysql> grant all privileges on zabbix.* to zabbix@localhost identified by '<password>'; # mysql> quit;参考:https://www.zabbix.com/documentation/3.4/manual/installation/install_from_packages/rhel_centos
安装服务端:
# yum install zabbix-server-mysql zabbix-get注:zabbix-server服务包含在zabbix-server-mysql包里;
安装web GUI:
# yum install zabbix-web zabbix-web-mysql
安装agent端:
# yum install zabbix-agent zabbix-sender
zabbbix server初始化:
2.x:三个sql脚本
# cd /usr/share/doc/zabbix-server-mysql-2.4.0/create
# mysql -uroot zabbix < schema.sql
# mysql -uroot zabbix < images.sql
# mysql -uroot zabbix < data.sql
3.x:一个sql脚本
# zcat /usr/share/doc/zabbix-server-mysql-3.0.*/create.sql.gz | mysql -uzabbix -p zabbix
或
# cd /usr/share/doc/zabbix-server-mysql-3.0.*/
# gzip -d create.sql.gz
# mysql [-h 127.0.0.1] -uzabbix -p zabbix < create.sql
启动zabbix-server进程
配置文件:/etc/zabbix/zabbix-server.conf
# cd /etc/zabbix/
# cp zabbix_server.conf{,.bak}
# vim /etc/zabbix/zabbix_server.conf
DBHost=localhost            # 81    数据库服务器地址
DBName=zabbix               # 101   数据库库名
DBUser=zabbix               # 115   mysql普通用户
DBPassword=<password>       # 125   mysql密码
# egrep '^DBHost|^DBName|^DBUser|^DBPassword' /etc/zabbix/zabbix_server.conf
指令有四类:
############ GENERAL PARAMETERS #################通用指令
############ ADVANCED PARAMETERS ################高级指令
####### LOADABLE MODULES #######加载模块
####### TLS-RELATED PARAMETERS #######和TLS有关的配置
通用参数:
ListenPort:默认端口:10051
SourceIP:当zabbix_server有多个IP时,不是对方授权的,需启用具体服务端IP;
LogType=file    # 日志类型,默认自我独立
LogFile=/var/log/zabbix/zabbix_server.log   # 日志路径
LogFileSize=0   #日志大小限制,建议改为1024;
PidFile=/var/run/zabbix/zabbix_server.pid   # 服务端pid文件路径
DBHost=localhost            # 91    数据库服务器地址
DBName=zabbix               # 101   数据库库名
DBUser=zabbix               # 115   mysql普通用户
DBPassword=<password>       # 125   mysql密码
DBSocket=/tmp/mysql.sock    # 当数据库和zabbix——server在同一台主机时,改为mysql的sock路径;
DBPort=3306                 # mysql的监听端口

CentOS 6:/etc/init.d/zabbix-server
# service zabbix-server start
# service zabbix-server status

CentOS 7:/usr/lib/systemd/system/zabbix-server.service
# systemctl start zabbix-server.service
# systemctl status zabbix-server.service
# systemctl enable zabbix-server.service        # 添加到开机自启动;

# ss -tnl |grep :10051
# iptables -vnL     #防火墙没有阻断10051端口;

注意:CentOS为7.0或7.1时,请把trousers包更新到0.3.11以后;否则一启动,就挂掉;
# rpm -q trousers
# rpm -q php-mysql
配置zabbix-web
配置PHP的时区指定:(二者配置一个即可,本文配置zabbix文件)
(1):php全局
php.ini
(2):zabbix应用程序
# vim /etc/httpd/conf.d/zabbix.conf
# php_value date.timezone Europe/Riga   # 改为
php_value date.timezone Asia/Shanghai
或
# sed -i 's@# php_value date.timezone Europe/Riga@php_value date.timezone Asia/Shanghai@g'    /etc/httpd/conf.d/zabbix.conf
# grep Shanghai /etc/httpd/conf.d/zabbix.conf
php_value date.timezone Asia/Shanghai
启动httpd
CentOS 6:
# service httpd start
CentOS 7:
# systemctl start httpd.service
# systemctl enable httpd.service # 添加到开机自启动;
# ss -tnl |grep :80
通过web界面安装zabbix
参考:https://www.zabbix.com/documentation/3.4/manual/installation/install#installing_frontend在浏览器中,打开Zabbix URL:http:// <server_ip_or_name> / zabbix您应该看到前端安装向导的第一个屏幕。
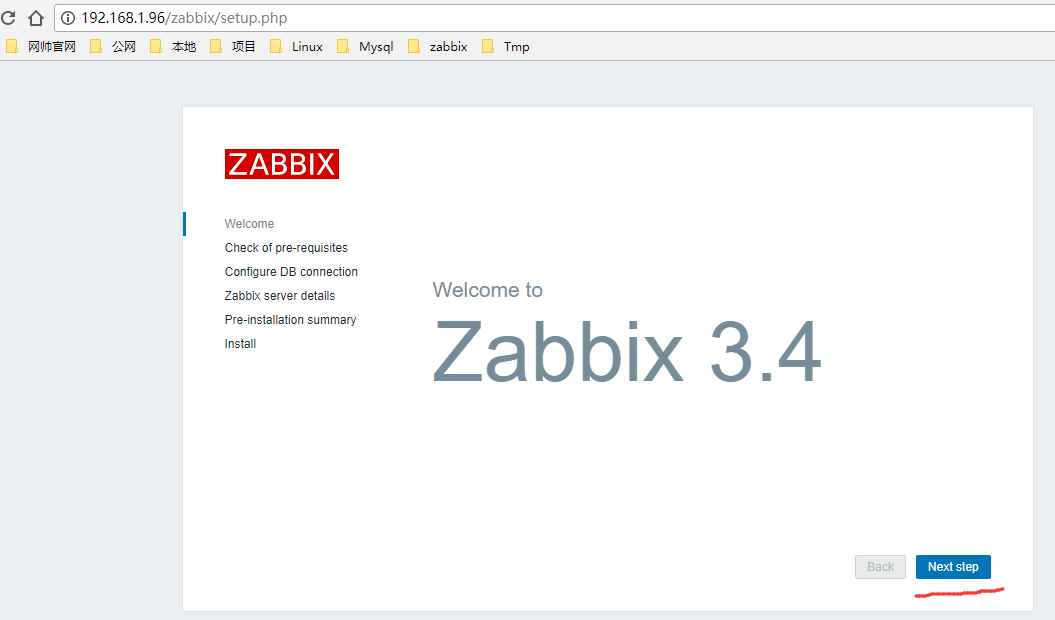
主页面
setup
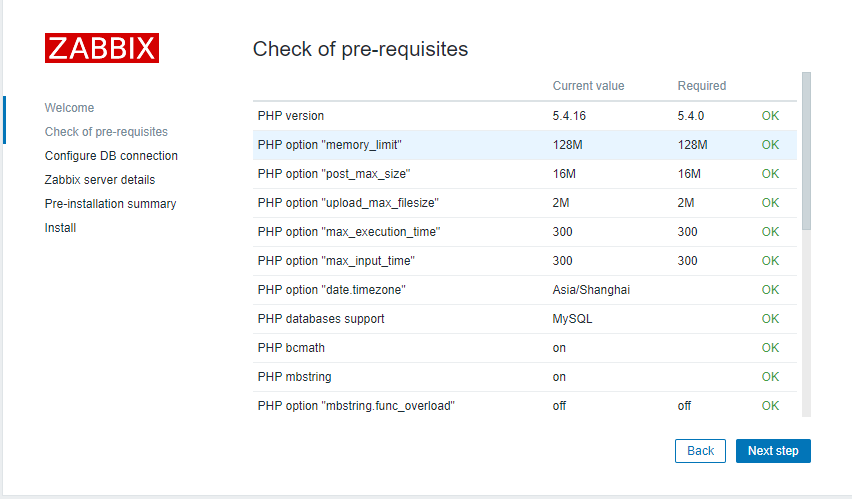
依赖关系检测;各项都为OK
Next step
| Pre-requisite | Minimum value | Description |
| PHP version | 5.4.0 | |
| PHP memory_limit option | 128MB | In php.ini: memory_limit = 128M |
| PHP post_max_size option | 16MB | In php.ini: post_max_size = 16M |
| PHP upload_max_filesize option | 2MB | In php.ini: upload_max_filesize = 2M |
| PHP max_execution_time option | 300 seconds (values 0 and -1 are allowed) | In php.ini: max_execution_time = 300 |
| PHP max_input_time option | 300 seconds (values 0 and -1 are allowed) | In php.ini: max_input_time = 300 |
| PHP session.auto_start option | must be disabled | In php.ini: session.auto_start = 0 |
| Database support | One of: MySQL, Oracle, PostgreSQL, IBM DB2 | One of the following modules must be installed: mysql, oci8, pgsql, ibm_db2 |
| bcmath | php-bcmath | |
| mbstring | php-mbstring | |
| PHP mbstring.func_overload option | must be disabled | In php.ini: mbstring.func_overload = 0 |
| PHP always_populate_raw_post_data option | must be disabled | Required only for PHP versions 5.6.0 or newer. In php.ini: always_populate_raw_post_data = -1 |
| sockets | php-net-socket. Required for user script support. | |
| gd | 2.0 or higher | php-gd. PHP GD extension must support PNG images (--with-png-dir), JPEG (--with-jpeg-dir) images and FreeType 2 (--with-freetype-dir). |
| libxml | 2.6.15 | php-xml or php5-dom |
| xmlwriter | php-xmlwriter | |
| xmlreader | php-xmlreader | |
| ctype | php-ctype | |
| session | php-session | |
| gettext | php-gettext Since Zabbix 2.2.1, the PHP gettext extension is not a mandatory requirement for installing Zabbix. If gettext is not installed, the frontend will work as usual, however, the translations will not be available. |
取消(下一步)
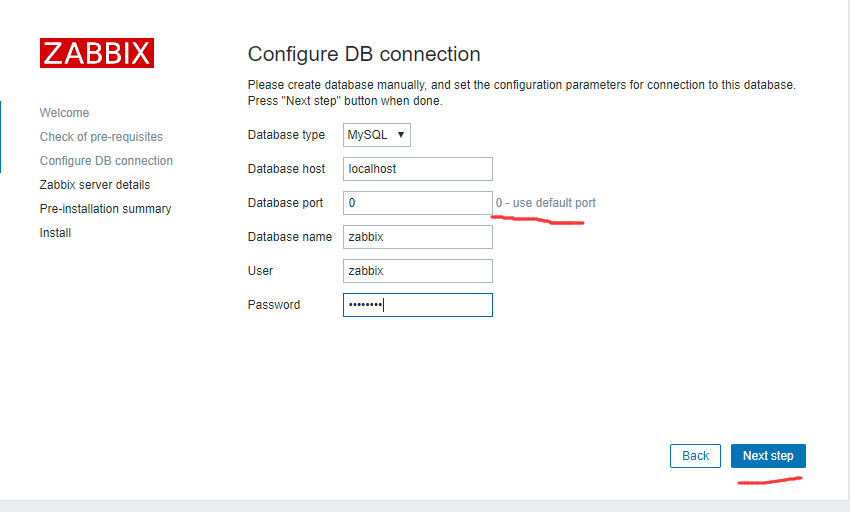
输入连接到数据库的详细信息。必须已经创建了Zabbix数据库。 连接数据库配置
数据库类型
host :127.0.0.1
port # 0表示默认
DB name: zabbix
user :zabbix
password :密码

输入Zabbix服务器详细信息。 连接测试:
host: # 主机地址
Port:10051
Name
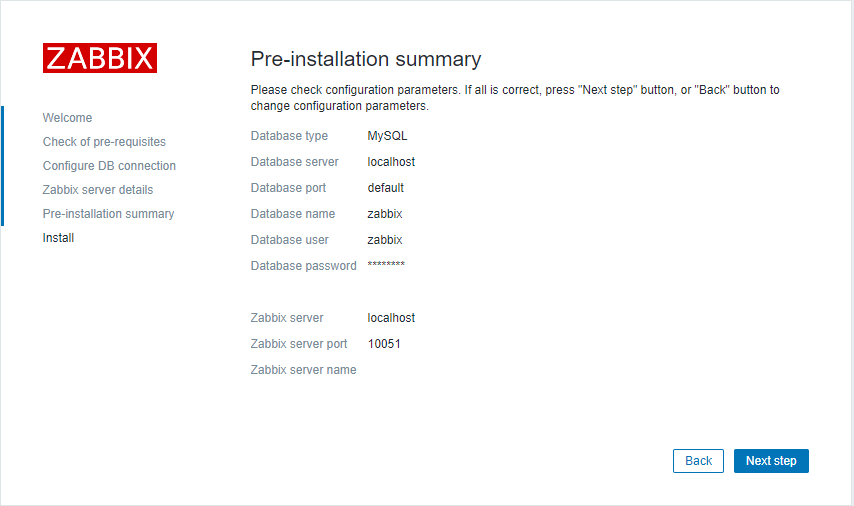
下载配置文件,并将其放在您将Zabbix PHP文件复制到的Web服务器HTML文档子目录中的conf /下。
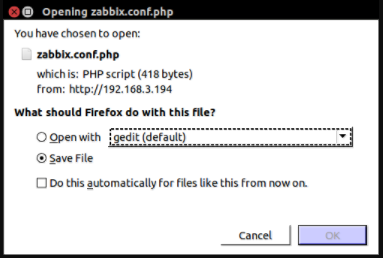
提供Web服务器用户对conf /目录具有写入权限,配置文件将被自动保存,并且可以立即进入下一步。 配置列表简要
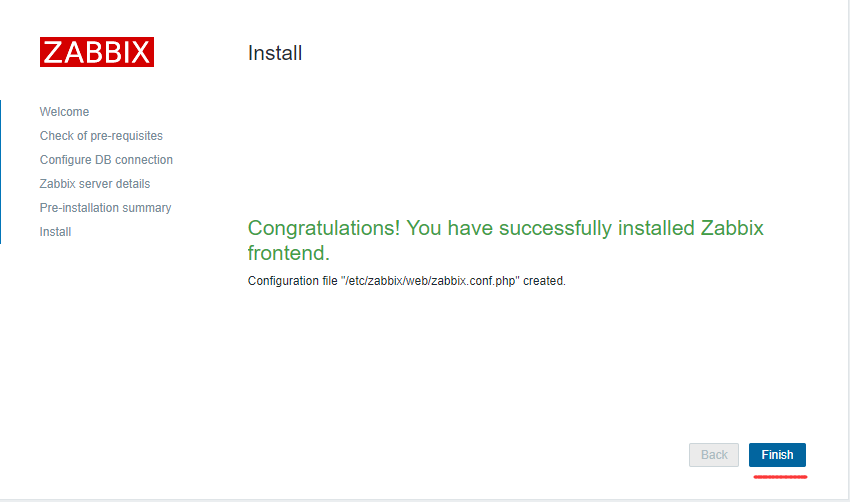
install
安装后生成的配置文件:/etc/zabbix/web/zabbix.conf.php
选择:Finish
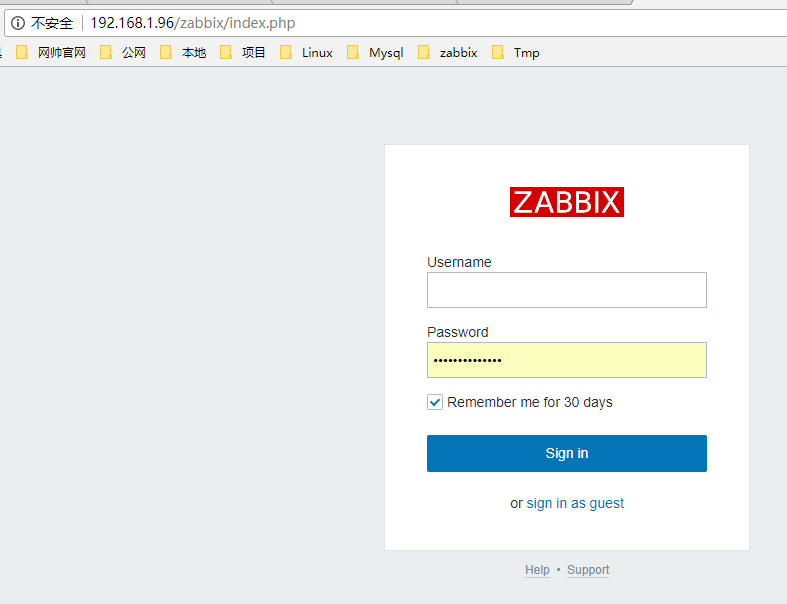
登录:
username:Admin
password:zabbix 配置监控请看官方文档:https://www.zabbix.com/documentation/3.4/manual/quickstart/login
zabbix客户端:
# yum install zabbix-agent zabbix-sender

配置文件:/etc/zabbix/zabbix_agentd.conf(3个*号开头的必须配置)
#### Passive checks related (被动检测相关的配置:agent等待server过来请求数据)
*Server=127.0.0.1
# 定义了服务端或代理端的IP地址,多个用逗号隔开授权给哪些zabbix-server或zabbix-proxy过来采集数据的服务器地址列表;
ListenPort=10050
ListenIP=0.0.0.0    # 本机的所有地址;
StartAgents=3       # agent进程数量;

#### Active checks related(主动检测相关的配置:agent主动向server发送监控数据)
*ServerActive=IP[:Port]
# 定义了服务端或代理端的IP地址,多个用逗号隔开,当前agent主动发送监控数据到server端;
*Hostname=HOSTNAME  # zabbix web界面:配置-主机-对应主机配置中的一定要与这个名字一致。名称可以随便起。
启动服务:
# systemctl start zabbix-agent.service
# systemctl status zabbix-agent.service
# systemctl enable zabbix-agent.service        # 开机自启动
# ss -tnl | grep :10050
# iptables -vnL     #防火墙没有阻断10050端口;

相关文章推荐
- zabbix服务器yum安装
- CentOS 7 yum安装Zabbix
- CentOS 7 yum安装Zabbix
- Centos7下使用Yum安装Zabbix2.4
- yum 安装LNMP+zabbix (一)
- Centos7.3安装Zabbix3.2(Yum详细步骤)
- Linux运维-zabbix_agent最新版的yum安装
- yum安装zabbix
- 使用yum快速安装zabbix
- CentOS 7 yum安装Zabbix
- Linux 主机 yum安装zabbix-agent客户端
- Zabbix之CentOS7.3下yum安装Zabbix3.5
- zabbix 安装-yum
- yum安装zabbix监控
- 使用yum方式安装 zabbix3.0
- CentOS 7 yum安装Zabbix
- yum 安装zabbix报错
- centos6.5 yum 安装zabbix
- CentOS 7 yum安装Zabbix
- linux下yum安装配置zabbix监控