arduino+oled测试实验
2017-09-06 22:37
951 查看
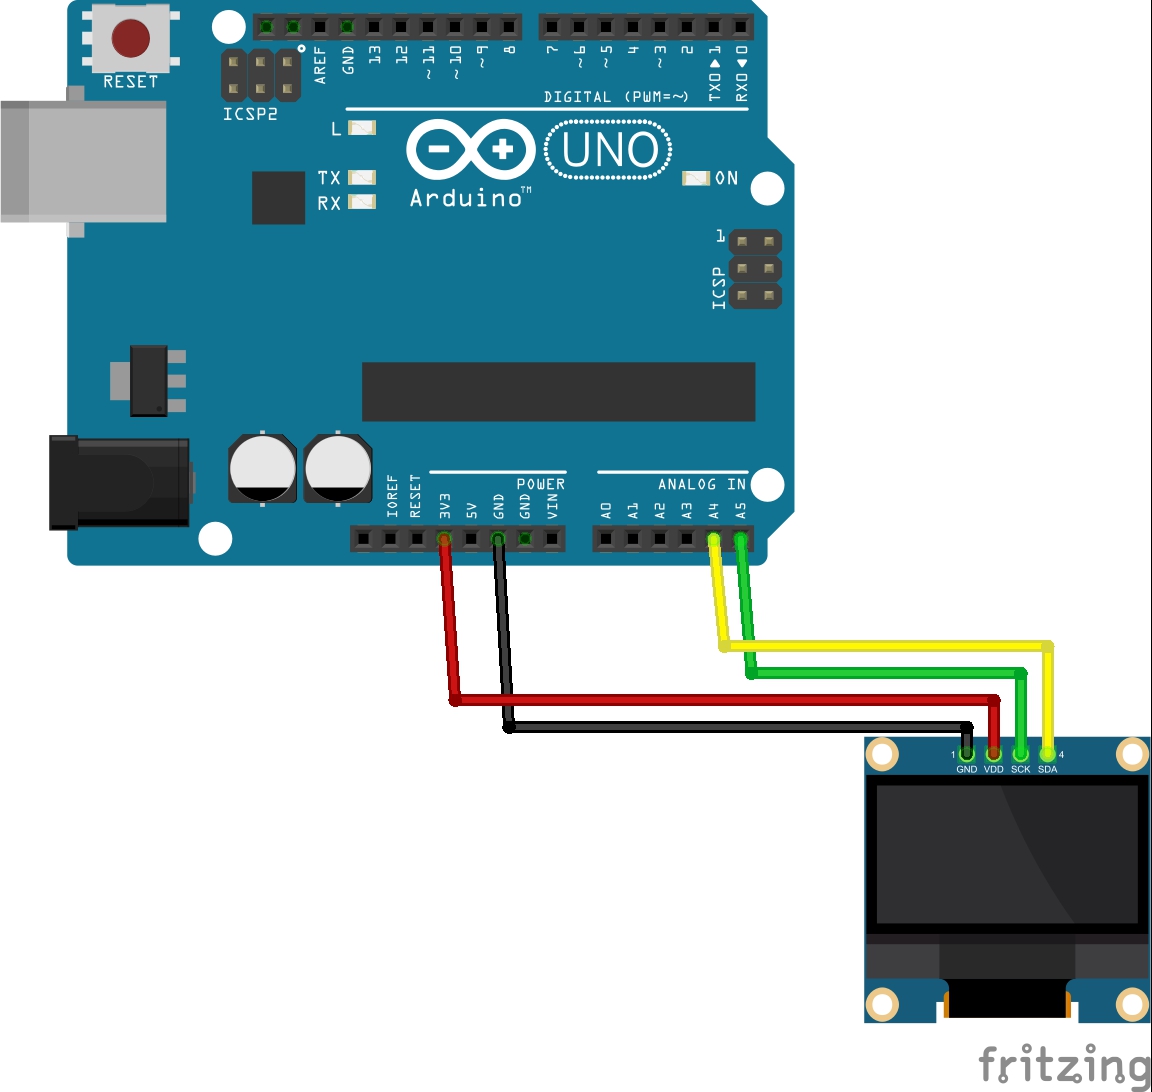
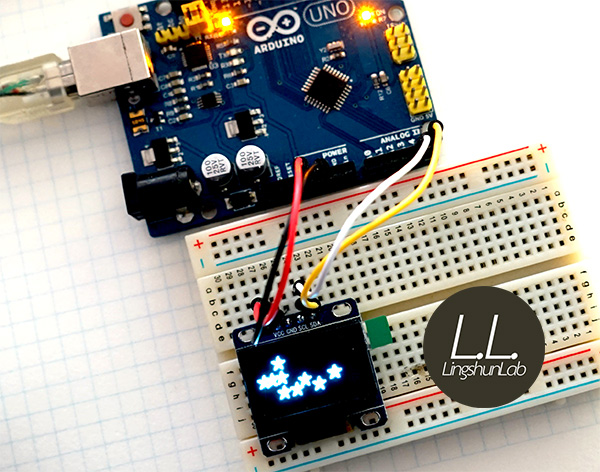
一、连线
针脚说明
VCC 接3.3v电源GND 接地(GND)
SCL 时钟线
SDA 数据线
接线图
二、下载测试代码
在上代码之前,先下载两个库分别是
Adafruit SSD1306 Library:
http://download.csdn.net/download/qq_24397253/9969004
Adafruit GFX Library:
http://download.csdn.net/download/qq_24397253/9967474
下载后把解压的文件放在 Arduino 安装目录里的 "libraries"
例如:C:\Program Files (x86)\Arduino\libraries
调出示例程序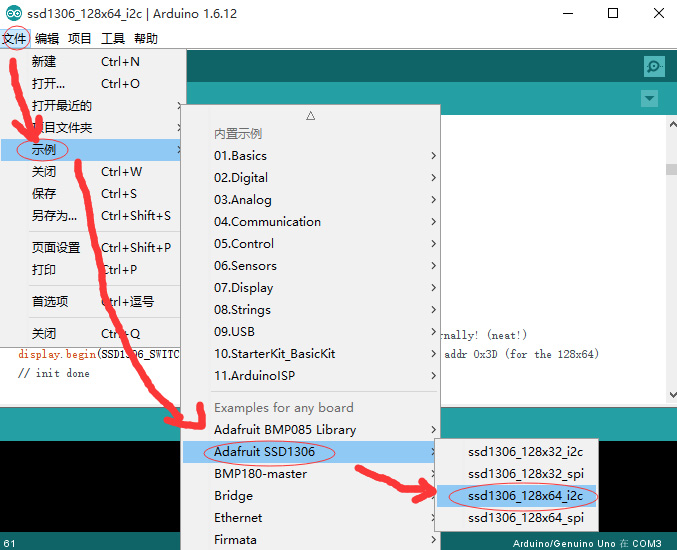
或者复制以下代码,都是一样的:
[objc] view
plain copy
/*********************************************************************
This is an example for our Monochrome OLEDs based on SSD1306 drivers
Pick one up today in the adafruit shop!
------> http://www.adafruit.com/category/63_98
This example is for a 128x64 size display using I2C to communicate
3 pins are required to interface (2 I2C and one reset)
Adafruit invests time and resources providing this open source code,
please support Adafruit and open-source hardware by purchasing
products from Adafruit!
Written by Limor Fried/Ladyada for Adafruit Industries.
BSD license, check license.txt for more information
All text above, and the splash screen must be included in any redistribution
*********************************************************************/
#include <SPI.h>
#include <Wire.h>
#include <Adafruit_GFX.h>
#include <Adafruit_SSD1306.h>
#define OLED_RESET 4
Adafruit_SSD1306 display(OLED_RESET);
#define NUMFLAKES 10
#define XPOS 0
#define YPOS 1
#define DELTAY 2
#define LOGO16_GLCD_HEIGHT 16
#define LOGO16_GLCD_WIDTH 16
static const unsigned char PROGMEM logo16_glcd_bmp[] =
{ B00000000, B11000000,
B00000001, B11000000,
B00000001, B11000000,
B00000011, B11100000,
B11110011, B11100000,
B11111110, B11111000,
B01111110, B11111111,
B00110011, B10011111,
B00011111, B11111100,
B00001101, B01110000,
B00011011, B10100000,
B00111111, B11100000,
B00111111, B11110000,
B01111100, B11110000,
B01110000, B01110000,
B00000000, B00110000 };
#if (SSD1306_LCDHEIGHT != 64)
#error("Height incorrect, please fix Adafruit_SSD1306.h!");
#endif
void setup() {
Serial.begin(9600);
// by default, we'll generate the high voltage from the 3.3v line internally! (neat!)
display.begin(SSD1306_SWITCHCAPVCC, 0x3D); // initialize with the I2C addr 0x3D (for the 128x64)
// init done
// Show image buffer on the display hardware.
// Since the buffer is intialized with an Adafruit splashscreen
// internally, this will display the splashscreen.
display.display();
delay(2000);
// Clear the buffer.
display.clearDisplay();
// draw a single pixel
display.drawPixel(10, 10, WHITE);
// Show the display buffer on the hardware.
// NOTE: You _must_ call display after making any drawing commands
// to make them visible on the display hardware!
display.display();
delay(2000);
display.clearDisplay();
// draw many lines
testdrawline();
display.display();
delay(2000);
display.clearDisplay();
// draw rectangles
testdrawrect();
display.display();
delay(2000);
display.clearDisplay();
// draw multiple rectangles
testfillrect();
display.display();
delay(2000);
display.clearDisplay();
// draw mulitple circles
testdrawcircle();
display.display();
delay(2000);
display.clearDisplay();
// draw a white circle, 10 pixel radius
display.fillCircle(display.width()/2, display.height()/2, 10, WHITE);
display.display();
delay(2000);
display.clearDisplay();
testdrawroundrect();
delay(2000);
display.clearDisplay();
testfillroundrect();
delay(2000);
display.clearDisplay();
testdrawtriangle();
delay(2000);
display.clearDisplay();
testfilltriangle();
delay(2000);
display.clearDisplay();
// draw the first ~12 characters in the font
testdrawchar();
display.display();
delay(2000);
display.clearDisplay();
// draw scrolling text
testscrolltext();
delay(2000);
display.clearDisplay();
// text display tests
display.setTextSize(1);
display.setTextColor(WHITE);
display.setCursor(0,0);
display.println("Hello, world!");
display.setTextColor(BLACK, WHITE); // 'inverted' text
display.println(3.141592);
display.setTextSize(2);
display.setTextColor(WHITE);
display.print("0x"); display.println(0xDEADBEEF, HEX);
display.display();
delay(2000);
display.clearDisplay();
// miniature bitmap display
display.drawBitmap(30, 16, logo16_glcd_bmp, 16, 16, 1);
display.display();
delay(1);
// invert the display
display.invertDisplay(true);
delay(1000);
display.invertDisplay(false);
delay(1000);
display.clearDisplay();
// draw a bitmap icon and 'animate' movement
testdrawbitmap(logo16_glcd_bmp, LOGO16_GLCD_HEIGHT, LOGO16_GLCD_WIDTH);
}
void loop() {
}
void testdrawbitmap(const uint8_t *bitmap, uint8_t w, uint8_t h) {
uint8_t icons[NUMFLAKES][3];
// initialize
for (uint8_t f=0; f< NUMFLAKES; f++) {
icons[f][XPOS] = random(display.width());
icons[f][YPOS] = 0;
icons[f][DELTAY] = random(5) + 1;
Serial.print("x: ");
Serial.print(icons[f][XPOS], DEC);
Serial.print(" y: ");
Serial.print(icons[f][YPOS], DEC);
Serial.print(" dy: ");
Serial.println(icons[f][DELTAY], DEC);
}
while (1) {
// draw each icon
for (uint8_t f=0; f< NUMFLAKES; f++) {
display.drawBitmap(icons[f][XPOS], icons[f][YPOS], bitmap, w, h, WHITE);
}
display.display();
delay(200);
// then erase it + move it
for (uint8_t f=0; f< NUMFLAKES; f++) {
display.drawBitmap(icons[f][XPOS], icons[f][YPOS], bitmap, w, h, BLACK);
// move it
icons[f][YPOS] += icons[f][DELTAY];
// if its gone, reinit
if (icons[f][YPOS] > display.height()) {
icons[f][XPOS] = random(display.width());
icons[f][YPOS] = 0;
icons[f][DELTAY] = random(5) + 1;
}
}
}
}
void testdrawchar(void) {
display.setTextSize(1);
display.setTextColor(WHITE);
display.setCursor(0,0);
for (uint8_t i=0; i < 168; i++) {
if (i == '\n') continue;
display.write(i);
if ((i > 0) && (i % 21 == 0))
display.println();
}
display.display();
delay(1);
}
void testdrawcircle(void) {
for (int16_t i=0; i<display.height(); i+=2) {
display.drawCircle(display.width()/2, display.height()/2, i, WHITE);
display.display();
delay(1);
}
}
void testfillrect(void) {
uint8_t color = 1;
for (int16_t i=0; i<display.height()/2; i+=3) {
// alternate colors
display.fillRect(i, i, display.width()-i*2, display.height()-i*2, color%2);
display.display();
delay(1);
color++;
}
}
void testdrawtriangle(void) {
for (int16_t i=0; i<min(display.width(),display.height())/2; i+=5) {
display.drawTriangle(display.width()/2, display.height()/2-i,
display.width()/2-i, display.height()/2+i,
display.width()/2+i, display.height()/2+i, WHITE);
display.display();
delay(1);
}
}
void testfilltriangle(void) {
uint8_t color = WHITE;
for (int16_t i=min(display.width(),display.height())/2; i>0; i-=5) {
display.fillTriangle(display.width()/2, display.height()/2-i,
display.width()/2-i, display.height()/2+i,
display.width()/2+i, display.height()/2+i, WHITE);
if (color == WHITE) color = BLACK;
else color = WHITE;
display.display();
delay(1);
}
}
void testdrawroundrect(void) {
for (int16_t i=0; i<display.height()/2-2; i+=2) {
display.drawRoundRect(i, i, display.width()-2*i, display.height()-2*i, display.height()/4, WHITE);
display.display();
delay(1);
}
}
void testfillroundrect(void) {
uint8_t color = WHITE;
for (int16_t i=0; i<display.height()/2-2; i+=2) {
display.fillRoundRect(i, i, display.width()-2*i, display.height()-2*i, display.height()/4, color);
if (color == WHITE) color = BLACK;
else color = WHITE;
display.display();
delay(1);
}
}
void testdrawrect(void) {
for (int16_t i=0; i<display.height()/2; i+=2) {
display.drawRect(i, i, display.width()-2*i, display.height()-2*i, WHITE);
display.display();
delay(1);
}
}
void testdrawline() {
for (int16_t i=0; i<display.width(); i+=4) {
display.drawLine(0, 0, i, display.height()-1, WHITE);
display.display();
delay(1);
}
for (int16_t i=0; i<display.height(); i+=4) {
display.drawLine(0, 0, display.width()-1, i, WHITE);
display.display();
delay(1);
}
delay(250);
display.clearDisplay();
for (int16_t i=0; i<display.width(); i+=4) {
display.drawLine(0, display.height()-1, i, 0, WHITE);
display.display();
delay(1);
}
for (int16_t i=display.height()-1; i>=0; i-=4) {
display.drawLine(0, display.height()-1, display.width()-1, i, WHITE);
display.display();
delay(1);
}
delay(250);
display.clearDisplay();
for (int16_t i=display.width()-1; i>=0; i-=4) {
display.drawLine(display.width()-1, display.height()-1, i, 0, WHITE);
display.display();
delay(1);
}
for (int16_t i=display.height()-1; i>=0; i-=4) {
display.drawLine(display.width()-1, display.height()-1, 0, i, WHITE);
display.display();
delay(1);
}
delay(250);
display.clearDisplay();
for (int16_t i=0; i<display.height(); i+=4) {
display.drawLine(display.width()-1, 0, 0, i, WHITE);
display.display();
delay(1);
}
for (int16_t i=0; i<display.width(); i+=4) {
display.drawLine(display.width()-1, 0, i, display.height()-1, WHITE);
display.display();
delay(1);
}
delay(250);
}
void testscrolltext(void) {
display.setTextSize(2);
display.setTextColor(WHITE);
display.setCursor(10,0);
display.clearDisplay();
display.println("scroll");
display.display();
delay(1);
display.startscrollright(0x00, 0x0F);
delay(2000);
display.stopscroll();
delay(1000);
display.startscrollleft(0x00, 0x0F);
delay(2000);
display.stopscroll();
delay(1000);
display.startscrolldiagright(0x00, 0x07);
delay(2000);
display.startscrolldiagleft(0x00, 0x07);
delay(2000);
display.stopscroll();
}
编译的过程,可能会遇到以下问题:
①提示错误
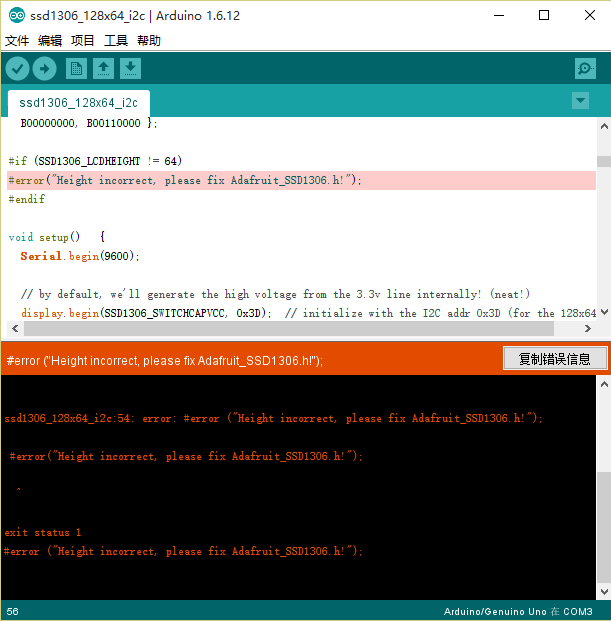
#error("Height incorrect, please fix Adafruit_SSD1306.h!");
错误信息意思是指:
高度不正确,请修正Adafruit_SSD1306.h!
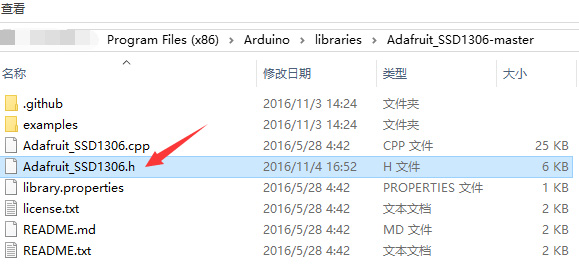
进入Arduino安装文件夹的libraries文件夹的Adfruit_SSD1306-master 找到Adafruit_SSD1306.h
打开此文件,找到第70行左右

默认是定义 SSD1306_128_32 ,由于我们使用的是128*64的OLED,所以,把原来的#define SSD1306_128_32,前面加上//
把#define SSD_128_64 前面的//去掉
最后就如上面图例一样
②模块的IIC 地址问题
模块的地址修改在这个位置,示例程序的61行
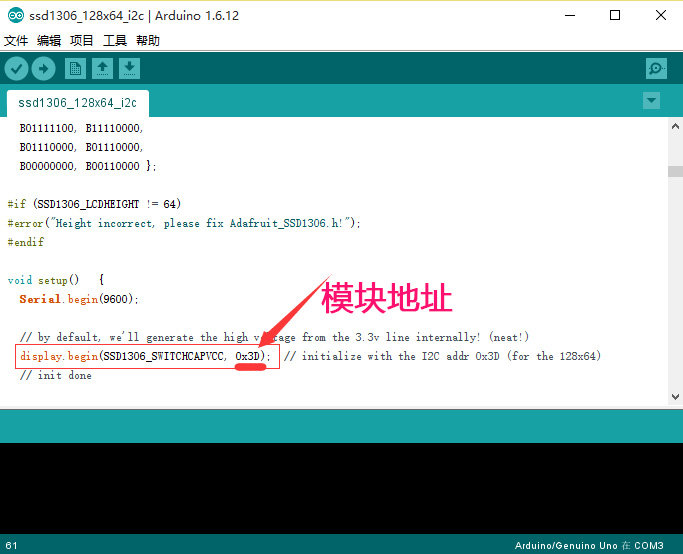
这个模块地址我用的是这个,但每个模块可能不一样,具体请咨询购买的商家,又或者可以参考下面链接的,IIC搜索地址程序。
寻找设备地址的代码 把模块按接线方法接好,上传这段代码后,打开端口监视器,就能找到在I2C上的设备地址
#include <Wire.h>

void setup(){
Wire.begin();
Serial.begin(9600);
Serial.println("\nI2C Scanner");
}
void loop(){
byte error, address;
int nDevices;
Serial.println("Scanning...");
nDevices = 0;
for (address = 1; address < 127; address++ ){
// The i2c_scanner uses the return value of
// the Write.endTransmisstion to see if
// a device did acknowledge to the address.
Wire.beginTransmission(address);
error = Wire.endTransmission();
if (error == 0){
Serial.print("I2C device found at address 0x");
if (address < 16)
Serial.print("0");
Serial.print(address, HEX);
Serial.println(" !");
nDevices++;
}else if (error == 4){
Serial.print("Unknow error at address 0x");
if (address < 16)
Serial.print("0");
Serial.println(address, HEX);
}
}
if (nDevices == 0)
Serial.println("No I2C devices found\n");
else
Serial.println("done\n");
delay(5000); // wait 5 seconds for next scan
}
三、实验效果

相关文章推荐
- 基于ROS_Arduino室内移动机器人SLAM实验测试
- S02_CH14_ EMIO_OLED 实验
- 速度球测试实验
- Arduino实例2-LED 闪烁实验
- Android ***测试学习手册(二)准备实验环境
- 好像木有白盒测试实验的报告,补一个~
- 灵感手环第一步——0.96寸OLED显示实验
- Arduino 单位数码管实验
- 软件测试第一次实验
- Arduino使用OLED显示内容
- 记一次云计算测试实验-openstack-icehouse-compute节点-安装neutron
- Mozilla实验引擎Servo通过Acid2测试
- 老鼠测试有毒药物实验——2进制的妙用
- 如何在Android开发中测试应用在真机上实验
- OpenRisc-35-基于orpsoc,eCos的sd card controller的测试实验
- 实验二-2 Eclipse&Hadoop 做英文词频统计进行集群测试
- 【测试实验】stm32 usart 前导符,空闲符号,断开符号
- 以案例和实验为主线的测试技术课程教学体系结构
- LCD1602的测试实验
- 测试 arduino pro mini 的 PWM