JavaWeb---制作验证码
2017-09-03 22:45
495 查看
JavaWeb---制作验证码
2016-07-18 22:05 469人阅读 评论(1) 收藏 举报分类:
【Java】(17)
目录(?)[+]
说起验证码,绝壁是个让人蛋疼的问题,特别是节假日在12306上面抢票的时候遇到的外星系验证码,大大降低了用户的体验度!
可是作为我辈中人,还是要知道验证码为毛存在,其作用是什么!
如果再想深究,那么坐下来,让我们好好探讨探讨如何制作验证码!请跟我来……
验证码形式
字母数字组合、加减法、中英文、算式加减法……为什么需要验证码
验证码降低了用户体验度,但是为什么存在呢???如果没有验证码:
1) 对特定用户不断登录破解密码
2) 对某个网站创建账户
3) 对某个网站提交垃圾数据
4) 都某个网站刷票
如果存在验证码:
只有人亲自识别验证码,输入验证码内容,才能登录、发评论等等,防止计算机破解自动登录发灌水帖等;通过验证码来区分人和计算机;
制作验证码
验证码包含两部分:输入框和显示验证码的图片;一般验证机制如下图:
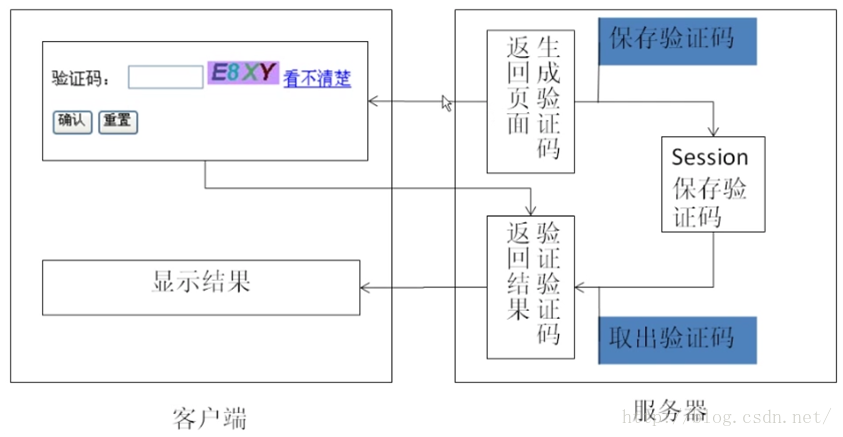
可是,显示验证码的图片是如何产生的呢?
通过Servlet手工制作验证码(简单型)
1) 手工生成的验证码比较简单,用到的类有2) BufferedImage图像数据缓冲区
3) Graphics绘制图片
4) Color获取颜色
5) Random生成随机数
6) ImageIO输出图片
ImageServlet类:
[java] view
plain copy
print?
package hdu.terence;
import java.awt.Color;
import java.awt.Graphics;
import java.awt.image.BufferedImage;
import java.io.IOException;
import java.io.PrintWriter;
import java.util.Random;
import javax.imageio.ImageIO;
import javax.servlet.ServletException;
import javax.servlet.http.HttpServlet;
importjavax.servlet.http.HttpServletRequest;
importjavax.servlet.http.HttpServletResponse;
public class ImageServlet extendsHttpServlet {
publicImageServlet() {
super();
}
publicvoid destroy() {
super.destroy();
}
publicvoid doGet(HttpServletRequest request, HttpServletResponse response)
throwsServletException, IOException {
BufferedImagebi=new BufferedImage(68,22,BufferedImage.TYPE_INT_RGB);
Graphicsg=bi.getGraphics();
Colorc=new Color(200,150,255);
g.setColor(c);
g.fillRect(0,0, 68, 22);
char[]ch="WQERTYUIOPASDFG127890HJKLZ3456XCVBNMmnbvcxzkjhgfdsaqwertyuiop".toCharArray();
Randomr=new Random();
intlen=ch.length,index;
StringBuffersb=new StringBuffer();//用于保存图片
for(inti=0;i<4;i++)
{
index=r.nextInt(len);
g.setColor(newColor(r.nextInt(88),r.nextInt(188),r.nextInt(255)));
g.drawString(ch[index]+"",(i*15)+3, 18);
sb.append(ch[index]);
}
request.getSession().setAttribute("verifyCode",sb.toString());
ImageIO.write(bi,"JPG", response.getOutputStream());
}
publicvoid doPost(HttpServletRequest request, HttpServletResponse response)
throwsServletException, IOException {
}
publicvoid init() throws ServletException {
}
}
LoginServlet类:
[java] view
plain copy
print?
package hdu.terence;
import java.io.IOException;
import java.io.PrintWriter;
import javax.servlet.ServletException;
import javax.servlet.http.HttpServlet;
importjavax.servlet.http.HttpServletRequest;
importjavax.servlet.http.HttpServletResponse;
public class LoginServlet extendsHttpServlet {
publicLoginServlet() {
super();
}
publicvoid destroy() {
}
publicvoid doGet(HttpServletRequest request, HttpServletResponse response)
throwsServletException, IOException {
response.setContentType("text/html;charset=gbk");
StringverifyCode=(String) request.getSession().getAttribute("verifyCode");
StringcheckCode=request.getParameter("checkCode");
verifyCode=verifyCode.toUpperCase();
checkCode=checkCode.toUpperCase();
PrintWriterout=response.getWriter();
if(checkCode.equals(verifyCode))
{
out.println("niece!验证码输入正确!");
}
else
{
out.println("你似不似撒?验证码都能输入错误!!!!!!");
}
out.flush();
out.close();
}
publicvoid doPost(HttpServletRequest request, HttpServletResponse response)
throwsServletException, IOException {
}
publicvoid init() throws ServletException { }
}
JSP:
[javascript] view
plain copy
print?
<head>
<script type="text/javascript">
function reloadVerifyCode()
{
var time =new Date().getTime();
document.getElementById("imageCode")
document.getElementById("imageCode").src="<%=request.getContextPath()%>/servlet/ImageServlet?d="+time;
//加time传递参数是为了区分请求连接,重新获取验证码;
}
</script>
</head>
<body>
<form action="<%=request.getContextPath() %>/servlet/LoginServlet" method="get">
验证码:<input type="text" name="checkCode"id="checkCode">
<img alt="验证码" id="imageCode"src="<%=request.getContextPath() %>/servlet/ImageServlet"/>
<a href="javascript:reloadVerifyCode();">看不清,重新获取</a><br>
<input type="submit"name="submit" value="确定">
<input type="reset"name="submit" value="重置">
</form>
</body>
结果:

通过Kaptcha开源组件制作验证码(花式验证码)
Kaptcha:这个工具是可配置的,可以生成各种花式的验证码,可通过配置参数增加机器识别难度。准备步骤:
1) 下载kaptcha-2.3.jar(点击下载kaptcha-2.3.jar)
2) 将jar包导入项目,添加到路径
3) 编写页面
4) 配置web.xml
5) 启动项目
数字、英文混合验证
Step1 JSP:[html] view
plain copy
print?
<table>
<tr>
<th>输入验证码:</th>
<th align="left" > <input name="checkCode"Id="checkCode" type="text"/></th>
</tr>
<tr>
<th> </th>
<th><img src="randomcode.jpg">看不清,重换一张 </th>
</tr>
<tr>
<th> </th>
<th align="left">
<input type="submit" value="确定"/>
<input type="reset" value="重置"/>
</th>
</tr>
</table>
src:连接到后台生成的randomcode.jpg;
Step2 在web.xml中添加映射配置:
[html] view
plain copy
print?
<servlet-mapping>
<servlet-name>kaptcha</servlet-name>
<url-pattern>/randomcode.jpg</url-pattern>
</servlet-mapping>
Step3 增加配置参数,防止机器识别图片;
可配置的参数如下:
-
[html] view
plain copy
print?
<span style="color:#000000;"><init-param>
<description>图片边框,合法值:yes , no</description>
<param-name>kaptcha.border</param-name>
<param-value>yes</param-value>
</init-param>
-<init-param>
<description>边框颜色,合法值: r,g,b (and optional alpha) 或者white,black,blue.</description>
<param-name>kaptcha.border.color</param-name>
<param-value>red</param-value>
</init-param>
-<init-param>
<description>边框厚度,合法值:>0</description>
<param-name>kaptcha.border.thickness</param-name>
<param-value>2</param-value>
</init-param>
-<init-param>
<description>图片宽 200</description>
<param-name>kaptcha.image.width</param-name>
<param-value>150</param-value>
</init-param>
-<init-param>
<description>图片高 50</description>
<param-name>kaptcha.image.height</param-name>
<param-value>50</param-value>
</init-param>
-<init-param>
<description>图片实现类</description>
<param-name>kaptcha.producer.impl</param-name>
<param-value>com.google.code.kaptcha.impl.DefaultKaptcha</param-value>
</init-param>
-<init-param>
<description>不用文本实现:com.google.code.kaptcha.impl.DifaultTextCreator用文本实现:则用自己重写的中文类(内含算法)ChineseTextCheck.ChineseTextCode</description>
<param-name>kaptcha.textproducer.impl</param-name>
<param-value>ChineseTextCheck.ChineseTextCode</param-value>
</init-param>
-<init-param>
<description>文本集合,验证码值从此集合中获取</description>
<param-name>kaptcha.textproducer.char.string</param-name>
<param-value>qwertys1zcmd2345s67g890</param-value>
- <!--
<param-value>abcde2345678gfynmnpwx</param-value>
-->
- <!--
<param-value>你好我好大家好</param-value>
-->
</init-param>
-<init-param>
<description>验证码长度 5</description>
<param-name>kaptcha.textproducer.char.length</param-name>
<param-value>5</param-value>
</init-param>
-<init-param>
<description>字体Arial, Courier</description>
<param-name>kaptcha.textproducer.font.names</param-name>
<param-value>Arial, Courier</param-value>
</init-param>
-<init-param>
<description>字体大小 40px.</description>
<param-name>kaptcha.textproducer.font.size</param-name>
<param-value>30</param-value>
</init-param>
-<init-param>
<description>字体颜色,合法值: r,g,b 或者 white,black,blue.</description>
<param-name>kaptcha.textproducer.font.color</param-name>
<param-value>black</param-value>
</init-param>
-<init-param>
<description>文字间隔 2</description>
<param-name>kaptcha.textproducer.char.space</param-name>
<param-value>2</param-value>
</init-param>
-<init-param>
<description>干扰实现类</description>
<param-name>kaptcha.noise.impl</param-name>
-<param-value>
- <!--
com.google.code.kaptcha.impl.NoNoise
-->
com.google.code.kaptcha.impl.DefaultNoise
</param-value>
</init-param>
-<init-param>
<description>干扰颜色,合法值: r,g,b 或者 white,black,blue.</description>
<param-name>kaptcha.noise.color</param-name>
<param-value>blue</param-value>
</init-param>
-<init-param>
<description>图片样式: 水纹com.google.code.kaptcha.impl.WaterRipple鱼眼com.google.code.kaptcha.impl.FishEyeGimpy阴影com.google.code.kaptcha.impl.ShadowGimpy</description>
<param-name>kaptcha.obscurificator.impl</param-name>
<param-value>com.google.code.kaptcha.impl.FishEyeGimpy</param-value>
</init-param>
-<init-param>
<description>背景实现类</description>
<param-name>kaptcha.background.impl</param-name>
<param-value>com.google.code.kaptcha.impl.DefaultBackground</param-value>
</init-param>
-<init-param>
<description>背景颜色渐变,开始颜色</description>
<param-name>kaptcha.background.clear.from</param-name>
<param-value>red</param-value>
</init-param>
-<init-param>
<description>背景颜色渐变,结束颜色</description>
<param-name>kaptcha.background.clear.to</param-name>
<param-value>white</param-value>
</init-param>
-<init-param>
<description>文字渲染器</description>
<param-name>kaptcha.word.impl</param-name>
<param-value>com.google.code.kaptcha.text.impl.DefaultWordRenderer</param-value>
</init-param>
-<init-param>
<description>session中存放验证码的key键</description>
<param-name>kaptcha.session.key</param-name>
<param-value>KAPTCHA_SESSION_KEY</param-value>
</init-param>
-<init-param>
<description>The date the kaptcha is generatedis put into the HttpSession. This is the key value for that item in thesession.</description>
<param-name>kaptcha.session.date</param-name>
<param-value>KAPTCHA_SESSION_DATE</param-value>
</init-param></span>
Step 4 结果
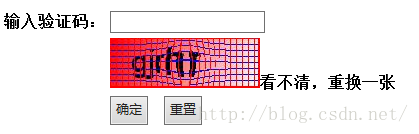
中文验证码
Step1 重写配置文件里面的TextProducer类[java] view
plain copy
print?
import java.util.Random;
import com.google.code.kaptcha.text.TextProducer;
importcom.google.code.kaptcha.util.Configurable;
public class ChineseTextCode extendsConfigurable implements TextProducer {
/*
* 中文验证码(non-Javadoc)
* 粘贴以下算法重写文本实现类
* @see com.google.code.kaptcha.text.TextProducer#getText()
*/
publicString getText() {
intlength = getConfig().getTextProducerCharLength();
StringfinalWord = "", firstWord = "";
inttempInt = 0;
String[]array = { "0", "1", "2", "3","4", "5", "6", "7", "8","9",
"a","b", "c", "d", "e", "f" };
Randomrand = new Random();
for(int i = 0; i < length; i++) {
switch(rand.nextInt(array.length)) {
case1:
tempInt= rand.nextInt(26) + 65;
firstWord= String.valueOf((char) tempInt);
break;
case2:
intr1,
r2,
r3,
r4;
StringstrH,
strL;//high&low
r1= rand.nextInt(3) + 11; // 前闭后开[11,14)
if(r1 == 13) {
r2= rand.nextInt(7);
}else {
r2= rand.nextInt(16);
}
r3= rand.nextInt(6) + 10;
if(r3 == 10) {
r4= rand.nextInt(15) + 1;
}else if (r3 == 15) {
r4= rand.nextInt(15);
}else {
r4= rand.nextInt(16);
}
strH= array[r1] + array[r2];
strL= array[r3] + array[r4];
byte[]bytes = new byte[2];
bytes[0]= (byte) (Integer.parseInt(strH, 16));
bytes[1]= (byte) (Integer.parseInt(strL, 16));
firstWord= new String(bytes);
break;
default:
tempInt= rand.nextInt(10) + 48;
firstWord= String.valueOf((char) tempInt);
break;
}
finalWord+= firstWord;
}
returnfinalWord;
}
publicString getText1() {
intlength = getConfig().getTextProducerCharLength();
//char[]charS = getConfig().getTextProducerCharString();
String[]s = new String[]{"我","是","阿","S","靖","卡","哥","滚","蛋","呸"};
Randomrand = new Random();
StringBuffersb = new StringBuffer();
for(inti = 0; i < length; i++){
intind =rand.nextInt(s.length);
sb.append(s[ind]);
}
returnsb.toString();
}
}
Step2 然后修改配置文件web.xml
[html] view
plain copy
print?
<init-param>
<description>文本实现类</description>
<param-name>kaptcha.textproducer.impl</param-name>
<param-value>
ChineseTextCheck.ChineseTextCode
</param-value>
</init-param>
Step 3 结果
算式验证码
以重写Servlet的方式实现算式验证码步骤:
1) 获取随机数值,结果相加
2) 将计算公式写到图片上
3) 将相加结果保存到session中
4) 依此为目标重写KapthaServlet类
Step1 重写KaptchaServlet
[java] view
plain copy
print?
package formula;
import com.google.code.kaptcha.Producer;
import com.google.code.kaptcha.util.Config;
import java.awt.image.BufferedImage;
import java.io.IOException;
import java.util.Enumeration;
import java.util.Properties;
import javax.imageio.ImageIO;
import javax.servlet.Servlet;
import javax.servlet.ServletConfig;
import javax.servlet.ServletException;
import javax.servlet.ServletOutputStream;
import javax.servlet.http.HttpServlet;
import javax.servlet.http.HttpServletRequest;
importjavax.servlet.http.HttpServletResponse;
import javax.servlet.http.HttpSession;
public class KaptchaServlet extendsHttpServlet implements Servlet {
privateProperties props;
privateProducer kaptchaProducer;
privateString sessionKeyValue;
publicKaptchaServlet() {
this.props= new Properties();
this.kaptchaProducer= null;
this.sessionKeyValue= null;
}
publicvoid init(ServletConfig conf) throws ServletException {
super.init(conf);
ImageIO.setUseCache(false);
EnumerationinitParams = conf.getInitParameterNames();
while(initParams.hasMoreElements()) {
Stringkey = (String) initParams.nextElement();
Stringvalue = conf.getInitParameter(key);
this.props.put(key,value);
}
Configconfig = new Config(this.props);
this.kaptchaProducer= config.getProducerImpl();
this.sessionKeyValue= config.getSessionKey();
}
publicvoid doGet(HttpServletRequest req, HttpServletResponse resp)
throwsServletException, IOException {
resp.setDateHeader("Expires",0L);
resp.setHeader("Cache-Control","no-store, no-cache, must-revalidate");
resp.addHeader("Cache-Control","post-check=0, pre-check=0");
resp.setHeader("Pragma","no-cache");
resp.setContentType("image/jpeg");
StringcapText = this.kaptchaProducer.createText();
Strings1 = capText.substring(0, 1);
Strings2 = capText.substring(1, 2);
intr = Integer.valueOf(s1).intValue() + Integer.valueOf(s2).intValue();
req.getSession().setAttribute(this.sessionKeyValue,String.valueOf(r));
BufferedImagebi = this.kaptchaProducer.createImage(s1+"+"+s2+"=?");
ServletOutputStreamout = resp.getOutputStream();
ImageIO.write(bi,"jpg", out);
try{
out.flush();
}finally {
out.close();
}
}
}
Step2 配置web.xml
[html] view
plain copy
print?
<servlet-name>kaptcha</servlet-name>
<description>文字、数字英文方式:com.google.code.kaptcha.servlet.KaptchaServlet
算式:使用自己重写的类:formula.KaptchaServlet
</description>
<servlet-class>formula.KaptchaServlet</servlet-class>
上述中formula.KaptchaServlet是指自己在formula包下重写的KaptchaServlet类。
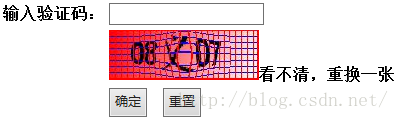
Step3 结果

References Demo
参考源码:verifyCode
相关文章推荐
- javaweb 验证码制作
- 【javaweb】使用java制作简单的验证码
- javaWeb之JAVA实现验证码的制作
- JavaWeb---制作验证码
- javaweb必会_网页验证码制作
- 【JavaWeb】(11)Java实现验证码制作
- Java Web应用产品安装程序制作方案
- java实现验证码制作
- 【JavaWeb】画验证码图片
- 比较简单的JavaWeb验证码
- JAVAWEB项目如何实现验证码 (转)
- JAVAWEB开发之HttpServletResponse和HttpServletRequest详解(下)(各种乱码、验证码、重定向和转发)
- java web登录界面中添加验证码
- Java Web开发之图形验证码的生成与使用方法
- JavaWeb开发之普通图片验证码生成技术与算术表达式验证码生成技术
- Javaweb中快速生成验证码Captcha
- javaWeb中图片验证码的生成
- Java制作图形验证码
- JAVAWEB项目如何实现验证码