Android------Binder 实例分析
2017-09-02 15:58
417 查看
提示: android版本7.1
binder的主要内容其实是在native层,java层其实只是一个壳,为什么我们在写aidl的时候会那么容易,主要原因是因为binder框架已经为我们封装好了,我们只要简单编写接口,然后调用就可以了,所以说具体的流程是在native层实现的,前面的文章虽然长长短短的写了不少java和native层的binder,但相信在大家的脑中并没有把这些东西串联起来,对于没有接触过的人来说,理解起来还是比较困难的,这里我想举2个例子来帮助大家打通任督二脉,相信对于修为的提升还是有不小帮助的。这2个例子其实是《深入理解android卷1》和《深入理解android卷3》中的,挺不错的,这里我把它们整理了一下,加上了自己的理解,内容如下:
内容梳理:
1.选取ActivityManagerService来分析java binder的工作过程
2.选取一个完全用c++编写的服务来分析binder的工作过程
1》我们先来分析ActivityManagerService的工作过程,这里分2部分来分析:
A。首先分析AMS如何将自己注册到ServiceManager
B。然后分析AMS如何响应客户端的binder请求
(A) AMS如何将自己注册到ServiceManager
我们知道SystemServer中会启动很多service,其中就包括了AMS,在它的startBootstrapServices中有下面的代码:
然后就用object = env->NewObject(gBinderProxyOffsets.mClass, gBinderProxyOffsets.mConstructor)来创建一个BinderProxy对象,val是传入的BpBinder(0)对象,
然后用 env->SetLongField(object, gBinderProxyOffsets.mObject, (jlong)val.get())将native层的BpBinder的指针保存到了BinderProxy对象的mObject字段中,这个操作是将BpBinder和BinderProxy关联起来的纽带。函数最后返回了这个BinderProxy
BinderInternal.getContextObject()的作用其实就是创建了一个java层的BinderProxy对象,并把它和native层的BpBinder关联了起来。
回到上面的流程,ServiceManagerNative.asInterface(BinderInternal.getContextObject()):
分下完了getIServiceManager,就要分析getIServiceManager().addService(name, service, allowIsolated)中的addService的过程了。
这里调用的是ServiceManagerProxy.addService:
这里的mRemote实际上是刚才上面分析的传入的BinderProxy,调用它的transact将封装好的数据发送出去,它的transact函数调用的是一个native方法:
IBinder* target = (IBinder*) env->GetLongField(obj, gBinderProxyOffsets.mObject)从java的BinderProxy中得到之前创建号的BpBinder对象
status_t err = target->transact(code, *data, reply, flags)通过native的BpBinder对象将请求发送给ServiceManager来处理addService的请求
status_t err = target->transact(code, *data, reply, flags)中的code就是java层传入的ADD_SERVICE_TRANSACTION,这个值是3,这里会调用BpBinder的transact方法:
这里的事物处理分为3部分:
数据错误检查;传输数据;等待响应
这里和驱动打交道的过程我就不想贴出来分析了,这里的过程走完后就又轮到我们的servicemanager登场了。
前面说过servicemanager这个守护进程会一直执行loop循环,它里面有个binder_parse函数,会回调svcmgr_handler这个方法:
(B) servicemanager如何响应客户端的请求
我们知道客户端transact,服务端会onTransact,
在之前的文章中我分析过JavaBBinder中的mObject保存的是android.os.Binder在native层的JNI对象,
当服务端收到客户端的请求后,BBinder会调用onTransact,而JavaBBinder重载了这个方法:
这里的mObject就是传入的ActivityManagerService,gBinderOffsets.mExecTransact就是指的它的execTransact方法,也就是Binder的execTransact方法:
2》选取natvite层的一个实例来分析binder
这里我们选取mediaserver来分析,毕竟前辈们都是拿它来分析binder的。
mediaserver的入口函数是Main_mediaserver.cpp的main函数:
我在《native层架构浅析》中已经说明了defaultServiceManager拿到的是一个包含了一个句柄值为0的BpBinder引用的BpServiceManager对象。用于和servicemanager通信。
下面这张图是gityuan的,改图很好的诠释了MediaPlayService的架构:
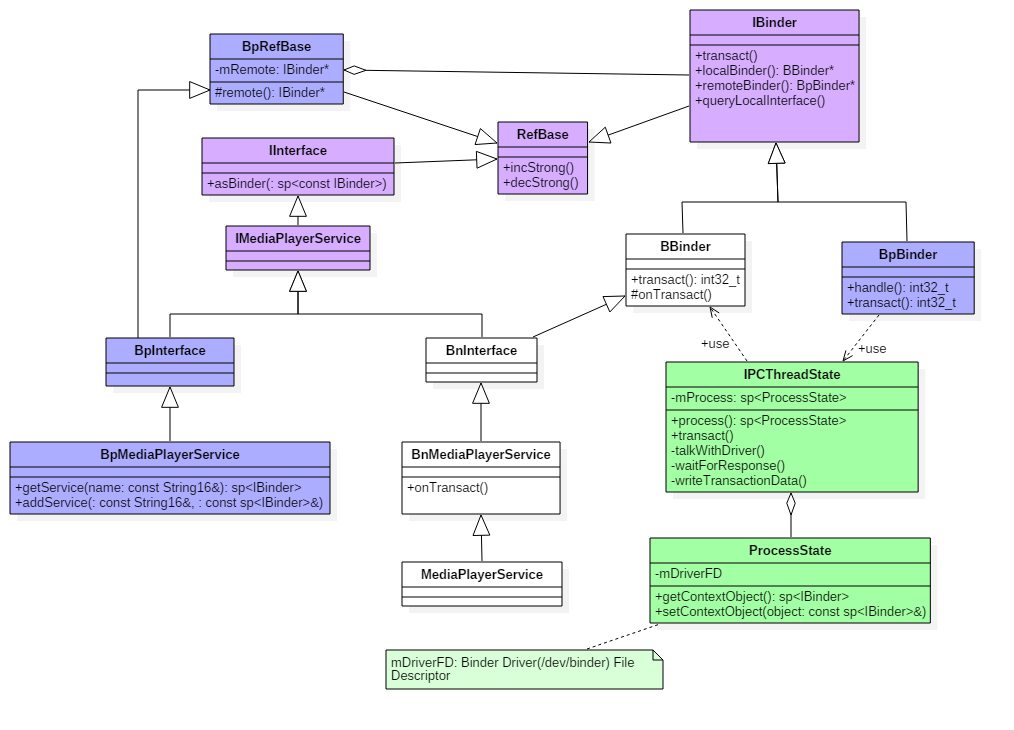
个人认为这个Bninterface就相当于java层自动生成的stub类
个人认为这个BnMediaPLayerService就相当于java层继承stub的类(比如说ActivityManagerService)
BpMediaPlayerService中包含的IBinder对象就相当于BinderProxy
当然这种理解并不一定对,只是为了好理解
sp<ProcessState> proc(ProcessState::self())用于创建一个该进程唯一的ProcesState对象:
下面就是 sp<IServiceManager> sm(defaultServiceManager()),它的得到的是一个句柄值为0的BpBinder引用的BpServiceManager对象,这里就不重复来说了。
接着看MediaPlayerService::instantiate():
看下BpInterface的构造方法:
而handler为0代表的就是servicemanager,所以这里是调用的servicemanager的客户端引用对象BpBinder(0)的transact方法。这里实际上是业务层把数据打包后交给了通信层去处理。
来看下BpBInder的transact函数:
然后看下他的构造函数:
接下来就要分析它的IPCThreadState的transact函数了,其实上面分析java层的时候也贴出这个代码:
这里先发数据,然后等待结果,这里面还有一个重要的函数,writeTransactionData,waitForResponse,talkWithDriver三个函数如果仔细吃透,相信你对这里的驱动通信就没问题了,过程就不仔细分析了。
下面来分析ProcessState的startThreadPool和IPCThreadState的joinThreadPool:
总结一下mediaserver的main函数:
首先拿到该进程的ProcessState对象,然后通过BpServiceManager的addService来添加服务,然后通过ProcessState的startThreadPool来开启新的线程通过joinThreadPool来读取binder设备,查看是否有请求,同时主线程也调用joinThreadPool来读取binder设备,查看请求,说明binder设备是支持多线程的,一定含有同步的工作。
上面的的MediaPlayerService::instantiate()是addService的过程,下面来说下客户端是如何拿到mediaplayerservice的获取过程
一般在代码中都是通过如下方法来获取的:
sp<IBinder> binder = defaultServiceManager()->getService(String16("media.player"));我们已经知道defaultServiceManager()拿到的是BpServiceManager(BpBinder(0)),这里直接来看它的getService方法:
virtual sp<IBinder> getService(const String16& name) const
{
unsigned n;
for (n = 0; n < 5; n++){
sp<IBinder> svc = checkService(name);
if (svc != NULL) return svc;
ALOGI("Waiting for service %s...\n", String8(name).string());
sleep(1);
}
return NULL;
}
这里会检索服务是否存在,并且不存在就休眠一秒,持续5次。来看checkService:
virtual sp<IBinder> checkService( const String16& name) const
{
Parcel data, reply;
//写入RPC头
data.writeInterfaceToken(IServiceManager::getInterfaceDescriptor());
//写入服务名
data.writeString16(name);
remote()->transact(CHECK_SERVICE_TRANSACTION, data, &reply);
return reply.readStrongBinder();
}
remote()也分析过了,是BpBinder(0),transact函数又会调用IPCThreadState来和binder驱动交互,这里我们直接看下他的返回值reply.readStrongBinder()
sp<IBinder> Parcel::readStrongBinder() const
{
sp<IBinder> val;
readStrongBinder(&val);
return val;
}继续看readStrongBinder(&val):
status_t Parcel::readStrongBinder(sp<IBinder>* val) const
{
return unflatten_binder(ProcessState::self(), *this, val);
}接着看unflatten_binder方法
参考文献:《深入解析Android5.0系统》;《Android开发艺术探索》;《深入理解Android卷1》;《深入理解Android卷3》;;红茶一杯话binder------点击打开链接;gityuan的binder系列------点击打开链接;罗升阳的binder系列------点击打开链接;Andriod
Binder机制------点击打开链接;Android深入浅出之binder机制------点击打开链接;理解Android的binder机制-----点击打开链接;轻松理解Androidbinder------点击打开链接;binder
service入门------点击打开链接
binder的主要内容其实是在native层,java层其实只是一个壳,为什么我们在写aidl的时候会那么容易,主要原因是因为binder框架已经为我们封装好了,我们只要简单编写接口,然后调用就可以了,所以说具体的流程是在native层实现的,前面的文章虽然长长短短的写了不少java和native层的binder,但相信在大家的脑中并没有把这些东西串联起来,对于没有接触过的人来说,理解起来还是比较困难的,这里我想举2个例子来帮助大家打通任督二脉,相信对于修为的提升还是有不小帮助的。这2个例子其实是《深入理解android卷1》和《深入理解android卷3》中的,挺不错的,这里我把它们整理了一下,加上了自己的理解,内容如下:
内容梳理:
1.选取ActivityManagerService来分析java binder的工作过程
2.选取一个完全用c++编写的服务来分析binder的工作过程
1》我们先来分析ActivityManagerService的工作过程,这里分2部分来分析:
A。首先分析AMS如何将自己注册到ServiceManager
B。然后分析AMS如何响应客户端的binder请求
(A) AMS如何将自己注册到ServiceManager
我们知道SystemServer中会启动很多service,其中就包括了AMS,在它的startBootstrapServices中有下面的代码:
mActivityManagerService.setSystemProcess();找到setSystemProcess方法,看到:
ServiceManager.addService(Context.ACTIVITY_SERVICE, this, true);这句代码将AMS加入到了servicemanager中,再熟悉不过了,我们一步步来分析,打开ServiceManager.java
public static void addService(String name, IBinder service) {
try {
getIServiceManager().addService(name, service, false);
} catch (RemoteException e) {
Log.e(TAG, "error in addService", e);
}
}
前面的文章我说过getIServiceManager返回的是就是ServiceManagerProxy(new BinderProxy()),这里我将说明原因,首先我们分析getIServiceManager函数,private static IServiceManager getIServiceManager() {
if (sServiceManager != null) {
return sServiceManager;
}
// Find the service manager
sServiceManager = ServiceManagerNative.asInterface(BinderInternal.getContextObject());
return sServiceManager;
}这里我们看到servicemanager是单例的,毕竟它是一个守护进程,且是所有service的管理者。如果sServiceManager是空的,那就调用ServiceManagerNative.asInterface(BinderInternal.getContextObject())来生成一个,这句代码分2部分来分析,先来看BinderInternal.getContextObject(),该方法是一个native方法,对应了android_util_binder.cpp中的android_os_BinderInternal_getContextObject:static jobject android_os_BinderInternal_getContextObject(JNIEnv* env, jobject clazz)
{
sp<IBinder> b = ProcessState::self()->getContextObject(NULL);
return javaObjectForIBinder(env, b);
}这个方法我们也分2步来看, ProcessState::self()会new一个ProcessStatesp<ProcessState> ProcessState::self()
{
Mutex::Autolock _l(gProcessMutex);
if (gProcess != NULL) {
return gProcess;
}
gProcess = new ProcessState;
return gProcess;
}然后调用ProcessState的getContextObject方法:sp<IBinder> ProcessState::getContextObject(const sp<IBinder>& /*caller*/)
{
return getStrongProxyForHandle(0);
}getStrongProxyForHandle会返回一个BpBinder(0),然后就是调用javaObjectForIBinder(env, BpBinder(0))了。该函数就在android_util_binder.cpp中:jobject javaObjectForIBinder(JNIEnv* env, const sp<IBinder>& val)
{
if (val == NULL) return NULL;
if (val->checkSubclass(&gBinderOffsets)) {
// One of our own!
jobject object = static_cast<JavaBBinder*>(val.get())->object();
LOGDEATH("objectForBinder %p: it's our own %p!\n", val.get(), object);
return object;
}
// For the rest of the function we will hold this lock, to serialize
// looking/creation/destruction of Java proxies for native Binder proxies.
AutoMutex _l(mProxyLock);
// Someone else's... do we know about it?
jobject object = (jobject)val->findObject(&gBinderProxyOffsets);
if (object != NULL) {
jobject res = jniGetReferent(env, object);
if (res != NULL) {
ALOGV("objectForBinder %p: found existing %p!\n", val.get(), res);
return res;
}
LOGDEATH("Proxy object %p of IBinder %p no longer in working set!!!", object, val.get());
android_atomic_dec(&gNumProxyRefs);
val->detachObject(&gBinderProxyOffsets);
env->DeleteGlobalRef(object);
}
object = env->NewObject(gBinderProxyOffsets.mClass, gBinderProxyOffsets.mConstructor);
if (object != NULL) {
LOGDEATH("objectForBinder %p: created new proxy %p !\n", val.get(), object);
// The proxy holds a reference to the native object.
env->SetLongField(object, gBinderProxyOffsets.mObject, (jlong)val.get());
val->incStrong((void*)javaObjectForIBinder);
// The native object needs to hold a weak reference back to the
// proxy, so we can retrieve the same proxy if it is still active.
jobject refObject = env->NewGlobalRef(
env->GetObjectField(object, gBinderProxyOffsets.mSelf));
val->attachObject(&gBinderProxyOffsets, refObject,
jnienv_to_javavm(env), proxy_cleanup);
// Also remember the death recipients registered on this proxy
sp<DeathRecipientList> drl = new DeathRecipientList;
drl->incStrong((void*)javaObjectForIBinder);
env->SetLongField(object, gBinderProxyOffsets.mOrgue, reinterpret_cast<jlong>(drl.get()));
// Note that a new object reference has been created.
android_atomic_inc(&gNumProxyRefs);
incRefsCreated(env);
}
return object;
}这里的参数val即传入的BpBinder(0),上面的代码用jobject object = (jobject)val->findObject(&gBinderProxyOffsets)来查找gBinderProxyOffsets是否已经保存到了ObjectManager中,如果有就删除这个旧的对象。然后就用object = env->NewObject(gBinderProxyOffsets.mClass, gBinderProxyOffsets.mConstructor)来创建一个BinderProxy对象,val是传入的BpBinder(0)对象,
然后用 env->SetLongField(object, gBinderProxyOffsets.mObject, (jlong)val.get())将native层的BpBinder的指针保存到了BinderProxy对象的mObject字段中,这个操作是将BpBinder和BinderProxy关联起来的纽带。函数最后返回了这个BinderProxy
BinderInternal.getContextObject()的作用其实就是创建了一个java层的BinderProxy对象,并把它和native层的BpBinder关联了起来。
回到上面的流程,ServiceManagerNative.asInterface(BinderInternal.getContextObject()):
static public IServiceManager asInterface(IBinder obj)
{
if (obj == null) {
return null;
}
IServiceManager in =
(IServiceManager)obj.queryLocalInterface(descriptor);
if (in != null) {
return in;
}
return new ServiceManagerProxy(obj);
}这里就得到了ServiceManagerProxy(BinderProxy);其实这里的asInterface和native层的IInterface.h中的interface_cast很相似,一样的作用。分下完了getIServiceManager,就要分析getIServiceManager().addService(name, service, allowIsolated)中的addService的过程了。
这里调用的是ServiceManagerProxy.addService:
public void addService(String name, IBinder service, boolean allowIsolated)
throws RemoteException {
Parcel data = Parcel.obtain();
Parcel reply = Parcel.obtain();
data.writeInterfaceToken(IServiceManager.descriptor);
data.writeString(name);
data.writeStrongBinder(service);
data.writeInt(allowIsolated ? 1 : 0);
mRemote.transact(ADD_SERVICE_TRANSACTION, data, reply, 0);
reply.recycle();
data.recycle();
}这里的mRemote实际上是刚才上面分析的传入的BinderProxy,调用它的transact将封装好的数据发送出去,它的transact函数调用的是一个native方法:
public boolean transact(int code, Parcel data, Parcel reply, int flags) throws RemoteException {
Binder.checkParcel(this, code, data, "Unreasonably large binder buffer");
if (Binder.isTracingEnabled()) { Binder.getTransactionTracker().addTrace(); }
return transactNative(code, data, reply, flags);
}对应的是android_util_Binder.cpp的android_os_BinderProxy_transact方法:static jboolean android_os_BinderProxy_transact(JNIEnv* env, jobject obj,
jint code, jobject dataObj, jobject replyObj, jint flags) // throws RemoteException
{
if (dataObj == NULL) {
jniThrowNullPointerException(env, NULL);
return JNI_FALSE;
}
Parcel* data = parcelForJavaObject(env, dataObj);
if (data == NULL) {
return JNI_FALSE;
}
Parcel* reply = parcelForJavaObject(env, replyObj);
if (reply == NULL && replyObj != NULL) {
return JNI_FALSE;
}
IBinder* target = (IBinder*)
env->GetLongField(obj, gBinderProxyOffsets.mObject);
if (target == NULL) {
jniThrowException(env, "java/lang/IllegalStateException", "Binder has been finalized!");
return JNI_FALSE;
}
ALOGV("Java code calling transact on %p in Java object %p with code %" PRId32 "\n",
target, obj, code);
bool time_binder_calls;
int64_t start_millis;
if (kEnableBinderSample) {
// Only log the binder call duration for things on the Java-level main thread.
// But if we don't
time_binder_calls = should_time_binder_calls();
if (time_binder_calls) {
start_millis = uptimeMillis();
}
}
//printf("Transact from Java code to %p sending: ", target); data->print();
status_t err = target->transact(code, *data, reply, flags);
//if (reply) printf("Transact from Java code to %p received: ", target); reply->print();
if (kEnableBinderSample) {
if (time_binder_calls) {
conditionally_log_binder_call(start_millis, target, code);
}
}
if (err == NO_ERROR) {
return JNI_TRUE;
} else if (err == UNKNOWN_TRANSACTION) {
return JNI_FALSE;
}
signalExceptionForError(env, obj, err, true /*canThrowRemoteException*/, data->dataSize());
return JNI_FALSE;
}IBinder* target = (IBinder*) env->GetLongField(obj, gBinderProxyOffsets.mObject)从java的BinderProxy中得到之前创建号的BpBinder对象
status_t err = target->transact(code, *data, reply, flags)通过native的BpBinder对象将请求发送给ServiceManager来处理addService的请求
status_t err = target->transact(code, *data, reply, flags)中的code就是java层传入的ADD_SERVICE_TRANSACTION,这个值是3,这里会调用BpBinder的transact方法:
status_t BpBinder::transact(
uint32_t code, const Parcel& data, Parcel* reply, uint32_t flags)
{
// Once a binder has died, it will never come back to life.
if (mAlive) {
status_t status = IPCThreadState::self()->transact(
mHandle, code, data, reply, flags);
if (status == DEAD_OBJECT) mAlive = 0;
return status;
}
return DEAD_OBJECT;
}这里就调用了PCThreadState的transact方法:status_t IPCThreadState::transact(int32_t handle,
uint32_t code, const Parcel& data,
Parcel* reply, uint32_t flags)
{
status_t err = data.errorCheck();//数据错误检查
flags |= TF_ACCEPT_FDS;
IF_LOG_TRANSACTIONS() {
TextOutput::Bundle _b(alog);
alog << "BC_TRANSACTION thr " << (void*)pthread_self() << " / hand "
<< handle << " / code " << TypeCode(code) << ": "
<< indent << data << dedent << endl;
}
if (err == NO_ERROR) {//传输数据
LOG_ONEWAY(">>>> SEND from pid %d uid %d %s", getpid(), getuid(),
(flags & TF_ONE_WAY) == 0 ? "READ REPLY" : "ONE WAY");
err = writeTransactionData(BC_TRANSACTION, flags, handle, code, data, NULL);
}
if (err != NO_ERROR) {
if (reply) reply->setError(err);
return (mLastError = err);
}
if ((flags & TF_ONE_WAY) == 0) {
#if 0
if (code == 4) { // relayout
ALOGI(">>>>>> CALLING transaction 4");
} else {
ALOGI(">>>>>> CALLING transaction %d", code);
}
#endif
if (reply) {
//等待响应
err = waitForResponse(reply);
} else {
Parcel fakeReply;
err = waitForResponse(&fakeReply);
}
#if 0
if (code == 4) { // relayout
ALOGI("<<<<<< RETURNING transaction 4");
} else {
ALOGI("<<<<<< RETURNING transaction %d", code);
}
#endif
IF_LOG_TRANSACTIONS() {
TextOutput::Bundle _b(alog);
alog << "BR_REPLY thr " << (void*)pthread_self() << " / hand "
<< handle << ": ";
if (reply) alog << indent << *reply << dedent << endl;
else alog << "(none requested)" << endl;
}
} else {//oneway,则不需要等待reply的场景
err = waitForResponse(NULL, NULL);
}
return err;
}这里的事物处理分为3部分:
数据错误检查;传输数据;等待响应
这里和驱动打交道的过程我就不想贴出来分析了,这里的过程走完后就又轮到我们的servicemanager登场了。
前面说过servicemanager这个守护进程会一直执行loop循环,它里面有个binder_parse函数,会回调svcmgr_handler这个方法:
int svcmgr_handler(struct binder_state *bs,
struct binder_transaction_data *txn,
struct binder_io *msg,
struct binder_io *reply)
{
struct svcinfo *si;
uint16_t *s;
size_t len;
uint32_t handle;
uint32_t strict_policy;
int allow_isolated;
//ALOGI("target=%p code=%d pid=%d uid=%d\n",
// (void*) txn->target.ptr, txn->code, txn->sender_pid, txn->sender_euid);
if (txn->target.ptr != BINDER_SERVICE_MANAGER)
return -1;
if (txn->code == PING_TRANSACTION)
return 0;
// Equivalent to Parcel::enforceInterface(), reading the RPC
// header with the strict mode policy mask and the interface name.
// Note that we ignore the strict_policy and don't propagate it
// further (since we do no outbound RPCs anyway).
strict_policy = bio_get_uint32(msg);
s = bio_get_string16(msg, &len);
if (s == NULL) {
return -1;
}
if ((len != (sizeof(svcmgr_id) / 2)) ||
memcmp(svcmgr_id, s, sizeof(svcmgr_id))) {
fprintf(stderr,"invalid id %s\n", str8(s, len));
return -1;
}
if (sehandle && selinux_status_updated() > 0) {
struct selabel_handle *tmp_sehandle = selinux_android_service_context_handle();
if (tmp_sehandle) {
selabel_close(sehandle);
sehandle = tmp_sehandle;
}
}
switch(txn->code) {
case SVC_MGR_GET_SERVICE:
case SVC_MGR_CHECK_SERVICE:
s = bio_get_string16(msg, &len);
if (s == NULL) {
return -1;
}
handle = do_find_service(s, len, txn->sender_euid, txn->sender_pid);
if (!handle)
break;
bio_put_ref(reply, handle);
return 0;
case SVC_MGR_ADD_SERVICE:
s = bio_get_string16(msg, &len);
if (s == NULL) {
return -1;
}
handle = bio_get_ref(msg);
allow_isolated = bio_get_uint32(msg) ? 1 : 0;
if (do_add_service(bs, s, len, handle, txn->sender_euid,
allow_isolated, txn->sender_pid))
return -1;
break;
case SVC_MGR_LIST_SERVICES: {
uint32_t n = bio_get_uint32(msg);
if (!svc_can_list(txn->sender_pid, txn->sender_euid)) {
ALOGE("list_service() uid=%d - PERMISSION DENIED\n",
txn->sender_euid);
return -1;
}
si = svclist;
while ((n-- > 0) && si)
si = si->next;
if (si) {
bio_put_string16(reply, si->name);
return 0;
}
return -1;
}
default:
ALOGE("unknown code %d\n", txn->code);
return -1;
}
bio_put_uint32(reply, 0);
return 0;
}当从binder_transaction_data结构体的code取出的值为3,即SVC_MGR_ADD_SERVICE时,就调用do_add_service添加服务。(B) servicemanager如何响应客户端的请求
我们知道客户端transact,服务端会onTransact,
在之前的文章中我分析过JavaBBinder中的mObject保存的是android.os.Binder在native层的JNI对象,
当服务端收到客户端的请求后,BBinder会调用onTransact,而JavaBBinder重载了这个方法:
virtual status_t onTransact(
uint32_t code, const Parcel& data, Parcel* reply, uint32_t flags = 0)
{
JNIEnv* env = javavm_to_jnienv(mVM);
ALOGV("onTransact() on %p calling object %p in env %p vm %p\n", this, mObject, env, mVM);
IPCThreadState* thread_state = IPCThreadState::self();
const int32_t strict_policy_before = thread_state->getStrictModePolicy();
//printf("Transact from %p to Java code sending: ", this);
//data.print();
//printf("\n");
jboolean res = env->CallBooleanMethod(mObject, gBinderOffsets.mExecTransact,
code, reinterpret_cast<jlong>(&data), reinterpret_cast<jlong>(reply), flags);
if (env->ExceptionCheck()) {
jthrowable excep = env->ExceptionOccurred();
report_exception(env, excep,
"*** Uncaught remote exception! "
"(Exceptions are not yet supported across processes.)");
res = JNI_FALSE;
/* clean up JNI local ref -- we don't return to Java code */
env->DeleteLocalRef(excep);
}
// Check if the strict mode state changed while processing the
// call. The Binder state will be restored by the underlying
// Binder system in IPCThreadState, however we need to take care
// of the parallel Java state as well.
if (thread_state->getStrictModePolicy() != strict_policy_before) {
set_dalvik_blockguard_policy(env, strict_policy_before);
}
if (env->ExceptionCheck()) {
jthrowable excep = env->ExceptionOccurred();
report_exception(env, excep,
"*** Uncaught exception in onBinderStrictModePolicyChange");
/* clean up JNI local ref -- we don't return to Java code */
env->DeleteLocalRef(excep);
}
// Need to always call through the native implementation of
// SYSPROPS_TRANSACTION.
if (code == SYSPROPS_TRANSACTION) {
BBinder::onTransact(code, data, reply, flags);
}
//aout << "onTransact to Java code; result=" << res << endl
// << "Transact from " << this << " to Java code returning "
// << reply << ": " << *reply << endl;
return res != JNI_FALSE ? NO_ERROR : UNKNOWN_TRANSACTION;
}这里的mObject就是传入的ActivityManagerService,gBinderOffsets.mExecTransact就是指的它的execTransact方法,也就是Binder的execTransact方法:
private boolean execTransact(int code, long dataObj, long replyObj,
int flags) {
Parcel data = Parcel.obtain(dataObj);
Parcel reply = Parcel.obtain(replyObj);
// theoretically, we should call transact, which will call onTransact,
// but all that does is rewind it, and we just got these from an IPC,
// so we'll just call it directly.
boolean res;
// Log any exceptions as warnings, don't silently suppress them.
// If the call was FLAG_ONEWAY then these exceptions disappear into the ether.
try {
res = onTransact(code, data, reply, flags);
} catch (RemoteException|RuntimeException e) {
if (LOG_RUNTIME_EXCEPTION) {
Log.w(TAG, "Caught a RuntimeException from the binder stub implementation.", e);
}
if ((flags & FLAG_ONEWAY) != 0) {
if (e instanceof RemoteException) {
Log.w(TAG, "Binder call failed.", e);
} else {
Log.w(TAG, "Caught a RuntimeException from the binder stub implementation.", e);
}
} else {
reply.setDataPosition(0);
reply.writeException(e);
}
res = true;
} catch (OutOfMemoryError e) {
// Unconditionally log this, since this is generally unrecoverable.
Log.e(TAG, "Caught an OutOfMemoryError from the binder stub implementation.", e);
RuntimeException re = new RuntimeException("Out of memory", e);
reply.setDataPosition(0);
reply.writeException(re);
res = true;
}
checkParcel(this, code, reply, "Unreasonably large binder reply buffer");
reply.recycle();
data.recycle();
// Just in case -- we are done with the IPC, so there should be no more strict
// mode violations that have gathered for this thread. Either they have been
// parceled and are now in transport off to the caller, or we are returning back
// to the main transaction loop to wait for another incoming transaction. Either
// way, strict mode begone!
StrictMode.clearGatheredViolations();
return res;
}
}这里调用onTransact函数,ActivityManagerNative继承了Binder,实现了onTransact方法,在它的onTransact方法中去实现各种业务。2》选取natvite层的一个实例来分析binder
这里我们选取mediaserver来分析,毕竟前辈们都是拿它来分析binder的。
mediaserver的入口函数是Main_mediaserver.cpp的main函数:
int main(int argc __unused, char **argv __unused)
{
signal(SIGPIPE, SIG_IGN);
//获的ProcessState对象
sp<ProcessState> proc(ProcessState::self());
//获取BpServiceManager对象
sp<IServiceManager> sm(defaultServiceManager());
ALOGI("ServiceManager: %p", sm.get());
InitializeIcuOrDie();
//注册多媒体服务
MediaPlayerService::instantiate();
ResourceManagerService::instantiate();
registerExtensions();
//启动binder线程池
ProcessState::self()->startThreadPool();
//当前线程加入到线程池
IPCThreadState::self()->joinThreadPool();
}我在《native层架构浅析》中已经说明了defaultServiceManager拿到的是一个包含了一个句柄值为0的BpBinder引用的BpServiceManager对象。用于和servicemanager通信。
下面这张图是gityuan的,改图很好的诠释了MediaPlayService的架构:
个人认为这个Bninterface就相当于java层自动生成的stub类
个人认为这个BnMediaPLayerService就相当于java层继承stub的类(比如说ActivityManagerService)
BpMediaPlayerService中包含的IBinder对象就相当于BinderProxy
当然这种理解并不一定对,只是为了好理解
sp<ProcessState> proc(ProcessState::self())用于创建一个该进程唯一的ProcesState对象:
sp<ProcessState> ProcessState::self()
{
Mutex::Autolock _l(gProcessMutex);
if (gProcess != NULL) {
return gProcess;
}
gProcess = new ProcessState;
return gProcess;
}看它的self函数知道gProcess是单例的,看下ProcessState的构造函数:ProcessState::ProcessState()
//打开binder驱动
: mDriverFD(open_driver())
, mVMStart(MAP_FAILED)
, mThreadCountLock(PTHREAD_MUTEX_INITIALIZER)
, mThreadCountDecrement(PTHREAD_COND_INITIALIZER)
, mExecutingThreadsCount(0)
, mMaxThreads(DEFAULT_MAX_BINDER_THREADS)
, mStarvationStartTimeMs(0)
, mManagesContexts(false)
, mBinderContextCheckFunc(NULL)
, mBinderContextUserData(NULL)
, mThreadPoolStarted(false)
, mThreadPoolSeq(1)
{
if (mDriverFD >= 0) {
//采用内存映射,给binder分配地址空间
// mmap the binder, providing a chunk of virtual address space to receive transactions.
mVMStart = mmap(0, BINDER_VM_SIZE, PROT_READ, MAP_PRIVATE | MAP_NORESERVE, mDriverFD, 0);
if (mVMStart == MAP_FAILED) {
// *sigh*
ALOGE("Using /dev/binder failed: unable to mmap transaction memory.\n");
close(mDriverFD);
mDriverFD = -1;
}
}
LOG_ALWAYS_FATAL_IF(mDriverFD < 0, "Binder driver could not be opened. Terminating.");
}前面文章也说过mDriveFD记录的是binder驱动句柄值,这里先打开了dev/binder设备,然后通过mmap映射一段内存用于收发数据。下面就是 sp<IServiceManager> sm(defaultServiceManager()),它的得到的是一个句柄值为0的BpBinder引用的BpServiceManager对象,这里就不重复来说了。
接着看MediaPlayerService::instantiate():
void MediaPlayerService::instantiate() {
defaultServiceManager()->addService(
String16("media.player"), new MediaPlayerService());
}这里调用的是BpServiceManager的addService:virtual status_t addService(const String16& name, const sp<IBinder>& service,
bool allowIsolated)
{
Parcel data, reply;
data.writeInterfaceToken(IServiceManager::getInterfaceDescriptor());
data.writeString16(name);
data.writeStrongBinder(service);
data.writeInt32(allowIsolated ? 1 : 0);
status_t err = remote()->transact(ADD_SERVICE_TRANSACTION, data, &reply);
return err == NO_ERROR ? reply.readExceptionCode() : err;
}这里的remote()调用是BpRefBase中的,因为我们知道BpServiceManager继承了BpInterface<IServiceManager>,而BpInterface<IServiceManager>继承了IServiceManager和BpRefBase;所以这里调用的就是BpRefBase中的remote()用来返回mRemote,而BpInterface中内聚了BpRefBase中的mRemote看下BpInterface的构造方法:
template<typename INTERFACE>
inline BpInterface<INTERFACE>::BpInterface(const sp<IBinder>& remote)
: BpRefBase(remote)
{
}BpInterface的构造方法引用了父类BpRefBase的构造方法,上面说过BpInterface的构造方法传入的是BpBinder(0),兜了一圈,原来那么这里remote()指的就是BpBinder(0),而handler为0代表的就是servicemanager,所以这里是调用的servicemanager的客户端引用对象BpBinder(0)的transact方法。这里实际上是业务层把数据打包后交给了通信层去处理。
来看下BpBInder的transact函数:
status_t BpBinder::transact(
uint32_t code, const Parcel& data, Parcel* reply, uint32_t flags)
{
// Once a binder has died, it will never come back to life.
if (mAlive) {
status_t status = IPCThreadState::self()->transact(
mHandle, code, data, reply, flags);
if (status == DEAD_OBJECT) mAlive = 0;
return status;
}

return DEAD_OBJECT;
}这里又看到了IPCThreadState,它是真正和驱动交互的关键者,我们在上面的java层分析中也看到了它,java层要transact也是调用的BpBinder的transact,所以说真正的核心都是在native层。看下它IPCThreadState的self函数:IPCThreadState* IPCThreadState::self()
{
if (gHaveTLS) {//第一次进来为false
restart:
//TLS是Thread local storage(线程本地存储空间)的简称,这种空间每个线程都有,而且线程间不共享这鞋空间
const pthread_key_t k = gTLS;
//从线程本地存储空间中获得保存在其中的IPCThreadState对象
IPCThreadState* st = (IPCThreadState*)pthread_getspecific(k);
if (st) return st;
//如果不存在就new一个IPCThreadState
return new IPCThreadState;
}
if (gShutdown) {
ALOGW("Calling IPCThreadState::self() during shutdown is dangerous, expect a crash.\n");
return NULL;
}
pthread_mutex_lock(&gTLSMutex);
if (!gHaveTLS) {
int key_create_value = pthread_key_create(&gTLS, threadDestructor);
if (key_create_value != 0) {
pthread_mutex_unlock(&gTLSMutex);
ALOGW("IPCThreadState::self() unable to create TLS key, expect a crash: %s\n",
strerror(key_create_value));
return NULL;
}
gHaveTLS = true;
}
pthread_mutex_unlock(&gTLSMutex);
goto restart;
}然后看下他的构造函数:
IPCThreadState::IPCThreadState()
: mProcess(ProcessState::self()),
mMyThreadId(gettid()),
mStrictModePolicy(0),
mLastTransactionBinderFlags(0)
{
//在构造函数中,把自己设置到线程本地存储中去
 pthread_setspecific(gTLS, this);
clearCaller();
//mIn和mOut是两个parcel,把它看成是发送和接收命令的缓冲区即可。
 mIn.setDataCapacity(256);
mOut.setDataCapacity(256);
}每个线程都有一个IPCThreadState,每个IPCThreadState都有一个mIN和mOut,mIn是用来接收来自Binder设备的数据的,mOut则是用来存储发往BInder设备的数据的。接下来就要分析它的IPCThreadState的transact函数了,其实上面分析java层的时候也贴出这个代码:
status_t IPCThreadState::transact(int32_t handle,
uint32_t code, const Parcel& data,
Parcel* reply, uint32_t flags)
{
status_t err = data.errorCheck();

flags |= TF_ACCEPT_FDS;

IF_LOG_TRANSACTIONS() {
TextOutput::Bundle _b(alog);
alog << "BC_TRANSACTION thr " << (void*)pthread_self() << " / hand "
<< handle << " / code " << TypeCode(code) << ": "
<< indent << data << dedent << endl;
}

if (err == NO_ERROR) {
LOG_ONEWAY(">>>> SEND from pid %d uid %d %s", getpid(), getuid(),
(flags & TF_ONE_WAY) == 0 ? "READ REPLY" : "ONE WAY");
//这里的BC_TRANSACTION,它是应用程序向binder设备发送消息的消息码,而binder设备向应用程序回复消息码以BR开头,
//这些消息码是在kernel/drivers/staging/android/Binder.c的binder_return_strings和binder_command_strings字符串数组中
err = writeTransactionData(BC_TRANSACTION, flags, handle, code, data, NULL);
}

if (err != NO_ERROR) {
if (reply) reply->setError(err);
return (mLastError = err);
}

if ((flags & TF_ONE_WAY) == 0) {
#if 0
if (code == 4) { // relayout
ALOGI(">>>>>> CALLING transaction 4");
} else {
ALOGI(">>>>>> CALLING transaction %d", code);
}
#endif
if (reply) {
err = waitForResponse(reply);
} else {
Parcel fakeReply;
err = waitForResponse(&fakeReply);
}
#if 0
if (code == 4) { // relayout
ALOGI("<<<<<< RETURNING transaction 4");
} else {
ALOGI("<<<<<< RETURNING transaction %d", code);
}
#endif

IF_LOG_TRANSACTIONS() {
TextOutput::Bundle _b(alog);
alog << "BR_REPLY thr " << (void*)pthread_self() << " / hand "
<< handle << ": ";
if (reply) alog << indent << *reply << dedent << endl;
else alog << "(none requested)" << endl;
}
} else {
err = waitForResponse(NULL, NULL);
}

return err;
}
这里先发数据,然后等待结果,这里面还有一个重要的函数,writeTransactionData,waitForResponse,talkWithDriver三个函数如果仔细吃透,相信你对这里的驱动通信就没问题了,过程就不仔细分析了。
下面来分析ProcessState的startThreadPool和IPCThreadState的joinThreadPool:
void ProcessState::startThreadPool()
{
 AutoMutex _l(mLock);
//如果已经开启的线程池就不再开启
if (!mThreadPoolStarted) {
mThreadPoolStarted = true;
spawnPooledThread(true);
}
}来看下spawnPooledThread:void ProcessState::spawnPooledThread(bool isMain)
{
if (mThreadPoolStarted) {
String8 name = makeBinderThreadName();
ALOGV("Spawning new pooled thread, name=%s\n", name.string());
sp<Thread> t = new PoolThread(isMain);
t->run(name.string());
}
}PoolThread是IPCThreadState中定义的一个子类:class PoolThread : public Thread
{
public:
PoolThread(bool isMain)
: mIsMain(isMain)
{
}
protected:
virtual bool threadLoop()
{
//这里创建一个IPCThreadState
IPCThreadState::self()->joinThreadPool(mIsMain);
return false;
}
const bool mIsMain;
};从函数名看是创建现成池,其实就只是创建一个线程,该PoolThread继承Thread类,t->run()方法最终调用PoolThread的threadLoop方法void IPCThreadState::joinThreadPool(bool isMain)
{
LOG_THREADPOOL("**** THREAD %p (PID %d) IS JOINING THE THREAD POOL\n", (void*)pthread_self(), getpid());
mOut.writeInt32(isMain ? BC_ENTER_LOOPER : BC_REGISTER_LOOPER);
// This thread may have been spawned by a thread that was in the background
// scheduling group, so first we will make sure it is in the foreground
// one to avoid performing an initial transaction in the background.
set_sched_policy(mMyThreadId, SP_FOREGROUND);
status_t result;
do {
processPendingDerefs();
// now get the next command to be processed, waiting if necessary
result = getAndExecuteCommand();
if (result < NO_ERROR && result != TIMED_OUT && result != -ECONNREFUSED && result != -EBADF) {
ALOGE("getAndExecuteCommand(fd=%d) returned unexpected error %d, aborting",
mProcess->mDriverFD, result);
abort();
}
// Let this thread exit the thread pool if it is no longer
// needed and it is not the main process thread.
if(result == TIMED_OUT && !isMain) {
break;
}
} while (result != -ECONNREFUSED && result != -EBADF);
LOG_THREADPOOL("**** THREAD %p (PID %d) IS LEAVING THE THREAD POOL err=%p\n",
(void*)pthread_self(), getpid(), (void*)result);
mOut.writeInt32(BC_EXIT_LOOPER);
talkWithDriver(false);
}这里也是在不停的talkWithDriver。总结一下mediaserver的main函数:
首先拿到该进程的ProcessState对象,然后通过BpServiceManager的addService来添加服务,然后通过ProcessState的startThreadPool来开启新的线程通过joinThreadPool来读取binder设备,查看是否有请求,同时主线程也调用joinThreadPool来读取binder设备,查看请求,说明binder设备是支持多线程的,一定含有同步的工作。
上面的的MediaPlayerService::instantiate()是addService的过程,下面来说下客户端是如何拿到mediaplayerservice的获取过程
一般在代码中都是通过如下方法来获取的:
sp<IBinder> binder = defaultServiceManager()->getService(String16("media.player"));我们已经知道defaultServiceManager()拿到的是BpServiceManager(BpBinder(0)),这里直接来看它的getService方法:
virtual sp<IBinder> getService(const String16& name) const
{
unsigned n;
for (n = 0; n < 5; n++){
sp<IBinder> svc = checkService(name);
if (svc != NULL) return svc;
ALOGI("Waiting for service %s...\n", String8(name).string());
sleep(1);
}
return NULL;
}
这里会检索服务是否存在,并且不存在就休眠一秒,持续5次。来看checkService:
virtual sp<IBinder> checkService( const String16& name) const
{
Parcel data, reply;
//写入RPC头
data.writeInterfaceToken(IServiceManager::getInterfaceDescriptor());
//写入服务名
data.writeString16(name);
remote()->transact(CHECK_SERVICE_TRANSACTION, data, &reply);
return reply.readStrongBinder();
}
remote()也分析过了,是BpBinder(0),transact函数又会调用IPCThreadState来和binder驱动交互,这里我们直接看下他的返回值reply.readStrongBinder()
sp<IBinder> Parcel::readStrongBinder() const
{
sp<IBinder> val;
readStrongBinder(&val);
return val;
}继续看readStrongBinder(&val):
status_t Parcel::readStrongBinder(sp<IBinder>* val) const
{
return unflatten_binder(ProcessState::self(), *this, val);
}接着看unflatten_binder方法
status_t unflatten_binder(const sp<ProcessState>& proc,
const Parcel& in, sp<IBinder>* out)
{
const flat_binder_object* flat = in.readObject(false);

if (flat) {
switch (flat->type) {
case BINDER_TYPE_BINDER:
//当请求服务的进程与服务属于同一进程
 *out = reinterpret_cast<IBinder*>(flat->cookie);
return finish_unflatten_binder(NULL, *flat, in);
case BINDER_TYPE_HANDLE:
//当请求服务的进程与服务属于不同进程
                *out = proc->getStrongProxyForHandle(flat->handle);、
//创建BpBinder对象
 return finish_unflatten_binder(
static_cast<BpBinder*>(out->get()), *flat, in);
}
}
return BAD_TYPE;
}
sp<IBinder> ProcessState::getStrongProxyForHandle(int32_t handle)
{
sp<IBinder> result;
AutoMutex _l(mLock);
//根据handler查找对应的hanler_entry
handle_entry* e = lookupHandleLocked(handle);
if (e != NULL) {
// We need to create a new BpBinder if there isn't currently one, OR we
// are unable to acquire a weak reference on this current one. See comment
// in getWeakProxyForHandle() for more info about this.
IBinder* b = e->binder;
if (b == NULL || !e->refs->attemptIncWeak(this)) {
if (handle == 0) {
// Special case for context manager...
// The context manager is the only object for which we create
// a BpBinder proxy without already holding a reference.
// Perform a dummy transaction to ensure the context manager
// is registered before we create the first local reference
// to it (which will occur when creating the BpBinder).
// If a local reference is created for the BpBinder when the
// context manager is not present, the driver will fail to
// provide a reference to the context manager, but the
// driver API does not return status.
//
// Note that this is not race-free if the context manager
// dies while this code runs.
//
// TODO: add a driver API to wait for context manager, or
// stop special casing handle 0 for context manager and add
// a driver API to get a handle to the context manager with
// proper reference counting.
Parcel data;
status_t status = IPCThreadState::self()->transact(
0, IBinder::PING_TRANSACTION, data, NULL, 0);
if (status == DEAD_OBJECT)
return NULL;
}
b = new BpBinder(handle);
e->binder = b;
if (b) e->refs = b->getWeakRefs();
result = b;
} else {
// This little bit of nastyness is to allow us to add a primary
// reference to the remote proxy when this team doesn't have one
// but another team is sending the handle to us.
result.force_set(b);
e->refs->decWeak(this);
}
}
return result;
}这样就根据服务不同的handler返回对应的BpBinder代理接口。参考文献:《深入解析Android5.0系统》;《Android开发艺术探索》;《深入理解Android卷1》;《深入理解Android卷3》;;红茶一杯话binder------点击打开链接;gityuan的binder系列------点击打开链接;罗升阳的binder系列------点击打开链接;Andriod
Binder机制------点击打开链接;Android深入浅出之binder机制------点击打开链接;理解Android的binder机制-----点击打开链接;轻松理解Androidbinder------点击打开链接;binder
service入门------点击打开链接

相关文章推荐
- 实例分析android中的Binder通信机制(3)
- Android Binder 原理实例分析(讲的不错)
- 实例分析android中的Binder通信机制(1)
- 实例分析android中的Binder通信机制(2)
- Android中SeekBar和RatingBar用法实例分析
- Android获取通话时间实例分析
- Android开发之App widget用法实例分析
- Android Binder 简单实例
- Android 内核--Binder架构分析
- Android Binder机制分析(5) Binder_ioctl()分析
- Android开发中StackOverflowError错误实例分析
- Android SO逆向2-实例分析
- Android系统进程间通信Binder机制在应用程序框架层的Java接口源代码分析(2)
- Android系统进程间通信(IPC)机制Binder中的Server启动过程源代码分析(1) 推荐
- 从驱动层分析android的Binder机制-android学习之旅(83)
- Android内存泄漏分析实例
- Android4.1中BinderService用法实例分析
- Android TabLayout(选项卡布局)简单用法实例分析
- Android binder -- Binder应用实例