React Native封装Android原生控件
2017-09-01 18:15
591 查看
第一步:
我们首先要创建一个RN项目:
第二步:
是用Android studio打开RN项目中的Android项目。
在新建一个文件夹用于存放我们封装的控件,结构如下:

第三步:
创建ViewManager,比如TextViewManager,代码如下:
1.getName方法用于js端导出时,使用的控件名称。
2.createViewInstance方法用于创建控件与初始化状态。
3.使用@ReactProp注解的方法,是将js端传入的属性值导出,并且给控件设置该属性值。
@ReactProp
该注解可以传入两个参数:
1. name:js端使用时传入的参数名,必传。
2. defaultBoolean:设置默认值,可选,其他选项:defaultInt,defaultFloat。这些参数必须是对应的基础类型的值(也就是boolean,int, float),这些值会被传递给setter方法,以免JavaScript端某些情况下在组件中移除了对应的属性。
第四步:
注册ViewManager,新建一个class,名为ReactViewPackage,在这个class里面加入以下代码:
这里面需要我们实现ReactPackage的两个方法:createViewManagers,createNativeModules。以前还有一个叫做createJSModules的方法,现在被移除掉了。其中,createNativeModules是用来添加原生模块的,比如:Toast等。createViewManagers是用来添加原生的UI组件的。
我们第一个创建的TextView是UI组件,所以我们将TextViewManager添加到createViewManagers中,如果没有引入原生模块,可以将createNativeModules方返回空数组:
第五步:
在项目的MainApplication.java文件的getPackages方法中添加,我们封装的原生模块:
ok,到这一步我们基本的封装已经完毕。
第六步:
需要我们在js端导出所封装的原生组件,如下:
这里,由于我们是封装的TextView,需要使用requireNativeComponent在原生代码中引用。requireNativeComponent通常接受两个参数,第一个参数是原生视图的名字,也就是我们在ViewManager中使用getName方法定义的名字,而第二个参数是一个描述组件接口的对象。组件接口应当声明一个友好的name,用来在调试信息中显示;组件接口还必须声明propTypes字段,用来对应到原生视图上。这个propTypes还可以用来检查用户使用View的方式是否正确。
第六步:
使用所封装好的组件:
第七步:
在项目的根目录下,运行:
成功啦!!!
第八步:为原生模块添加方法
要给js端调用的方法,需要使用@ReactMethod注解:
在js端如下调用:
第九步:为原生代码添加回调函数
1.使用Callback:
在js端如下调用:
2.使用Promise:
在js端使用:
3.给JS发送事件
js端使用DeviceEventEmitter设置监听接收:
大家也可以先看一下官方文档:http://reactnative.cn/docs/0.47/native-modules-android.html#content
遇到的问题:
1.在js端导出组件后使用的时候,报错:
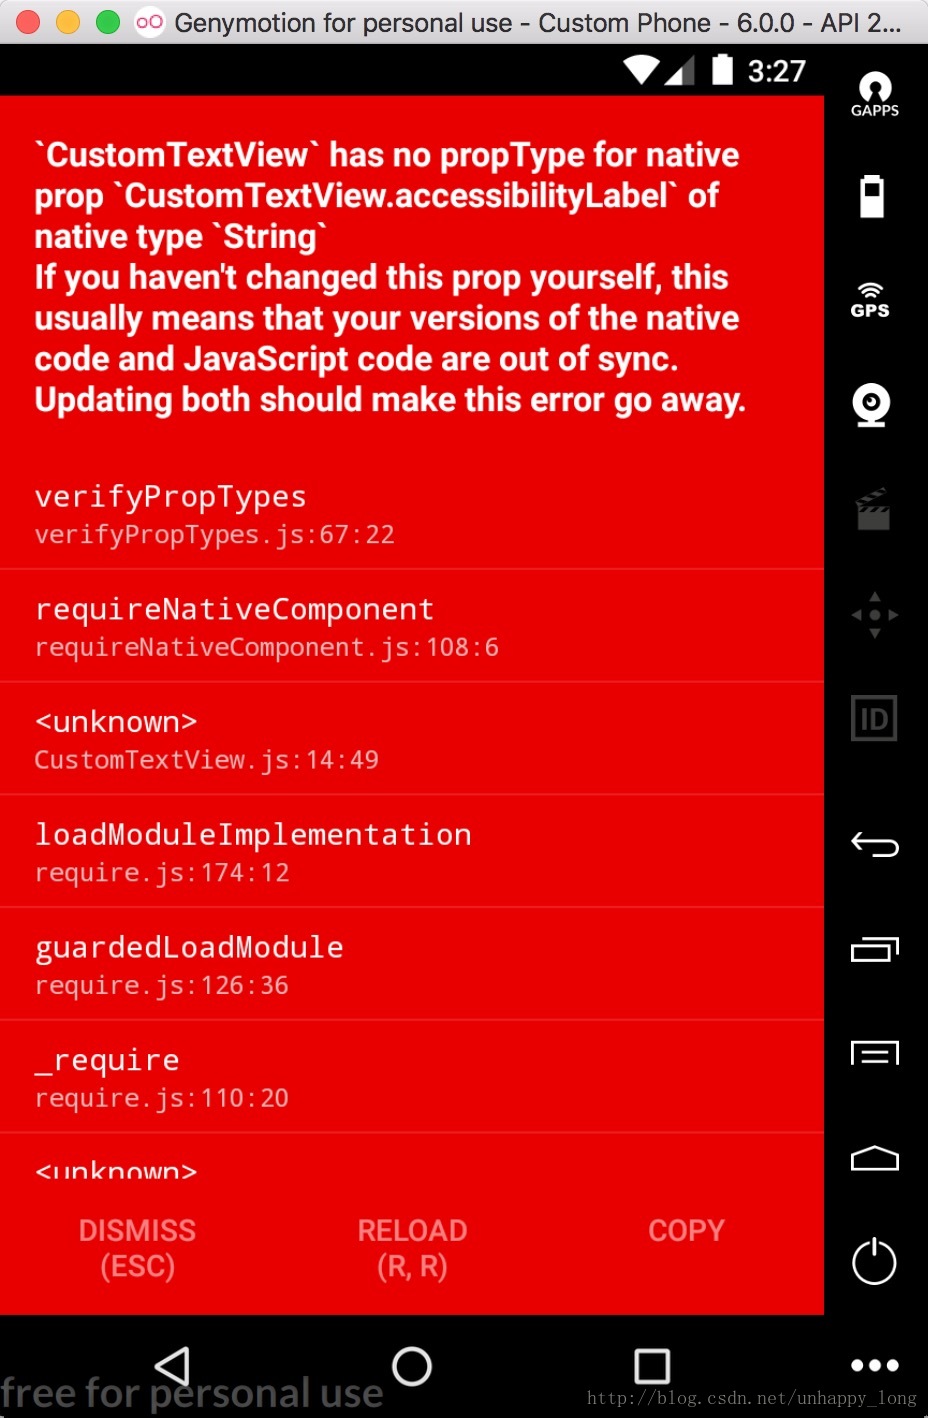
解决方案:
在requireNativeComponent的第二个参数内,也就是描述组件属性的时候,在propTypes内,加入…View.propTypes:
因为,在这里我只描述了我规定的属性字段,RN其实自己会添加很多默认的属性,使用扩展符合并就可以了。
最后附上源码:https://github.com/1035901787/CustomRnView
我们首先要创建一个RN项目:
react-native init 你的项目名
第二步:
是用Android studio打开RN项目中的Android项目。
在新建一个文件夹用于存放我们封装的控件,结构如下:
第三步:
创建ViewManager,比如TextViewManager,代码如下:
import android.graphics.Color;
import android.util.Log;
import android.view.View;
import android.widget.TextView;

import com.facebook.react.bridge.Arguments;
import com.facebook.react.bridge.ReactContext;
import com.facebook.react.bridge.ReactMethod;
import com.facebook.react.bridge.ReadableMap;
import com.facebook.react.bridge.WritableMap;
import com.facebook.react.uimanager.SimpleViewManager;
import com.facebook.react.uimanager.ThemedReactContext;
import com.facebook.react.uimanager.annotations.ReactProp;
import com.facebook.react.uimanager.events.RCTEventEmitter;

/**
* Created by sujialong on 2017/9/1.
*/
public class TextViewManager extends SimpleViewManager<TextView> {

@Override
public String getName() {
return "CustomTextView";
}

@Override
protected TextView createViewInstance(ThemedReactContext reactContext) {
final TextView textView = new TextView(reactContext);
//        final ThemedReactContext myContext = reactContext;
//注册点击事件
textView.setOnClickListener(new View.OnClickListener() {
@Override
public void onClick(View v) {
WritableMap event = Arguments.createMap();
event.putString("message", "MyMessage哈哈哈--自定义");
ReactContext reactContext = (ReactContext)textView.getContext();
reactContext.getJSModule(RCTEventEmitter.class).receiveEvent(
textView.getId(),
"topChange",
event);
}
});
return textView;
}

@ReactProp(name="text")
public void setText(TextView textView,String text){
textView.setText(text);
}

@ReactProp(name="textSize")
public void setTextSize(TextView view,float fontSize){
view.setTextSize(fontSize);
}

@ReactProp(name = "textColor",defaultInt = Color.BLACK)
public void setTextColor(TextView view,int textColor){
view.setTextColor(textColor);
}
}
1.getName方法用于js端导出时,使用的控件名称。
2.createViewInstance方法用于创建控件与初始化状态。
3.使用@ReactProp注解的方法,是将js端传入的属性值导出,并且给控件设置该属性值。
@ReactProp
该注解可以传入两个参数:
1. name:js端使用时传入的参数名,必传。
2. defaultBoolean:设置默认值,可选,其他选项:defaultInt,defaultFloat。这些参数必须是对应的基础类型的值(也就是boolean,int, float),这些值会被传递给setter方法,以免JavaScript端某些情况下在组件中移除了对应的属性。
第四步:
注册ViewManager,新建一个class,名为ReactViewPackage,在这个class里面加入以下代码:
import com.facebook.react.ReactPackage;
import com.facebook.react.bridge.NativeModule;
import com.facebook.react.bridge.ReactApplicationContext;
import com.facebook.react.uimanager.ViewManager;

import java.util.Arrays;
import java.util.Collections;
import java.util.List;

/**
* Created by sujialong on 2017/9/1.
*/
public class ReactViewPackage implements ReactPackage {

@Override
public List<NativeModule> createNativeModules(ReactApplicationContext reactContext) {
return Arrays.<NativeModule>asList(
new ToastViewManager(reactContext)
);
}

@Override
public List<ViewManager> createViewManagers(ReactApplicationContext reactContext) {
return Arrays.<ViewManager>asList(
new TextViewManager()
);
}
}
这里面需要我们实现ReactPackage的两个方法:createViewManagers,createNativeModules。以前还有一个叫做createJSModules的方法,现在被移除掉了。其中,createNativeModules是用来添加原生模块的,比如:Toast等。createViewManagers是用来添加原生的UI组件的。
我们第一个创建的TextView是UI组件,所以我们将TextViewManager添加到createViewManagers中,如果没有引入原生模块,可以将createNativeModules方返回空数组:
@Override
public List<NativeModule> createViewManagers(ReactApplicationContext reactContext) {
return Collections.emptyList();
}
第五步:
在项目的MainApplication.java文件的getPackages方法中添加,我们封装的原生模块:
@Override
protected List<ReactPackage> getPackages() {
return Arrays.<ReactPackage>asList(
new MainReactPackage(),
new ReactViewPackage()
);
}
ok,到这一步我们基本的封装已经完毕。
第六步:
需要我们在js端导出所封装的原生组件,如下:
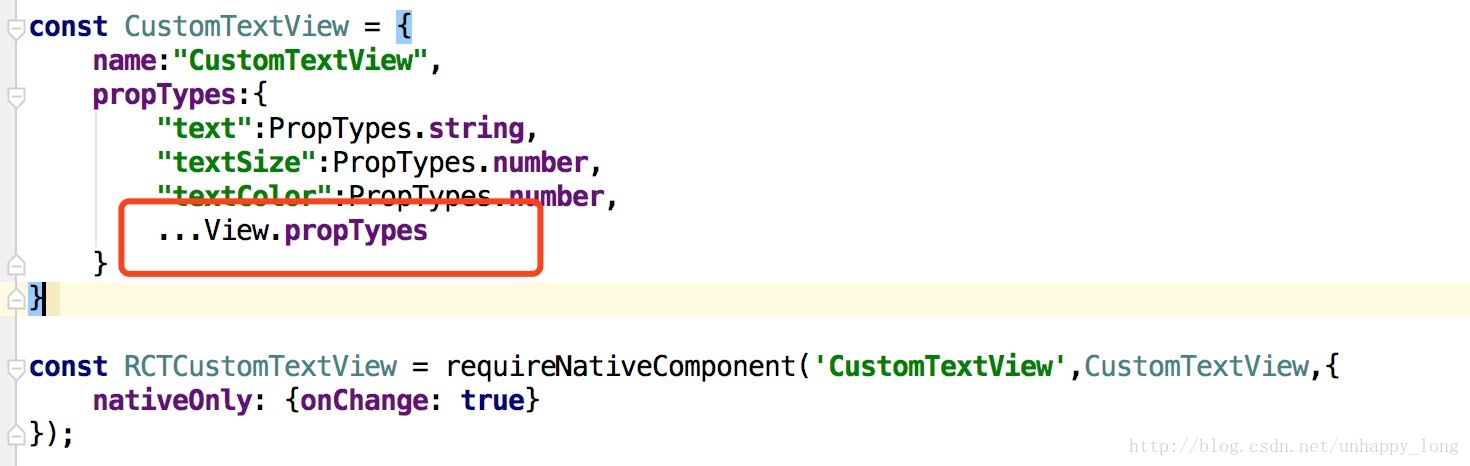
import React, {PureComponent,PropTypes} from 'react';
import {requireNativeComponent,View} from 'react-native';

const CustomTextView = {
name:"CustomTextView",
propTypes:{
"text":PropTypes.string,
"textSize":PropTypes.number,
"textColor":PropTypes.number,
...View.propTypes
}
}

const RCTCustomTextView = requireNativeComponent('CustomTextView',CustomTextView,{
nativeOnly: {onChange: true}
});

export default class MyView extends PureComponent {

_onChange = (event: Event) => {
const onChangeMessage = this.props.onChangeMessage;
onChangeMessage && onChangeMessage(event.nativeEvent);
}

render() {
return (
<RCTCustomTextView {...this.props} onChange={this._onChange}/>
);
}
}

MyView.propTypes = {
onChangeMessage:PropTypes.func,
};
这里,由于我们是封装的TextView,需要使用requireNativeComponent在原生代码中引用。requireNativeComponent通常接受两个参数,第一个参数是原生视图的名字,也就是我们在ViewManager中使用getName方法定义的名字,而第二个参数是一个描述组件接口的对象。组件接口应当声明一个友好的name,用来在调试信息中显示;组件接口还必须声明propTypes字段,用来对应到原生视图上。这个propTypes还可以用来检查用户使用View的方式是否正确。
第六步:
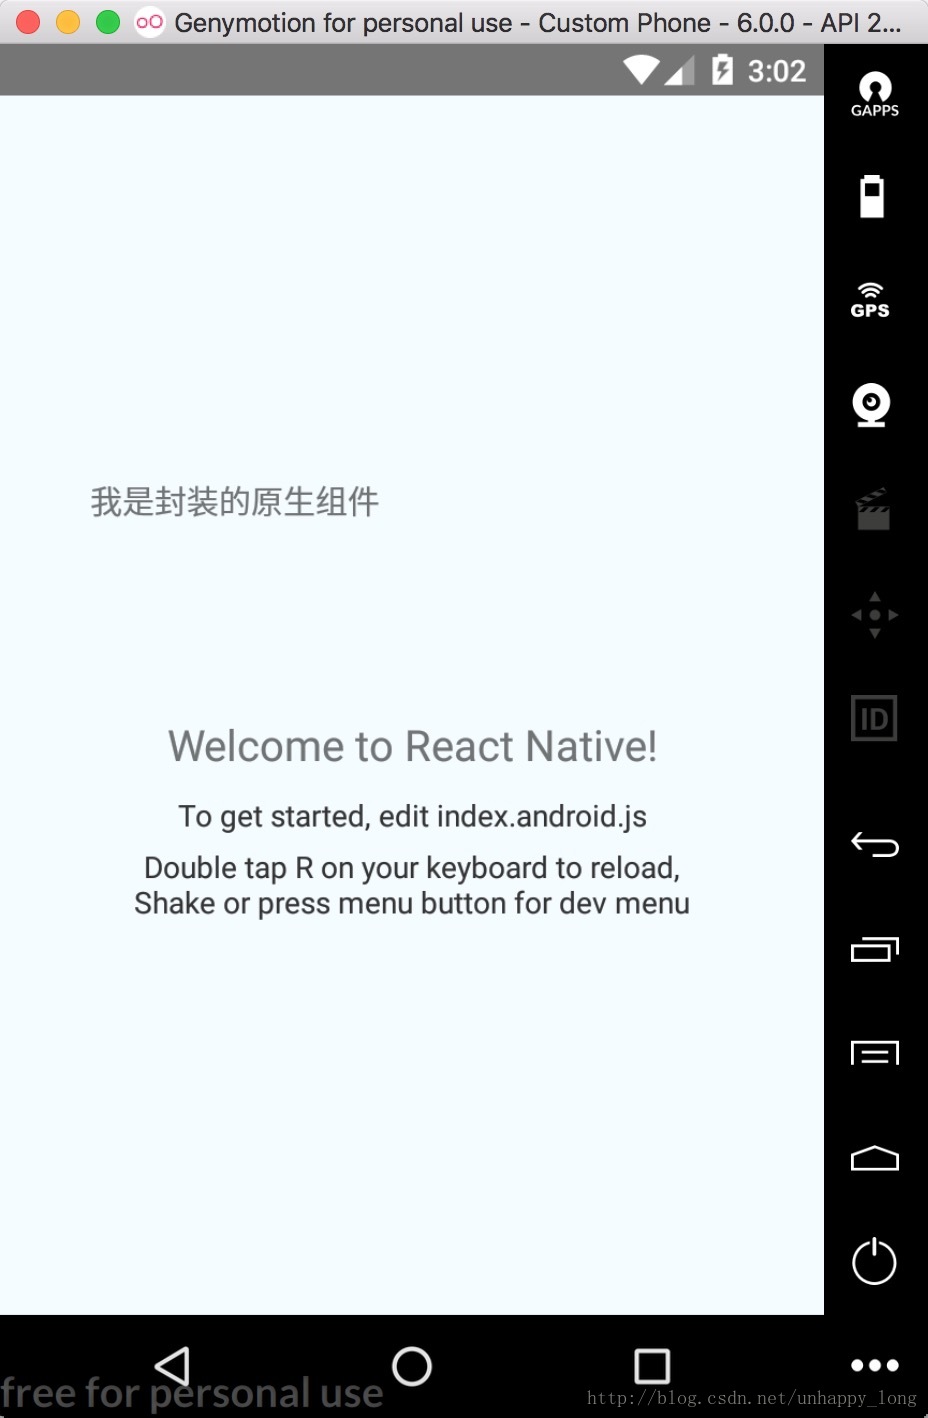
使用所封装好的组件:
import React, { Component } from 'react';
import {
AppRegistry,
StyleSheet,
Text,
View,
DeviceEventEmitter
} from 'react-native';
import CustomTextView from './src/CustomTextView';
export default class CustomRnView extends Component {
render() {
return (
<View style={styles.container}>
<CustomTextView
style={styles.myTextView}
text="我是封装的原生组件"
textSize={15}
onChangeMessage={(msg)=>{
CustomToastView.show("点到我了----",CustomToastView.SHORT);
CustomToastView.getNativeClass(this._getNativeClass);
this._getNativePromise();
}}/>
</View>
);
}
}
const styles = StyleSheet.create({
container: {
flex: 1,
justifyContent: 'center',
alignItems: 'center',
backgroundColor: '#F5FCFF',
},
myTextView:{
width:300,
height:100,
},
});第七步:
在项目的根目录下,运行:
react-native run-android
成功啦!!!
第八步:为原生模块添加方法
要给js端调用的方法,需要使用@ReactMethod注解:
@ReactMethod
public void show(String message, int duration){
Toast.makeText(getReactApplicationContext(), message, duration).show();
}
在js端如下调用:
import CustomToastView from './src/CustomToastView';

CustomToastView.show("message",CustomToastView.SHORT);
第九步:为原生代码添加回调函数
1.使用Callback:
import com.facebook.react.bridge.Callback;

//使用回调函数
@ReactMethod
public void getNativeClass(Callback callback){
callback.invoke("使用回调函数");
}
在js端如下调用:
import CustomToastView from './src/CustomToastView';

CustomToastView.getNativeClass((res) => {
alert(res);
});
2.使用Promise:
//使用promise回调
@ReactMethod
public void getArguments(Boolean isResolve,Promise promise){
WritableMap map = Arguments.createMap();
map.putString("name", "Arno");
map.putString("age", "25");

if(isResolve){
promise.resolve(map);
}else{
promise.reject(map.toString());
}
}
在js端使用:
import CustomToastView from './src/CustomToastView';

CustomToastView.getArguments(true)
.then((res) => {
console.log("getArguments---success");
console.log(res);
},(error)=>{
console.log("getArguments---error");
console.log(res);
});
3.给JS发送事件
private static final String TestEventName = "TestEventName";

//发送事件,js端使用事件监听接收
public void setEvent(){
WritableMap params = Arguments.createMap();
params.putString("name", "Jack");
reactContext_
.getJSModule(DeviceEventManagerModule.RCTDeviceEventEmitter.class)
.emit(TestEventName, params);
}
js端使用DeviceEventEmitter设置监听接收:
import {
DeviceEventEmitter
} from 'react-native';

DeviceEventEmitter.addListener(CustomToastView.TestEventName,(res)=>{
console.log("我是事件监听");
console.log(res);
});大家也可以先看一下官方文档:http://reactnative.cn/docs/0.47/native-modules-android.html#content
遇到的问题:
1.在js端导出组件后使用的时候,报错:
解决方案:
在requireNativeComponent的第二个参数内,也就是描述组件属性的时候,在propTypes内,加入…View.propTypes:
因为,在这里我只描述了我规定的属性字段,RN其实自己会添加很多默认的属性,使用扩展符合并就可以了。
最后附上源码:https://github.com/1035901787/CustomRnView

相关文章推荐
- react-native 在android封装原生listView
- React-Native开发之原生模块封装(Android)升级版
- React Native之原生UI组件封装---适配Android
- [置顶] React-Native开发之原生模块封装(Android)升级版
- react native学习笔记25——Android原生模块的封装与调用
- 带着问题写React Native原生控件--Android视频直播控件
- React Native之原生UI组件封装---适配Android
- react native android 高德地图原生代码编写
- react-native封装原生下拉刷新组件
- React Native移植原生Android
- React Native:调用Android原生代码打开和关闭手电筒
- React Native之调用安卓原生控件
- Android React Native使用原生模块
- ReactNative调用Android原生模块
- React Native移植原生Android
- React Native Android原生模块开发实战|教程|心得|如何创建React Native Android原生模块
- ReactNative跟Android原生模块是如何进行数据交互实例
- 【React Native开发】React Native移植原生Android项目(4)
- Android React Native植入原生应用小记
- React Native 中的 Android 原生模块