centos7.x之yum安装zabbix
2017-08-28 00:03
351 查看
1、安装LAMP
#关闭防火墙方便测试
yum install epel-release -y
systemctl stop firewalld.service
systemctl disable firewalld.service
setenforce 0
#安装httpd
yum install httpd
systemctl start httpd.service
systemctl enable httpd.service
#安装数据库5.6
wget http://dev.mysql.com/get/mysql-community-release-el7-5.noarch.rpm rpm -ivh mysql-community-release-el7-5.noarch.rpm
yum install mysql-community-server
systemctl restart mysqld.service
#设置msyql密码为 123456
mysql> set password for 'root'@'localhost' =password('123456');

#远程连接设置,所有以root账号连接的远程用户,设其密码为 123456
mysql> grant all on xxxx.* to 'root'@'%' identified by '123456' with grant option;

#更新权限
mysql>flush privileges;

#数据库开机启动
systemctl enable mysqld.service
#安装php
yum install php -y
#安装PHP组件,使PHP支持mysql
yum install php-mysql php-gd libjpeg* php-ldap php-odbc php-pear php-xml php-xmlrpc php-mbstring php-bcmath php-mhash -y
#重启对应服务
systemctl restart mysqld.service
systemctl restart httpd.service

#以上 安装 apahce 、mysql 、php  安装完毕。

查看安装环境版本:

cd  /var/www/html  ,新建index.php文件,输入:
<?php
phpinfo();
?>
2、安装zabbix
#安装zabbix server
rpm -ivh http://repo.zabbix.com/zabbix/3.4/rhel/7/x86_64/zabbix-release-3.4-1.el7.centos.noarch.rpm #安装Zabbix server and agent(agent是可选的)
yum install zabbix-server-mysql zabbix-web-mysql zabbix-agent zabbix-java-gateway -y
vi /etc/httpd/conf.d/zabbix.conf
更新时区:
php_value date.timezone Asia/Shanghai
#重启httpd
systemctl restart httpd
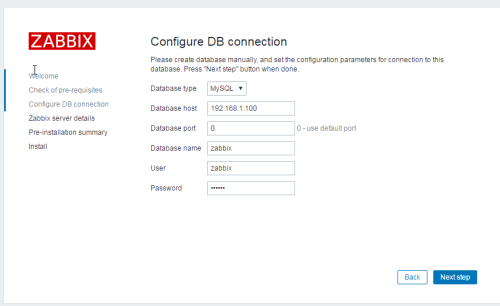
#创建MySQL 数据库和用户
mysql –u root –p
mysql> create database zabbix character set utf8;

mysql> grant all privileges on zabbix.* to 'zabbix'@'%' identified by 'zabbix';

mysql> flush privileges;
#数据库导入zabbix template
#-p 后面的zabbix不是密码,而是选择zabbix数据库,导入都是数据表
zcat /usr/share/doc/zabbix-server-mysql-3.4.0/create.sql.gz | mysql -uzabbix -p zabbix

#Configure database for Zabbix server/proxy
# vi /etc/zabbix/zabbix_server.conf
DBHost=192.168.1.100
DBName=zabbix
DBUser=zabbix
DBPassword=zabbix
#Starting Zabbix server process
systemctl start zabbix-server
systemctl enable zabbix-server
#添加selinux设置
setsebool -P httpd_can_connect_zabbix on
setsebool -P httpd_can_network_connect_db on
systemctl start httpd
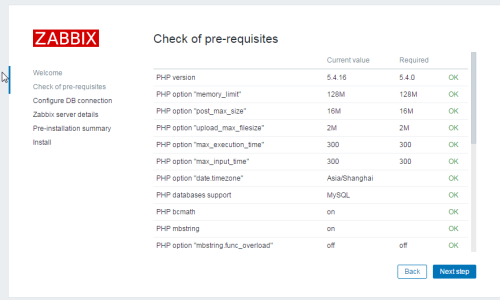
#修改PHP 设置,后来再搭建多几次发现这个php设置可以不用更改
vi /etc/php.ini
max_execution_time = 600
max_input_time = 600
memory_limit = 256
Mpost_max_size = 32M
upload_max_filesize = 16M
date.timezone = Asia/Shanghai
#允许Zabbix web console 对特定IP段可用 (可选)
vi /etc/httpd/conf.d/zabbix.conf
如果设置 ‘Allow from All’, 这可以允许全部可以访问
php_value upload_max_filesize 2M
php_value max_input_time 300
php_value always_populate_raw_post_data -1
# php_value date.timezone Europe/Riga
php_value date.timezone Asia/Shanghai
</IfModule>
</Directory>

<Directory "/usr/share/zabbix/conf">
Require all denied
</Directory>

<Directory "/usr/share/zabbix/app">
Require all denied
</Directory>

<Directory "/usr/share/zabbix/include">
Require all denied
</Directory>

<Directory "/usr/share/zabbix/local">
Require all denied
</Directory>
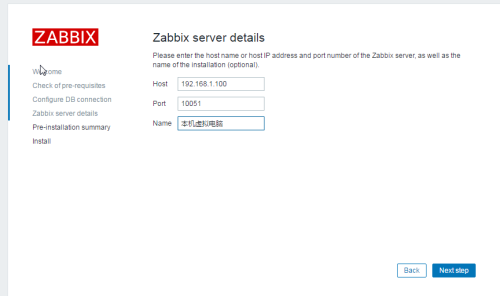
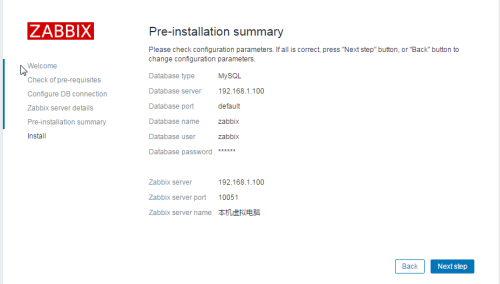
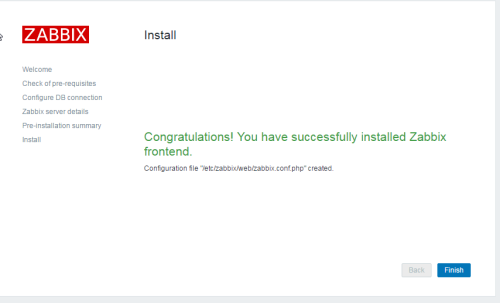
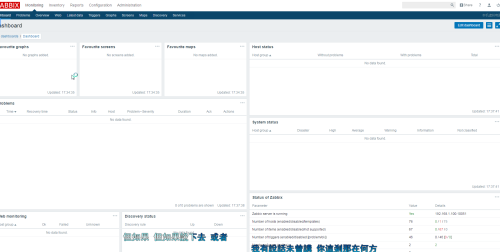
#前端web界面访问配置 http://192.168.1.100/zabbix/setup.php
#zabbix默认账号和密码
The default user name is Admin, password zabbix.
#添加zabbix-agent,前面安装zabbix server的时候,一起yum安装了,现在只要修改一下数据即可
vim /etc/hosts
添加
192.168.1.100   Zabbix server

service zabbix-agent start
chkconfig zabbix-agent on

相关文章推荐
- CentOS 7 yum安装Zabbix
- Zabbix之CentOS7.3下yum安装Zabbix3.5
- Centos7下使用Yum安装Zabbix2.4
- Centos7下使用yum安装lnmp zabbix3.2
- centos7 yum方式安装zabbix-agent
- CentOS 7 yum安装Zabbix
- CentOS 7 yum安装Zabbix
- CentOS 7 yum安装Zabbix
- CentOS 7以yum方式安装zabbix3.2及配置文件详解
- Centos 6.5 yum安装zabbix2.2
- Centos7.3安装Zabbix3.2(Yum详细步骤)
- CentOS 7 yum安装Zabbix
- centos6.5 yum 安装zabbix
- CentOS 7 yum安装Zabbix
- CentOS 7 yum安装Zabbix
- Centos7下yum安装zabbix-server的部署(一)
- centos6.8上yum安装zabbix3.2
- centos7 yum安装zabbix监控
- [Config]Zabbix的Mongodb插件安装,centos
- linux中redhat 7安装centos 7的yum