RabbitMQ实践--安装、JAVA客户端操作
2017-08-20 13:48
543 查看
RabbitMQ是一种消息中间件,用于处理来自客户端的异步消息。服务端将要发送的消息放入到队列池中。接收端可以根据RabbitMQ配置的转发机制接收服务端发来的消息。RabbitMQ依据指定的转发规则进行消息的转发、缓冲和持久化操作,主要用在多服务器间或单服务器的子系统间进行通信,是分布式系统标准的配置。
建议先看我的另一篇博文,对RabbitMQ有个整体的认识再来操作,将会事半功倍
RabbitMQ–整体简介:http://blog.csdn.net/qq_34039315/article/details/77378641
也可以考虑先对消息队列有个整体的认识:
消息队列综述:http://blog.csdn.net/qq_34039315/article/details/77338178
链接地址:http://www.erlang.org/downloads
同理,参考rabbitMQ官网来安装RabbitMQ:
链接地址:http://www.rabbitmq.com/download.html
请在windows在RabbitMQ的安装目录 执行如下命令
各平台插件管理命令:
注意:重启服务器后生效
然后打开连接http://localhost:15672,以guest/guest登录就可以看到服务器当前的运行状态
http://next.rabbitmq.com/documentation.html

添加maven依赖,此处对slf4j的实现是简单的slf4j-simple实现,在真正的生产环境中建议使用log4j、logback等。
代码如下:
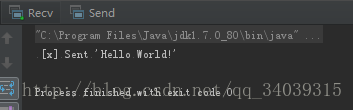
运行:
发送端运行两次
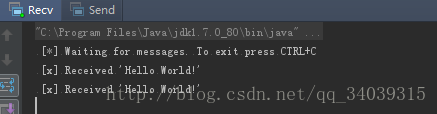
接收端会一直接收
代码如下:
此处Recv1与Recv2代码一致,不再赘述
运行
send发送如下
[x] Sent ‘Hello World 1’
[x] Sent ‘Hello World 2’
[x] Sent ‘Hello World 3’
[x] Sent ‘Hello World 4’
[x] Sent ‘Hello World 5’
[x] Sent ‘Hello World 6’
[x] Sent ‘Hello World 7’
[x] Sent ‘Hello World 8’
[x] Sent ‘Hello World 9’
[x] Sent ‘Hello World 10’
Recv1接收如下
[*] Waiting for messages. To exit press CTRL+C
[x] Received ‘Hello World 1’
[x] Received ‘Hello World 3’
[x] Received ‘Hello World 5’
[x] Received ‘Hello World 7’
[x] Received ‘Hello World 9’
Recv2接收如下
[*] Waiting for messages. To exit press CTRL+C
[x] Received ‘Hello World 2’
[x] Received ‘Hello World 4’
[x] Received ‘Hello World 6’
[x] Received ‘Hello World 8’
[x] Received ‘Hello World 10’
修改方法如下:
Recv增加消息确认反馈机制
代码改动如下:
为什么要改队列名字呢?因为RabbitMQ只会遵循首次创建队列时候的属性!后面声明同一个名字的队列的时候,如果没有这个队列则创建,有则忽略创建任务。当然,你也可以先删除以前的队列,然后再创建,就不用改队列名了。
Recv增加设置
最终整体代码如下:
创建一个日志系统,一个Send,两个Recv。
重点是增加Exchange,通过fanout类型将消息广播给所有的的Recv。
这里我们创建临时队列,从RabbitMQ中获取队列名,然后在不需要使用的时候删除它。
代码如下:
运行两次ReceiveLogs,再运行EmitLog,就会发现ReceiveLogs都接受到了相同的消息
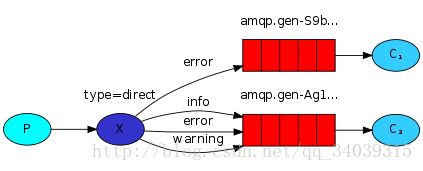
重点是Exchange的direct类型。如果某些消费者只关注部分消息怎么办?这个direct类型解决这类问题,也叫routing模式
运行即可发现ReceiveLogsDirect2只收到了error的相关信息,而ReceiveLogsDirect1接收到了所有消息
Exchange的topic类型,用通配符的方式来匹配相应的接收信息
符号“#”匹配一个或多个词,符号“*”匹配不多不少一个词
代码如下:

建议先看我的另一篇博文,对RabbitMQ有个整体的认识再来操作,将会事半功倍
RabbitMQ–整体简介:http://blog.csdn.net/qq_34039315/article/details/77378641
也可以考虑先对消息队列有个整体的认识:
消息队列综述:http://blog.csdn.net/qq_34039315/article/details/77338178
RabbitMQ服务端安装
Rabbitmq基于erlang语言开发,所有需要安装erlang虚拟机,各平台参考官网安装即可。Mac、linux的安装方法在页面的相对后面一点,也很简单。链接地址:http://www.erlang.org/downloads
同理,参考rabbitMQ官网来安装RabbitMQ:
链接地址:http://www.rabbitmq.com/download.html
开启管理插件
使用Rabbit MQ 管理插件,可以更好的可视化方式查看Rabbit MQ 服务器实例的状态请在windows在RabbitMQ的安装目录 执行如下命令
# sbin\rabbitmq-plugins.bat enable rabbitmq_management
# net stop RabbitMQ && net start RabbitMQ
各平台插件管理命令:
开启某个插件:rabbitmq-plugins enable xxx
关闭某个插件:rabbitmq-plugins disable xxx
注意:重启服务器后生效
然后打开连接http://localhost:15672,以guest/guest登录就可以看到服务器当前的运行状态
文档地址
文档页: 文档分为 服务器及关键插件、客户端及特性、插件、开发、协议 部分,可以参考对应的文档继续深入了解。http://next.rabbitmq.com/documentation.html
java客户端操作实践
本操作系列根据官网的指引文档http://next.rabbitmq.com/getstarted.html操作结果,由于纯英文展示,本文做了部分翻译和加工操作“Hello World”
本小节创建一个很简单的队列,一个生产者,一个消费者。添加maven依赖,此处对slf4j的实现是简单的slf4j-simple实现,在真正的生产环境中建议使用log4j、logback等。
<dependency>
<groupId>com.rabbitmq</groupId>
<artifactId>amqp-client</artifactId>
<version>4.1.0</version>
</dependency>
<dependency>
<groupId>org.slf4j</groupId>
<artifactId>slf4j-api</artifactId>
<version>1.7.25</version>
</dependency>
<dependency>
<groupId>org.slf4j</groupId>
<artifactId>slf4j-simple</artifactId>
<version>1.7.25</version>
</dependency>
代码如下:
import com.rabbitmq.client.Channel;
import com.rabbitmq.client.Connection;
import com.rabbitmq.client.ConnectionFactory;
import java.io.IOException;
import java.util.concurrent.TimeoutException;

/**
*
* @author xuexiaolei
* @version 2017年08月20日
*/
public class Send {
private final static String QUEUE_NAME = "hello";

public static void main(String[] args) throws IOException, TimeoutException {
//创建一个连接,并且从连接处获取一个channel,为什么用channel参考"RabbitMQ--整体综述"
ConnectionFactory factory = new ConnectionFactory();
factory.setHost("localhost");
Connection connection = factory.newConnection();
Channel channel = connection.createChannel();
//将消息发送到某个Queue上面去
channel.queueDeclare(QUEUE_NAME, false, false, false, null);
String message = "Hello World!";
channel.basicPublish("", QUEUE_NAME, null, message.getBytes());
System.out.println(" [x] Sent '" + message + "'");
//如同数据库连接一样,依次关闭连接
channel.close();
connection.close();
}
}
import com.rabbitmq.client.*;
import java.io.IOException;
import java.util.concurrent.TimeoutException;
/**
*
* @author xuexiaolei
* @version 2017年08月20日
*/
public class Recv {
private final static String QUEUE_NAME = "hello";
public static void main(String[] args) throws IOException, TimeoutException {
//创建一个连接,并且从连接处获取一个channel,为什么用channel参考"RabbitMQ--整体综述"
ConnectionFactory factory = new ConnectionFactory();
factory.setHost("localhost");
Connection connection = factory.newConnection();
Channel channel = connection.createChannel();
//声明接收某个队列的消息
channel
15fb3
.queueDeclare(QUEUE_NAME, false, false, false, null);
System.out.println(" [*] Waiting for messages. To exit press CTRL+C");
//创建一个默认消费者,并在handleDelivery中回调处理消息内容
Consumer consumer = new DefaultConsumer(channel) {
@Override
public void handleDelivery(String consumerTag, Envelope envelope,
AMQP.BasicProperties properties, byte[] body)
throws IOException {
String message = new String(body, "UTF-8");
System.out.println(" [x] Received '" + message + "'");
}
};
//channel绑定队列、消费者,autoAck为true表示一旦收到消息则自动回复确认消息
channel.basicConsume(QUEUE_NAME, true, consumer);
}
}运行:
发送端运行两次
接收端会一直接收
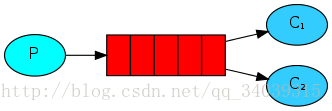
Work Queues
分发消息队列,多个消费者代码如下:
import com.rabbitmq.client.Channel;
import com.rabbitmq.client.Connection;
import com.rabbitmq.client.ConnectionFactory;

import java.io.IOException;
import java.util.concurrent.TimeoutException;

/**
*
* @author xuexiaolei
* @version 2017年08月20日
*/
public class Send {
private final static String QUEUE_NAME = "hello";

public static void main(String[] args) throws IOException, TimeoutException {
//创建一个连接,并且从连接处获取一个channel,为什么用channel参考"RabbitMQ--整体综述"
ConnectionFactory factory = new ConnectionFactory();
factory.setHost("localhost");
Connection connection = factory.newConnection();
Channel channel = connection.createChannel();
//将消息发送到某个Queue上面去
channel.queueDeclare(QUEUE_NAME, false, false, false, null);
for (int i = 0; i < 10; i++) {//改为发送十次消息
String message = "Hello World " + (i+1);
channel.basicPublish("", QUEUE_NAME, null, message.getBytes());
System.out.println(" [x] Sent '" + message + "'");
}
//如同数据库连接一样,依次关闭连接
channel.close();
connection.close();
}
}
import com.rabbitmq.client.*;
import java.io.IOException;
import java.util.Random;
import java.util.concurrent.TimeoutException;
/**
*
* @author xuexiaolei
* @version 2017年08月20日
*/
public class Recv1 {
private final static String QUEUE_NAME = "hello";
public static void main(String[] args) throws IOException, TimeoutException {
//创建一个连接,并且从连接处获取一个channel,为什么用channel参考"RabbitMQ--整体综述"
ConnectionFactory factory = new ConnectionFactory();
factory.setHost("localhost");
Connection connection = factory.newConnection();
Channel channel = connection.createChannel();
//声明接收某个队列的消息
channel.queueDeclare(QUEUE_NAME, false, false, false, null);
System.out.println(" [*] Waiting for messages. To exit press CTRL+C");
//创建一个默认消费者,并在handleDelivery中回调处理消息内容
Consumer consumer = new DefaultConsumer(channel) {
@Override
public void handleDelivery(String consumerTag, Envelope envelope,
AMQP.BasicProperties properties, byte[] body)
throws IOException {
String message = new String(body, "UTF-8");
System.out.println(" [x] Received '" + message + "'");
//增加处理时间
try {
Thread.sleep(1000);
} catch (InterruptedException e) {
e.printStackTrace();
}
}
};
//channel绑定队列、消费者,autoAck为true表示一旦收到消息自动回复确认消息
channel.basicConsume(QUEUE_NAME, true, consumer);
}
}此处Recv1与Recv2代码一致,不再赘述
运行
send发送如下
[x] Sent ‘Hello World 1’
[x] Sent ‘Hello World 2’
[x] Sent ‘Hello World 3’
[x] Sent ‘Hello World 4’
[x] Sent ‘Hello World 5’
[x] Sent ‘Hello World 6’
[x] Sent ‘Hello World 7’
[x] Sent ‘Hello World 8’
[x] Sent ‘Hello World 9’
[x] Sent ‘Hello World 10’
Recv1接收如下
[*] Waiting for messages. To exit press CTRL+C
[x] Received ‘Hello World 1’
[x] Received ‘Hello World 3’
[x] Received ‘Hello World 5’
[x] Received ‘Hello World 7’
[x] Received ‘Hello World 9’
Recv2接收如下
[*] Waiting for messages. To exit press CTRL+C
[x] Received ‘Hello World 2’
[x] Received ‘Hello World 4’
[x] Received ‘Hello World 6’
[x] Received ‘Hello World 8’
[x] Received ‘Hello World 10’
探索1:将Rev1的Thread.sleep(50)修改为50,意思是Rev1的处理能力比Rev2的处理能力强20倍,会发生什么事情呢?
结果还是和原来一样,每个Recv处理5个间隔一个的消息,为什么这样呢?默认情况下,RabbitMQ采用轮询的方式发送message,所以只能一个轮一个地发送。这个在机器处理能力不均匀的场景是不合适的,当然RabbitMQ是提供了配置方法的。探索2:在Recv2处理到收到第二条消息的时候,我们强制kill掉Recv2会发生什么事情呢?剩余的消息会不会转发到Recv1上呢?
不会的,当前的模式下,RabbitMQ发送完消息后就把缓存的消息删除了,不关心消息是否真正的处理是否完成,所以如果宕机等会发生消息丢失的情况。这个时候就需要消息确认机制了,Recv真正的收到消息,处理完消息后,RabbitMQ才删除消息。修改方法如下:
Recv增加消息确认反馈机制
@Override
public void handleDelivery(String consumerTag, Envelope envelope,
AMQP.BasicProperties properties, byte[] body)
throws IOException {
String message = new String(body, "UTF-8");
System.out.println(" [x] Received '" + message + "'");
//增加处理时间
try {
Thread.sleep(50);
} catch (InterruptedException e) {
e.printStackTrace();
} finally {
System.out.println(" [x] Done");
//此处增加消息确认确认机制,envelope.getDeliveryTag()获取消息的唯一标识,false表示仅ack当前消息
channel.basicAck(envelope.getDeliveryTag(), false);
}

//channel绑定队列、消费者,autoAck为true表示一旦收到消息自动回复确认消息
channel.basicConsume(QUEUE_NAME, false, consumer);
探索3:消息确认机制可以大体上保证消费端不丢失消息,那么Broker怎么保证呢?
开启持久化即可,当然达不到100%,毕竟持久化也是需要少量的时间,但这个时间可能造成微量损失。代码改动如下:
//统一修改队列名称
private final static String QUEUE_NAME = "task_queue";
//声明队列的时候说明属性
boolean durable = true;
channel.queueDeclare(QUEUE_NAME, durable, false, false, null);
//发送消息的时候说明保存方式
channel.basicPublish("", QUEUE_NAME, MessageProperties.PERSISTENT_TEXT_PLAIN, message.getBytes());
为什么要改队列名字呢?因为RabbitMQ只会遵循首次创建队列时候的属性!后面声明同一个名字的队列的时候,如果没有这个队列则创建,有则忽略创建任务。当然,你也可以先删除以前的队列,然后再创建,就不用改队列名了。
探索4:修正探索1的缺点
改成根据处理能力来分发消息,代码修改如下:Recv增加设置
int prefetchCount = 1;
channel.basicQos(prefetchCount);
最终整体代码如下:
import com.rabbitmq.client.Channel;
import com.rabbitmq.client.Connection;
import com.rabbitmq.client.ConnectionFactory;
import com.rabbitmq.client.MessageProperties;

import java.io.IOException;
import java.util.concurrent.TimeoutException;

/**
*
* @author xuexiaolei
* @version 2017年08月20日
*/
public class Send {
private final static String QUEUE_NAME = "task_queue";

public static void main(String[] args) throws IOException, TimeoutException {
//创建一个连接,并且从连接处获取一个channel,为什么用channel参考"RabbitMQ--整体综述"
ConnectionFactory factory = new ConnectionFactory();
factory.setHost("localhost");
Connection connection = factory.newConnection();
Channel channel = connection.createChannel();
//将消息发送到某个Queue上面去
boolean durable = true;
channel.queueDeclare(QUEUE_NAME, durable, false, false, null);
for (int i = 0; i < 10; i++) {//改为发送十次消息
String message = "Hello World " + (i+1);
channel.basicPublish("", QUEUE_NAME, MessageProperties.PERSISTENT_TEXT_PLAIN, message.getBytes());
System.out.println(" [x] Sent '" + message + "'");
}
//如同数据库连接一样,依次关闭连接
channel.close();
connection.close();
}
}
import com.rabbitmq.client.*;
import java.io.IOException;
import java.util.concurrent.TimeoutException;
/**
*
* @author xuexiaolei
* @version 2017年08月20日
*/
public class Recv1 {
private final static String QUEUE_NAME = "task_queue";
public static void main(String[] args) throws IOException, TimeoutException {
//创建一个连接,并且从连接处获取一个channel,为什么用channel参考"RabbitMQ--整体综述"
ConnectionFactory factory = new ConnectionFactory();
factory.setHost("localhost");
Connection connection = factory.newConnection();
final Channel channel = connection.createChannel();
//声明接收某个队列的消息
boolean durable = true;
channel.queueDeclare(QUEUE_NAME, durable, false, false, null);
System.out.println(" [*] Waiting for messages. To exit press CTRL+C");
int prefetchCount = 1; channel.basicQos(prefetchCount);
//创建一个默认消费者,并在handleDelivery中回调处理消息内容
Consumer consumer = new DefaultConsumer(channel) {
@Override
public void handleDelivery(String consumerTag, Envelope envelope,
AMQP.BasicProperties properties, byte[] body)
throws IOException {
String message = new String(body, "UTF-8");
System.out.println(" [x] Received '" + message + "'");
//增加处理时间
try {
Thread.sleep(50);
} catch (InterruptedException e) {
e.printStackTrace();
} finally {
System.out.println(" [x] Done");
//此处增加消息确认确认机制,envelope.getDeliveryTag()获取消息的唯一标识,false表示仅ack当前消息
channel.basicAck(envelope.getDeliveryTag(), false);
}
}
};
//channel绑定队列、消费者,autoAck为true表示一旦收到消息自动回复确认消息
channel.basicConsume(QUEUE_NAME, false, consumer);
}
}
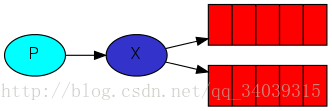
Publish/Subscribe
创建一个日志系统,一个Send,两个Recv。
重点是增加Exchange,通过fanout类型将消息广播给所有的的Recv。
这里我们创建临时队列,从RabbitMQ中获取队列名,然后在不需要使用的时候删除它。
代码如下:
import com.rabbitmq.client.Channel;
import com.rabbitmq.client.Connection;
import com.rabbitmq.client.ConnectionFactory;

import java.util.concurrent.TimeoutException;

/**
*
* @author xuexiaolei
* @version 2017年08月20日
*/
public class EmitLog {

private static final String EXCHANGE_NAME = "logs";

public static void main(String[] argv) throws java.io.IOException, TimeoutException {
//建立连接
ConnectionFactory factory = new ConnectionFactory();
factory.setHost("localhost");
Connection connection = factory.newConnection();
Channel channel = connection.createChannel();
//声明exchange,并用fanout类型
channel.exchangeDeclare(EXCHANGE_NAME, "fanout");
for (int i = 0; i < 10; i++) {//改为发送十次消息
String message = "Hello World " + (i + 1);
channel.basicPublish(EXCHANGE_NAME, "", null, message.getBytes());
System.out.println(" [x] Sent '" + message + "'");
}
//关闭连接
channel.close();
connection.close();
}
}
import com.rabbitmq.client.*;
import java.io.IOException;
/**
*
* @author xuexiaolei
* @version 2017年08月20日
*/
public class ReceiveLogs {
private static final String EXCHANGE_NAME = "logs";
public static void main(String[] argv) throws Exception {
//简历连接
ConnectionFactory factory = new ConnectionFactory();
factory.setHost("localhost");
Connection connection = factory.newConnection();
Channel channel = connection.createChannel();
//声明Exchange类型
channel.exchangeDeclare(EXCHANGE_NAME, "fanout");
//获取随机队列名称
String queueName = channel.queueDeclare().getQueue();
//Exchange与queue绑定
channel.queueBind(queueName, EXCHANGE_NAME, "");
System.out.println(" [*] " + queueName + "Waiting for messages. To exit press CTRL+C");
Consumer consumer = new DefaultConsumer(channel) {
@Override
public void handleDelivery(String consumerTag, Envelope envelope,
AMQP.BasicProperties properties, byte[] body) throws IOException {
String message = new String(body, "UTF-8");
System.out.println(" [x] Received '" + message + "'");
try {
Thread.sleep(500);
} catch (InterruptedException e) {
e.printStackTrace();
}
}
};
channel.basicConsume(queueName, true, consumer);
}
}运行两次ReceiveLogs,再运行EmitLog,就会发现ReceiveLogs都接受到了相同的消息
Routing
重点是Exchange的direct类型。如果某些消费者只关注部分消息怎么办?这个direct类型解决这类问题,也叫routing模式
import com.rabbitmq.client.Channel;
import com.rabbitmq.client.Connection;
import com.rabbitmq.client.ConnectionFactory;

import java.util.*;
import java.util.concurrent.TimeoutException;

/**
*
* @author xuexiaolei
* @version 2017年08月20日
*/
public class EmitLogDirect {
private static final String EXCHANGE_NAME = "direct_logs";
private static final List<String> SEVERITIES = new ArrayList<>();
static {
SEVERITIES.add("info");
SEVERITIES.add("error");
SEVERITIES.add("warning");
}

public static void main(String[] argv) throws java.io.IOException, TimeoutException {
ConnectionFactory factory = new ConnectionFactory();
factory.setHost("localhost");
Connection connection = factory.newConnection();
Channel channel = connection.createChannel();

channel.exchangeDeclare(EXCHANGE_NAME, "direct");

for (int i = 0; i < 10; i++) {
String severity = SEVERITIES.get(new Random().nextInt(3));//随机产生一个routingKey
String message = "some logs " + i;
channel.basicPublish(EXCHANGE_NAME, severity, null, message.getBytes());
System.out.println(" [x] Sent '" + severity + "':'" + message + "'");
}

channel.close();
connection.close();
}
}
import com.rabbitmq.client.*;
import java.io.IOException;
/**
*
* @author xuexiaolei
* @version 2017年08月20日
*/
public class ReceiveLogsDirect1 {
private static final String EXCHANGE_NAME = "direct_logs";
public static void main(String[] argv) throws Exception {
ConnectionFactory factory = new ConnectionFactory();
factory.setHost("localhost");
Connection connection = factory.newConnection();
Channel channel = connection.createChannel();
channel.exchangeDeclare(EXCHANGE_NAME, "direct");
String queueName = channel.queueDeclare().getQueue();
//绑定固定类型的routingKey
channel.queueBind(queueName, EXCHANGE_NAME, "info");
channel.queueBind(queueName, EXCHANGE_NAME, "error");
channel.queueBind(queueName, EXCHANGE_NAME, "warning");
System.out.println(" [*] Waiting for messages. To exit press CTRL+C");
Consumer consumer = new DefaultConsumer(channel) {
@Override
public void handleDelivery(String consumerTag, Envelope envelope,
AMQP.BasicProperties properties, byte[] body) throws IOException {
String message = new String(body, "UTF-8");
System.out.println(" [x] Received '" + envelope.getRoutingKey() + "':'" + message + "'");
}
};
channel.basicConsume(queueName, true, consumer);
}
}import com.rabbitmq.client.*;
import java.io.IOException;
/**
*
* @author xuexiaolei
* @version 2017年08月20日
*/
public class ReceiveLogsDirect2 {
private static final String EXCHANGE_NAME = "direct_logs";
public static void main(String[] argv) throws Exception {
ConnectionFactory factory = new ConnectionFactory();
factory.setHost("localhost");
Connection connection = factory.newConnection();
Channel channel = connection.createChannel();
channel.exchangeDeclare(EXCHANGE_NAME, "direct");
String queueName = channel.queueDeclare().getQueue();
//绑定固定类型的routingKey,只关心error
channel.queueBind(queueName, EXCHANGE_NAME, "error");
System.out.println(" [*] Waiting for messages. To exit press CTRL+C");
Consumer consumer = new DefaultConsumer(channel) {
@Override
public void handleDelivery(String consumerTag, Envelope envelope,
AMQP.BasicProperties properties, byte[] body) throws IOException {
String message = new String(body, "UTF-8");
System.out.println(" [x] Received '" + envelope.getRoutingKey() + "':'" + message + "'");
}
};
channel.basicConsume(queueName, true, consumer);
}
}运行即可发现ReceiveLogsDirect2只收到了error的相关信息,而ReceiveLogsDirect1接收到了所有消息
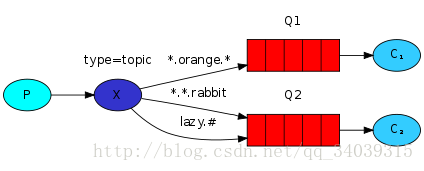
Topics
Exchange的topic类型,用通配符的方式来匹配相应的接收信息
符号“#”匹配一个或多个词,符号“*”匹配不多不少一个词
代码如下:
import com.rabbitmq.client.Channel;
import com.rabbitmq.client.Connection;
import com.rabbitmq.client.ConnectionFactory;

import java.util.ArrayList;
import java.util.List;
import java.util.Random;
import java.util.concurrent.TimeoutException;

/**
*
* @author xuexiaolei
* @version 2017年08月20日
*/
public class EmitLogDirect {
private static final String EXCHANGE_NAME = "topic_logs";
private static final List<String> SEVERITIES = new ArrayList<>();
static {
// 符号“#”匹配一个或多个词,符号“*”匹配不多不少一个词
SEVERITIES.add("*.*.rabbit");
SEVERITIES.add("a.b.rabbit");
SEVERITIES.add("c.rabbit");//丢失,因为不匹配
SEVERITIES.add("lazy.#");
SEVERITIES.add("lazy.a.b");
SEVERITIES.add("lazy.c");
SEVERITIES.add("*.orange.*");
SEVERITIES.add("a.orange.b");
SEVERITIES.add("c.orange");//丢失,因为不匹配
}

public static void main(String[] argv) throws java.io.IOException, TimeoutException {
ConnectionFactory factory = new ConnectionFactory();
factory.setHost("localhost");
Connection connection = factory.newConnection();
Channel channel = connection.createChannel();

channel.exchangeDeclare(EXCHANGE_NAME, "topic");

for (int i = 0; i < 30; i++) {
String severity = SEVERITIES.get(new Random().nextInt(SEVERITIES.size()));//随机产生一个routingKey
String message = "some logs " + i;
channel.basicPublish(EXCHANGE_NAME, severity, null, message.getBytes());
System.out.println(" [x] Sent '" + severity + "':'" + message + "'");
}

channel.close();
connection.close();
}
}
import com.rabbitmq.client.*;
import java.io.IOException;
/**
*
* @author xuexiaolei
* @version 2017年08月20日
*/
public class ReceiveLogsDirect1 {
private static final String EXCHANGE_NAME = "topic_logs";
public static void main(String[] argv) throws Exception {
ConnectionFactory factory = new ConnectionFactory();
factory.setHost("localhost");
Connection connection = factory.newConnection();
Channel channel = connection.createChannel();
channel.exchangeDeclare(EXCHANGE_NAME, "topic");
String queueName = channel.queueDeclare().getQueue();
//绑定固定类型的topic
channel.queueBind(queueName, EXCHANGE_NAME, "*.*.rabbit");
channel.queueBind(queueName, EXCHANGE_NAME, "lazy.#");
System.out.println(" [*] Waiting for messages. To exit press CTRL+C");
Consumer consumer = new DefaultConsumer(channel) {
@Override
public void handleDelivery(String consumerTag, Envelope envelope,
AMQP.BasicProperties properties, byte[] body) throws IOException {
String message = new String(body, "UTF-8");
System.out.println(" [x] Received '" + envelope.getRoutingKey() + "':'" + message + "'");
}
};
channel.basicConsume(queueName, true, consumer);
}
}import com.rabbitmq.client.*;
import java.io.IOException;
/**
*
* @author xuexiaolei
* @version 2017年08月20日
*/
public class ReceiveLogsDirect2 {
private static final String EXCHANGE_NAME = "topic_logs";
public static void main(String[] argv) throws Exception {
ConnectionFactory factory = new ConnectionFactory();
factory.setHost("localhost");
Connection connection = factory.newConnection();
Channel channel = connection.createChannel();
channel.exchangeDeclare(EXCHANGE_NAME, "topic");
String queueName = channel.queueDeclare().getQueue();
//绑定固定类型的topic
channel.queueBind(queueName, EXCHANGE_NAME, "*.orange.*");
System.out.println(" [*] Waiting for messages. To exit press CTRL+C");
Consumer consumer = new DefaultConsumer(channel) {
@Override
public void handleDelivery(String consumerTag, Envelope envelope,
AMQP.BasicProperties properties, byte[] body) throws IOException {
String message = new String(body, "UTF-8");
System.out.println(" [x] Received '" + envelope.getRoutingKey() + "':'" + message + "'");
}
};
channel.basicConsume(queueName, true, consumer);
}
}Remote procedure call (RPC)
RPC毕竟不是MQ擅长的事情,建议使用擅长的工具做擅长的事,所以此处不再赘述

相关文章推荐
- redis之redis的安装,主从复制配置以及java客户端操作
- 【RabbitMQ】CentOS安装RabbitMQ,及简单的Java客户端连接
- RabbitMQ---安装、运行、java客户端连接
- ubuntu在安装LDAP服务器,在windows客户端下查看,并使用java操作LDAP
- rabbitmq客户端c++安装详细记录
- Windows下svn客户端TortoiseSVN的安装和操作
- dotNet客户端与Java服务器端Web Service互操作过程中DateTime格式的问题
- 计算机安装Java时,出现“此操作只对目前安装的产品有效。”
- Windows下svn客户端TortoiseSVN的安装和操作
- asp.net TreeView安装、使用(如何将TreeView打包发布)(带CheckBox选择框的TreeView的初始化,TreeView客户端操作:选择父节点后自动选择所有子节点,子节点选择后自动选择父节点)(TreeView节点精确定位)
- Windows下svn客户端TortoiseSVN的安装和操作
- SVN的使用总结(2)--Windows下svn客户端TortoiseSVN的安装和操作
- svn客户端TortoiseSVN安装配置和操作详解
- Windows下svn客户端TortoiseSVN的安装和操作
- Windows下svn客户端TortoiseSVN的安装和操作
- rabbitmq客户端c++安装详细记录
- asp.net TreeView安装、使用(如何将TreeView打包发布)(带CheckBox选择框的TreeView的初始化,TreeView客户端操作:选择父节点后自动选择所有子节点,子节点选择后自动选择父节点)(TreeView节点精确定位)
- Web Service中Axis与DotNet互操作最佳实践:传递java.util.Map对象给C#(译)
- 如何让客户端自动检测安装程序(java)
- SVN服务器端,客户端的安装与配置,SVN的基本操作与集成