Android setContentView()源码解析
2017-08-16 16:43
627 查看
前言
在Activity中一般第一句就是调用setContentView(R.layout.XXX),但这其中系统做了那些工作?
我们知道,在ClassLoader装载了MainActivity之后,首先创建了Application,之后依次调用Application对象的onAttach和onCreate()方法。然后顺序调用第一个Activity的onAttach和onCreate()方法。大概有个印象即可,后文会涉及到。具体参考:Launcher启动应用程序流程源码解析。
新建测试工程TestHierarchy
新建工程后,activity_main.xml中默认只有一个RelativeLayout,其中包含一个TextView。设置
Android:id="@+id/myRelativeLayout",
android:id="@+id/myTextView"。
设置MainActivity继承自Activity。
保持默认
MainActivity extends AppCompatActivity
保持默认
<style name="AppTheme" parent="Theme.AppCompat.Light.DarkActionBar">
至此初始工作完毕。
使用hierarchy查看布局结构
hierarchy是随着SDK发布的一款可视化布局分析工具。这里只需要基础的查看布局层次。由于Hierarchy Viewer只能连接Android开发版手机或是模拟器,所以我们先在虚拟机上运行程序,然后进入..\sdk\tools,找到hierarchyviewer.bat,双击。接着选中我们的程序,之后点击Load View Hierarchy,之后会得到一个黑不溜秋的视图。而这里,就是重点要看的地方。但是为了方便理解,省去一部分不必要的Tiltle等元素,这里以继承Activity为例进行解析。可以先点击各个节点试试每个View对应的位置。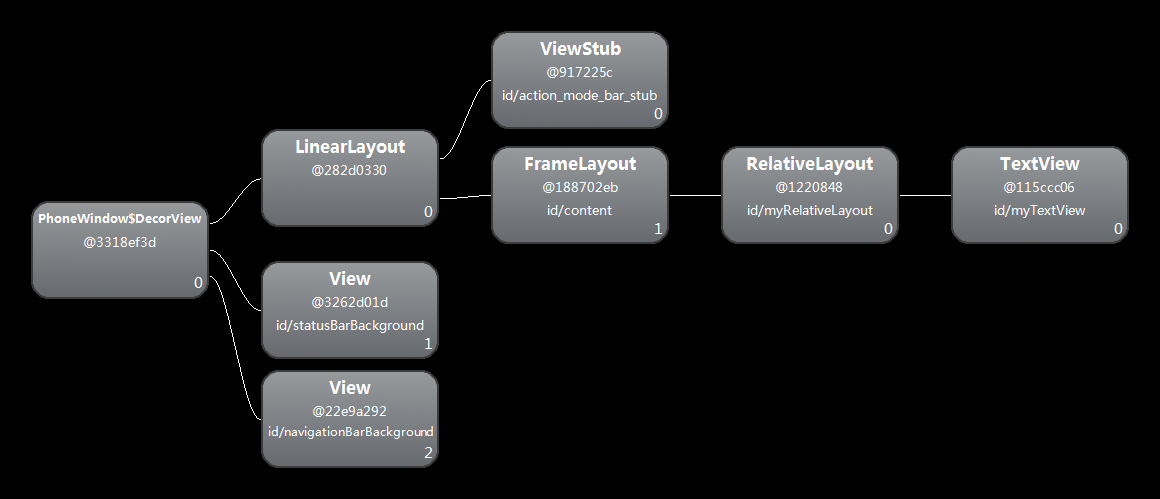
MainActivity继承Activity
这里注意下右上角的两个节点,这明显就是activity_main.xml。不信看id!
源码解析
源码位置:frameworks/base/core/Java/android/app/Activity.javaActivity#setContentView()
public void setContentView(@LayoutRes int layoutResID) {
getWindow().setContentView(layoutResID);
initWindowDecorActionBar();
}12
3
4

1
2
3
4
[/code]
由于继承的是Activity,首先我们就省略了
initWindowDecorActionBar()这一步。Activity大法好~。接下来要关注的就一行代码。首先看下这个
getWindow()返回的是个什么鬼。
public Window getWindow() {
return mWindow;
}12
3
1
2
3
[/code]
前言中说Activity的创建的时候第一个执行的方法就是attach()。这里的mWindow就是在attach()方法中被实例化的。
final void attach(...){
mWindow = new PhoneWindow(this);
mWindow.setCallback(this);
}12
3
4
1
2
3
4
[/code]
mWindow是个Window对象,但是PhoneWindow继承于Window。通过PhoneWindow获取到mWindow之后设置了一个回调。Activity实现了Window.Callback接口,而且Activity中持有一个Window的引用,这就意味着在调用Callback接口方法的时候,Activity可以得到相应的回调。并且Activity可以通过Window属性去操作View。跟进
getWindow().setContentView(layoutResID)。
源码位置:frameworks/base/core/java/com/android/internal/policy/PhoneWindow.java
PhoneWindow#setContentView()
@Override
public void setContentView(int layoutResID) {
if (mContentParent == null) {
installDecor();
} else if (!hasFeature(FEATURE_CONTENT_TRANSITIONS)) {
mContentParent.removeAllViews();
}
// 返回false,执行else分支
if (hasFeature(FEATURE_CONTENT_TRANSITIONS)) {
final Scene newScene = Scene.getSceneForLayout(mContentParent, layoutResID, getContext());
transitionTo(newScene);
} else {
mLayoutInflater.inflate(layoutResID, mContentParent);
}
mContentParent.requestApplyInsets();
final Callback cb = getCallback();
if (cb != null && !isDestroyed()) {
cb.onContentChanged();
}
}12
3
4
5
6
7
8
9
10
11
12
13
14
15
16
17
18
19
20
1
2
3
4
5
6
7
8
9
10
11
12
13
14
15
16
17
18
19
20
[/code]
先大概分析这段代码流程,首先判断mContentParent是不是为空,第一次进来什么也没干呐,铁定为null。FEATURE_CONTENT_TRANSITIONS属性用于设置Activity的切换效果,默认false。上面首先调用了
installDecor(),从上下文名称来看,这个方法应该和mContentParent变量有关系。接着调用
mLayoutInflater.inflate(layoutResID, mContentParent)将我们设置的
R.layout.XXX填充到mContentParent。结合前面hierarchyviewer图来看,mContentParent就是包含activity_main.xml的FrameLayout的一个实例。最后回调
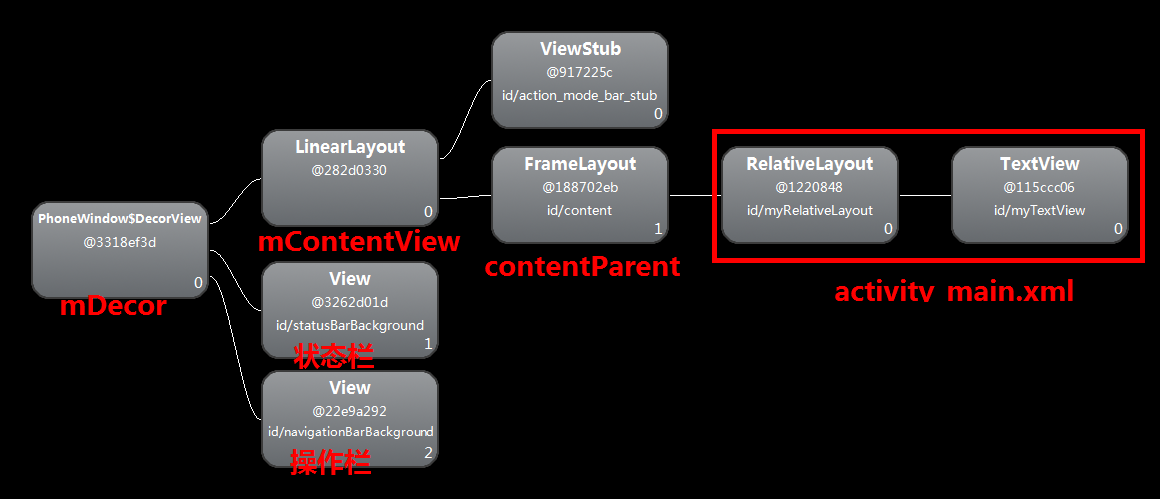
Callback#onContentChanged(),这里的cb其实就是Activity对象。这个方法在Activity中的实现为空方法,所以我们可以在自己的Activity中复写这个方法,实现自己的逻辑。在Activity的布局文件发生改动,即调用setContentView()或者addContentView()之后会调用onContentChanged()方法。跟进installDecor(),下面重点解析mDecor和mContentParent。
PhoneWindow#installDecor()
private void installDecor() {
if (mDecor == null) {
mDecor = generateDecor();
...
}
if (mContentParent == null) {
mContentParent = generateLayout(mDecor);
...
}
...
}12
3
4
5
6
7
8
9
10
11
1
2
3
4
5
6
7
8
9
10
11
[/code]
首先调用generateDecor()方法获取mDecor实例,接着依据mDecor实例获取到mContentParent。跟进。
PhoneWindow#generateDecor()
protected DecorView generateDecor() {
return new DecorView(getContext(), -1);
}

private final class DecorView extends FrameLayout12
3
4
5
1
2
3
4
5
[/code]
在PhoneWindow#generateDecor()中直接new了一个DecorView 对象,可以看到:DecorView也只是个继承FrameLayout的ViewGroup。下面跟进generateLayout()。
PhoneWindow#generateDecor()
protected ViewGroup generateLayout(DecorView decor) {
// 获取自定义属性window
TypedArray a = getWindowStyle();
...
if (a.getBoolean(R.styleable.Window_windowNoTitle, false)) {
requestFeature(FEATURE_NO_TITLE);
}
...
if ((features & (1 << FEATURE_SWIPE_TO_DISMISS)) != 0) {
layoutResource = R.layout.screen_swipe_dismiss;
}
....
else {
// Embedded, so no decoration is needed.
layoutResource = R.layout.screen_simple;
// System.out.println("Simple!");
}
mDecor.startChanging();

View in = mLayoutInflater.inflate(layoutResource, null);
decor.addView(in, new ViewGroup.LayoutParams(MATCH_PARENT, MATCH_PARENT));
mContentRoot = (ViewGroup) in;

ViewGroup contentParent = (ViewGroup)findViewById(ID_ANDROID_CONTENT);
...
mDecor.finishChanging();
return contentParent;
}12
3
4
5
6
7
8
9
10
11
12
13
14
15
16
17
18
19
20
21
22
23
24
25
26
27
28
1
2
3
4
5
6
7
8
9
10
11
12
13
14
15
16
17
18
19
20
21
22
23
24
25
26
27
28
[/code]
前面省略的一大段的作用是获取自定义属性window之后所做的各种初始化工作,这里以
requestFeature(FEATURE_NO_TITLE)为例。因为在这之后才执行
View in = mLayoutInflater.inflate(layoutResource, null),将系统依据style采用的布局文件转换为View in,这里继承的是Activity,style=Theme.AppCompat.Light.DarkActionBar,所以加载的布局为
screen_title.xml。之后将in加入到mDecor中,接着将in赋值给mContentRoot。这里的
public static final int ID_ANDROID_CONTENT = com.android.internal.R.id.content。布局文件screen_title.xml如下所示:
<?xml version="1.0" encoding="utf-8"?>
<LinearLayout xmlns:android="http://schemas.android.com/apk/res/android"
android:layout_width="match_parent"
android:layout_height="match_parent"
android:fitsSystemWindows="true"
android:orientation="vertical">
<ViewStub android:id="@+id/action_mode_bar_stub"
android:inflatedId="@+id/action_mode_bar"
android:layout="@layout/action_mode_bar"
android:layout_width="match_parent"
android:layout_height="wrap_content"
android:theme="?attr/actionBarTheme" />
<FrameLayout
android:id="@android:id/content"
android:layout_width="match_parent"
android:layout_height="match_parent"
android:foregroundInsidePadding="false"
android:foregroundGravity="fill_horizontal|top"
android:foreground="?android:attr/windowContentOverlay" />
</LinearLayout>
1
2
3
4
5
6
7
8
9
10
11
12
13
14
15
16
17
18
19
20
21
1
2
3
4
5
6
7
8
9
10
11
12
13
14
15
16
17
18
19
20
21
[/code]
id为content的Framelayout是contentParent,最外层的LinearLayout为mContentView。id为action_mode_bar_stub的
android:visibility="gone"。最后放出一张自己标注的图~
更多Framework源码解析,请移步 Framework源码解析系列[目录]

相关文章推荐
- Android 源码解析 之 setContentView
- Android应用setContentView与LayoutInflater加载解析机制源码分析
- Android应用setContentView与LayoutInflater加载解析机制源码分析
- Android应用setContentView与LayoutInflater加载解析机制源码分析(超级棒!)
- Android 源码解析 之 setContentView
- Android应用setContentView与LayoutInflater加载解析机制源码分析(转载)
- Android setContentView与LayoutInflater加载解析机制源码分析
- Android setContentView()源码解析
- Android应用setContentView与LayoutInflater加载解析机制源码分析
- Android setContentView()源码解析
- Android应用setContentView与LayoutInflater加载解析机制源码分析
- Android(11)——从源码的角度解析setContentView
- Android应用setContentView与LayoutInflater加载解析机制源码分析
- Android源码解析setContentView
- Android应用setContentView与LayoutInflater加载解析机制源码分析
- Android应用setContentView与LayoutInflater加载解析机制源码分析
- Android 源码解析 之 setContentView
- Android应用setContentView与LayoutInflater加载解析机制源码分析
- Android 源码解析 之 setContentView
- Android 源码解析 之 setContentView