Android 7.0 ActivityManagerService(2) 启动Activity的过程:一
2017-08-15 11:05
513 查看
从这一篇博客开始,我们将阅读AMS启动一个Activity的代码流程。
自己对Activity的启动过程也不是很了解,这里就初步做一个代码阅读笔记,为以后的迭代打下一个基础。
一、基础知识
在分析Activity的启动过程前,有必要先了解一下Activity相关的基础知识。
1、Task和Activity的设计理念
关于Android中Task和Activity的介绍,个人觉得《深入理解android》中的例子不错。
我们就借鉴其中的例子,进行相应的说明:
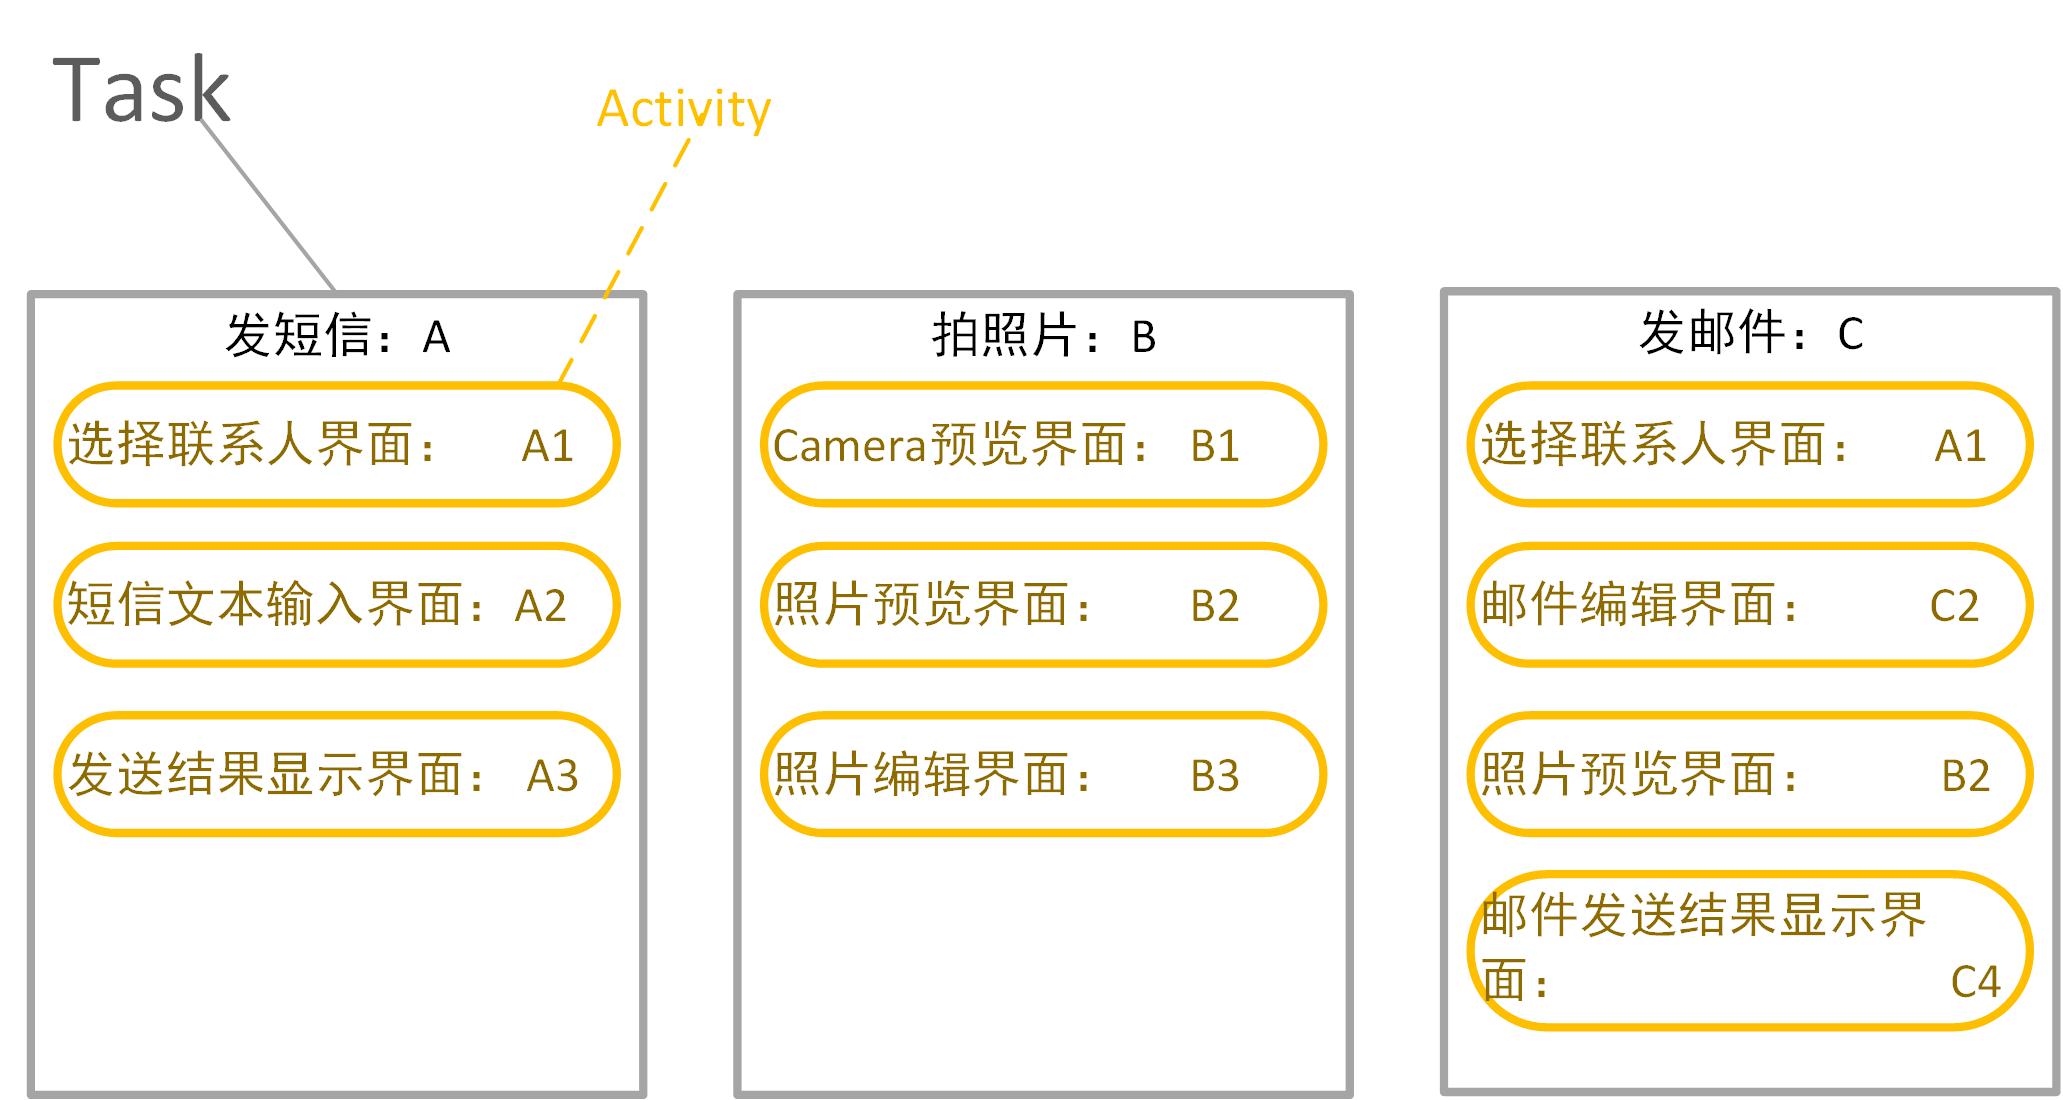
上图列出了用户在Android系统上想干的三件事,分别用A、B、C表示。
在Android中,每一件事可以被看作是一个Task;一个Task可以被细分成多个子步骤,每个子步骤可以被看作是一个Activity。
从上图可以看出,A、B两个Task使用了不同的Activity来完成相应的任务,即A、B两个Task的Activity之间没有复用。
但是在Task C中,分别使用了Task A中的A1、Task B中的B2。
这么设计的原因是:用户想做的事情(Task)即使完全不同,但是当细分Task为Activity时,就可能出现Activity功能类似的情况。
当Task A和Task B中已经有能满足需求的Activity时,Task C就会优先复用而不是重新创建Activity。
通过重用Activity可以节省一定的开销,同时为用户提供一致的界面和用户体验。
对Android的设计理念有一定的了解后,我们看看Android是如何组织Task及它所包含的Activity。

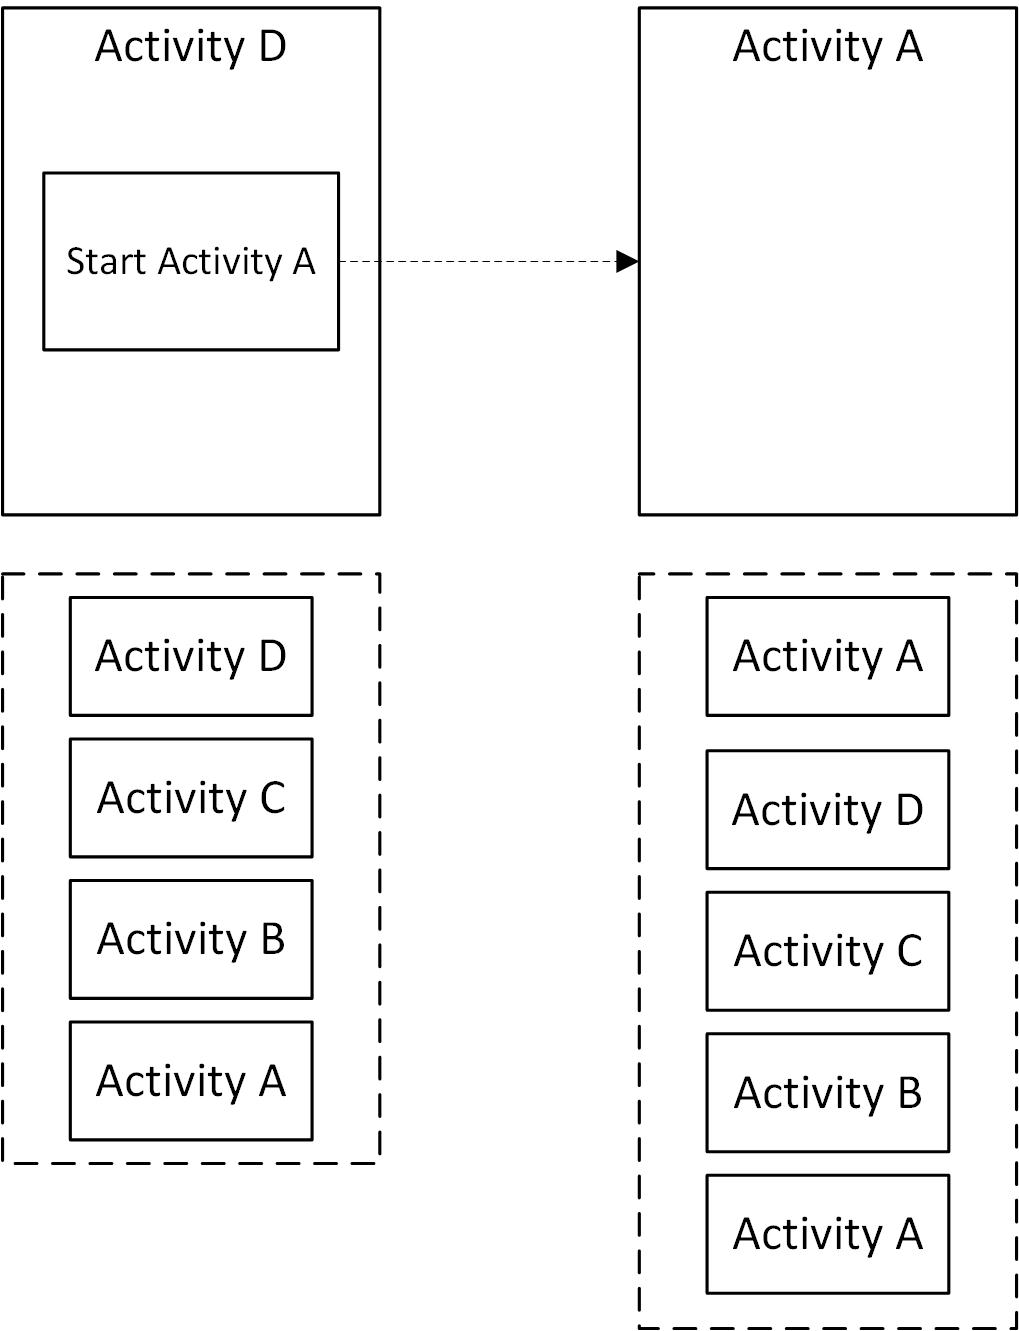
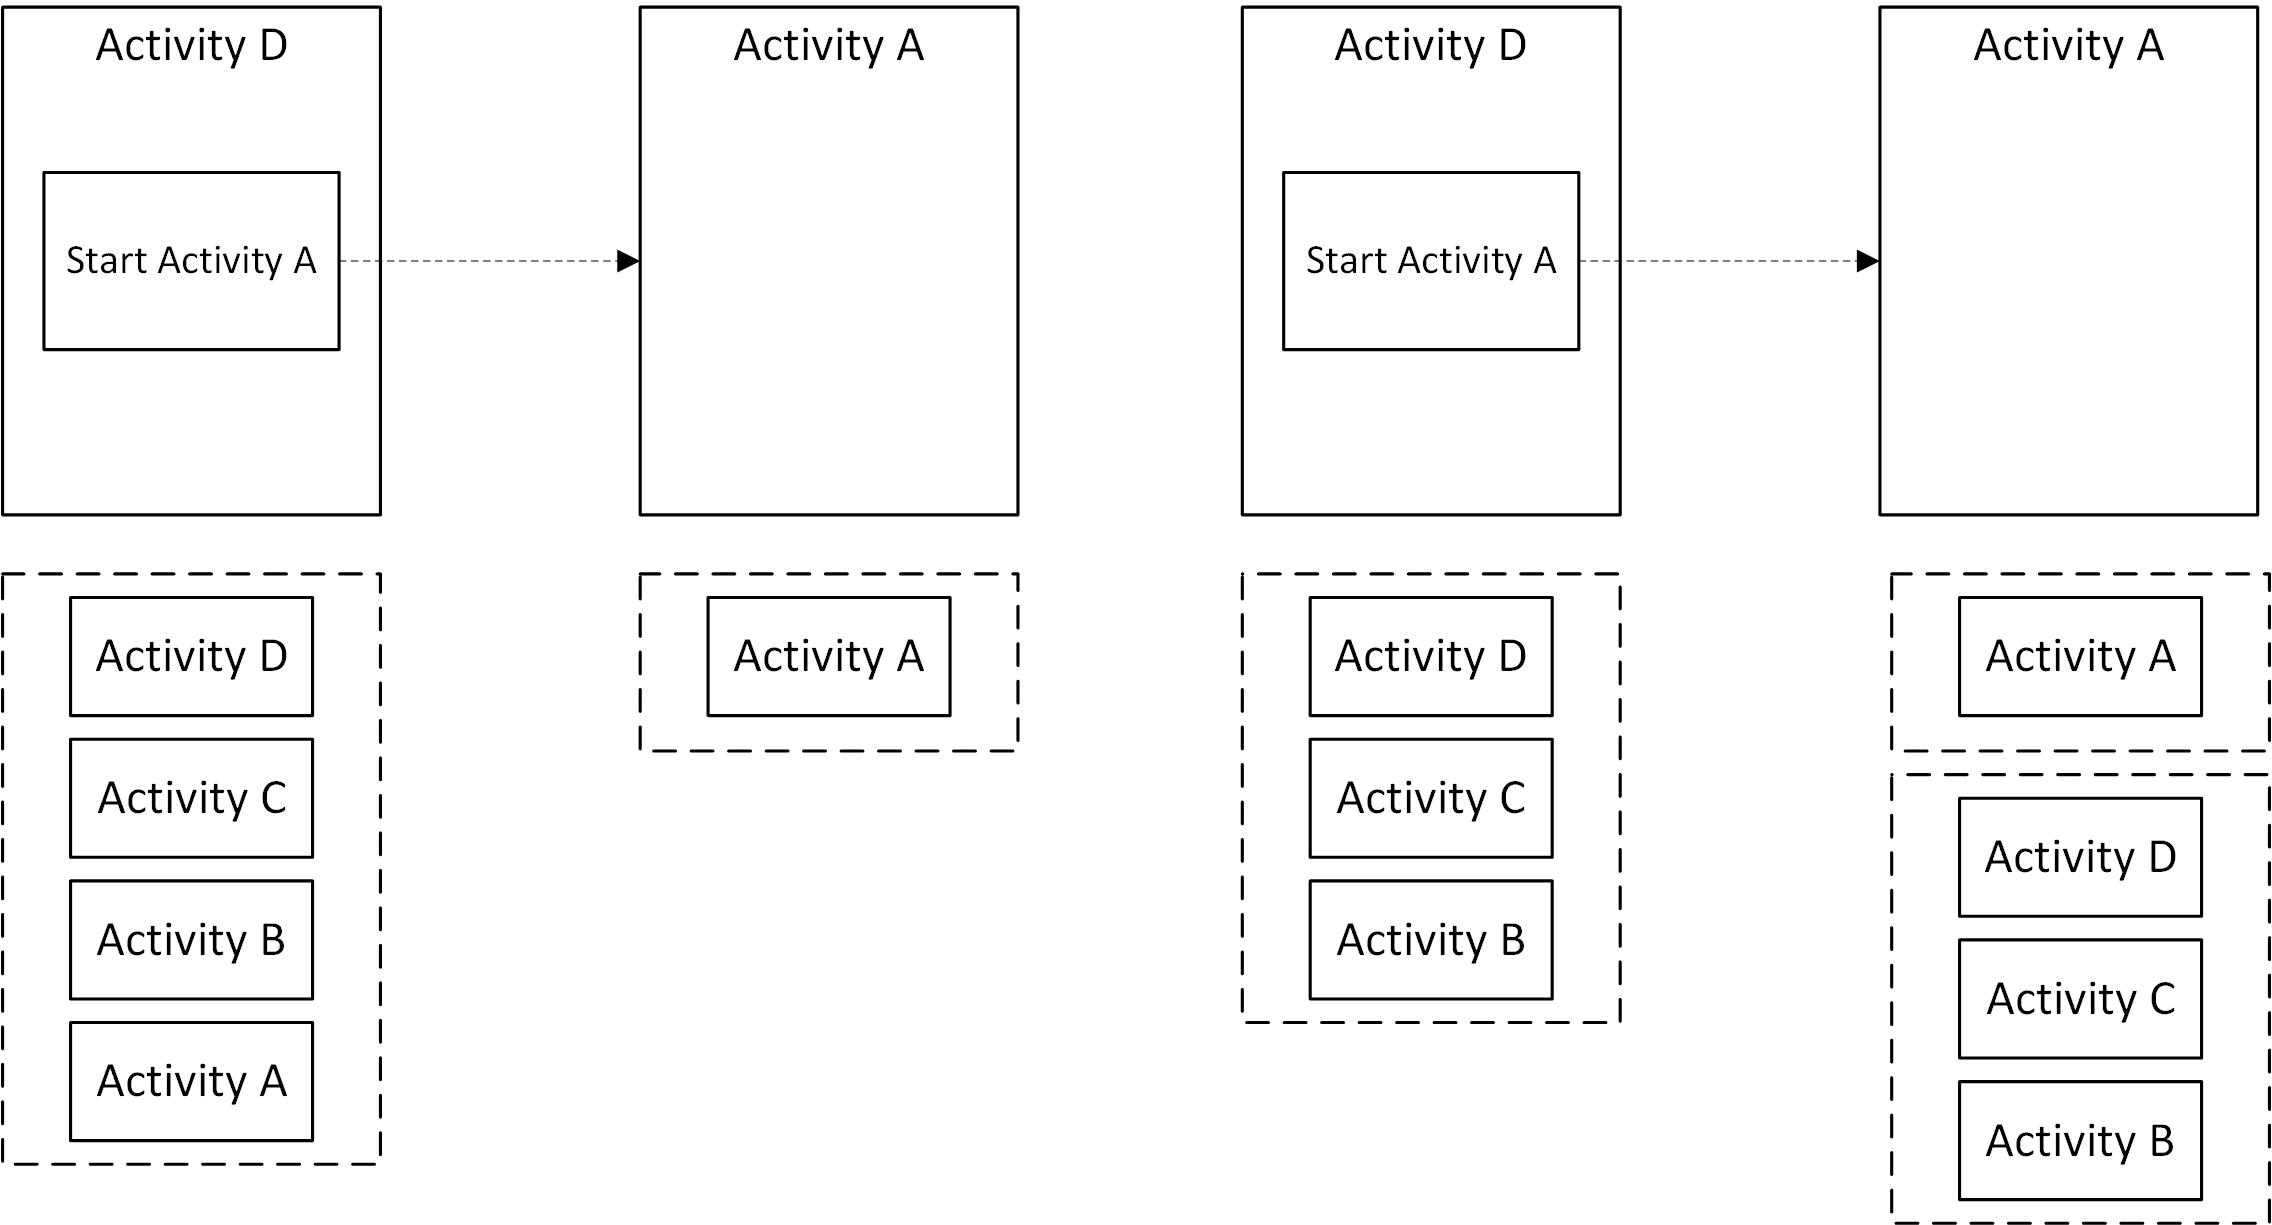
上图为一个比较经典的示例:图中的Task包含4个Activity。用户可以单击按钮跳转到下一个Activity。同时,通过返回键可以回到上一个Activity。
图中虚线下方为Activity的组织方式。从图中可以看出,Android是以Stack的方式来管理Activity的。
先启动的Activity成为栈底成员,被启动的Activity将作为栈顶成员显示在界面上。
当按返回键时,栈顶成员出栈,前一个Activity成为栈顶显示在界面上。
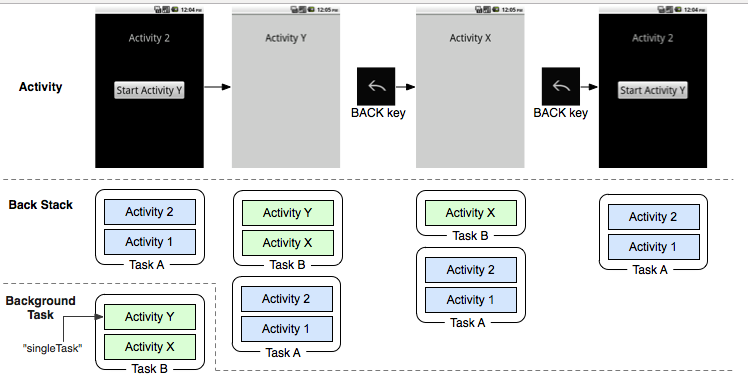
以上是一个Task的情况。当有多个Task时,Android系统只支持一个处于前台的Task,其余的Task均处于后台。
这些后台Task内部Activity保持顺序不变。用户可以一次将整个Task挪到后台或置为前台,如下图所示:
在AMS中,将用ActivityRecord来作为Activity的记录者、TaskRecord作为Task的记录者,TaskRecord中有对应的ActivityStack专门管理ActivityRecord。
2、启动模式
Android定义了4种Activity的启动模式,分别为Standard、SingleTop、SingleTask和SingleInstance。
Standard模式
我们平时直接创建的Activity都是这种模式。
这种模式的Activity的特点是:只要你创建并启动了Activity实例,Android就会向当前的任务栈中加入新创建的实例。退出该Activity时,Android就会在任务栈中销毁该实例。
因此,一个Task中可以有多个相同类型的Activity(类型相同,但不是同一个对象)。
Standard模式启动Activity的栈结构如下图所示:
SingleTop模式
这种模式会考虑当前要激活的Activity实例在任务栈中是否正处于栈顶。
如果处于栈顶则无需重新创建新的实例,将重用已存在的实例,
否则会在任务栈中创建新的实例。
SingleTop模式启动Activity的栈结构如下图所示:
注意:当用SingleTop模式启动位于栈顶的Activity时,并不会创建新的Activity,但栈顶Activity的onNewIntent函数将被调用。
SingleTask模式
在该种模式下,只要Activity在一个栈中存在,那么多次启动此Activity都不会重新创建实例。和SingleTop一样,系统也会回调其onNewIntent。
具体一点,当一个具有singleTask模式的Activity A请求启动后,系统先会寻找是否存在A想要的任务栈。
如果不存在对应任务栈,就重新创建一个任务栈,然后创建A的实例后,把A放到任务栈中。
如果存在A所需的任务栈,那么系统将判断该任务栈中是否有实例A。
如果有实例A,那么系统就将A调到栈顶并调用其onNewIntent方法(会清空A之上的Activity)。
如果没有实例A,那么系统就创建实例A并压入栈中。
SingleTask模式启动Activity的栈结构如下图所示:
SingleInstance模式
SingleInstance模式是一种加强版的SingleTask模式,它除了具有SingleTask所有的特性外,还加强了一点,那就是具有此模式的Activity只能单独地位于一个任务栈中。
3、Intent Flags
启动模式主要是配置在xml文件中的,例如:
2
3

1
2
3
[/code]
除了启动模式外,Android在用Intent拉起Activity时,还可以使用Intent Flags控制Activity及Task之间的关系。
Intent Flags数量非常多,这里只列举其中的一部分:
Intent.FLAG_ACTIVITY_NEW_TASK
默认的跳转类型,将目标Activity放到一个新的Task中。
Intent.FLAG_ACTIVITY_CLEAR_TASK
当用这个FLAG启动一个Activity时,系统会先把与该Activity有关联的Task释放掉,然后启动一个新的Task,并把目标Activity放到新的Task。
该标志必须和Intent.FLAG_ACTIVITY_NEW_TASK一起使用。
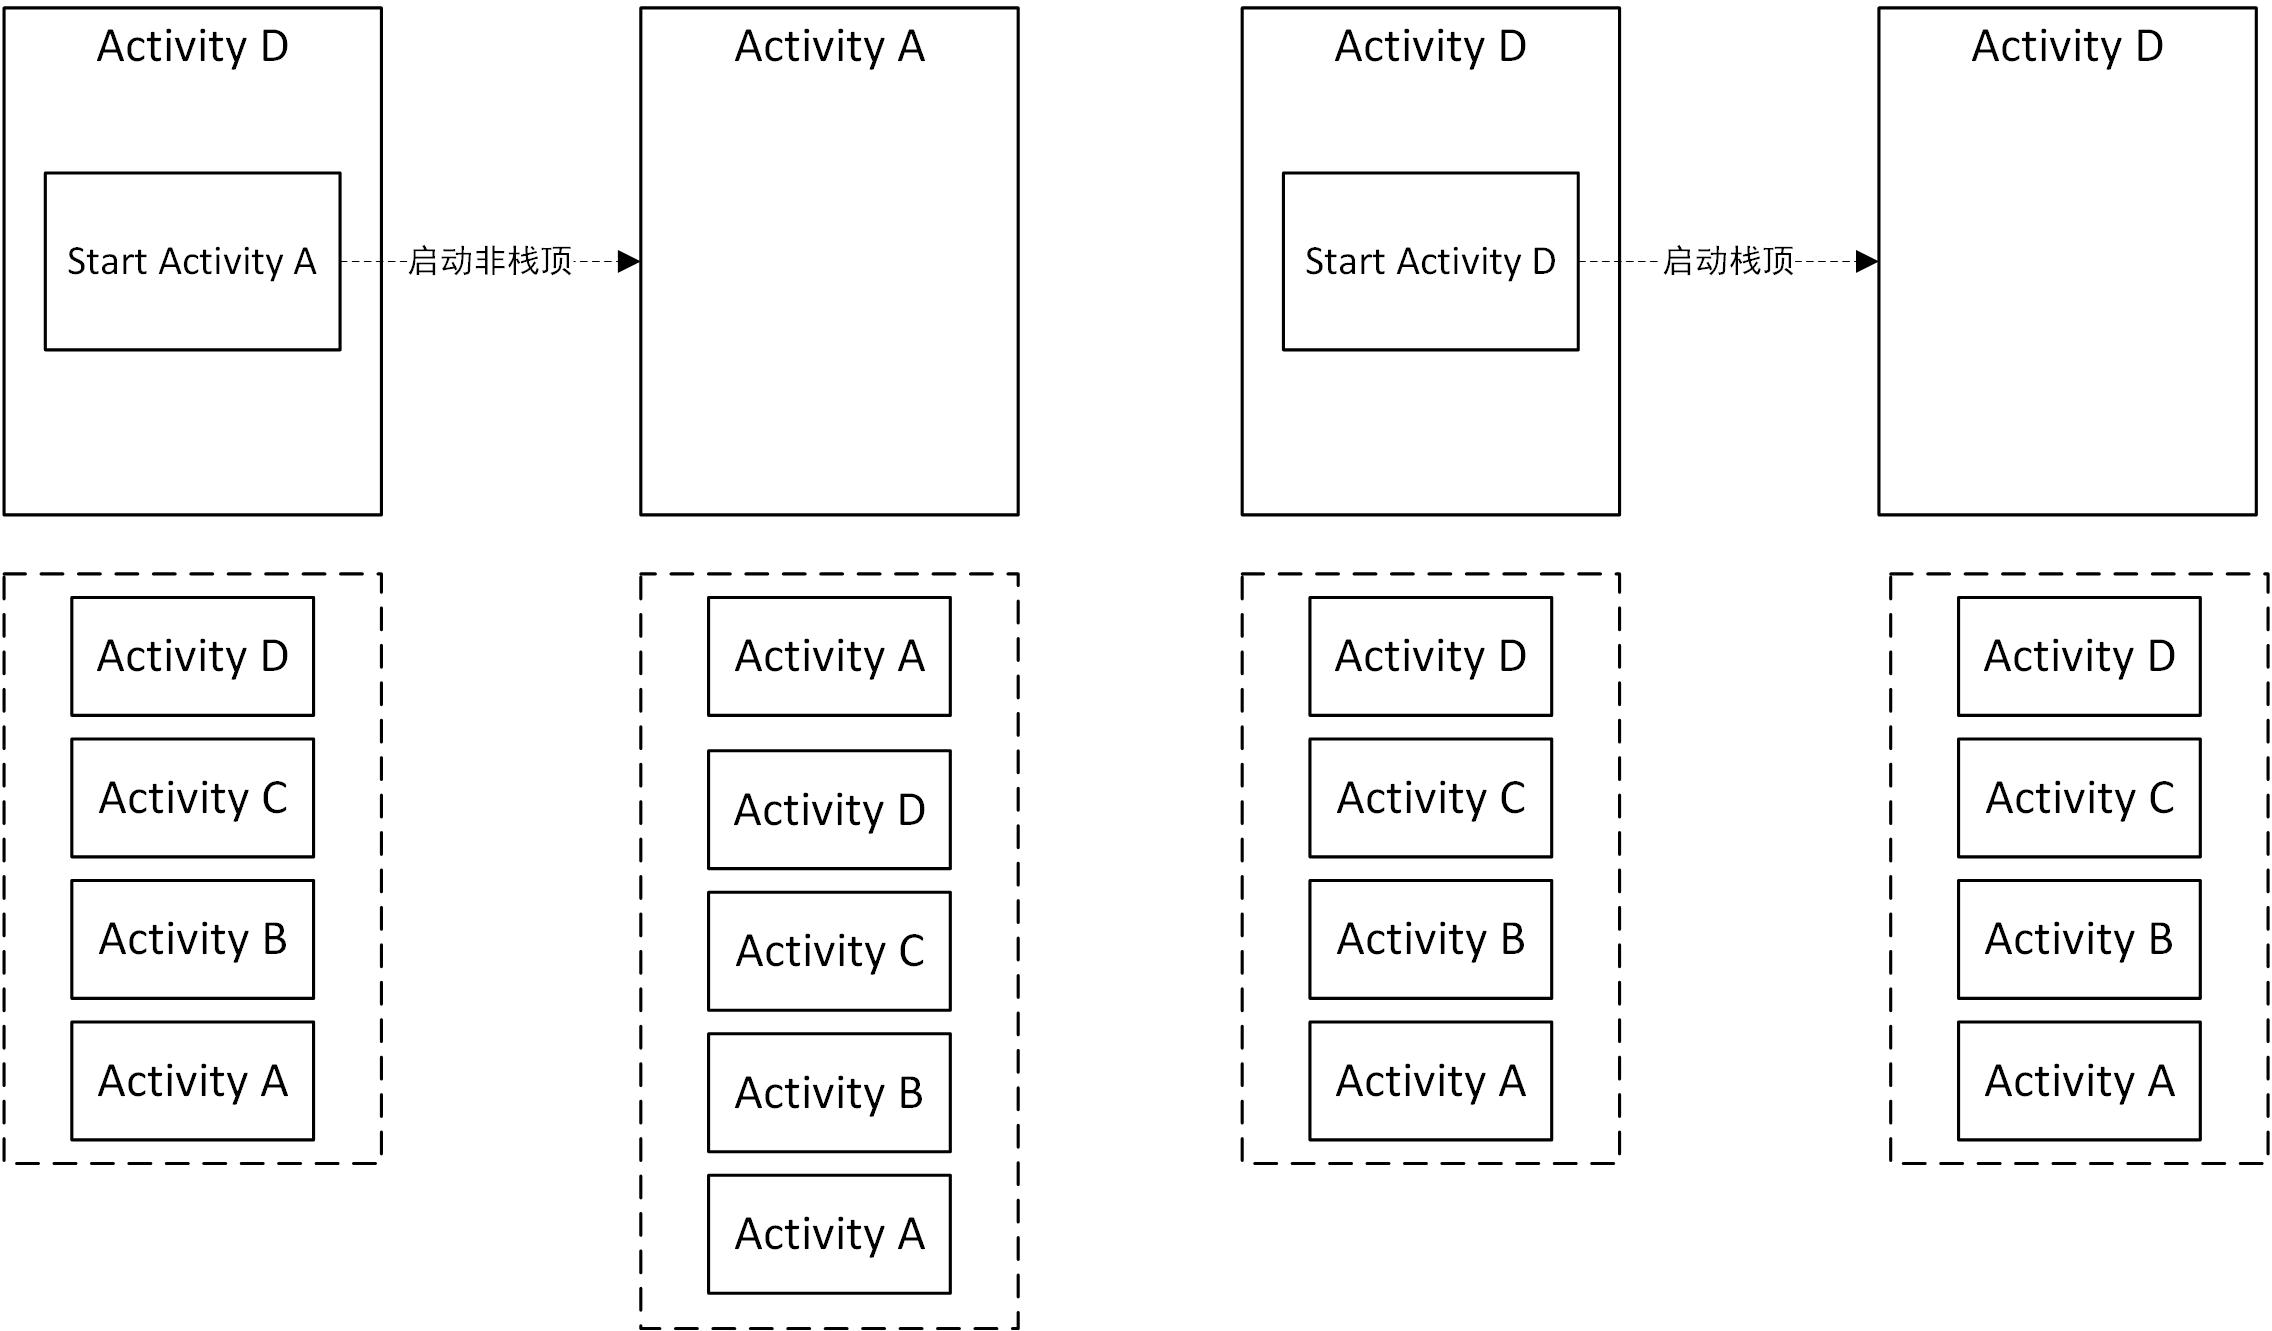
FLAG_ACTIVITY_SINGLE_TOP
这个FLAG就相当于启动模式中的singleTop。
例如:原来栈中结构是A B C D。现在,在D中启动D,那么栈中的结构还是A B C D。
FLAG_ACTIVITY_CLEAR_TOP
这个FLAG类似于启动模式中的SingleTask。
这种FLAG启动的Activity会其之上的Activity全部弹出栈空间。
例如:原来栈中的结构是A B C D ,从D中跳转到B,栈中的结构就变为了A B了。
FLAG_ACTIVITY_NO_HISTORY
用这个FLAG启动的Activity,一旦退出,就不会存在于栈中。
例如:原来栈中的结构是A B C,现在用这个FLAG启动D。然后在D中启动E,栈中的结构为A B C E。
对这些基础知识有了一定的了解后,我们来看看AMS启动Activity的代码级流程。
在这一篇博客中,我们对代码流程的分析,将截止于启动Activity对应的进程。
于是,这部分流程中大部分的内容,将围绕Activity如何选择对应的Task来展开,
由于Task的选择还要涉及对启动模式、Intent Flags等的判断,
因此整个代码将极其的琐碎,需要很有耐心才能较仔细地看完。
二、am命令
我们将看看利用am命令如何启动一个Activity。
之所以选择从am命令入手,是因为当我们从一个Activity拉起另一个Activity时,
当前Activity对应的进程需要和AMS进行交互,
这就要求我们需要对进程中与AMS交互的对象比较了解时,才比较容易分析。
而从am入手分析,当被启动Activity被创建后,代码流程自然就会涉及到这个进程与AMS的交互,
整个逻辑的顺序很容易理解。
当我们利用adb shell进入到手机的控制台后,可以利用am命令启动Activity、Service等。
具体的格式类似于:

1
[/code]
例如,启动浏览器的命令是:
1
[/code]
上面命令中的-W是一个可选项,表示等待目标activity启动后,am才返回结果;
-n ,表示后接COMPONENT。
am命令可接的参数有很多种,有兴趣可以研究一下,此处不再一一列举。
如同之前介绍pm安装apk的流程中提及的,pm命令是一个执行脚本。
am与pm一样,同样是定义于手机中的执行脚本。
am脚本的文件路径是frameworks/base/cms/am,其内容如下:
2
3
4
5
6
7
8
1
2
3
4
5
6
7
8
[/code]
与调用pm命令类似,调用am命令同样最终会调用到Am.Java(frameworks/base/cmds/am/src/com/android/commands/am)的main函数。
这里的调用过程可以参考Android7.0 PackageManagerService (3) APK安装的第二部分。
现在我们直接看看Am.java的main函数:
2
3
4
5
6
7
8
9
1
2
3
4
5
6
7
8
9
[/code]
Am继承自BaseCommand,上面的run函数定义于BaseCommand中:
2
3
4
5
6
7
8
9
10
11
12
13
14
15
16
17
1
2
3
4
5
6
7
8
9
10
11
12
13
14
15
16
17
[/code]
现在进入到Am.java的onRun函数:
2
3
4
5
6
7
8
9
10
11
12
13
14
15
1
2
3
4
5
6
7
8
9
10
11
12
13
14
15
[/code]
从代码可以看出,am命令的功能很多,此处我们主要看看start相关的runStart函数:
2
3
4
5
6
7
8
9
10
11
12
13
14
15
16
17
18
19
20
21
22
23
24
25
26
27
28
29
30
31
32
33
34
35
36
37
38
39
40
41
42
43
44
45
46
47
48
49
50
51
52
53
54
55
56
1
2
3
4
5
6
7
8
9
10
11
12
13
14
15
16
17
18
19
20
21
22
23
24
25
26
27
28
29
30
31
32
33
34
35
36
37
38
39
40
41
42
43
44
45
46
47
48
49
50
51
52
53
54
55
56
[/code]
从上面的代码可以看出,am最终将调用AMS的startActivityAndWait或startActivityAsUser函数,来启动参数指定的Activity。
我们以startActivityAndWait为例进行分析。
三、startActivityAndWait流程
startActivityAndWait的参数比较多,先来大致看一下参数的含义:
2
3
4
5
6
7
8
9
10
11
12
13
14
15
16
17
18
19
20
21
22
23
24
25
26
27
28
29
30
31
1
2
3
4
5
6
7
8
9
10
11
12
13
14
15
16
17
18
19
20
21
22
23
24
25
26
27
28
29
30
31
[/code]
现在我们看看startActivityAndWait函数的具体内容:
2
3
4
5
6
7
8
9
10
11
12
13
14
1
2
3
4
5
6
7
8
9
10
11
12
13
14
[/code]
上面代码中的ActivityStarter初始化于AMS的构造函数中,专门负载启动Activity相关的工作。
当我们通过am命令启动一个Activity时,假设系统之前没有启动过该Activity,那么从功能的角度来看,ActivityStarter调用artActivityMayWait函数后,系统将完成以下工作:
1、上文提及在Am.java中,为Intent增加了标志位FLAG_ACTIVITY_NEW_TASK,因此系统将为Activity创建ActivityRecord和对应的TaskRecord。
2、系统需要启动一个新的应用进程以加载并运行该Activity。
3、还需要停止当前正在显示的Activity。
接下来,我们跟进一下ActivityStarter的startActivityMayWait函数。
我们可以将该函数分为三部分进行分析:
1 第一部分
2
3
4
5
6
7
8
9
10
11
12
13
14
15
16
17
18
19
20
21
22
23
24
25
26
27
28
29
30
31
32
33
34
35
36
37
38
39
40
41
42
43
44
45
46
47
48
49
50
51
52
53
54
55
56
57
58
59
60
61
62
1
2
3
4
5
6
7
8
9
10
11
12
13
14
15
16
17
18
19
20
21
22
23
24
25
26
27
28
29
30
31
32
33
34
35
36
37
38
39
40
41
42
43
44
45
46
47
48
49
50
51
52
53
54
55
56
57
58
59
60
61
62
[/code]
从上面的代码来看,startActivityMayWait在第一阶段最主要的工作其实就是:
1、解析出与Intent相匹配的ActivityInfo。
2、得到启动该Activity的Task,即父Activity的Task或前台Task。
2 第二部分
2
3
4
5
6
7
1
2
3
4
5
6
7
[/code]
这一部分中,涉及到了启动Activity的核心函数startActivityLocked。该函数比较复杂,我们在后面单独分析。
当该函数成功执行完毕后,Activity将会被启动,并形成对应的ActivityRecord被AMS统一管理。
我们先看看startActivityMayWait函数第三部分的工作。
3 第三部分
2
3
4
5
6
7
8
9
10
11
12
13
14
15
16
17
18
19
20
21
22
23
24
25
26
27
28
29
30
31
32
33
34
35
36
37
38
39
40
41
42
1
2
3
4
5
6
7
8
9
10
11
12
13
14
15
16
17
18
19
20
21
22
23
24
25
26
27
28
29
30
31
32
33
34
35
36
37
38
39
40
41
42
[/code]
从上面的代码可以看出,第三阶段的工作就是根据返回值做一些处理。
由于我们在输入的命令时,指定了-W选项,因此将进入wait状态等待Activity界面被显示。
四、startActivityLocked流程
接下来,我们看看上面提及到的核心函数startActivityLocked:
2
3
4
5
6
7
8
9
10
11
12
13
14
15
16
17
18
19
20
21
22
23
24
25
26
27
28
29
30
31
32
33
34
35
36
37
38
39
40
41
42
43
44
45
46
47
48
49
50
51
52
53
54
55
56
57
58
59
60
61
62
63
64
65
66
67
68
69
70
71
72
73
74
75
76
77
78
79
80
81
82
83
84
85
86
87
88
89
90
91
92
93
94
95
96
97
98
99
100
101
102
103
104
105
106
107
108
109
110
111
112
113
114
115
116
117
118
119
120
121
122
123
124
125
126
127
128
129
130
131
132
133
134
135
136
137
138
139
140
141
142
143
144
145
146
147
148
149
150
151
152
153
154
155
156
157
1
2
3
4
5
6
7
8
9
10
11
12
13
14
15
16
17
18
19
20
21
22
23
24
25
26
27
28
29
30
31
32
33
34
35
36
37
38
39
40
41
42
43
44
45
46
47
48
49
50
51
52
53
54
55
56
57
58
59
60
61
62
63
64
65
66
67
68
69
70
71
72
73
74
75
76
77
78
79
80
81
82
83
84
85
86
87
88
89
90
91
92
93
94
95
96
97
98
99
100
101
102
103
104
105
106
107
108
109
110
111
112
113
114
115
116
117
118
119
120
121
122
123
124
125
126
127
128
129
130
131
132
133
134
135
136
137
138
139
140
141
142
143
144
145
146
147
148
149
150
151
152
153
154
155
156
157
[/code]
startActivityLocked函数比较长,但主干比较清晰,只是添加许多条件判断。
从代码来看主要工作包括:
1、处理sourceRecord和resultRecord。
sourceRecord表示发起本次请求的Activity,即父Activity对应的信息;
resultRecord表示接收处理结果的Activity。
在一般情况下,sourceRecord和resultRecord应指向同一个Activity。
2、处理app switch。
如果AMS当前禁止app switch,那么AMS会将本次请求保存起来,以待允许app switch时再进行处理。
从代码可以看出,当AMS可以进行app switch时,在处理本次的请求前,会先调用doPendingActivityLaunchesLocked函数。
doPendingActivityLaunchesLocked函数将启动之前因系统禁止app switch而保存的请求。
3、调用startActivityUnchecked处理本次Activity的启动请求。
在分析接下来的流程前,我们先看看app switch相关的内容。
在AMS中,提供了两个函数stopAppSwitches和resumeAppSwitches,用于暂时禁止App切换及恢复切换。
这种需求的考虑是:当某些重要的Activity处于前台时,不希望系统因为用户操作之外的原因切换Activity。
1、stopAppSwitches
先来看看stopAppSwitches:
2
3
4
5
6
7
8
9
10
11
12
13
14
15
16
17
1
2
3
4
5
6
7
8
9
10
11
12
13
14
15
16
17
[/code]
对于上面的代码,需要注意两点:
1、此处的控制机制名为app switch,而不是Activity switch。
这是因为如果从受保护的Activity中启动另一个Activity,那么这个新的Activity的目的应该是针对同一个任务。
于是这次的启动就不应该受app switch的制约。
2、执行stopAppSwitches后,应用程序应该调用resumeAppSwitches以允许app switch。
为了防止应用程序有意或者无意没调用resumeAppSwitches,在stopAppSwitches中设置了一个超时时间,过了此超时时间,系统会发送一个消息触发App Switch的操作。
2、resumeAppSwitches
现在我们看看resumeAppSwitches的代码:
2
3
4
5
6
7
8
9
10
11
1
2
3
4
5
6
7
8
9
10
11
[/code]
从代码可以看出,resumeAppSwitches只设置了mAppSwitchesAllowedTime的值为0,它并不处理在stop和resume这段时间内积攒起的Pending请求。
根据前面startActivityLocked函数,我们知道如果在执行resume app switch后,又有新的请求需要处理,则先调用doPendingActivityLaunchesLocked处理那些pending的请求。
此外,resumeAppSwitches函数中并没有撤销stopAppSwitches函数中设置的超时消息,所以当该消息被处理时,同样会触发处理pending请求的流程。
五、startActivityUnchecked流程
顺着请求的处理流程,我们接下来看看startActivityUnchecked函数。
startActivityUnchecked函数比较长,我们分段看一下。
Part-I
第一部分如下代码所示,主要用于判断是否需要为新的Activity创建一个Task。
2
3
4
5
6
7
8
9
10
11
1
2
3
4
5
6
7
8
9
10
11
[/code]
我们依次看看上述代码中的几个函数:
1、setInitialState
2
3
4
5
6
7
8
9
10
11
12
13
14
15
16
17
18
19
20
21
22
23
24
25
26
27
28
29
30
31
32
33
34
35
36
37
38
39
40
41
1
2
3
4
5
6
7
8
9
10
11
12
13
14
15
16
17
18
19
20
21
22
23
24
25
26
27
28
29
30
31
32
33
34
35
36
37
38
39
40
41
[/code]
上面的这部分代码,有些参数的用途目前还不太清楚,没有进行记录,以后重新阅读时,再进行添加和修改。
Activity启动时,Intent可以选择的Flag太多了,setInitialState对于一些不太常用的Flag也进行了判断。
因此,如果需要真正弄懂这一部分,还是要看看关于Intent中Flag相关的文档。
2、computeLaunchingTaskFlags
2
3
4
5
6
7
8
9
10
11
12
13
14
15
16
17
18
19
20
21
22
23
24
25
26
27
28
29
30
31
32
33
34
35
36
37
38
39
40
41
42
43
44
45
46
47
48
49
50
51
52
53
54
55
56
57
58
59
60
61
62
63
64
65
66
67
68
69
70
71
72
73
74
75
76
77
78
79
80
81
82
83
84
85
86
87
88
1
2
3
4
5
6
7
8
9
10
11
12
13
14
15
16
17
18
19
20
21
22
23
24
25
26
27
28
29
30
31
32
33
34
35
36
37
38
39
40
41
42
43
44
45
46
47
48
49
50
51
52
53
54
55
56
57
58
59
60
61
62
63
64
65
66
67
68
69
70
71
72
73
74
75
76
77
78
79
80
81
82
83
84
85
86
87
88
[/code]
如同函数名一样,这部分代码主要用于决策是否在LaunchFlags中添加FLAG_ACTIVITY_NEW_TASK。
主要的思想可以简化为:
1、如果参数中,指定了希望Activity加入的Task,同时这个Task确实可用(不与当前的LaunchFlags矛盾),那么mInTask和mReuseTask的值不为null,不需要添加FLAG_ACTIVITY_NEW_TASK。
2、如果不满足1中的条件,即没有指定希望Activity加入的Task,或者指定的Task无法使用,在满足条件的情况下,会为LaunchFlags添加FLAG_ACTIVITY_NEW_TASK。
简单的一句话就是:在正常情况下,若现存Task中,没有待启动Activity可以使用的,就重新为其创建一个。
3、computeSourceStack
2
3
4
5
6
7
8
9
10
11
12
13
14
15
16
17
18
19
20
21
22
23
24
25
26
1
2
3
4
5
6
7
8
9
10
11
12
13
14
15
16
17
18
19
20
21
22
23
24
25
26
[/code]
这一部分代码主要用于记录父Activity对应的TaskRecord信息。
如同注释部分,当父Activity Finishing时,此父Activity对应Task不再作为新Activity的sourceStack,因为该Task有可能会被Android系统清理掉。
在这种情况下,Android系统将创建新的Task作为sourceStack,同时使这个新Task的信息与父Activity原有sourceTask信息相同。
至此,startActivityUnchecked的第一部分结束。
在这一部分中,代码主要判断Activity是否需要插入到现有Task中,同时当存在父Activity时,判断sourceTask是否有效。
所有的这些判断,最后都用于决策新启动的Activity是否需要携带FLAG_ACTIVITY_NEW_TASK标志,即是否需要新建一个Task对象。
Part-II
接下来,我们看看startActivityUnchecked的第二部分。
2
3
4
5
6
7
8
9
10
11
12
13
14
15
16
17
18
19
20
21
22
23
24
25
26
27
28
29
30
31
32
33
34
35
36
37
38
39
40
41
42
43
44
45
46
47
48
49
50
51
52
53
54
55
56
57
58
59
60
61
62
63
64
65
66
1
2
3
4
5
6
7
8
9
10
11
12
13
14
15
16
17
18
19
20
21
22
23
24
25
26
27
28
29
30
31
32
33
34
35
36
37
38
39
40
41
42
43
44
45
46
47
48
49
50
51
52
53
54
55
56
57
58
59
60
61
62
63
64
65
66
[/code]
这一段代码主要是针对复用Activity的场景,代码逻辑比较繁杂,但主要目的是:
当判断新启动的Activity可以复用现有Task中的Activity时,则按照Activity的启动模式,对该Activity所在的Task执行相应的操作。
接下来,我们看看其中比较关键的函数。
1、getReusableIntentActivity
getReusableIntentActivity将决定新启动的Activity是否可以复用现有的Activity。
2
3
4
5
6
7
8
9
10
11
12
13
14
15
16
17
18
19
20
21
22
23
24
25
26
27
28
29
30
31
32
33
34
35
36
37
38
39
40
41
42
43
44
45
46
47
48
49
50
1
2
3
4
5
6
7
8
9
10
11
12
13
14
15
16
17
18
19
20
21
22
23
24
25
26
27
28
29
30
31
32
33
34
35
36
37
38
39
40
41
42
43
44
45
46
47
48
49
50
[/code]
这段代码参照注释,不难理解它的意思:
当我们启动一个Activity时,优先是想进行复用。因此,需要寻找匹配该Activity的Task。
如果在启动参数中,指定了目标Task,那么显然需要利用ActivityStackSupervisor找到指定的Task。
如果指定的Task存在,那么新启动的Activity将插入到该Task的Top位置。
如果启动参数未指定启动Task,那么就需要根据Activity信息,利用ActivityStackSupervisor在当前的Task中进行匹配了。
具体的匹配规则,在这里就不做进一步展开了。
2、setTargetStackAndMoveToFrontIfNeeded
这一部分代码应该是,当可以进行Activity复用时,在必要的情况下,将待启动Activity所在的Task移动到前台。
2
3
4
5
6
7
8
9
10
11
12
13
14
15
16
17
18
19
20
21
22
23
24
25
26
27
28
29
30
31
32
33
34
35
36
37
38
39
40
41
42
43
44
45
46
47
48
49
50
51
52
53
54
55
56
57
58
59
60
61
62
63
64
65
66
67
68
69
70
71
72
73
74
75
76
77
78
79
80
81
82
83
84
85
86
87
88
89
90
91
92
93
94
95
96
97
98
99
1
2
3
4
5
6
7
8
9
10
11
12
13
14
15
16
17
18
19
20
21
22
23
24
25
26
27
28
29
30
31
32
33
34
35
36
37
38
39
40
41
42
43
44
45
46
47
48
49
50
51
52
53
54
55
56
57
58
59
60
61
62
63
64
65
66
67
68
69
70
71
72
73
74
75
76
77
78
79
80
81
82
83
84
85
86
87
88
89
90
91
92
93
94
95
96
97
98
99
[/code]
这段代码背后的逻辑还是比较复杂的。
不过从代码来看,在正常的情况下,若待启动的Activity可以被复用,那么对应的Task会被移动到前台。
至此,startActivityUnchecked第二部分代码分析完毕。
这部分代码我略去了很多的细节,但仍然很难一眼就看懂。
目前,我们仅需要记住这段代码的核心目的:当发现待启动的Activity可以复用时,在必要时将对应的Task移动到前台。
至于其它的判断分支,主要依赖于启动模式之类的信息。
Part-III
2
3
4
5
6
7
8
9
10
11
12
13
14
15
16
17
18
19
20
21
22
23
24
25
26
27
28
29
30
31
32
33
34
35
36
37
38
39
40
41
42
43
44
45
46
47
48
49
50
51
52
53
54
55
56
57
58
59
60
61
62
63
64
65
66
67
68
69
70
71
72
73
74
75
76
77
78
79
80
81
82
83
84
1
2
3
4
5
6
7
8
9
10
11
12
13
14
15
16
17
18
19
20
21
22
23
24
25
26
27
28
29
30
31
32
33
34
35
36
37
38
39
40
41
42
43
44
45
46
47
48
49
50
51
52
53
54
55
56
57
58
59
60
61
62
63
64
65
66
67
68
69
70
71
72
73
74
75
76
77
78
79
80
81
82
83
84
[/code]
startActivityUnchecked第三部分代码最核心的内容是:决定是否为待启动的Activity创建对应的Task,同时将Activity和Task关联起来。
最后,调用ActivityStackSupervisor的resumeFocusedStackTopActivityLocked函数。
六、resumeFocusedStackTopActivityLocked流程
顺着代码流程,我们看看ActivityStackSupervisor中的resumeFocusedStackTopActivityLocked函数:
2
3
4
5
6
7
8
9
10
11
12
13
14
1
2
3
4
5
6
7
8
9
10
11
12
13
14
[/code]
我们跟进ActivityStack的resumeTopActivityUncheckedLocked函数:
2
3
4
5
6
7
8
9
10
11
12
13
14
15
16
17
18
19
20
21
22
23
24
25
26
27
28
29
30
31
32
33
34
35
36
37
38
39
40
41
42
43
44
45
46
47
48
49
50
51
52
53
54
55
56
57
58
59
60
61
62
63
64
65
66
67
68
69
70
71
72
73
74
75
76
77
78
79
80
81
82
83
84
85
86
87
88
89
90
91
92
93
94
95
96
97
98
99
100
101
102
103
104
105
106
107
108
109
110
111
112
113
114
115
116
117
118
119
120
121
122
123
124
125
126
127
128
129
130
131
132
133
134
135
136
137
138
1
2
3
4
5
6
7
8
9
10
11
12
13
14
15
16
17
18
19
20
21
22
23
24
25
26
27
28
29
30
31
32
33
34
35
36
37
38
39
40
41
42
43
44
45
46
47
48
49
50
51
52
53
54
55
56
57
58
59
60
61
62
63
64
65
66
67
68
69
70
71
72
73
74
75
76
77
78
79
80
81
82
83
84
85
86
87
88
89
90
91
92
93
94
95
96
97
98
99
100
101
102
103
104
105
106
107
108
109
110
111
112
113
114
115
116
117
118
119
120
121
122
123
124
125
126
127
128
129
130
131
132
133
134
135
136
137
138
[/code]
resumeTopActivityInnerLocked函数非常繁琐,但整体来讲应该只有两个比较关键的地方:
1、如果mResumedActivity不为空,则需要先暂停这个Activity。
mResumedActivity代表当前已经存在于界面的Activity。当需要启动一个新的Activity时,需要先停止当前的Activity。
这部分工作由startPausingLocked函数来完成。
当前的Activity被中断后,将重新启动新的Activity。
2、当mResumedActivity为空时,若待启动的Activity对应的应用存在,那么仅需要重新启动该Activity;
否则,需要调用ActivityStackSupervisor的startSpecificActivityLocked函数,启动整个进程。
需要说明的是:
1、当系统启动第一个Activity,即Home时,mResumedActivity的值才会为null。
因此,即使我们以脚本的方式,启动一个Activity,也必须先中断当前的界面,才能进行后续的操作。
2、分析startPausingLocked函数时,将涉及到当前界面对应的进程、新启动Activity所在的进程,与AMS之间的交互,整体比较复杂。
因此还是先从简单的情况入手,看看直接启动新Activity所在进程的startSpecificActivityLocked函数。
从逻辑上看,猜测startPausingLocked函数中断现有Activity后,最终也会调用startSpecificActivityLocked启动新Activity。
七、startSpecificActivityLocked流程
现在我们跟进一下startSpecificActivityLocked函数:
2
3
4
5
6
7
8
9
10
11
12
13
14
15
16
17
18
19
20
21
22
23
24
25
26
27
28
29
30
31
32
33
34
35
36
37
38
1
2
3
4
5
6
7
8
9
10
11
12
13
14
15
16
17
18
19
20
21
22
23
24
25
26
27
28
29
30
31
32
33
34
35
36
37
38
[/code]
顺着流程,进入AMS的startProcessLocked函数:
2
3
4
5
6
7
8
9
10
11
12
13
14
15
16
17
18
19
20
21
22
23
24
25
26
27
28
29
30
31
32
33
34
35
36
37
38
39
40
41
42
43
44
45
46
47
48
49
50
51
52
53
54
55
56
57
58
59
60
61
62
63
64
65
66
67
68
69
70
71
72
73
74
75
76
77
78
79
80
81
82
83
84
85
86
87
88
89
90
91
92
93
94
95
96
97
98
99
100
101
102
103
104
105
106
107
108
109
110
111
112
113
114
115
1
2
3
4
5
6
7
8
9
10
11
12
13
14
15
16
17
18
19
20
21
22
23
24
25
26
27
28
29
30
31
32
33
34
35
36
37
38
39
40
41
42
43
44
45
46
47
48
49
50
51
52
53
54
55
56
57
58
59
60
61
62
63
64
65
66
67
68
69
70
71
72
73
74
75
76
77
78
79
80
81
82
83
84
85
86
87
88
89
90
91
92
93
94
95
96
97
98
99
100
101
102
103
104
105
106
107
108
109
110
111
112
113
114
115
[/code]
这段代码对是否应该创建新进程进行判断,若需要创建新进程,将进一步调用重载后的startProcessLocked函数。
2
3
4
5
6
7
8
9
10
11
12
13
14
15
16
17
18
19
20
21
22
23
24
25
26
27
28
29
30
31
32
33
34
35
36
37
38
39
40
41
42
43
44
45
46
47
48
49
50
51
52
53
54
55
56
57
58
59
60
61
62
63
64
65
66
67
68
69
70
71
72
73
74
75
76
77
78
79
80
81
82
83
84
85
86
87
88
89
90
91
92
93
94
95
96
97
98
99
100
101
102
103
104
105
106
107
108
109
110
111
112
113
114
115
116
117
118
119
120
121
122
123
124
125
126
127
128
129
130
1
2
3
4
5
6
7
8
9
10
11
12
13
14
15
16
17
18
19
20
21
22
23
24
25
26
27
28
29
30
31
32
33
34
35
36
37
38
39
40
41
42
43
44
45
46
47
48
49
50
51
52
53
54
55
56
57
58
59
60
61
62
63
64
65
66
67
68
69
70
71
72
73
74
75
76
77
78
79
80
81
82
83
84
85
86
87
88
89
90
91
92
93
94
95
96
97
98
99
100
101
102
103
104
105
106
107
108
109
110
111
112
113
114
115
116
117
118
119
120
121
122
123
124
125
126
127
128
129
130
[/code]
至此,startSpecificActivityLocked函数分析完毕,Android系统开始通过创建zygote创建应用进程。
总结
至此,AMS启动Activity的第一部分分析完毕。后续部分可以参考启动Activity的过程:二
这一部分相对比较杂乱,需要考虑Activity的启动模式、Intent Flags等信息,以决定Activity与Task之间的关系。
这部分代码还需要判断Activity是否复用,是否需要移动对应的Task到前台,及在必要时,按照启动模式和Intent Flags对Task中的内容进行调整。
最后,判断Activity对应的进程是否存在。若对应进程存在,进需要重启Activity;否则,需要发送消息给zygote启动进程。
整体来讲,这部分代码的流程基本可以用下图表示:
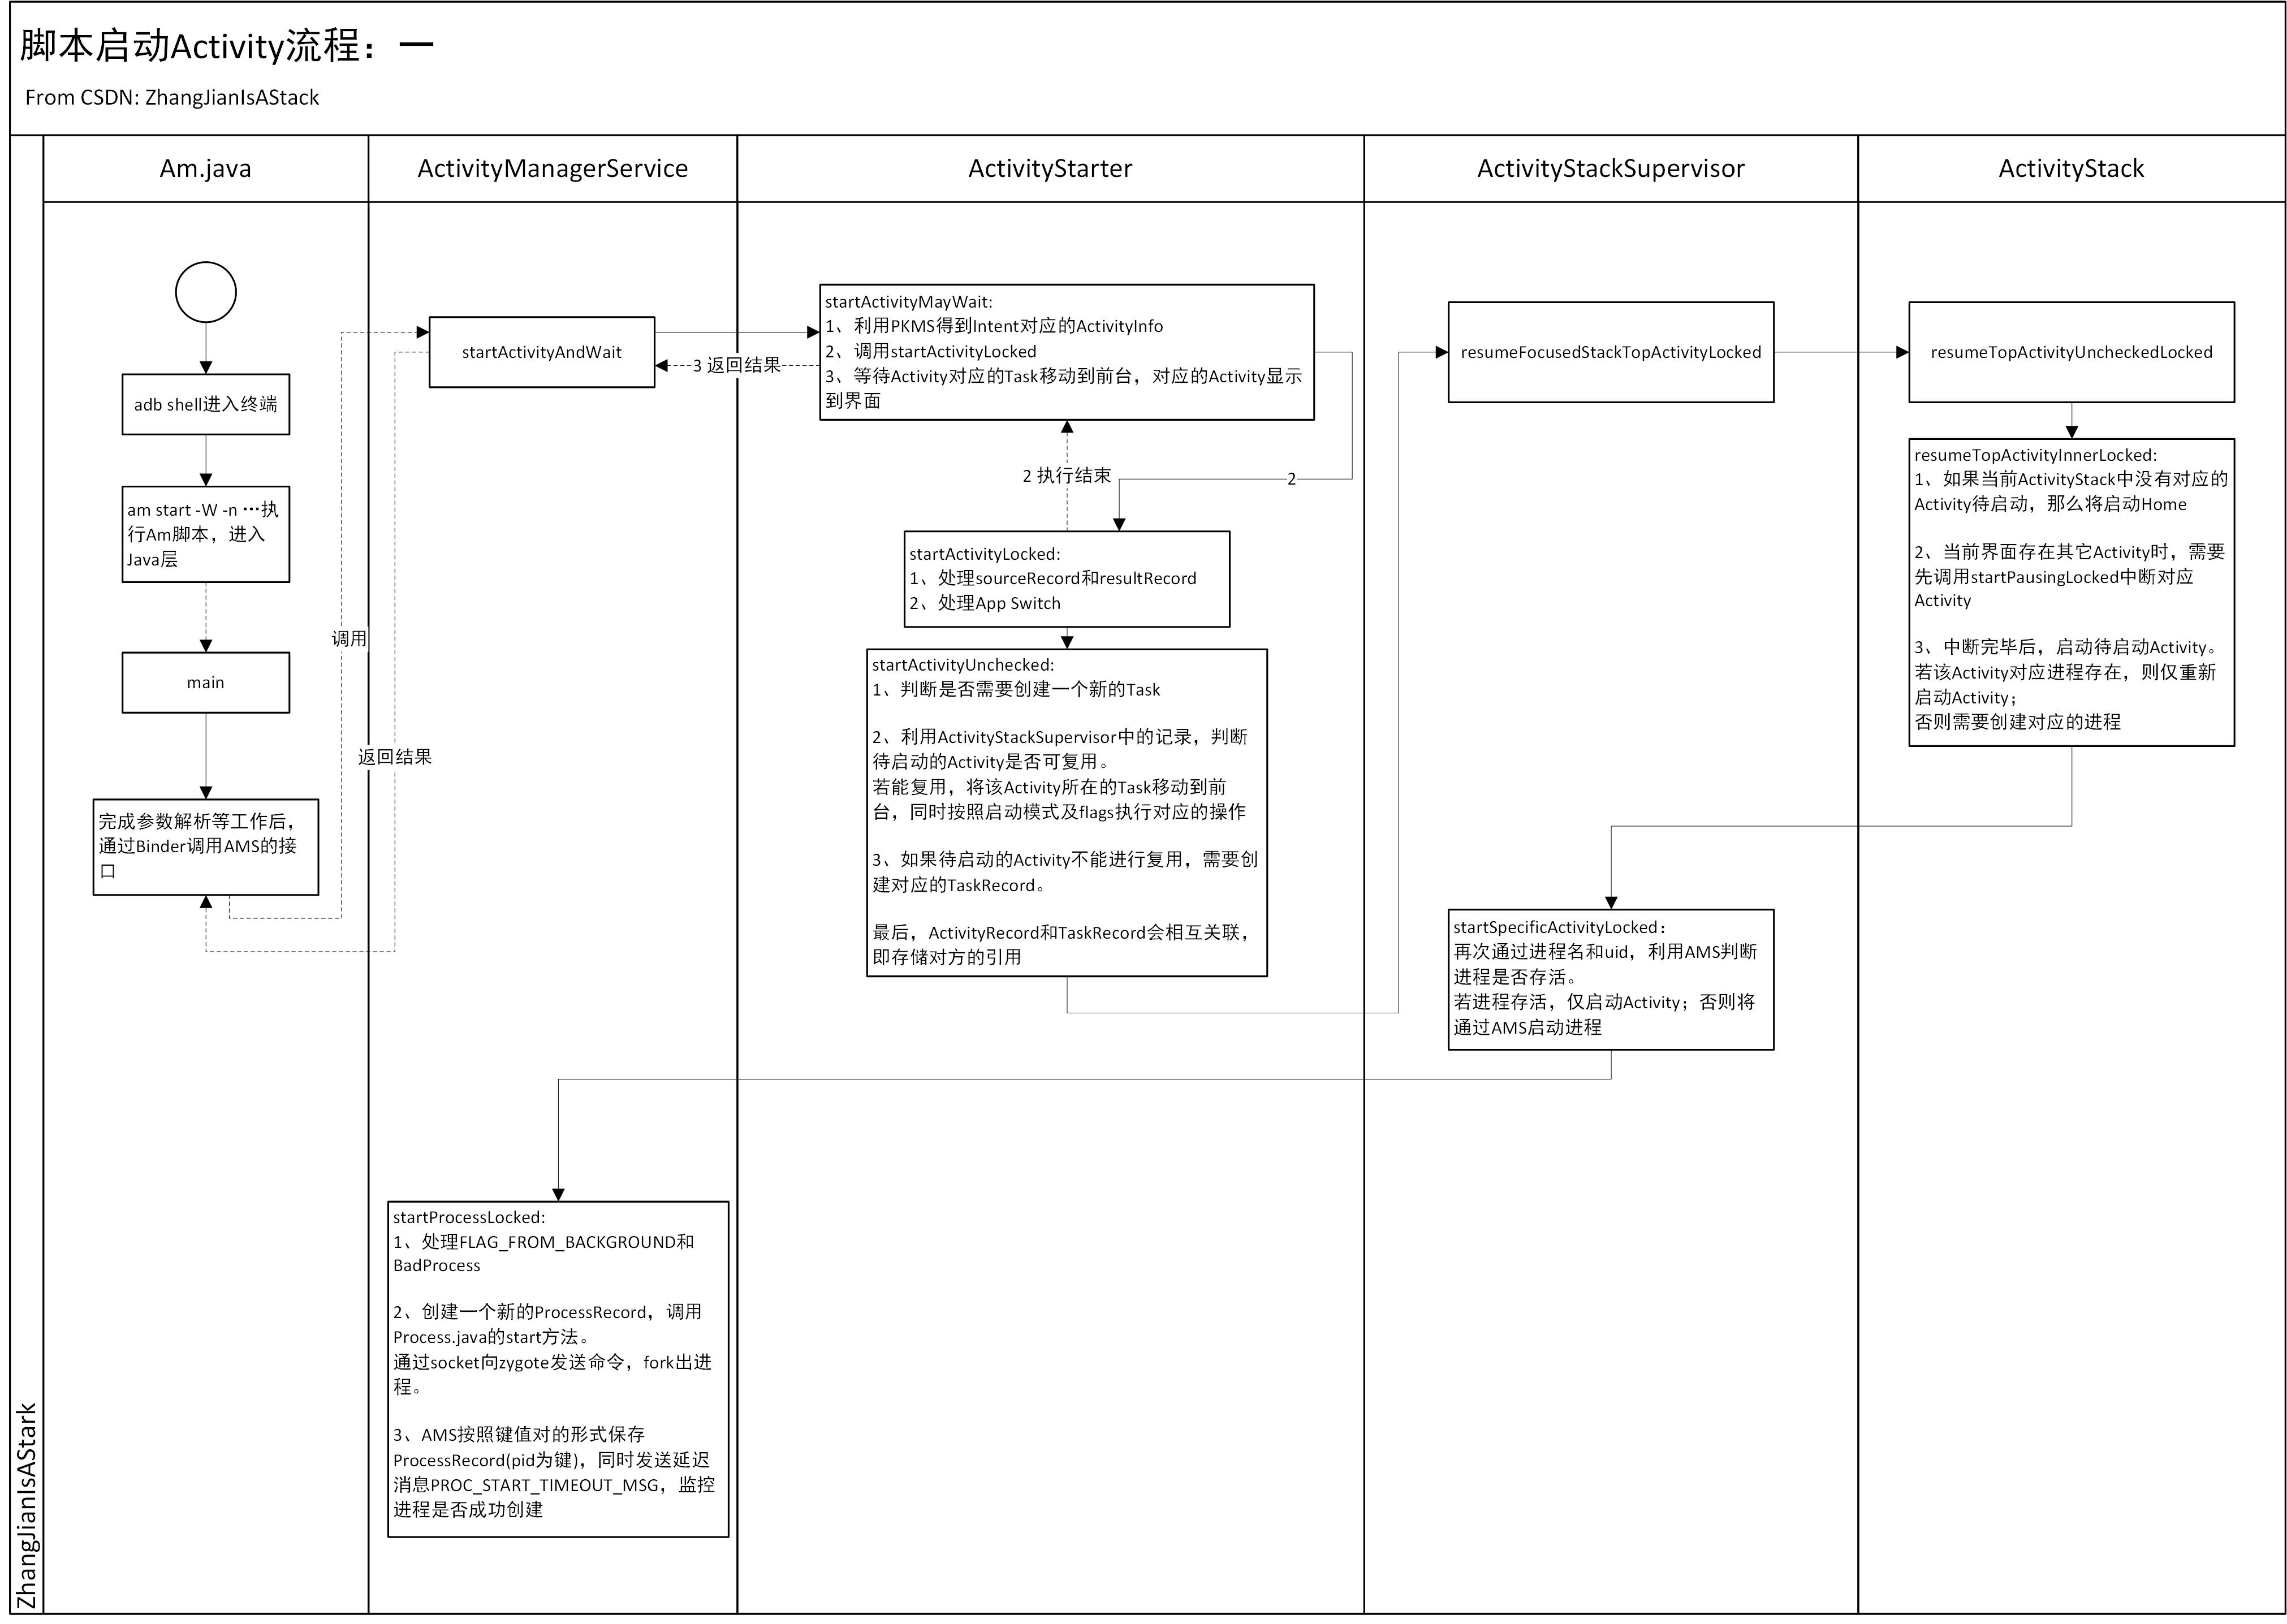
大图地址
自己对AMS的驾驭能力还不够,不能较好地精炼出最核心的流程,因此这部分分析不够简洁,
目前的分析只能算作一个代码阅读笔记,如有不恰当的地方,欢迎指正。
自己对Activity的启动过程也不是很了解,这里就初步做一个代码阅读笔记,为以后的迭代打下一个基础。
一、基础知识
在分析Activity的启动过程前,有必要先了解一下Activity相关的基础知识。
1、Task和Activity的设计理念
关于Android中Task和Activity的介绍,个人觉得《深入理解android》中的例子不错。
我们就借鉴其中的例子,进行相应的说明:
上图列出了用户在Android系统上想干的三件事,分别用A、B、C表示。
在Android中,每一件事可以被看作是一个Task;一个Task可以被细分成多个子步骤,每个子步骤可以被看作是一个Activity。
从上图可以看出,A、B两个Task使用了不同的Activity来完成相应的任务,即A、B两个Task的Activity之间没有复用。
但是在Task C中,分别使用了Task A中的A1、Task B中的B2。
这么设计的原因是:用户想做的事情(Task)即使完全不同,但是当细分Task为Activity时,就可能出现Activity功能类似的情况。
当Task A和Task B中已经有能满足需求的Activity时,Task C就会优先复用而不是重新创建Activity。
通过重用Activity可以节省一定的开销,同时为用户提供一致的界面和用户体验。
对Android的设计理念有一定的了解后,我们看看Android是如何组织Task及它所包含的Activity。
上图为一个比较经典的示例:图中的Task包含4个Activity。用户可以单击按钮跳转到下一个Activity。同时,通过返回键可以回到上一个Activity。
图中虚线下方为Activity的组织方式。从图中可以看出,Android是以Stack的方式来管理Activity的。
先启动的Activity成为栈底成员,被启动的Activity将作为栈顶成员显示在界面上。
当按返回键时,栈顶成员出栈,前一个Activity成为栈顶显示在界面上。
以上是一个Task的情况。当有多个Task时,Android系统只支持一个处于前台的Task,其余的Task均处于后台。
这些后台Task内部Activity保持顺序不变。用户可以一次将整个Task挪到后台或置为前台,如下图所示:
在AMS中,将用ActivityRecord来作为Activity的记录者、TaskRecord作为Task的记录者,TaskRecord中有对应的ActivityStack专门管理ActivityRecord。
2、启动模式
Android定义了4种Activity的启动模式,分别为Standard、SingleTop、SingleTask和SingleInstance。
Standard模式
我们平时直接创建的Activity都是这种模式。
这种模式的Activity的特点是:只要你创建并启动了Activity实例,Android就会向当前的任务栈中加入新创建的实例。退出该Activity时,Android就会在任务栈中销毁该实例。
因此,一个Task中可以有多个相同类型的Activity(类型相同,但不是同一个对象)。
Standard模式启动Activity的栈结构如下图所示:
SingleTop模式
这种模式会考虑当前要激活的Activity实例在任务栈中是否正处于栈顶。
如果处于栈顶则无需重新创建新的实例,将重用已存在的实例,
否则会在任务栈中创建新的实例。
SingleTop模式启动Activity的栈结构如下图所示:
注意:当用SingleTop模式启动位于栈顶的Activity时,并不会创建新的Activity,但栈顶Activity的onNewIntent函数将被调用。
SingleTask模式
在该种模式下,只要Activity在一个栈中存在,那么多次启动此Activity都不会重新创建实例。和SingleTop一样,系统也会回调其onNewIntent。
具体一点,当一个具有singleTask模式的Activity A请求启动后,系统先会寻找是否存在A想要的任务栈。
如果不存在对应任务栈,就重新创建一个任务栈,然后创建A的实例后,把A放到任务栈中。
如果存在A所需的任务栈,那么系统将判断该任务栈中是否有实例A。
如果有实例A,那么系统就将A调到栈顶并调用其onNewIntent方法(会清空A之上的Activity)。
如果没有实例A,那么系统就创建实例A并压入栈中。
SingleTask模式启动Activity的栈结构如下图所示:
SingleInstance模式
SingleInstance模式是一种加强版的SingleTask模式,它除了具有SingleTask所有的特性外,还加强了一点,那就是具有此模式的Activity只能单独地位于一个任务栈中。
3、Intent Flags
启动模式主要是配置在xml文件中的,例如:
<activity android:name=".TestActivity"
android:launchMode="singleTask"
>
1
2
3
1
2
3
[/code]
除了启动模式外,Android在用Intent拉起Activity时,还可以使用Intent Flags控制Activity及Task之间的关系。
Intent Flags数量非常多,这里只列举其中的一部分:
Intent.FLAG_ACTIVITY_NEW_TASK
默认的跳转类型,将目标Activity放到一个新的Task中。
Intent.FLAG_ACTIVITY_CLEAR_TASK
当用这个FLAG启动一个Activity时,系统会先把与该Activity有关联的Task释放掉,然后启动一个新的Task,并把目标Activity放到新的Task。
该标志必须和Intent.FLAG_ACTIVITY_NEW_TASK一起使用。
FLAG_ACTIVITY_SINGLE_TOP
这个FLAG就相当于启动模式中的singleTop。
例如:原来栈中结构是A B C D。现在,在D中启动D,那么栈中的结构还是A B C D。
FLAG_ACTIVITY_CLEAR_TOP
这个FLAG类似于启动模式中的SingleTask。
这种FLAG启动的Activity会其之上的Activity全部弹出栈空间。
例如:原来栈中的结构是A B C D ,从D中跳转到B,栈中的结构就变为了A B了。
FLAG_ACTIVITY_NO_HISTORY
用这个FLAG启动的Activity,一旦退出,就不会存在于栈中。
例如:原来栈中的结构是A B C,现在用这个FLAG启动D。然后在D中启动E,栈中的结构为A B C E。
对这些基础知识有了一定的了解后,我们来看看AMS启动Activity的代码级流程。
在这一篇博客中,我们对代码流程的分析,将截止于启动Activity对应的进程。
于是,这部分流程中大部分的内容,将围绕Activity如何选择对应的Task来展开,
由于Task的选择还要涉及对启动模式、Intent Flags等的判断,
因此整个代码将极其的琐碎,需要很有耐心才能较仔细地看完。
二、am命令
我们将看看利用am命令如何启动一个Activity。
之所以选择从am命令入手,是因为当我们从一个Activity拉起另一个Activity时,
当前Activity对应的进程需要和AMS进行交互,
这就要求我们需要对进程中与AMS交互的对象比较了解时,才比较容易分析。
而从am入手分析,当被启动Activity被创建后,代码流程自然就会涉及到这个进程与AMS的交互,
整个逻辑的顺序很容易理解。
当我们利用adb shell进入到手机的控制台后,可以利用am命令启动Activity、Service等。
具体的格式类似于:
am start -W -n 包名(package)/包名.activity名称1
1
[/code]
例如,启动浏览器的命令是:
am start -W -n com.android.browser/com.android.browser.BrowserActivity1
1
[/code]
上面命令中的-W是一个可选项,表示等待目标activity启动后,am才返回结果;
-n ,表示后接COMPONENT。
am命令可接的参数有很多种,有兴趣可以研究一下,此处不再一一列举。
如同之前介绍pm安装apk的流程中提及的,pm命令是一个执行脚本。
am与pm一样,同样是定义于手机中的执行脚本。
am脚本的文件路径是frameworks/base/cms/am,其内容如下:
#!/system/bin/sh
#
# Script to start "am" on the device, which has a very rudimentary
# shell.
#
base=/system
export CLASSPATH=$base/framework/am.jar
exec app_process $base</span>/bin com.android.commands.am.Am <span class="hljs-string">"<span class="hljs-variable">$@"
1
2
3
4
5
6
7
8
1
2
3
4
5
6
7
8
[/code]
与调用pm命令类似,调用am命令同样最终会调用到Am.Java(frameworks/base/cmds/am/src/com/android/commands/am)的main函数。
这里的调用过程可以参考Android7.0 PackageManagerService (3) APK安装的第二部分。
现在我们直接看看Am.java的main函数:
/**
* Command-line entry point.
*
* @param args The command-line arguments
*/
public static void main(String[] args) {
//创建一个Am对象,然后执行run函数
(new Am()).run(args);
}12
3
4
5
6
7
8
9
1
2
3
4
5
6
7
8
9
[/code]
Am继承自BaseCommand,上面的run函数定义于BaseCommand中:
/**
* Call to run the command.
*/
public void run(String[] args) {
..........
//将字符串封装到对象中,mArgs的类型为ShellCommand
mArgs.init(null, null, null, null, args, 0);
..........
try {
//子类实现
onRun();
} catch (IllegalArgumentException e) {
......
} catch (Exception e) {
......
}
}12
3
4
5
6
7
8
9
10
11
12
13
14
15
16
17
1
2
3
4
5
6
7
8
9
10
11
12
13
14
15
16
17
[/code]
现在进入到Am.java的onRun函数:
public void onRun() throws Exception {
mAm = ActivityManagerNative.getDefault();
..............
mPm = IPackageManager.Stub.asInterface(ServiceManager.getService("package"));
...............
//从父类的mArgs中中取出第一个参数
String op = nextArgRequired();

if (op.equals("start")) {
runStart();
} else if (op.equals("startservice")) {
runStartService();
} .........
...........
}12
3
4
5
6
7
8
9
10
11
12
13
14
15
1
2
3
4
5
6
7
8
9
10
11
12
13
14
15
[/code]
从代码可以看出,am命令的功能很多,此处我们主要看看start相关的runStart函数:
private void runStart() throws Exception {
//makeIntent会解析参数,得到对应的Intent
//主要是结合Intent的parseCommandArgs函数和Am内部定义的CommandOptionHandler解析字符串
//比较简单,不做深入分析
Intent intent = makeIntent(UserHandle.USER_CURRENT);
..........
//获取mimeType
String mimeType = intent.getType();
if (mimeType == null && intent.getData() != null
&& "content".equals(intent.getData().getScheme())) {
//如果是"content"类型的数据,那么利用AMS获取对应的mimeType
mimeType = mAm.getProviderMimeType(intent.getData(), mUserId);
}
..........
do {
if (mStopOption) {
//处理-S选项,即先停止对应的Activity,再启动它
//这些变量,均是makeIntent函数解析参数得到的
...............
}
............
//通过am命令启动的Activity,附加了标志FLAG_ACTIVITY_NEW_TASK
intent.addFlags(Intent.FLAG_ACTIVITY_NEW_TASK);
............
if (mProfileFile != null) {
//处理-P选项,用于性能统计
.............
}
.............
//通过添加参数--stack,可以指定Activity加入到特定的Task中
//此处就是将对应的Stack Id将被写入到options中
//与脚本命令中的 -W 一样,--stack是一个可选项
ActivityOptions options = null;
if (mStackId != INVALID_STACK_ID) {
options = ActivityOptions.makeBasic();
options.setLaunchStackId(mStackId);
}

if (mWaitOption) {
//如果有-W选项,进入该分支
result = mAm.startActivityAndWait(null, null, intent, mimeType,
null, null, 0, mStartFlags, profilerInfo,
options != null ? options.toBundle() : null, mUserId);
res = result.result;
} else {
//不等待activity启动,直接返回
res = mAm.startActivityAsUser(null, null, intent, mimeType,
null, null, 0, mStartFlags, profilerInfo,
options != null ? options.toBundle() : null, mUserId);
}
//判断am命令是否执行成功,成功时会break
..........
mRepeat--;
.........
}while (mRepeat > 1);
}12
3
4
5
6
7
8
9
10
11
12
13
14
15
16
17
18
19
20
21
22
23
24
25
26
27
28
29
30
31
32
33
34
35
36
37
38
39
40
41
42
43
44
45
46
47
48
49
50
51
52
53
54
55
56
1
2
3
4
5
6
7
8
9
10
11
12
13
14
15
16
17
18
19
20
21
22
23
24
25
26
27
28
29
30
31
32
33
34
35
36
37
38
39
40
41
42
43
44
45
46
47
48
49
50
51
52
53
54
55
56
[/code]
从上面的代码可以看出,am最终将调用AMS的startActivityAndWait或startActivityAsUser函数,来启动参数指定的Activity。
我们以startActivityAndWait为例进行分析。
三、startActivityAndWait流程
startActivityAndWait的参数比较多,先来大致看一下参数的含义:
public final WaitResult startActivityAndWait(
//在多数情况下,一个Activity的启动是由一个应用进程发起的
//IApplicationThread是应用进程和AMS交互的通道
//通过am启动Activity时,该参数为null
IApplicationThread caller,

//应用进程对应的pacakge
String callingPackage,

//启动使用的Intent和resolvedType
Intent intent, String resolvedType,

//均是给Activity.java中定义的startActivityForResult使用的
//resultTo用于接收返回的结果,resultWho用于描述接收结果的对象
//requestCode由调用者定义
IBinder resultTo, String resultWho, int requestCode,

//Intent携带的start activity对应的flag
int startFlags,

//性能统计有关
ProfilerInfo profilerInfo,

//用于指定Activity的一些选项
//从前面调用的代码来看,应该是指定Activity需要加入的Task
Bundle bOptions,

//表示调用的用户ID
int userId) {
..................
}12
3
4
5
6
7
8
9
10
11
12
13
14
15
16
17
18
19
20
21
22
23
24
25
26
27
28
29
30
31
1
2
3
4
5
6
7
8
9
10
11
12
13
14
15
16
17
18
19
20
21
22
23
24
25
26
27
28
29
30
31
[/code]
现在我们看看startActivityAndWait函数的具体内容:
public final WaitResult startActivityAndWait(....) {
//进行权限检查相关的工作
.............

//用于存储处理结果
WaitResult res = new WaitResult();

//进入ActivityStarter中的流程
mActivityStarter.startActivityMayWait(caller, -1, callingPackage, intent, resolvedType,
null, null, resultTo, resultWho, requestCode, startFlags, profilerInfo, res, null,
bOptions, false, userId, null, null);

return res;
}12
3
4
5
6
7
8
9
10
11
12
13
14
1
2
3
4
5
6
7
8
9
10
11
12
13
14
[/code]
上面代码中的ActivityStarter初始化于AMS的构造函数中,专门负载启动Activity相关的工作。
当我们通过am命令启动一个Activity时,假设系统之前没有启动过该Activity,那么从功能的角度来看,ActivityStarter调用artActivityMayWait函数后,系统将完成以下工作:
1、上文提及在Am.java中,为Intent增加了标志位FLAG_ACTIVITY_NEW_TASK,因此系统将为Activity创建ActivityRecord和对应的TaskRecord。
2、系统需要启动一个新的应用进程以加载并运行该Activity。
3、还需要停止当前正在显示的Activity。
接下来,我们跟进一下ActivityStarter的startActivityMayWait函数。
我们可以将该函数分为三部分进行分析:
1 第一部分
final int startActivityMayWait(............) {
...............
//判断是否指定了组件名
boolean componentSpecified = intent.getComponent() != null;
...............

//利用PKMS解析满足Intent等参数要求的信息
ResolveInfo rInfo = mSupervisor.resolveIntent(intent, resolvedType, userId);
...............

// Collect information about the target of the Intent.
// mSupervisor的类型为ActivityStackSupervisor, 负责管理Activity和对应Task之间的关系
// 此处,ActivityStackSupervisor实际仅从ResolveInfo中取出对应的ActivityInfo
ActivityInfo aInfo = mSupervisor.resolveActivity(intent, rInfo, startFlags, profilerInfo);

//得到options,其中可能指定了Activity需要加入的Task
ActivityOptions options = ActivityOptions.fromBundle(bOptions);

ActivityStackSupervisor.ActivityContainer container =
(ActivityStackSupervisor.ActivityContainer)iContainer;
synchronized (mService) {
//从am启动时,container为null
if (container != null && container.mParentActivity != null &&
container.mParentActivity.state != RESUMED) {
// Cannot start a child activity if the parent is not resumed.

//如果从一个Activity启动另一个Activity,从此处代码可以看出,
//要求父Activity已经执行过onResume
return ActivityManager.START_CANCELED;
}

final int realCallingPid = Binder.getCallingPid();
final int realCallingUid = Binder.getCallingUid();
....................

//以下代码是决定启动Activity时的Task
final ActivityStack stack;
if (container == null || container.mStack.isOnHomeDisplay()) {
//am启动,或Home来启动Activity
//stack为前台栈
stack = mSupervisor.mFocusedStack;
} else {
//当从一个Activity启动另一个Activity时,
//启动栈为父Activity的Task
stack = container.mStack;
}

//am启动时config == null
stack.mConfigWillChange = config != null && mService.mConfiguration.diff(config) != 0;
.................

//正常情况下,当一个Application退到后台时,系统会为它保存状态;当调度其到前台时,恢复它之前的状态,以保证用户体验的连续性
//AndroidManifest.xml中的Application标签可以申明一个CANT_SAVE_STATE属性
//设置了该属性的Application将不享受系统提供的状态保存/恢复功能,被称为heavy-weight process
if (aInfo != null &&
(aInfo.applicationInfo.privateFlags
& ApplicationInfo.PRIVATE_FLAG_CANT_SAVE_STATE) != 0) {
............................
}
...................
}
}12
3
4
5
6
7
8
9
10
11
12
13
14
15
16
17
18
19
20
21
22
23
24
25
26
27
28
29
30
31
32
33
34
35
36
37
38
39
40
41
42
43
44
45
46
47
48
49
50
51
52
53
54
55
56
57
58
59
60
61
62
1
2
3
4
5
6
7
8
9
10
11
12
13
14
15
16
17
18
19
20
21
22
23
24
25
26
27
28
29
30
31
32
33
34
35
36
37
38
39
40
41
42
43
44
45
46
47
48
49
50
51
52
53
54
55
56
57
58
59
60
61
62
[/code]
从上面的代码来看,startActivityMayWait在第一阶段最主要的工作其实就是:
1、解析出与Intent相匹配的ActivityInfo。
2、得到启动该Activity的Task,即父Activity的Task或前台Task。
2 第二部分
..................
//用于保存启动Activity后,对应的ActivityRecord
final ActivityRecord[] outRecord = new ActivityRecord[1];

//调用startActivityLocked函数,进行实际的启动工作
int res = startActivityLocked(...............);
..................
1
2
3
4
5
6
7
1
2
3
4
5
6
7
[/code]
这一部分中,涉及到了启动Activity的核心函数startActivityLocked。该函数比较复杂,我们在后面单独分析。
当该函数成功执行完毕后,Activity将会被启动,并形成对应的ActivityRecord被AMS统一管理。
我们先看看startActivityMayWait函数第三部分的工作。
3 第三部分
...................
//outResult不等于null,表示等待启动结果
//目标Activity要运行在一个新的应用进程中,因此需要等待应用进程正常启动并处理相关请求
if (outResult != null) {
outResult.result = res;
if (res == ActivityManager.START_SUCCESS) {
mSupervisor.mWaitingActivityLaunched.add(outResult);
do {
try {
//一直等待,直到outResult显示Activity对应的Task成为front task
mService.wait();
} catch (InterruptedException e) {
}
} while (outResult.result != START_TASK_TO_FRONT
&& !outResult.timeout && outResult.who == null);

if (outResult.result == START_TASK_TO_FRONT) {
res = START_TASK_TO_FRONT;
}
}

if (res == START_TASK_TO_FRONT) {
//Activity对应的task拉到前台后,一直要等到该界面被加载
ActivityRecord r = stack.topRunningActivityLocked();
if (r.nowVisible && r.state == RESUMED) {
outResult.timeout = false;
outResult.who = new ComponentName(r.info.packageName, r.info.name);
outResult.totalTime = 0;
outResult.thisTime = 0;
} else {
outResult.thisTime = SystemClock.uptimeMillis();
mSupervisor.mWaitingActivityVisible.add(outResult);
do {
try {
mService.wait();
} catch (InterruptedException e) {
}
} while (!outResult.timeout && outResult.who == null);
}
}
}
...............12
3
4
5
6
7
8
9
10
11
12
13
14
15
16
17
18
19
20
21
22
23
24
25
26
27
28
29
30
31
32
33
34
35
36
37
38
39
40
41
42
1
2
3
4
5
6
7
8
9
10
11
12
13
14
15
16
17
18
19
20
21
22
23
24
25
26
27
28
29
30
31
32
33
34
35
36
37
38
39
40
41
42
[/code]
从上面的代码可以看出,第三阶段的工作就是根据返回值做一些处理。
由于我们在输入的命令时,指定了-W选项,因此将进入wait状态等待Activity界面被显示。
四、startActivityLocked流程
接下来,我们看看上面提及到的核心函数startActivityLocked:
final int startActivityLocked(..............) {
//err用于保存错误信息
int err = ActivityManager.START_SUCCESS;

//用于保存启动Activity对应的进程信息
ProcessRecord callerApp = null;

//如果参数中的调用者不为空,则从AMS中找到对应的ProcessRecord,目的是得到调用者的pid和uid
//当利用am命令启动时,caller等于null
if (caller != null) {
callerApp = mService.getRecordForAppLocked(caller);
if (callerApp != null) {
callingPid = callerApp.pid;
callingUid = callerApp.info.uid;
} else {
................
}
}

final int userId = aInfo != null ? UserHandle.getUserId(aInfo.applicationInfo.uid) : 0;
.........................
//sourceRecord用于保存父Activity的信息
ActivityRecord sourceRecord = null;

//resultRecord用于保存接收启动结果的Activity
ActivityRecord resultRecord = null;

//对于startActivityForResult才有意义
if (resultTo != null) {
//利用ActivityStackSupervisor判断是否有resultTo对应的ActivityRecord
//这里的隐含条件是,resultTo的对象就是父Activity
sourceRecord = mSupervisor.isInAnyStackLocked(resultTo);
.................
if (sourceRecord != null) {
if (requestCode >= 0 && !sourceRecord.finishing) {
resultRecord = sourceRecord;
}
}
}

//得到启动Activity使用的标志位
final int launchFlags = intent.getFlags();

if ((launchFlags & Intent.FLAG_ACTIVITY_FORWARD_RESULT) != 0 && sourceRecord != null) {
// Transfer the result target from the source activity to the new
// one being started, including any failures.
//以这个标签启动的Activity,将接收原本发往父Activity的result
//这部分代码没细看,感觉没什么用吧。。。
....................
}

//检查一些条件是否满足,修改err的状态
.....................

//得到接收启动结果的Task
final ActivityStack resultStack = resultRecord == null ? null : resultRecord.task.stack;

if (err != START_SUCCESS) {
if (resultRecord != null) {
//如果存在err,需要返回错误信息
resultStack.sendActivityResultLocked(
-1, resultRecord, resultWho, requestCode, RESULT_CANCELED, null);
}
ActivityOptions.abort(options);
return err;
}

//检查权限
boolean abort = !mSupervisor.checkStartAnyActivityPermission(.............);

//根据IntentFirewall判断Intent是否满足要求
abort |= !mService.mIntentFirewall.checkStartActivity(.............);

//通过接口,可以为AMS设置一个IActivityController类型的监听者;AMS进行操作时,将会回调该监听者
//例如进行Monkey测试的时候,Monkey会设置该回调对象
if (mService.mController != null) {
try {
Intent watchIntent = intent.cloneFilter();

//交给回调对象处理,判断能否进行后续流程
//进行Monkey测试时,可以设置黑名单,处于黑名单中的Activity将不能启动
abort |= !mService.mController.activityStarting(watchIntent,
aInfo.applicationInfo.packageName);
} catch (RemoteException e) {
mService.mController = null;
}
}
................
//以上任一条件不满足时,进行通知
if (abort) {
if (resultRecord != null) {
resultStack.sendActivityResultLocked(-1, resultRecord, resultWho, requestCode,
RESULT_CANCELED, null);
}
// We pretend to the caller that it was really started, but
// they will just get a cancel result.
ActivityOptions.abort(options);
return START_SUCCESS;
}

// If permissions need a review before any of the app components can run, we
// launch the review activity and pass a pending intent to start the activity
// we are to launching now after the review is completed.
//在必要时,再检查一下权限,代码未细看,暂时觉得没有必要看
if (Build.PERMISSIONS_REVIEW_REQUIRED && aInfo != null) {
................
}
..............
//创建一个ActivityRecord对象
ActivityRecord r = new ActivityRecord(.........);
if (outActivity != null) {
outActivity[0] = r;
}
.........................
final ActivityStack stack = mSupervisor.mFocusedStack;
if (voiceSession == null && (stack.mResumedActivity == null
|| stack.mResumedActivity.info.applicationInfo.uid != callingUid)) {
//检查调用进程是否有权限切换Activity
if (!mService.checkAppSwitchAllowedLocked(callingPid, callingUid,
realCallingPid, realCallingUid, "Activity start")) {

//如果调用进程没有权限进行切换,则将本次Activity的启动请求保存起来
//后续有机会再进行启动
PendingActivityLaunch pal =  new PendingActivityLaunch(r,
sourceRecord, startFlags, stack, callerApp);
mPendingActivityLaunches.add(pal);
ActivityOptions.abort(options);
return ActivityManager.START_SWITCHES_CANCELED;
}
}

//用于控制app switch
if (mService.mDidAppSwitch) {
mService.mAppSwitchesAllowedTime = 0;
} else {
mService.mDidAppSwitch = true;
}

//启动处于pending状态的Activity
doPendingActivityLaunchesLocked(false);

try {
//WindowManager延迟绘制
//个人觉得可能是为了优化性能,比如当前界面还有细节未绘制完,但要拉起一个新的界面,那么此时就不需要绘制了)
mService.mWindowManager.deferSurfaceLayout();

//调用startActivityUnchecked
err = startActivityUnchecked(r, sourceRecord, voiceSession, voiceInteractor, startFlags,
true, options, inTask);
} finally {
//WindowManager重新开始绘制(绘制当前的前台界面)
mService.mWindowManager.continueSurfaceLayout();
}
//此处将通知ActivityStarter, Activity对应的Task被移动到前台
postStartActivityUncheckedProcessing(r, err, stack.mStackId, mSourceRecord, mTargetStack);
return err;
}12
3
4
5
6
7
8
9
10
11
12
13
14
15
16
17
18
19
20
21
22
23
24
25
26
27
28
29
30
31
32
33
34
35
36
37
38
39
40
41
42
43
44
45
46
47
48
49
50
51
52
53
54
55
56
57
58
59
60
61
62
63
64
65
66
67
68
69
70
71
72
73
74
75
76
77
78
79
80
81
82
83
84
85
86
87
88
89
90
91
92
93
94
95
96
97
98
99
100
101
102
103
104
105
106
107
108
109
110
111
112
113
114
115
116
117
118
119
120
121
122
123
124
125
126
127
128
129
130
131
132
133
134
135
136
137
138
139
140
141
142
143
144
145
146
147
148
149
150
151
152
153
154
155
156
157
1
2
3
4
5
6
7
8
9
10
11
12
13
14
15
16
17
18
19
20
21
22
23
24
25
26
27
28
29
30
31
32
33
34
35
36
37
38
39
40
41
42
43
44
45
46
47
48
49
50
51
52
53
54
55
56
57
58
59
60
61
62
63
64
65
66
67
68
69
70
71
72
73
74
75
76
77
78
79
80
81
82
83
84
85
86
87
88
89
90
91
92
93
94
95
96
97
98
99
100
101
102
103
104
105
106
107
108
109
110
111
112
113
114
115
116
117
118
119
120
121
122
123
124
125
126
127
128
129
130
131
132
133
134
135
136
137
138
139
140
141
142
143
144
145
146
147
148
149
150
151
152
153
154
155
156
157
[/code]
startActivityLocked函数比较长,但主干比较清晰,只是添加许多条件判断。
从代码来看主要工作包括:
1、处理sourceRecord和resultRecord。
sourceRecord表示发起本次请求的Activity,即父Activity对应的信息;
resultRecord表示接收处理结果的Activity。
在一般情况下,sourceRecord和resultRecord应指向同一个Activity。
2、处理app switch。
如果AMS当前禁止app switch,那么AMS会将本次请求保存起来,以待允许app switch时再进行处理。
从代码可以看出,当AMS可以进行app switch时,在处理本次的请求前,会先调用doPendingActivityLaunchesLocked函数。
doPendingActivityLaunchesLocked函数将启动之前因系统禁止app switch而保存的请求。
3、调用startActivityUnchecked处理本次Activity的启动请求。
在分析接下来的流程前,我们先看看app switch相关的内容。
在AMS中,提供了两个函数stopAppSwitches和resumeAppSwitches,用于暂时禁止App切换及恢复切换。
这种需求的考虑是:当某些重要的Activity处于前台时,不希望系统因为用户操作之外的原因切换Activity。
1、stopAppSwitches
先来看看stopAppSwitches:
public void stopAppSwitches() {
//检查调用进程是否有STOP_APP_SWITCHES权限
..............

synchronized(this) {
//设置了一个超时时间,目前为5s
//过了该时间,AMS可以重新切换App
mAppSwitchesAllowedTime = SystemClock.uptimeMillis()
+ APP_SWITCH_DELAY_TIME;
mDidAppSwitch = false;

//发送一个延迟消息,触发允许App Switch的操作
mHandler.removeMessages(DO_PENDING_ACTIVITY_LAUNCHES_MSG);
Message msg = mHandler.obtainMessage(DO_PENDING_ACTIVITY_LAUNCHES_MSG);
mHandler.sendMessageDelayed(msg, APP_SWITCH_DELAY_TIME);
}
}12
3
4
5
6
7
8
9
10
11
12
13
14
15
16
17
1
2
3
4
5
6
7
8
9
10
11
12
13
14
15
16
17
[/code]
对于上面的代码,需要注意两点:
1、此处的控制机制名为app switch,而不是Activity switch。
这是因为如果从受保护的Activity中启动另一个Activity,那么这个新的Activity的目的应该是针对同一个任务。
于是这次的启动就不应该受app switch的制约。
2、执行stopAppSwitches后,应用程序应该调用resumeAppSwitches以允许app switch。
为了防止应用程序有意或者无意没调用resumeAppSwitches,在stopAppSwitches中设置了一个超时时间,过了此超时时间,系统会发送一个消息触发App Switch的操作。
2、resumeAppSwitches
现在我们看看resumeAppSwitches的代码:
public void resumeAppSwitches() {
//同样是进行权限检查
.............

synchronized(this) {
// Note that we don't execute any pending app switches... we will
// let those wait until either the timeout, or the next start
// activity request.
mAppSwitchesAllowedTime = 0;
}
}12
3
4
5
6
7
8
9
10
11
1
2
3
4
5
6
7
8
9
10
11
[/code]
从代码可以看出,resumeAppSwitches只设置了mAppSwitchesAllowedTime的值为0,它并不处理在stop和resume这段时间内积攒起的Pending请求。
根据前面startActivityLocked函数,我们知道如果在执行resume app switch后,又有新的请求需要处理,则先调用doPendingActivityLaunchesLocked处理那些pending的请求。
此外,resumeAppSwitches函数中并没有撤销stopAppSwitches函数中设置的超时消息,所以当该消息被处理时,同样会触发处理pending请求的流程。
五、startActivityUnchecked流程
顺着请求的处理流程,我们接下来看看startActivityUnchecked函数。
startActivityUnchecked函数比较长,我们分段看一下。
Part-I
第一部分如下代码所示,主要用于判断是否需要为新的Activity创建一个Task。
private int startActivityUnchecked(.......) {
//根据参数重新设置类的成员变量
//将存储当前Activity对应的启动模式等信息
setInitialState(............);

computeLaunchingTaskFlags();

computeSourceStack();

mIntent.setFlags(mLaunchFlags);
...................12
3
4
5
6
7
8
9
10
11
1
2
3
4
5
6
7
8
9
10
11
[/code]
我们依次看看上述代码中的几个函数:
1、setInitialState
private void setInitialState(.........) {
//重置当前类的成员变量
reset();

//用于保存当前准备启动的Activity
mStartActivity = r;

mIntent = r.intent;
...........
mSourceRecord = sourceRecord;
...........

mLaunchSingleTop = r.launchMode == LAUNCH_SINGLE_TOP;
mLaunchSingleInstance = r.launchMode == LAUNCH_SINGLE_INSTANCE;
mLaunchSingleTask = r.launchMode == LAUNCH_SINGLE_TASK;
................

// We'll invoke onUserLeaving before onPause only if the launching
// activity did not explicitly state that this is an automated launch.
//判断是否需要调用因本次Activity启动,而被系统移到后台的当前Activity的onUserLeaveHint函数
mSupervisor.mUserLeaving = (mLaunchFlags & FLAG_ACTIVITY_NO_USER_ACTION) == 0;
................

if (mOptions != null && mOptions.getLaunchTaskId() != -1 && mOptions.getTaskOverlay()) {
r.mTaskOverlay = true;
final TaskRecord task = mSupervisor.anyTaskForIdLocked(mOptions.getLaunchTaskId());
final ActivityRecord top = task != null ? task.getTopActivity() : null;
if (top != null && !top.visible) {

// The caller specifies that we'd like to be avoided to be moved to the front, so be
// it!
// 从代码来看,这一处有些奇怪
// 如果启动参数中指定了Activity需要加入的Task,但该Task的top Activity当前是不可见的
// 那么新启动的Activity也将不可见
mDoResume = false;
mAvoidMoveToFront = true;
}
}
............................
mNoAnimation = (mLaunchFlags & FLAG_ACTIVITY_NO_ANIMATION) != 0;
}12
3
4
5
6
7
8
9
10
11
12
13
14
15
16
17
18
19
20
21
22
23
24
25
26
27
28
29
30
31
32
33
34
35
36
37
38
39
40
41
1
2
3
4
5
6
7
8
9
10
11
12
13
14
15
16
17
18
19
20
21
22
23
24
25
26
27
28
29
30
31
32
33
34
35
36
37
38
39
40
41
[/code]
上面的这部分代码,有些参数的用途目前还不太清楚,没有进行记录,以后重新阅读时,再进行添加和修改。
Activity启动时,Intent可以选择的Flag太多了,setInitialState对于一些不太常用的Flag也进行了判断。
因此,如果需要真正弄懂这一部分,还是要看看关于Intent中Flag相关的文档。
2、computeLaunchingTaskFlags
private void computeLaunchingTaskFlags() {
// If the caller is not coming from another activity, but has given us an explicit task into
// which they would like us to launch the new activity, then let's see about doing that.

//mSourceRecord == null,意味着新启动的Activity没有Activity
//mInTask != null && mInTask.stack != null, 意味着该请求指定了对应的希望加入的Task
//这些参数都是setInitialState解析函数输入参数得到的
if (mSourceRecord == null && mInTask != null && mInTask.stack != null) {
final Intent baseIntent = mInTask.getBaseIntent();
final ActivityRecord root = mInTask.getRootActivity();
.......................

// If this task is empty, then we are adding the first activity -- it
// determines the root, and must be launching as a NEW_TASK.
//如果以SingleInstance或SingleTask启动,判断一些条件是否满足
//从代码来看,如果参数指定Activity启动在某个Task中,同时启动模式又定义为SingleInstance或SingleTask
//那么对应的Task必须是空的,否则会报错
if (mLaunchSingleInstance || mLaunchSingleTask) {
.....................
}

// If task is empty, then adopt the interesting intent launch flags in to the
// activity being started.
if (root == null) {
//重新调整一下flag
......................
mIntent.setFlags(mLaunchFlags);
mInTask.setIntent(mStartActivity);

//表示将加入到指定的Task中
mAddingToTask = true;

// If the task is not empty and the caller is asking to start it as the root of
// a new task, then we don't actually want to start this on the task. We will
// bring the task to the front, and possibly give it a new intent.
} else if ((mLaunchFlags & FLAG_ACTIVITY_NEW_TASK) != 0) {
//如果指定Task不为空,同时启动参数携带了FLAG_ACTIVITY_NEW_TASK
//那么最终这个Activity还是会启动在一个新创建的Task内,因此mAddingToTask为false
mAddingToTask = false;
} else {
mAddingToTask = true;
}

//mInTask不为null时,说明要复用
mReuseTask = mInTask;
} else {
//这一部分才是我们比较常见的,即不指定启动Task的情况

mInTask = null;

// Launch ResolverActivity in the source task, so that it stays in the task bounds
// when in freeform workspace.
// Also put noDisplay activities in the source task. These by itself can be placed
// in any task/stack, however it could launch other activities like ResolverActivity,
// and we want those to stay in the original task.

//参考上面注释和下面代码,可以看出这是对特殊情况的处理
//当被启动的Activity是ResolverActivity或不需要显示的Activity时,
//如果父Activity存在且有足够的空间,那么这类Activity无条件地启动在父Activity所在的Task中
if ((mStartActivity.isResolverActivity() || mStartActivity.noDisplay) && mSourceRecord != null
&& mSourceRecord.isFreeform())  {
mAddingToTask = true;
}
}

//如果还没有找到待启动Activity对应的Task
//在下列情况下,为Activity添加FLAG_ACTIVITY_NEW_TASK标志
//参考注释和代码,比较容易理解
if (mInTask == null) {
if (mSourceRecord == null) {
// This activity is not being started from another...  in this
// case we -always- start a new task.
if ((mLaunchFlags & FLAG_ACTIVITY_NEW_TASK) == 0 && mInTask == null) {
...............
mLaunchFlags |= FLAG_ACTIVITY_NEW_TASK;
}
} else if (mSourceRecord.launchMode == LAUNCH_SINGLE_INSTANCE) {
// The original activity who is starting us is running as a single
// instance...  this new activity it is starting must go on its
// own task.
mLaunchFlags |= FLAG_ACTIVITY_NEW_TASK;
} else if (mLaunchSingleInstance || mLaunchSingleTask) {
// The activity being started is a single instance...  it always
// gets launched into its own task.
mLaunchFlags |= FLAG_ACTIVITY_NEW_TASK;
}
}
}12
3
4
5
6
7
8
9
10
11
12
13
14
15
16
17
18
19
20
21
22
23
24
25
26
27
28
29
30
31
32
33
34
35
36
37
38
39
40
41
42
43
44
45
46
47
48
49
50
51
52
53
54
55
56
57
58
59
60
61
62
63
64
65
66
67
68
69
70
71
72
73
74
75
76
77
78
79
80
81
82
83
84
85
86
87
88
1
2
3
4
5
6
7
8
9
10
11
12
13
14
15
16
17
18
19
20
21
22
23
24
25
26
27
28
29
30
31
32
33
34
35
36
37
38
39
40
41
42
43
44
45
46
47
48
49
50
51
52
53
54
55
56
57
58
59
60
61
62
63
64
65
66
67
68
69
70
71
72
73
74
75
76
77
78
79
80
81
82
83
84
85
86
87
88
[/code]
如同函数名一样,这部分代码主要用于决策是否在LaunchFlags中添加FLAG_ACTIVITY_NEW_TASK。
主要的思想可以简化为:
1、如果参数中,指定了希望Activity加入的Task,同时这个Task确实可用(不与当前的LaunchFlags矛盾),那么mInTask和mReuseTask的值不为null,不需要添加FLAG_ACTIVITY_NEW_TASK。
2、如果不满足1中的条件,即没有指定希望Activity加入的Task,或者指定的Task无法使用,在满足条件的情况下,会为LaunchFlags添加FLAG_ACTIVITY_NEW_TASK。
简单的一句话就是:在正常情况下,若现存Task中,没有待启动Activity可以使用的,就重新为其创建一个。
3、computeSourceStack
private void computeSourceStack() {
if (mSourceRecord == null) {
//无父Activity,对应的TaskRecord为null
mSourceStack = null;
return;
}
if (!mSourceRecord.finishing) {
//有父Activity,同时该Activity没有finishing,则记录对应的TaskRecord
mSourceStack = mSourceRecord.task.stack;
return;
}

// If the source is finishing, we can't further count it as our source. This is because the
// task it is associated with may now be empty and on its way out, so we don't want to
// blindly throw it in to that task.  Instead we will take the NEW_TASK flow and try to find
// a task for it. But save the task information so it can be used when creating the new task.
// 阅读注释即可
if ((mLaunchFlags & FLAG_ACTIVITY_NEW_TASK) == 0) {
................
mLaunchFlags |= FLAG_ACTIVITY_NEW_TASK;
mNewTaskInfo = mSourceRecord.info;
mNewTaskIntent = mSourceRecord.task.intent;
}
mSourceRecord = null;
mSourceStack = null;
}12
3
4
5
6
7
8
9
10
11
12
13
14
15
16
17
18
19
20
21
22
23
24
25
26
1
2
3
4
5
6
7
8
9
10
11
12
13
14
15
16
17
18
19
20
21
22
23
24
25
26
[/code]
这一部分代码主要用于记录父Activity对应的TaskRecord信息。
如同注释部分,当父Activity Finishing时,此父Activity对应Task不再作为新Activity的sourceStack,因为该Task有可能会被Android系统清理掉。
在这种情况下,Android系统将创建新的Task作为sourceStack,同时使这个新Task的信息与父Activity原有sourceTask信息相同。
至此,startActivityUnchecked的第一部分结束。
在这一部分中,代码主要判断Activity是否需要插入到现有Task中,同时当存在父Activity时,判断sourceTask是否有效。
所有的这些判断,最后都用于决策新启动的Activity是否需要携带FLAG_ACTIVITY_NEW_TASK标志,即是否需要新建一个Task对象。
Part-II
接下来,我们看看startActivityUnchecked的第二部分。
...................
//决定是否将新的Activity插入到现有的Task中
//返回null表示否
mReusedActivity = getReusableIntentActivity();

//从参数中得到希望Activity加入的Task对应的stackId
final int preferredLaunchStackId =
(mOptions != null) ? mOptions.getLaunchStackId() : INVALID_STACK_ID;

//以下,皆是当需要将新的Activity插入到现有的Task时,对应的处理过程
if (mReusedActivity != null) {
//LockTaskMode相关的处理,目前不太懂
.........

if (mStartActivity.task == null) {
//设置待启动Activity的Task
mStartActivity.task = mReusedActivity.task;
}

if (mReusedActivity.task.intent == null) {
// This task was started because of movement of the activity based on affinity...
// Now that we are actually launching it, we can assign the base intent.

//如果复用Activity之前的Task没有Intent,现在重新设置
mReusedActivity.task.setIntent(mStartActivity);
}

// This code path leads to delivering a new intent, we want to make sure we schedule it
// as the first operation, in case the activity will be resumed as a result of later
// operations.
//这里就是之前分析启动模式时提过的,以singleTask等方式启动现有Task中的Activity,将会清空其上的Activity
if ((mLaunchFlags & FLAG_ACTIVITY_CLEAR_TOP) != 0
|| mLaunchSingleInstance || mLaunchSingleTask) {
// In this situation we want to remove all activities from the task up to the one
// being started. In most cases this means we are resetting the task to its initial
// state.

//这里进行清空操作
final ActivityRecord top = mReusedActivity.task.performClearTaskForReuseLocked(
mStartActivity, mLaunchFlags);

if (top != null) {
if (top.frontOfTask) {
// Activity aliases may mean we use different intents for the top activity,
// so make sure the task now has the identity of the new intent.

//top Activity将会是待启动的Activity
top.task.setIntent(mStartActivity);
}
..................
//这里最后会出发待启动Activity的onNewIntent方法
top.deliverNewIntentLocked(mCallingUid, mStartActivity.intent,
mStartActivity.launchedFromPackage);
}
}

//这里应该是将复用Activity对应的Task移动到前台
mReusedActivity = setTargetStackAndMoveToFrontIfNeeded(mReusedActivity);
.......................

//最后根据复用Activity的信息,修改待加入Task相关的变量
setTaskFromIntentActivity(mReusedActivity);
.......................
}

..................12
3
4
5
6
7
8
9
10
11
12
13
14
15
16
17
18
19
20
21
22
23
24
25
26
27
28
29
30
31
32
33
34
35
36
37
38
39
40
41
42
43
44
45
46
47
48
49
50
51
52
53
54
55
56
57
58
59
60
61
62
63
64
65
66
1
2
3
4
5
6
7
8
9
10
11
12
13
14
15
16
17
18
19
20
21
22
23
24
25
26
27
28
29
30
31
32
33
34
35
36
37
38
39
40
41
42
43
44
45
46
47
48
49
50
51
52
53
54
55
56
57
58
59
60
61
62
63
64
65
66
[/code]
这一段代码主要是针对复用Activity的场景,代码逻辑比较繁杂,但主要目的是:
当判断新启动的Activity可以复用现有Task中的Activity时,则按照Activity的启动模式,对该Activity所在的Task执行相应的操作。
接下来,我们看看其中比较关键的函数。
1、getReusableIntentActivity
getReusableIntentActivity将决定新启动的Activity是否可以复用现有的Activity。
/**
* Decide whether the new activity should be inserted into an existing task. Returns null
* if not or an ActivityRecord with the task into which the new activity should be added.
*/

private ActivityRecord getReusableIntentActivity() {
// We may want to try to place the new activity in to an existing task.  We always
// do this if the target activity is singleTask or singleInstance; we will also do
// this if NEW_TASK has been requested, and there is not an additional qualifier telling
// us to still place it in a new task: multi task, always doc mode, or being asked to
// launch this as a new task behind the current one.

//根据标志位和启动模式,决定新启动的Activity是否要放入到已有的Task中,参看注释
boolean putIntoExistingTask = ((mLaunchFlags & FLAG_ACTIVITY_NEW_TASK) != 0 &&
(mLaunchFlags & FLAG_ACTIVITY_MULTIPLE_TASK) == 0)
|| mLaunchSingleInstance || mLaunchSingleTask;

// If bring to front is requested, and no result is requested and we have not been given
// an explicit task to launch in to, and we can find a task that was started with this
// same component, then instead of launching bring that one to the front.
putIntoExistingTask &= mInTask == null && mStartActivity.resultTo == null;

//保存返回结果
ActivityRecord intentActivity = null;

//如果启动参数中指定了TaskId,那么优先使用对应的Task
if (mOptions != null && mOptions.getLaunchTaskId() != -1) {
//ActivityStackSupervisor统一管理Task和Activity的组织关系
final TaskRecord task = mSupervisor.anyTaskForIdLocked(mOptions.getLaunchTaskId());
intentActivity = task != null ? task.getTopActivity() : null;
} else if (putIntoExistingTask) {
if (mLaunchSingleInstance) {
// There can be one and only one instance of single instance activity in the
// history, and it is always in its own unique task, so we do a special search.

intentActivity = mSupervisor.findActivityLocked(mIntent, mStartActivity.info, false);
} else if ((mLaunchFlags & FLAG_ACTIVITY_LAUNCH_ADJACENT) != 0) {
// For the launch adjacent case we only want to put the activity in an existing
// task if the activity already exists in the history.

intentActivity = mSupervisor.findActivityLocked(mIntent, mStartActivity.info,
!mLaunchSingleTask);
} else {
// Otherwise find the best task to put the activity in.
intentActivity = mSupervisor.findTaskLocked(mStartActivity);
}
}

return intentActivity;
}12
3
4
5
6
7
8
9
10
11
12
13
14
15
16
17
18
19
20
21
22
23
24
25
26
27
28
29
30
31
32
33
34
35
36
37
38
39
40
41
42
43
44
45
46
47
48
49
50
1
2
3
4
5
6
7
8
9
10
11
12
13
14
15
16
17
18
19
20
21
22
23
24
25
26
27
28
29
30
31
32
33
34
35
36
37
38
39
40
41
42
43
44
45
46
47
48
49
50
[/code]
这段代码参照注释,不难理解它的意思:
当我们启动一个Activity时,优先是想进行复用。因此,需要寻找匹配该Activity的Task。
如果在启动参数中,指定了目标Task,那么显然需要利用ActivityStackSupervisor找到指定的Task。
如果指定的Task存在,那么新启动的Activity将插入到该Task的Top位置。
如果启动参数未指定启动Task,那么就需要根据Activity信息,利用ActivityStackSupervisor在当前的Task中进行匹配了。
具体的匹配规则,在这里就不做进一步展开了。
2、setTargetStackAndMoveToFrontIfNeeded
这一部分代码应该是,当可以进行Activity复用时,在必要的情况下,将待启动Activity所在的Task移动到前台。
private ActivityRecord setTargetStackAndMoveToFrontIfNeeded(ActivityRecord intentActivity) {
//保存待移动的ActivityStack
//这里也可以看出,每个Task有对应的ActivityStack,用于管理运行在其中的Activity
mTargetStack = intentActivity.task.stack;
mTargetStack.mLastPausedActivity = null;

// If the target task is not in the front, then we need to bring it to the front...
// except...  well, with SINGLE_TASK_LAUNCH it's not entirely clear. We'd like to have
// the same behavior as if a new instance was being started, which means not bringing it
// to the front if the caller is not itself in the front.

//得到前台栈的top Activity
final ActivityStack focusStack = mSupervisor.getFocusedStack();
ActivityRecord curTop = (focusStack == null)
? null : focusStack.topRunningNonDelayedActivityLocked(mNotTop);

//条件满足时,需要进行移动到前台的操作
if (curTop != null
&& (curTop.task != intentActivity.task || curTop.task != focusStack.topTask())
&& !mAvoidMoveToFront) {
//添加对应的标志位
mStartActivity.intent.addFlags(Intent.FLAG_ACTIVITY_BROUGHT_TO_FRONT);

//觉得这里的判断是指,当父Activity存在时,才说明原来存在一个前台栈,才需要进行栈的移动
if (mSourceRecord == null || (mSourceStack.topActivity() != null &&
mSourceStack.topActivity().task == mSourceRecord.task)) {
// We really do want to push this one into the user's face, right now.

//mLaunchTaskBehind由特殊的标志决定
if (mLaunchTaskBehind && mSourceRecord != null) {
intentActivity.setTaskToAffiliateWith(mSourceRecord.task);
}

mMovedOtherTask = true;

// If the launch flags carry both NEW_TASK and CLEAR_TASK, the task's activities
// will be cleared soon by ActivityStarter in setTaskFromIntentActivity().
// So no point resuming any of the activities here, it just wastes one extra
// resuming, plus enter AND exit transitions.
// Here we only want to bring the target stack forward. Transition will be applied
// to the new activity that's started after the old ones are gone.

//前面介绍flag时,已经提到过当FLAG_ACTIVITY_CLEAR_TASK被使用时,
//被复用的Task整体会被清空,这里就是判断是否需要clear Task
final boolean willClearTask =
(mLaunchFlags & (FLAG_ACTIVITY_NEW_TASK | FLAG_ACTIVITY_CLEAR_TASK))
== (FLAG_ACTIVITY_NEW_TASK | FLAG_ACTIVITY_CLEAR_TASK);

if (!willClearTask) {
//得到待启动Activity将要加入的ActivityStack
//正常情况下,launchStack和TargetStack一致
final ActivityStack launchStack = getLaunchStack(
mStartActivity, mLaunchFlags, mStartActivity.task, mOptions);

if (launchStack == null || launchStack == mTargetStack) {
// We only want to move to the front, if we aren't going to launch on a
// different stack. If we launch on a different stack, we will put the
// task on top there.

//launchStack和TargetStack一致时,将ActivityStack对应的Task移动到前台
mTargetStack.moveTaskToFrontLocked(
intentActivity.task, mNoAnimation, mOptions,
mStartActivity.appTimeTracker, "bringingFoundTaskToFront");
mMovedToFront = true;

//以下是对不一致时的处理
} else if (launchStack.mStackId == DOCKED_STACK_ID
|| launchStack.mStackId == FULLSCREEN_WORKSPACE_STACK_ID) {
if ((mLaunchFlags & FLAG_ACTIVITY_LAUNCH_ADJACENT) != 0) {
// If we want to launch adjacent and mTargetStack is not the computed
// launch stack - move task to top of computed stack.

mSupervisor.moveTaskToStackLocked(intentActivity.task.taskId,
launchStack.mStackId, ON_TOP, FORCE_FOCUS, "launchToSide",
ANIMATE);
} else {
// We choose to move task to front instead of launching it adjacent
// when specific stack was requested explicitly and it appeared to be
// adjacent stack, but FLAG_ACTIVITY_LAUNCH_ADJACENT was not set.

mTargetStack.moveTaskToFrontLocked(intentActivity.task, mNoAnimation,
mOptions, mStartActivity.appTimeTracker,
"bringToFrontInsteadOfAdjacentLaunch");
}
mMovedToFront = true;
}
.............
}
....................
}
}

if (!mMovedToFront && mDoResume) {
..............
mTargetStack.moveToFront("intentActivityFound");
}
......................
return intentActivity;
}12
3
4
5
6
7
8
9
10
11
12
13
14
15
16
17
18
19
20
21
22
23
24
25
26
27
28
29
30
31
32
33
34
35
36
37
38
39
40
41
42
43
44
45
46
47
48
49
50
51
52
53
54
55
56
57
58
59
60
61
62
63
64
65
66
67
68
69
70
71
72
73
74
75
76
77
78
79
80
81
82
83
84
85
86
87
88
89
90
91
92
93
94
95
96
97
98
99
1
2
3
4
5
6
7
8
9
10
11
12
13
14
15
16
17
18
19
20
21
22
23
24
25
26
27
28
29
30
31
32
33
34
35
36
37
38
39
40
41
42
43
44
45
46
47
48
49
50
51
52
53
54
55
56
57
58
59
60
61
62
63
64
65
66
67
68
69
70
71
72
73
74
75
76
77
78
79
80
81
82
83
84
85
86
87
88
89
90
91
92
93
94
95
96
97
98
99
[/code]
这段代码背后的逻辑还是比较复杂的。
不过从代码来看,在正常的情况下,若待启动的Activity可以被复用,那么对应的Task会被移动到前台。
至此,startActivityUnchecked第二部分代码分析完毕。
这部分代码我略去了很多的细节,但仍然很难一眼就看懂。
目前,我们仅需要记住这段代码的核心目的:当发现待启动的Activity可以复用时,在必要时将对应的Task移动到前台。
至于其它的判断分支,主要依赖于启动模式之类的信息。
Part-III
..............
// If the activity being launched is the same as the one currently at the top, then
// we need to check if it should only be launched once.
// 下面这段代码的功能就是判断,当待启动的Activity已经位于前台栈顶时,是否需要重新启动一个实例
final ActivityStack topStack = mSupervisor.mFocusedStack;
final ActivityRecord top = topStack.topRunningNonDelayedActivityLocked(mNotTop);

final boolean dontStart = top != null && mStartActivity.resultTo == null
&& top.realActivity.equals(mStartActivity.realActivity)
&& top.userId == mStartActivity.userId
&& top.app != null && top.app.thread != null
//可以粗略的认为,上面的判断是为了确保待启动的Activity与当前的前台Activity一致
//下面的判断,决定了是否需要重新创建一个实例
&& ((mLaunchFlags & FLAG_ACTIVITY_SINGLE_TOP) != 0
|| mLaunchSingleTop || mLaunchSingleTask);

if (dontStart) {
................
if (mDoResume) {
//resume top activity
mSupervisor.resumeFocusedStackTopActivityLocked();
}
...............
//调用onNewIntent函数
top.deliverNewIntentLocked(
mCallingUid, mStartActivity.intent, mStartActivity.launchedFromPackage);
..............
return START_DELIVERED_TO_TOP;
}

//表示是否创建新的Task
boolean newTask = false;

//得到Affiliate Task,这个具体的含义,不是很懂
final TaskRecord taskToAffiliate = (mLaunchTaskBehind && mSourceRecord != null)
? mSourceRecord.task : null;

if (mStartActivity.resultTo == null && mInTask == null && !mAddingToTask
&& (mLaunchFlags & FLAG_ACTIVITY_NEW_TASK) != 0) {
newTask = true;
//如果mReuseTask不为null,那么将mStartActivity的Task设置为mReuseTask
//否则,重新创建一个Task给mStartActivity使用
setTaskFromReuseOrCreateNewTask(taskToAffiliate);
...................
} else if (mSourceRecord != null) {
..................
//待启动的Activity使用父Activity的Task
//其中在必要时将父Activity的Task移动到前台
//若待启动的Activity存在于Task中,但不在Task的顶部,还需要将Activity移动到顶部
final int result = setTaskFromSourceRecord();
.................
} else if (mInTask != null) {
................
//对应于以指定Task启动Activity的情况
final int result = setTaskFromInTask();
................
} else {
// This not being started from an existing activity, and not part of a new task...
// just put it in the top task, though these days this case should never happen.
//待启动的Activity使用前台Task或重新创建一个Task
setTaskToCurrentTopOrCreateNewTask();
}
......................
//将待启动的Activity加入到mTargetStack的记录中,同时调用WindowManager准备App切换相关的工作
mTargetStack.startActivityLocked(mStartActivity, newTask, mKeepCurTransition, mOptions);

if (mDoResume) {
..................
final ActivityRecord topTaskActivity = mStartActivity.task.topRunningActivityLocked();

//待启动的Activity不可见的情况
if (!mTargetStack.isFocusable()
|| (topTaskActivity != null && topTaskActivity.mTaskOverlay
&& mStartActivity != topTaskActivity)) {
..................................
} else {
//最终调用resumeFocusedStackTopActivityLocked
mSupervisor.resumeFocusedStackTopActivityLocked(mTargetStack, mStartActivity,
mOptions);
}
} else {
.............
}
..............12
3
4
5
6
7
8
9
10
11
12
13
14
15
16
17
18
19
20
21
22
23
24
25
26
27
28
29
30
31
32
33
34
35
36
37
38
39
40
41
42
43
44
45
46
47
48
49
50
51
52
53
54
55
56
57
58
59
60
61
62
63
64
65
66
67
68
69
70
71
72
73
74
75
76
77
78
79
80
81
82
83
84
1
2
3
4
5
6
7
8
9
10
11
12
13
14
15
16
17
18
19
20
21
22
23
24
25
26
27
28
29
30
31
32
33
34
35
36
37
38
39
40
41
42
43
44
45
46
47
48
49
50
51
52
53
54
55
56
57
58
59
60
61
62
63
64
65
66
67
68
69
70
71
72
73
74
75
76
77
78
79
80
81
82
83
84
[/code]
startActivityUnchecked第三部分代码最核心的内容是:决定是否为待启动的Activity创建对应的Task,同时将Activity和Task关联起来。
最后,调用ActivityStackSupervisor的resumeFocusedStackTopActivityLocked函数。
六、resumeFocusedStackTopActivityLocked流程
顺着代码流程,我们看看ActivityStackSupervisor中的resumeFocusedStackTopActivityLocked函数:
boolean resumeFocusedStackTopActivityLocked(
ActivityStack targetStack, ActivityRecord target, ActivityOptions targetOptions)) {
//待启动Activity对应的Task为前台Task时,调用该Task对应ActivityStack的resumeTopActivityUncheckedLocked函数
if (targetStack != null && isFocusedStack(targetStack)) {
return targetStack.resumeTopActivityUncheckedLocked(target, targetOptions);
}

final ActivityRecord r = mFocusedStack.topRunningActivityLocked();
if (r == null || r.state != RESUMED) {
//否则只是调用当前前台栈的resumeTopActivityUncheckedLocked
mFocusedStack.resumeTopActivityUncheckedLocked(null, null);
}
return false;
}12
3
4
5
6
7
8
9
10
11
12
13
14
1
2
3
4
5
6
7
8
9
10
11
12
13
14
[/code]
我们跟进ActivityStack的resumeTopActivityUncheckedLocked函数:
boolean resumeTopActivityUncheckedLocked(ActivityRecord prev, ActivityOptions options) {
...............
try {
............
result = resumeTopActivityInnerLocked(prev, options);
} finally {
..........
}
.........
}

private boolean resumeTopActivityInnerLocked(ActivityRecord prev, ActivityOptions options) {
....................
// Find the first activity that is not finishing.
//从当前ActivityStack的记录中,找到第一个待启动的ActivityRecord
final ActivityRecord next = topRunningActivityLocked();
....................
if (next == null) {
..............
//当前的ActivityStack没有等待启动的Activity时,将启动Home
return isOnHomeDisplay() &&
mStackSupervisor.resumeHomeStackTask(returnTaskType, prev, reason);
}
..............
// The activity may be waiting for stop, but that is no longer
// appropriate for it.
// 将待启动的Activity从下面几个队列中移除
mStackSupervisor.mStoppingActivities.remove(next);
mStackSupervisor.mGoingToSleepActivities.remove(next);
next.sleeping = false;
mStackSupervisor.mWaitingVisibleActivities.remove(next);

// If we are currently pausing an activity, then don't do anything until that is done.
//如果系统当前正在中断一个Activity,需要先等待那个Activity paus完毕,
//之后系统会重新调用resumeTopActivityInnerLocked函数,找到下一个要启动的Activity
if (!mStackSupervisor.allPausedActivitiesComplete()) {
...............
return false;
}

mStackSupervisor.setLaunchSource(next.info.applicationInfo.uid);

// We need to start pausing the current activity so the top one can be resumed...
final boolean dontWaitForPause = (next.info.flags & FLAG_RESUME_WHILE_PAUSING) != 0;

//中断后台栈?
boolean pausing = mStackSupervisor.pauseBackStacks(userLeaving, true, dontWaitForPause);

//mResumedActivity指向上一次启动的Activity,也就是当前界面显示的Activity
if (mResumedActivity != null) {
..........
//如果当前界面显示了一个Activity,那么在启动新的Activity之前,必须中断当前的Activity
pausing |= startPausingLocked(userLeaving, false, true, dontWaitForPause);
}

if (pausing) {
................
// At this point we want to put the upcoming activity's process
// at the top of the LRU list, since we know we will be needing it
// very soon and it would be a waste to let it get killed if it
// happens to be sitting towards the end.
if (next.app != null && next.app.thread != null) {
//在中断当前界面的Activity时,调用待启动Activity所在进程的优先级,保证其不被kill
mService.updateLruProcessLocked(next.app, true, null);
}
................
return true;
} else if (mResumedActivity == next && next.state == ActivityState.RESUMED &&
mStackSupervisor.allResumedActivitiesComplete()){
// It is possible for the activity to be resumed when we paused back stacks above if the
// next activity doesn't have to wait for pause to complete.
// So, nothing else to-do except:
// Make sure we have executed any pending transitions, since there
// should be nothing left to do at this point.
//特殊情况,上面的代码中断后台栈,同时启动模式指定了FLAG_RESUME_WHILE_PAUSING
mWindowManager.executeAppTransition();
mNoAnimActivities.clear();
..........
return true;
}

// If the most recent activity was noHistory but was only stopped rather
// than stopped+finished because the device went to sleep, we need to make
// sure to finish it as we're making a new activity topmost.
//若之前存在未正常结束的Activity,那么要优先结束掉这些Activity
if (mService.isSleepingLocked() && mLastNoHistoryActivity != null &&
!mLastNoHistoryActivity.finishing) {
................
requestFinishActivityLocked(mLastNoHistoryActivity.appToken, Activity.RESULT_CANCELED,
null, "resume-no-history", false);
mLastNoHistoryActivity = null;
................
}
..............
// Launching this app's activity, make sure the app is no longer
// considered stopped.
try {
//通过PKMS,修改待启动Activity对应Package的stop状态
AppGlobals.getPackageManager().setPackageStoppedState(
next.packageName, false, next.userId); /* TODO: Verify if correct userid */
} catch (RemoteException e1) {
} catch (IllegalArgumentException e) {
.................
}
...............
// We are starting up the next activity, so tell the window manager
// that the previous one will be hidden soon.  This way it can know
// to ignore it when computing the desired screen orientation.
// 与WindowManager有关,通知它停止绘画
if (prev != null) {
............
} else {
............
}

//处理动画相关的选项
Bundle resumeAnimOptions = null;
if (anim) {
ActivityOptions opts = next.getOptionsForTargetActivityLocked();
if (opts != null) {
resumeAnimOptions = opts.toBundle();
}
next.applyOptionsLocked();
} else {
next.clearOptionsLocked();
}
...............
if (next.app != null && next.app.thread != null) {
//如果待启动的Activity已有对应的进程存在,则只需要重启Activity
..............
} else {
............
mStackSupervisor.startSpecificActivityLocked(next, true, true);
..............
}
.............
return true;
}12
3
4
5
6
7
8
9
10
11
12
13
14
15
16
17
18
19
20
21
22
23
24
25
26
27
28
29
30
31
32
33
34
35
36
37
38
39
40
41
42
43
44
45
46
47
48
49
50
51
52
53
54
55
56
57
58
59
60
61
62
63
64
65
66
67
68
69
70
71
72
73
74
75
76
77
78
79
80
81
82
83
84
85
86
87
88
89
90
91
92
93
94
95
96
97
98
99
100
101
102
103
104
105
106
107
108
109
110
111
112
113
114
115
116
117
118
119
120
121
122
123
124
125
126
127
128
129
130
131
132
133
134
135
136
137
138
1
2
3
4
5
6
7
8
9
10
11
12
13
14
15
16
17
18
19
20
21
22
23
24
25
26
27
28
29
30
31
32
33
34
35
36
37
38
39
40
41
42
43
44
45
46
47
48
49
50
51
52
53
54
55
56
57
58
59
60
61
62
63
64
65
66
67
68
69
70
71
72
73
74
75
76
77
78
79
80
81
82
83
84
85
86
87
88
89
90
91
92
93
94
95
96
97
98
99
100
101
102
103
104
105
106
107
108
109
110
111
112
113
114
115
116
117
118
119
120
121
122
123
124
125
126
127
128
129
130
131
132
133
134
135
136
137
138
[/code]
resumeTopActivityInnerLocked函数非常繁琐,但整体来讲应该只有两个比较关键的地方:
1、如果mResumedActivity不为空,则需要先暂停这个Activity。
mResumedActivity代表当前已经存在于界面的Activity。当需要启动一个新的Activity时,需要先停止当前的Activity。
这部分工作由startPausingLocked函数来完成。
当前的Activity被中断后,将重新启动新的Activity。
2、当mResumedActivity为空时,若待启动的Activity对应的应用存在,那么仅需要重新启动该Activity;
否则,需要调用ActivityStackSupervisor的startSpecificActivityLocked函数,启动整个进程。
需要说明的是:
1、当系统启动第一个Activity,即Home时,mResumedActivity的值才会为null。
因此,即使我们以脚本的方式,启动一个Activity,也必须先中断当前的界面,才能进行后续的操作。
2、分析startPausingLocked函数时,将涉及到当前界面对应的进程、新启动Activity所在的进程,与AMS之间的交互,整体比较复杂。
因此还是先从简单的情况入手,看看直接启动新Activity所在进程的startSpecificActivityLocked函数。
从逻辑上看,猜测startPausingLocked函数中断现有Activity后,最终也会调用startSpecificActivityLocked启动新Activity。
七、startSpecificActivityLocked流程
现在我们跟进一下startSpecificActivityLocked函数:
void startSpecificActivityLocked(ActivityRecord r,
boolean andResume, boolean checkConfig) {
// Is this activity's application already running?
//从AMS中查询是否已经存在满足要求的进程
ProcessRecord app = mService.getProcessRecordLocked(r.processName,
r.info.applicationInfo.uid, true);

//设置启动时间
r.task.stack.setLaunchTime(r);

//如果对应进程已经存在,并向AMS注册过
if (app != null && app.thread != null) {
try {
if ((r.info.flags&ActivityInfo.FLAG_MULTIPROCESS) == 0
|| !"android".equals(r.info.packageName)) {
// Don't add this if it is a platform component that is marked
// to run in multiple processes, because this is actually
// part of the framework so doesn't make sense to track as a
// separate apk in the process.

//单进程非系统应用,向app中增加activity对应的package信息
//app中可能已经有对应的package信息了
app.addPackage(r.info.packageName, r.info.applicationInfo.versionCode,
mService.mProcessStats);
}

//通知进程启动目标Activity
realStartActivityLocked(r, app, andResume, checkConfig);
return;
} catch() {
............
}
}

//如果进程不存在,利用AMS的startProcessLocked函数,创建一个新的进程
mService.startProcessLocked(r.processName, r.info.applicationInfo, true, 0,
"activity", r.intent.getComponent(), false, false, true);
}12
3
4
5
6
7
8
9
10
11
12
13
14
15
16
17
18
19
20
21
22
23
24
25
26
27
28
29
30
31
32
33
34
35
36
37
38
1
2
3
4
5
6
7
8
9
10
11
12
13
14
15
16
17
18
19
20
21
22
23
24
25
26
27
28
29
30
31
32
33
34
35
36
37
38
[/code]
顺着流程,进入AMS的startProcessLocked函数:
//一大堆的参数,遇到了再分析吧。。。。。
final ProcessRecord startProcessLocked(..........) {
//转调用
return startProcessLocked(..........);
}

final ProcessRecord startProcessLocked(......) {
long startTime = SystemClock.elapsedRealtime();
ProcessRecord app;

//isolated为false
if (!isolated) {
//根据processName和uid寻找是否已经存在processRecord
app = getProcessRecordLocked(processName, info.uid, keepIfLarge);
..............

//FLAG_FROM_BACKGROUND表示发起这次启动的Task属于后台任务
//如果没有设置该标志,那么本次启动请求就是由前台Task触发的
if ((intentFlags & Intent.FLAG_FROM_BACKGROUND) != 0) {
// If we are in the background, then check to see if this process
// is bad.  If so, we will just silently fail.

//如果一个应用在1分钟内连续崩溃超过两次,AMS就会将其ProcessRecord加入到BadProcesses中
//正常情况下,一个应用崩溃后,系统会弹出一个警告框以提醒用户

//但是如果一个后台Task启动BadProcess,然后该Process崩溃,由于用户看不到该Process对应的界面,
//若弹出一个警告框,用户将觉得奇怪;因此,此处禁止后台Task启动BadProcess
if (mAppErrors.isBadProcessLocked(info)) {
........
return null;
}
} else {
// When the user is explicitly starting a process, then clear its
// crash count so that we won't make it bad until they see at
// least one crash dialog again, and make the process good again
// if it had been bad.
.........
//如果用户从界面主动选择启动一个Process,即使该Process是BadProcess,也不能禁止该操作
//而且还要清空对应Process的“不良”记录

//对比上面的代码,可以看出这其实是一种安全机制,防止不健全的程序不断启动潜在的崩溃组件,但该机制不限制用户行为
mAppErrors.resetProcessCrashTimeLocked(info);
if (mAppErrors.isBadProcessLocked(info)) {
........
mAppErrors.clearBadProcessLocked(info);
if (app != null) {
app.bad = false;
}
}
}
} else {
// If this is an isolated process, it can't re-use an existing process.
app = null;
}
.........
// We don't have to do anything more if:
// (1) There is an existing application record; and
// (2) The caller doesn't think it is dead, OR there is no thread
//     object attached to it so we know it couldn't have crashed; and
// (3) There is a pid assigned to it, so it is either starting or
//     already running.
............
if (app != null && app.pid > 0) {
if ((!knownToBeDead && !app.killed) || app.thread == null) {
// We already have the app running, or are waiting for it to
// come up (we have a pid but not yet its thread), so keep it.
............
// If this is a new package in the process, add the package to the list
//这个之前已经做过了,android代码写的比较冗余
app.addPackage(info.packageName, info.versionCode, mProcessStats);
..........
return app;
}

// An application record is attached to a previous process,
// clean it up now.
..............
//kill bad processes
.............
killProcessGroup(app.uid, app.pid);
handleAppDiedLocked(app, true, true);
..............
}
..................
if (app == null) {
..............
/创建出一个新的Process
app = newProcessRecordLocked(info, processName, isolated, isolatedUid);
..........
app.crashHandler = crashHandler;
.............
} else {
// If this is a new package in the process, add the package to the list
app.addPackage(info.packageName, info.versionCode, mProcessStats);
............
}

// If the system is not ready yet, then hold off on starting this
// process until it is.
if (!mProcessesReady
&& !isAllowedWhileBooting(info)
&& !allowWhileBooting) {
if (!mProcessesOnHold.contains(app)) {
mProcessesOnHold.add(app);
}
........
return app;
}
.............
//调用下一个startProcessLocked函数
startProcessLocked(
app, hostingType, hostingNameStr, abiOverride, entryPoint, entryPointArgs);
.......
return (app.pid != 0) ? app : null;
}12
3
4
5
6
7
8
9
10
11
12
13
14
15
16
17
18
19
20
21
22
23
24
25
26
27
28
29
30
31
32
33
34
35
36
37
38
39
40
41
42
43
44
45
46
47
48
49
50
51
52
53
54
55
56
57
58
59
60
61
62
63
64
65
66
67
68
69
70
71
72
73
74
75
76
77
78
79
80
81
82
83
84
85
86
87
88
89
90
91
92
93
94
95
96
97
98
99
100
101
102
103
104
105
106
107
108
109
110
111
112
113
114
115
1
2
3
4
5
6
7
8
9
10
11
12
13
14
15
16
17
18
19
20
21
22
23
24
25
26
27
28
29
30
31
32
33
34
35
36
37
38
39
40
41
42
43
44
45
46
47
48
49
50
51
52
53
54
55
56
57
58
59
60
61
62
63
64
65
66
67
68
69
70
71
72
73
74
75
76
77
78
79
80
81
82
83
84
85
86
87
88
89
90
91
92
93
94
95
96
97
98
99
100
101
102
103
104
105
106
107
108
109
110
111
112
113
114
115
[/code]
这段代码对是否应该创建新进程进行判断,若需要创建新进程,将进一步调用重载后的startProcessLocked函数。
private final void startProcessLocked(......) {
.................
//启动一个进程
//若AMS之前维持着这个进程的信息,那么现在需要移除
if (app.pid > 0 && app.pid != MY_PID) {
................
synchronized (mPidsSelfLocked) {
mPidsSelfLocked.remove(app.pid);
mHandler.removeMessages(PROC_START_TIMEOUT_MSG, app);
}
...........
app.setPid(0);
}
..............
//mProcessesOnHold用于保存那些在系统还没有准备好就提前请求启动的ProcessRecord
mProcessesOnHold.remove(app);
..............
updateCpuStats();
.............
try {
try {
final int userId = UserHandle.getUserId(app.uid);
//通过PKMS检查待启动进程对应的package是否满足启动条件
AppGlobals.getPackageManager().checkPackageStartable(app.info.packageName, userId);
} catch (RemoteException e) {
throw e.rethrowAsRuntimeException();
}

int uid = app.uid;
int[] gids = null;
int mountExternal = Zygote.MOUNT_EXTERNAL_NONE;
if (!app.isolated) {
int[] permGids = null;
try {
final IPackageManager pm = AppGlobals.getPackageManager();
//通过PKMS得到进程对应的Gid
permGids = pm.getPackageGids(app.info.packageName,
MATCH_DEBUG_TRIAGED_MISSING, app.userId);
MountServiceInternal mountServiceInternal = LocalServices.getService(
MountServiceInternal.class);
//这里应该是判断进程对外部存储设备的访问模式
mountExternal = mountServiceInternal.getExternalStorageMountMode(uid,
app.info.packageName);
} catch (RemoteException e) {
..............
}

/*
* Add shared application and profile GIDs so applications can share some
* resources like shared libraries and access user-wide resources
*/
if (ArrayUtils.isEmpty(permGids)) {
gids = new int[2];
} else {
gids = new int[permGids.length + 2];
//permGid放到2,3号位置
System.arraycopy(permGids, 0, gids, 2, permGids.length);
}

//得到共享应用的gid信息
gids[0] = UserHandle.getSharedAppGid(UserHandle.getAppId(uid));
gids[1] = UserHandle.getUserGid(UserHandle.getUserId(uid));
}
................
//ABI表示应用程序二进制接口,ABI精确地定义了你的应用程序及其代码期在运行时如何和系统交互
String requiredAbi = (abiOverride != null) ? abiOverride : app.info.primaryCpuAbi;
if (requiredAbi == null) {
requiredAbi = Build.SUPPORTED_ABIS[0];
}

String instructionSet = null;
if (app.info.primaryCpuAbi != null) {
//得到对应的指令集
instructionSet = VMRuntime.getInstructionSet(app.info.primaryCpuAbi);
}

app.gids = gids;
app.requiredAbi = requiredAbi;
app.instructionSet = instructionSet;

// Start the process.  It will either succeed and return a result containing
// the PID of the new process, or else throw a RuntimeException.
..........................
//指定反射的className
if (entryPoint == null) entryPoint = "android.app.ActivityThread";

//Process.java的start函数,将通过socket发送消息给zygote
//zygote将派生出一个子进程,子进程将通过反射调用ActivityThread的main函数
//注意此时传递给zygote的参数并没有包含任何与Activity相关的信息
Process.ProcessStartResult startResult = Process.start(entryPoint,
app.processName, uid, uid, gids, debugFlags, mountExternal,
app.info.targetSdkVersion, app.info.seinfo, requiredAbi, instructionSet,
app.info.dataDir, entryPointArgs);
...................
//增加电量统计项
mBatteryStatsService.noteProcessStart(app.processName, app.info.uid);
...................
if (app.persistent) {
//实际仅判断启动的进程是否为com.android.phone
//如果是Phone进程,watchdog将保留对应的pid
//watchdog打印dump日志时,会打印phone对应的dump信息
Watchdog.getInstance().processStarted(app.processName, startResult.pid);
}
..............
//利用启动的结果,更新ProcessRecord
app.setPid(startResult.pid);
app.usingWrapper = startResult.usingWrapper;
app.removed = false;
app.killed = false;
app.killedByAm = false;
...............
synchronized (mPidsSelfLocked) {
//AMS以键值对的形式,保存pid和processRecord
this.mPidsSelfLocked.put(startResult.pid, app);
if (isActivityProcess) {
Message msg = mHandler.obtainMessage(PROC_START_TIMEOUT_MSG);
msg.obj = app;
//发送一个延迟消息
//在消息被处理前,若新创建的进程没有和AMS交互,那么该进程启动失败
//正常延迟时间为10s
//若通过wrapper(例如valgrind)加载,应用程序将在wrapper的运行环境中工作,耗时较长,延迟时间在N中定义为1200s
mHandler.sendMessageDelayed(msg, startResult.usingWrapper
? PROC_START_TIMEOUT_WITH_WRAPPER : PROC_START_TIMEOUT);
}
}
............
} catch (RuntimeException e) {
...............
}
}12
3
4
5
6
7
8
9
10
11
12
13
14
15
16
17
18
19
20
21
22
23
24
25
26
27
28
29
30
31
32
33
34
35
36
37
38
39
40
41
42
43
44
45
46
47
48
49
50
51
52
53
54
55
56
57
58
59
60
61
62
63
64
65
66
67
68
69
70
71
72
73
74
75
76
77
78
79
80
81
82
83
84
85
86
87
88
89
90
91
92
93
94
95
96
97
98
99
100
101
102
103
104
105
106
107
108
109
110
111
112
113
114
115
116
117
118
119
120
121
122
123
124
125
126
127
128
129
130
1
2
3
4
5
6
7
8
9
10
11
12
13
14
15
16
17
18
19
20
21
22
23
24
25
26
27
28
29
30
31
32
33
34
35
36
37
38
39
40
41
42
43
44
45
46
47
48
49
50
51
52
53
54
55
56
57
58
59
60
61
62
63
64
65
66
67
68
69
70
71
72
73
74
75
76
77
78
79
80
81
82
83
84
85
86
87
88
89
90
91
92
93
94
95
96
97
98
99
100
101
102
103
104
105
106
107
108
109
110
111
112
113
114
115
116
117
118
119
120
121
122
123
124
125
126
127
128
129
130
[/code]
至此,startSpecificActivityLocked函数分析完毕,Android系统开始通过创建zygote创建应用进程。
总结
至此,AMS启动Activity的第一部分分析完毕。后续部分可以参考启动Activity的过程:二
这一部分相对比较杂乱,需要考虑Activity的启动模式、Intent Flags等信息,以决定Activity与Task之间的关系。
这部分代码还需要判断Activity是否复用,是否需要移动对应的Task到前台,及在必要时,按照启动模式和Intent Flags对Task中的内容进行调整。
最后,判断Activity对应的进程是否存在。若对应进程存在,进需要重启Activity;否则,需要发送消息给zygote启动进程。
整体来讲,这部分代码的流程基本可以用下图表示:
大图地址
自己对AMS的驾驭能力还不够,不能较好地精炼出最核心的流程,因此这部分分析不够简洁,
目前的分析只能算作一个代码阅读笔记,如有不恰当的地方,欢迎指正。

相关文章推荐
- Android 7.0 ActivityManagerService(3) 启动Activity的过程:二
- Android 7.0 ActivityManagerService(3) 启动Activity的过程:二
- Android 7.0 ActivityManagerService(1) AMS的启动过程
- Android 7.0 ActivityManagerService(4) 启动Activity的过程:三
- Android 7.0 ActivityManagerService(1) AMS的启动过程
- Android 7.0 ActivityManagerService(4) 启动Activity的过程:三
- Android 7.0 ActivityManagerService(2) 启动Activity的过程:一
- Activity manager service :activity 启动流程中process的切换过程
- 根Acitivity的启动过程(1) Launcher 向ActivityManagerService发送一个启动MainActivity的进程间通信请求
- Android PackageManagerService启动过程
- Android 7.0 ActivityManagerService(9) 进程管理相关流程分析(3) computeOomAdjLocked
- Android ActivityManagerService(AMS)的启动分析 << 代码讲的比较细致,在了解主要流程后再看这篇
- Android 7.0 ActivityManagerService(6) Service相关流程分析
- [Android5.1]ActivityManagerService启动过程分析
- ActivityManagerService的启动过程
- Android窗口管理服务WindowManagerService显示Activity组件的启动窗口(Starting Window)的过程分析
- Android 7.0 ActivityManagerService(5) 广播(Broadcast)相关流程分析
- Android 7.0 ActivityManagerService(10) App的crash处理
- [Android5.1]ActivityManagerService启动过程分析
- Android应用程序管理服务启动过程浅析(PackageManagerService)