学习SpringMVC——从最简单的开始
2017-08-14 15:07
260 查看
spring是个非常非常非常优秀的Java框架,主要是用它的IOC容器帮我们依赖注入和管理一些程序中的Bean组件,实现低耦合关联,最终提高系统可扩展性和可维护性,用它来辅助我们构建web工程将会感觉非常非常非常地愉悦。
Spring旗下的Spring MVC又是后来居上,设计得非常非常非常的优雅,可以用来替代Struts来做界面视图的控制(Controller)等。
现在我们就来搭建一个利用Spring和Spring MVC结合的web工程最佳实践的例子。以Spring
Framework 4.2.0为例,IDE为Myeclipse。
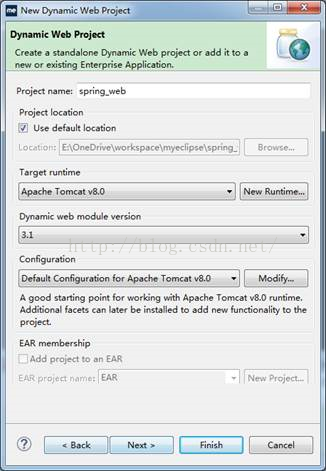
首先,New一个Dynamic Web Project
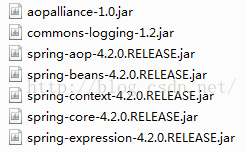
加入spring-context及其依赖的jar包
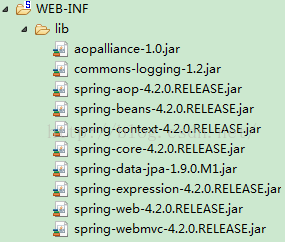
加入Spring MVC相关jar包

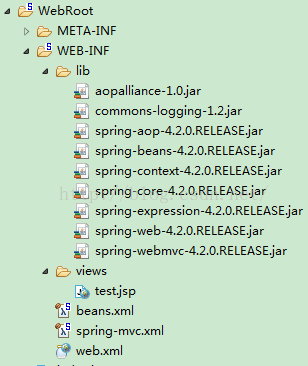
完整的jar包如下
现在开始准备配置Spring和Spring MVC的IOC容器,理论上说,可以只需要
23ff7
Spring
MVC的IOC容器即可,所有的bean都放到里面让Spring
MVC容器来管理,但是这样做并不优雅,我们可以让Spring MVC容器只管理和它本身相关的东西,像数据源、事务管理以及自己程序中需要用到的Bean等可以用Spring的IOC容器来管理。
在web.xml中配置以启动Spring的IOC容器:
[html] view
plain copy
<!-- 启动 Spring 的IOC容器 -->
<context-param>
<param-name>contextConfigLocation</param-name>
<param-value>/WEB-INF/beans.xml</param-value>
</context-param>
<listener>
<listener-class>org.springframework.web.context.ContextLoaderListener</listener-class>
</listener>
这段配置的意思是给ServletContext传入一个名为“contextConfigLocation”的配置信息,然后添加一个Spring为我们提供好的用来启动Spring容器的监听器,web应用启动的时候这个监听器就会从ServletContext中取名”contextConfigLocation”的配置信息,即Spring配置文件的所在路径,如果有就会从指定路径读取配置文件启动Spring容器,如果没有就从默认路径读取,这里我们指定为WEB-INF下的beans.xml文件,下面是一个最基本的beans.xml配置文件的例子:
[html] view
plain copy
<?xml version="1.0" encoding="UTF-8"?>
<beans xmlns="http://www.springframework.org/schema/beans"
xmlns:xsi="http://www.w3.org/2001/XMLSchema-instance"
xmlns:context="http://www.springframework.org/schema/context"
xsi:schemaLocation="http://www.springframework.org/schema/beans http://www.springframework.org/schema/beans/spring-beans.xsd http://www.springframework.org/schema/context http://www.springframework.org/schema/context/spring-context-4.2.xsd">
<context:component-scan base-package="com.cpwl">
</context:component-scan>
</beans>
以上配置指定了需要扫描组件的包,base-package表示需要扫描的包,Spring会扫描它及其所有子包中的组件(加了某些注解的类,如:@Component、@Controller、@Service、@Repository等),然后将其创建实例并放入IOC容器。
然后我们再来配置一下启动Spring MVC容器的必要配置,回到web.xml,将下面的配置粘贴进去:
[html] view
plain copy
<!-- 启动 Spring MVC 的IOC容器 -->
<servlet>
<servlet-name>springDispatcherServlet</servlet-name>
<servlet-class>org.springframework.web.servlet.DispatcherServlet</servlet-class>
<init-param>
<param-name>contextConfigLocation</param-name>
<param-value>/WEB-INF/spring-mvc.xml</param-value>
</init-param>
<load-on-startup>1</load-on-startup>
</servlet>
<servlet-mapping>
<servlet-name>springDispatcherServlet</servlet-name>
<url-pattern>/</url-pattern>
</servlet-mapping>
因为Spring MVC主要是用来作为前端控制器,所以它底层自然是Servlet实现的咯,上面配置的意思是配置一个Spring为我们提供好的用来启动Spring
MVC的Servlet,读取指定路径的Spring MVC配置文件,并指定它拦截所有请求(Spring
MVC会将请求交给指定请求路径的Controller去处理)。这里我们指定的路径为WEB-INF目录下的spring-mvc.xml文件作为Spring
MVC的配置文件。
来到WEB-INF目录,新建一个spring-mvc.xml文件,和beans.xml文件一样的格式。
我们主要利用Spring MVC来写Controller,每个Controller可以映射任意多个路径,利用注解来标注Controller非常方便和优雅,我们需要用到@Controller注解来指定Controller对象,用@RequestMapping来指定某方法映射某路径,这时只需要在spring-mvc.xml中加入<mvc:annotation-driven></mvc:annotation-driven>即可。
但是拦截所有请求,一些静态资源外界就不好访问,这时我们希望让服务器自身默认的Servlet去帮我们处理静态资源的响应,只需要再spring-mvc.xml文件里面配个<mvc:default-servlet-handler/>就行,用到了mvc命名空间,自然也就需要导入mvc命名空间了。
别急,还需要指定Spring MVC扫描组件的包,在spring-mvc.xml中加入类似这种的配置:<context:component-scanbase-package="com.cpwl"use-default-filters="false"></context:component-scan>
注意,use-default-filters置为false。
这时完整的spring-mvc.xml是这个样子的:
[html] view
plain copy
<?xml version="1.0" encoding="UTF-8"?>
<beans xmlns="http://www.springframework.org/schema/beans"
xmlns:xsi="http://www.w3.org/2001/XMLSchema-instance"
xmlns:mvc="http://www.springframework.org/schema/mvc"
xmlns:context="http://www.springframework.org/schema/context"
xsi:schemaLocation="http://www.springframework.org/schema/mvc http://www.springframework.org/schema/mvc/spring-mvc-4.2.xsd http://www.springframework.org/schema/beans http://www.springframework.org/schema/beans/spring-beans.xsd
http://www.springframework.org/schema/context http://www.springframework.org/schema/context/spring-context-4.2.xsd">
<mvc:default-servlet-handler/>
<mvc:annotation-driven></mvc:annotation-driven>
<context:component-scan base-package="com.cpwl" use-default-filters="false">
</context:component-scan>
</beans>
现在,我们可以来写一个Controller了:
[java] view
plain copy
package com.cpwl.springtest.controller;
import org.springframework.stereotype.Controller;
import org.springframework.web.bind.annotation.RequestMapping;
import org.springframework.web.bind.annotation.RequestMethod;
import org.springframework.web.servlet.ModelAndView;
@Controller
public class TestController {
public TestController() {
System.out.println("TestController constructed......");
}
@RequestMapping(value="/test",method=RequestMethod.GET)
public ModelAndView testMVC(){
ModelAndView modelAndView = new ModelAndView("/WEB-INF/views/test.jsp");
modelAndView.addObject("info", "陈鹏万里");
return modelAndView;
}
}
该Controller的testMVC方法映射了”/test”的路径,访问它的时候它将设置一个信息,然后转发给/WEB-INF/views/test.jsp来显示输出页面给客户端。
在WEB-INF目录下新建一个views目录,进入该目录再新建一个test.jsp,如下:
[html] view
plain copy
<%@ page language="java" import="java.util.*" pageEncoding="UTF-8"%>
<!DOCTYPE HTML PUBLIC "-//W3C//DTD HTML 4.01 Transitional//EN">
<html>
<head>
<title>Spring MVC Test</title>
</head>
<body>
Hello ${info} !!!!!
</body>
</html>
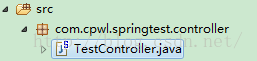
现在web工程的项目结构如下:
OK,现在我们将其部署到服务器,启动服务器后用浏览器访问testMVC()所映射的路径:
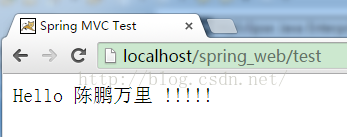
哎哟,不错哟。
但是!我们看下控制台输出的信息:
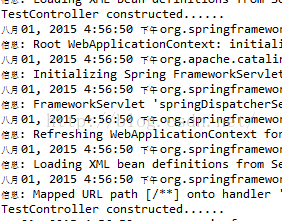
TestConstructor被创建了两次,Why???
这是因为我们用了两个容器,一个Spring一个SpringMVC,给它们所指定扫描的包都相同,所以所有组件都会被创建两次。
怎么解决?两种方案。
方案一:把Spring MVC容器需要扫描的组件单独放到一个包下,比如:com.cpwl.springtest.controller,然后在component-scan的base-package属性指定为改包的包名,Spring容器也类似这样做。但是这样并不是很好,实际开发中有时很难做到这样。
方案二:component-scan中指定filter,举个栗子,
spring-mvc.xml中的component-scan这样写:
[html] view
plain copy
<context:component-scan base-package="com.cpwl"
use-default-filters="false">
<context:include-filter type="annotation"
expression="org.springframework.stereotype.Controller" />
<context:include-filter type="annotation"
expression="org.springframework.web.bind.annotation.ControllerAdvice" />
</context:component-scan>
beans.xml中的component-scan这样写:
[html] view
plain copy
<context:component-scan base-package="com.cpwl">
<context:exclude-filter type="annotation"
expression="org.springframework.stereotype.Controller" />
<context:exclude-filter type="annotation"
expression="org.springframework.web.bind.annotation.ControllerAdvice"/>
</context:component-scan>
意思是让Spring MVC的容器只扫描和Controller相关的注解,Spring的容器就只不扫描和Controller相关的注解,这样它们就相安无事,可以一起愉快地为我们服务了。
其实还可以改进一些,在spring-mvc.xml中加入如下配置:
[html] view
plain copy
<bean
class="org.springframework.web.servlet.view.InternalResourceViewResolver">
<property name="prefix" value="/WEB-INF/views/"></property>
<property name="suffix" value=".jsp"></property>
</bean>
配置一个内部资源视图解析器,假如你在Controller里返回一个视图,它的路径就可以简写了,省略前缀和后缀,之前我们写的是:/WEB-INF/views/test.jsp,现在可以简写成:test
我们只需要返回一个简写的内部资源路径的字符串就行,这样,我们也没必要创建ModelAndView了,直接让方法的参数给我们提供一个Map,我们向里面写点数据然后交给视图去显示就行了,testMVC方法改写如下:
[java] view
plain copy
@RequestMapping(value="/test",method=RequestMethod.GET)
public String testMVC(Map<String,Object> map){
map.put("info", "陈鹏万里");
return "test";
}
用浏览器访问结果和之前一模一样,prettygood!
spring是个非常非常非常优秀的Java框架,主要是用它的IOC容器帮我们依赖注入和管理一些程序中的Bean组件,实现低耦合关联,最终提高系统可扩展性和可维护性,用它来辅助我们构建web工程将会感觉非常非常非常地愉悦。Spring旗下的Spring MVC又是后来居上,设计得非常非常非常的优雅,可以用来替代Struts来做界面视图的控制(Controller)等。
现在我们就来搭建一个利用Spring和Spring MVC结合的web工程最佳实践的例子。以Spring
Framework 4.2.0为例,IDE为Myeclipse。
首先,New一个Dynamic Web Project
加入spring-context及其依赖的jar包
加入Spring MVC相关jar包
完整的jar包如下
现在开始准备配置Spring和Spring MVC的IOC容器,理论上说,可以只需要Spring
MVC的IOC容器即可,所有的bean都放到里面让Spring
MVC容器来管理,但是这样做并不优雅,我们可以让Spring MVC容器只管理和它本身相关的东西,像数据源、事务管理以及自己程序中需要用到的Bean等可以用Spring的IOC容器来管理。
在web.xml中配置以启动Spring的IOC容器:
[html] view
plain copy
<!-- 启动 Spring 的IOC容器 -->
<context-param>
<param-name>contextConfigLocation</param-name>
<param-value>/WEB-INF/beans.xml</param-value>
</context-param>
<listener>
<listener-class>org.springframework.web.context.ContextLoaderListener</listener-class>
</listener>
这段配置的意思是给ServletContext传入一个名为“contextConfigLocation”的配置信息,然后添加一个Spring为我们提供好的用来启动Spring容器的监听器,web应用启动的时候这个监听器就会从ServletContext中取名”contextConfigLocation”的配置信息,即Spring配置文件的所在路径,如果有就会从指定路径读取配置文件启动Spring容器,如果没有就从默认路径读取,这里我们指定为WEB-INF下的beans.xml文件,下面是一个最基本的beans.xml配置文件的例子:
[html] view
plain copy
<?xml version="1.0" encoding="UTF-8"?>
<beans xmlns="http://www.springframework.org/schema/beans"
xmlns:xsi="http://www.w3.org/2001/XMLSchema-instance"
xmlns:context="http://www.springframework.org/schema/context"
xsi:schemaLocation="http://www.springframework.org/schema/beans http://www.springframework.org/schema/beans/spring-beans.xsd http://www.springframework.org/schema/context http://www.springframework.org/schema/context/spring-context-4.2.xsd">
&n
20000
bsp;
<context:component-scan base-package="com.cpwl">
</context:component-scan>
</beans>
以上配置指定了需要扫描组件的包,base-package表示需要扫描的包,Spring会扫描它及其所有子包中的组件(加了某些注解的类,如:@Component、@Controller、@Service、@Repository等),然后将其创建实例并放入IOC容器。
然后我们再来配置一下启动Spring MVC容器的必要配置,回到web.xml,将下面的配置粘贴进去:
[html] view
plain copy
<!-- 启动 Spring MVC 的IOC容器 -->
<servlet>
<servlet-name>springDispatcherServlet</servlet-name>
<servlet-class>org.springframework.web.servlet.DispatcherServlet</servlet-class>
<init-param>
<param-name>contextConfigLocation</param-name>
<param-value>/WEB-INF/spring-mvc.xml</param-value>
</init-param>
<load-on-startup>1</load-on-startup>
</servlet>
<servlet-mapping>
<servlet-name>springDispatcherServlet</servlet-name>
<url-pattern>/</url-pattern>
</servlet-mapping>
因为Spring MVC主要是用来作为前端控制器,所以它底层自然是Servlet实现的咯,上面配置的意思是配置一个Spring为我们提供好的用来启动Spring
MVC的Servlet,读取指定路径的Spring MVC配置文件,并指定它拦截所有请求(Spring
MVC会将请求交给指定请求路径的Controller去处理)。这里我们指定的路径为WEB-INF目录下的spring-mvc.xml文件作为Spring
MVC的配置文件。
来到WEB-INF目录,新建一个spring-mvc.xml文件,和beans.xml文件一样的格式。
我们主要利用Spring MVC来写Controller,每个Controller可以映射任意多个路径,利用注解来标注Controller非常方便和优雅,我们需要用到@Controller注解来指定Controller对象,用@RequestMapping来指定某方法映射某路径,这时只需要在spring-mvc.xml中加入<mvc:annotation-driven></mvc:annotation-driven>即可。
但是拦截所有请求,一些静态资源外界就不好访问,这时我们希望让服务器自身默认的Servlet去帮我们处理静态资源的响应,只需要再spring-mvc.xml文件里面配个<mvc:default-servlet-handler/>就行,用到了mvc命名空间,自然也就需要导入mvc命名空间了。
别急,还需要指定Spring MVC扫描组件的包,在spring-mvc.xml中加入类似这种的配置:<context:component-scanbase-package="com.cpwl"use-default-filters="false"></context:component-scan>
注意,use-default-filters置为false。
这时完整的spring-mvc.xml是这个样子的:
[html] view
plain copy
<?xml version="1.0" encoding="UTF-8"?>
<beans xmlns="http://www.springframework.org/schema/beans"
xmlns:xsi="http://www.w3.org/2001/XMLSchema-instance"
xmlns:mvc="http://www.springframework.org/schema/mvc"
xmlns:context="http://www.springframework.org/schema/context"
xsi:schemaLocation="http://www.springframework.org/schema/mvc http://www.springframework.org/schema/mvc/spring-mvc-4.2.xsd http://www.springframework.org/schema/beans http://www.springframework.org/schema/beans/spring-beans.xsd
http://www.springframework.org/schema/context http://www.springframework.org/schema/context/spring-context-4.2.xsd">
<mvc:default-servlet-handler/>
<mvc:annotation-driven></mvc:annotation-driven>
<context:component-scan base-package="com.cpwl" use-default-filters="false">
</context:component-scan>
</beans>
现在,我们可以来写一个Controller了:
[java] view
plain copy
package com.cpwl.springtest.controller;
import org.springframework.stereotype.Controller;
import org.springframework.web.bind.annotation.RequestMapping;
import org.springframework.web.bind.annotation.RequestMethod;
import org.springframework.web.servlet.ModelAndView;
@Controller
public class TestController {
public TestController() {
System.out.println("TestController constructed......");
}
@RequestMapping(value="/test",method=RequestMethod.GET)
public ModelAndView testMVC(){
ModelAndView modelAndView = new ModelAndView("/WEB-INF/views/test.jsp");
modelAndView.addObject("info", "陈鹏万里");
return modelAndView;
}
}
该Controller的testMVC方法映射了”/test”的路径,访问它的时候它将设置一个信息,然后转发给/WEB-INF/views/test.jsp来显示输出页面给客户端。
在WEB-INF目录下新建一个views目录,进入该目录再新建一个test.jsp,如下:
[html] view
plain copy
<%@ page language="java" import="java.util.*" pageEncoding="UTF-8"%>
<!DOCTYPE HTML PUBLIC "-//W3C//DTD HTML 4.01 Transitional//EN">
<html>
<head>
<title>Spring MVC Test</title>
</head>
<body>
Hello ${info} !!!!!
</body>
</html>
现在web工程的项目结构如下:
OK,现在我们将其部署到服务器,启动服务器后用浏览器访问testMVC()所映射的路径:
哎哟,不错哟。
但是!我们看下控制台输出的信息:
TestConstructor被创建了两次,Why???
这是因为我们用了两个容器,一个Spring一个SpringMVC,给它们所指定扫描的包都相同,所以所有组件都会被创建两次。
怎么解决?两种方案。
方案一:把Spring MVC容器需要扫描的组件单独放到一个包下,比如:com.cpwl.springtest.controller,然后在component-scan的base-package属性指定为改包的包名,Spring容器也类似这样做。但是这样并不是很好,实际开发中有时很难做到这样。
方案二:component-scan中指定filter,举个栗子,
spring-mvc.xml中的component-scan这样写:
[html] view
plain copy
<context:component-scan base-package="com.cpwl"
use-default-filters="false">
<context:include-filter type="annotation"
expression="org.springframework.stereotype.Controller" />
<context:include-filter type="annotation"
expression="org.springframework.web.bind.annotation.ControllerAdvice" />
</context:component-scan>
beans.xml中的component-scan这样写:
[html] view
plain copy
<context:component-scan base-package="com.cpwl">
<context:exclude-filter type="annotation"
expression="org.springframework.stereotype.Controller" />
<context:exclude-filter type="annotation"
expression="org.springframework.web.bind.annotation.ControllerAdvice"/>
</context:component-scan>
意思是让Spring MVC的容器只扫描和Controller相关的注解,Spring的容器就只不扫描和Controller相关的注解,这样它们就相安无事,可以一起愉快地为我们服务了。
其实还可以改进一些,在spring-mvc.xml中加入如下配置:
[html] view
plain copy
<bean
class="org.springframework.web.servlet.view.InternalResourceViewResolver">
<property name="prefix" value="/WEB-INF/views/"></property>
<property name="suffix" value=".jsp"></property>
</bean>
配置一个内部资源视图解析器,假如你在Controller里返回一个视图,它的路径就可以简写了,省略前缀和后缀,之前我们写的是:/WEB-INF/views/test.jsp,现在可以简写成:test
我们只需要返回一个简写的内部资源路径的字符串就行,这样,我们也没必要创建ModelAndView了,直接让方法的参数给我们提供一个Map,我们向里面写点数据然后交给视图去显示就行了,testMVC方法改写如下:
[java] view
plain copy
@RequestMapping(value="/test",method=RequestMethod.GET)
public String testMVC(Map<String,Object> map){
map.put("info", "陈鹏万里");
return "test";
}
用浏览器访问结果和之前一模一样,prettygood!

相关文章推荐
- 学习SpringMVC——从HelloWorld开始,简单快速上手springmvc
- 回归游戏的世界,简单图形编程学习的开始
- SpringMVC学习使用一:搭建简单的SpringMVC开发项目环境并使用
- 学习C#从俄罗斯方块开始(二)俄罗斯方块的规则和算法的简单实现
- mssql 存储过程学习中 [1]简单的开始
- SpringMVC简单入门(注解)<学习随笔>
- 学习O/RM,从最简单的例子开始...之三
- 从最简单开始的正则学习
- SpringMVC学习简单HelloWorld实例
- 学习O/RM,从最简单的例子开始...之二
- java maven、springmvc、mybatis 搭建简单Web项目学习笔记
- dom 学习的开始~简单留言1
- 学习O/RM,从最简单的例子开始...之四
- 学习SpringMVC——从HelloWorld开始
- 从最简单的开始学习JAVA【HelloWorld】...
- springmvc学习笔记(11)-springmvc注解开发之简单参数绑定
- JavaScript学习笔记(二)——从简单开始学起
- 学习SpringMVC——从HelloWorld开始
- 学习【设计模式】从简单开始----------------适配器模式
- JavaScript学习笔记(二)——从简单开始学起